Leaderboard


Popular Content
Showing content with the highest reputation on 10/19/2019 in all areas
-
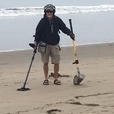
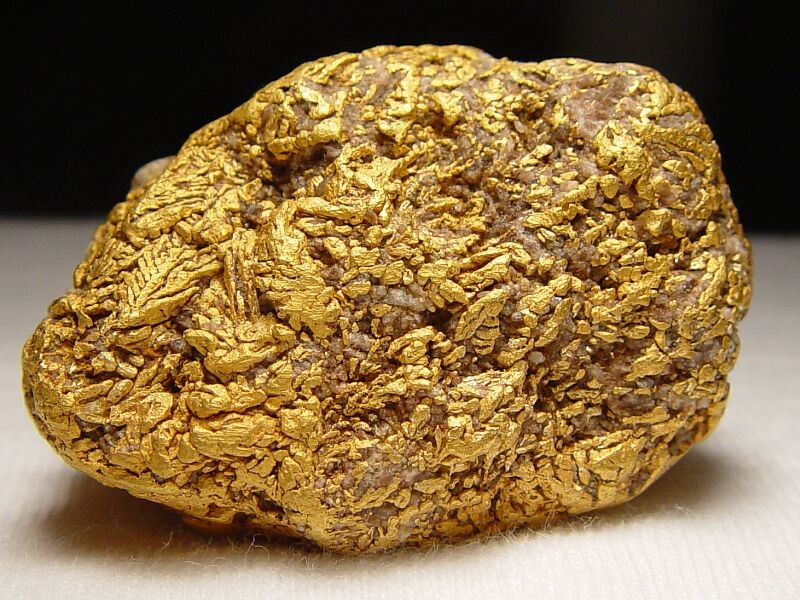
Wandering aimlessly when i found this, what a surprise when it popped out of the dirt.. https://www.detectorprospector.com/magazine/steves-mining-journal/georges-gold-nugget-moore-creek-metal-detecting/
 15 points
 -
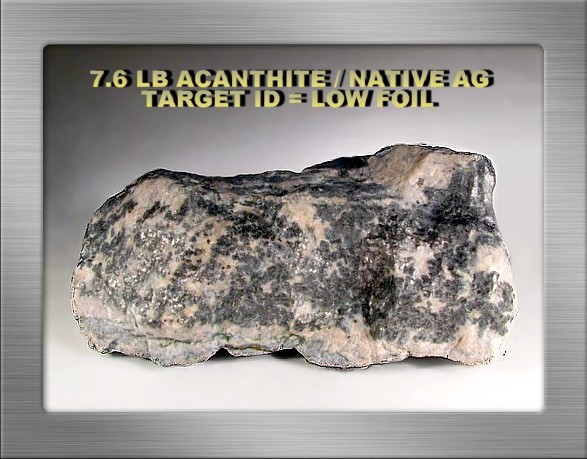
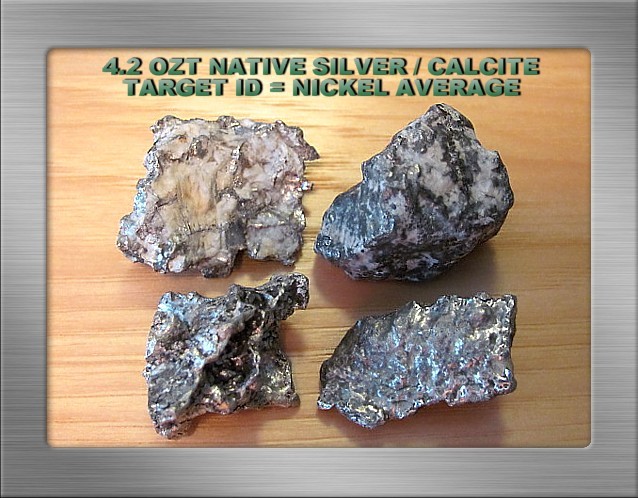
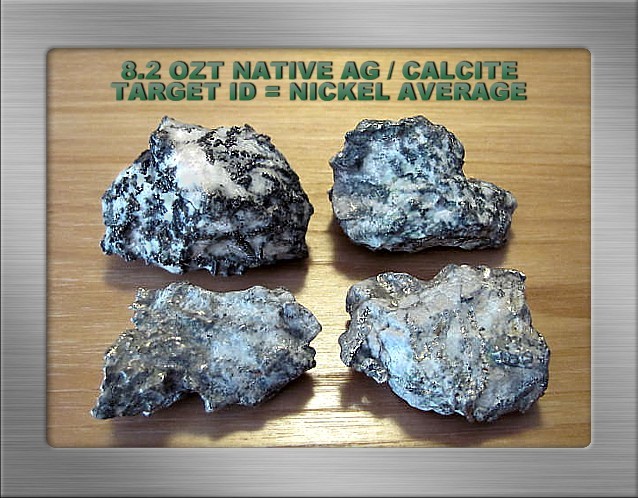
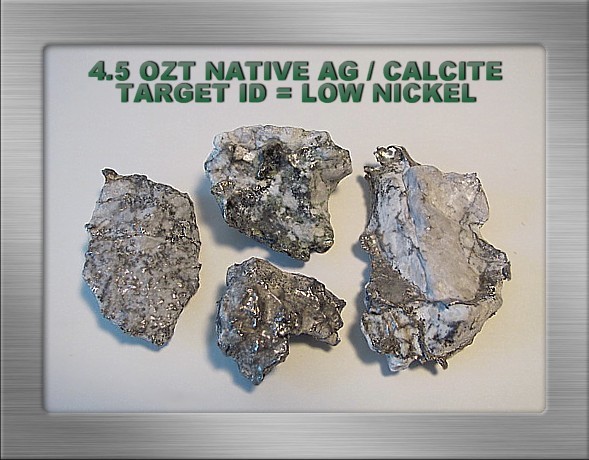
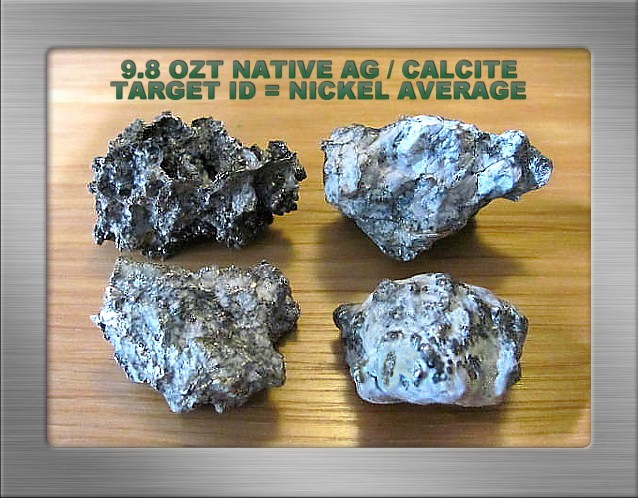
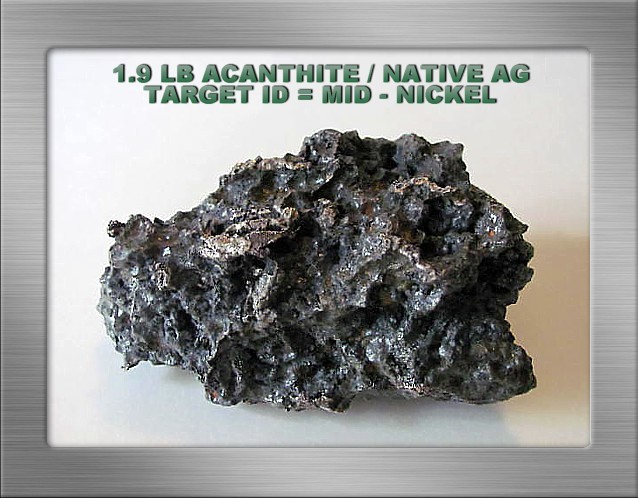
Collecting Native Silver & Related Minerals in Northeastern Ontario’s Silverfields Introduction… I’ve been cleaning and photographing some small native silver specimens that were found with a metal detector during my last few rockhounding visits to the silverfields of northeastern Ontario. They are commonplace examples of small silver that hobbyists can anticipate recovering from the tailing disposal areas of abandoned minesites, ranging in size from one-half to several troy ounces. The information and silver photos presented below may interest newcomers to the fascinating hobby of rock, gem and mineral collecting, particularly for those who have reasonable access to collecting sites for native silver and associated minerals such as the example displayed below. It is comprised primarily of rich, dendritic acanthite with some minor inclusions of native silver visible on the surface. Searching for Small Silver… When selecting an appropriate prospecting-capable metal detector for this application, consider the field conditions where you will be operating it. A large portion of your time will involve searching abandoned minesite tailing disposal areas because these sites offer you the best opportunity to find native silver and related minerals. (a) At many sites ferromagnetic susceptible substrates can be characterized as ranging from light to moderate, and will have little effect on a VLF detector’s ability to function effectively. But some areas, for example diabase dominant substrates, exhibit more elevated magnetic susceptibilities that to some extent will reduce a VLF metal detector’s detection depth and sensitivity, target ID accuracy, and discrimination reliability. The effects of harsh ground mineralization can be somewhat mitigated by operating a VLF metal detector in a true motion all-metal mode to maximize detection depth and sensitivity to targets. A smaller / DD coil will reduce the ground mineral footprint scanned by the detector, permitting the use of higher gain / sensitivity levels than would otherwise be possible. Regardless of target ID or the absence of it, ensure that all weak signals are investigated until the source is identified. An obvious alternative strategy to improve detection depth is to use a suitable PI detector for searching more difficult ferromagnetic ground mineral areas. A more recent Minelab PI model will ensure the best possible detection depth over such ground. (b) Consider the most frequent size of the silver you can expect to find with a metal detector. The small silver depicted in the accompanying photos is representative, and as noted above, range from about one-half to several troy ounces. They are typically larger coin-size targets detectable to very good depths, but keep in mind when choosing a suitable prospecting-capable VLF detector that most small silver is low conductive, and on average is characterized by a nickel target ID. (c) In some areas conductive pyrrhotite hotrocks are a real nuisance to both VLF and to PI detectors. Abundant pyrrhotite can render specific sites unsuitable for metal detecting. Target ID ranges from iron to low foil, with most pyrrhotite signals eliminated by upper iron range discrimination. My PI units, the Garrett Infinium and White’s TDI Pro, both generate enticing low conductive signals to solidly structured pyrrhotite, and similar to small, low conductive native silver, pyrrhotite PI signals must be dug. (d) Mining country, and abandoned mining camps in particular, are littered with iron trash of all sizes and description. Small, low conductive iron signals can be eliminated with suitable VLF iron range discrimination, but most non-descript small iron produces low conductive signals from my PI units. Similar to pyrrhotite, our PI units cannot reliably distinguish low conductive silver from low conductive ferrous trash. All low conductive PI signals therefore must be dug, and to do so is prudent fieldcraft regardless which PI brand or model is utilized for this detector-prospecting application. Incidentally, the same observation largely applies to VLF target ID reliability over deeper, weak target signals in more difficult ferromagnetic substrate conditions. Such signals tend to produce questionable readouts that either frequent or reside within the iron target ID range. To have any confidence in VLF target ID, it is necessary to remove surface material from deeper target signals until a reasonably strong VLF detection signal can be obtained. If any doubt about target ID remains, dig it to be absolutely certain of its identity. By comparison to low conductive iron, big compact iron such as larger drill bits and milling balls, and sizeable elongated iron such as broken pipes and implements, rail spikes, and drill rods tend to VLF target ID in the non-ferrous range. My PI units produce high conductive signals to large compact iron. A similar response, usually a double low-high or single low-high-low signal, is produced as the coil is swept lengthwise on elongated iron, whereas low conductive signals are normally produced when the coil is swept across the length of such targets. With native silver’s variable conductive potential (variations in size, shape, purity, structure) quite capable of producing both high and low conductive PI signals, the foregoing explains why all PI signals should be identified. While a large portion of our fieldwork in the northeastern Ontario silverfields is more suitably addressed with VLF units, we frequently use a ground-balancing PI unit for general scanning over tough ferromagnetic substrates where ferrous trash levels are tolerable. In these conditions we employ larger coils to improve detection depth over what VLF units can achieve. Additionally, our PI units eliminate or reduce most non-conductive iron-mineralized hotrock signals in the area. Such signals can be a particular nuisance when searching diabase dominant substrates with a VLF unit. Our VLF preference is to use mid-operating frequency range detectors for this application. Mid-frequency units respond reasonably well to both high and low conductive silver, and to weaker signals produced by low conductive particulate and sponge silver. By comparison to high frequency units such as my Goldbug2 for example, they are less vulnerable to elevated ferromagnetic mineralizations, and see both higher conductive targets and larger targets at better depths. Incidentally, low operating frequency units work reasonably well, but are less sensitive to low conductives. We operate both the mid-frequency White’s MXT and Fisher F75 for motion all-metal mode close-up scanning involved with removing surface material from hillslopes, trenching, sinking testholes, and for detecting excessively trashy areas requiring a discrimination mode, but there are other perfectly acceptable detectors that will perform well at these tasks. Your detector choice ideally should feature a target ID in a threshold-based motion all-metal mode, a discrimination mode, include a manually adjustable full range ground balance, a “fastgrab” ground balance for convenience and to assist with target signal evaluation, and a selection of searchcoil types and sizes. Which type of metal detector is best suited for this application? We operate the PI and VLF units described above to deal with variable field conditions and objectives, but the VLFs do much of the fieldwork here. Newcomers should begin with a VLF unit that incorporates the features outlined above as a minimum. You may wish to supplement your stock coil with larger and smaller coils to increase your versatility in the field. Once you have gained some field experience with the conditions as described above, and generally have learned more about collecting silver minerals, you can make a more informed decision as to whether acquiring a suitable prospecting-capable PI unit is a viable choice to satisfy your objectives in the field. Where to Look for Silver & Other Minerals… As a general principle regardless of the type of minerals one seeks, successful collecting invariably depends on knowing where to look and a willingness to do serious pick and shovel work. Surprisingly detailed information about where to search for many minerals is readily available online to hobby newcomers, with many collecting sites readily accessible by personal vehicle. On occasion, more remote sites or identified prospects will typically require a short hike. For example, extensive information about abandoned gold and silver mines can be accessed online, and many current government publications are available to interested hobbyists. My personal favorites include a series entitled Rocks and Minerals for the Collector authored by Ann P. Sabrina, in association with the Geological Survey of Canada. These publications supply practical, useful information pertaining to abandoned minesites throughout Canada. They provide road guides to accessible collecting locations, a brief history of a site’s mining operations, normally include production numbers for more prominent minerals such as cobalt, lead, zinc, nickel, copper, silver and gold, and usually provide a comprehensive list of mineral occurrences for each site. For casual or recreational prospecting enthusiasts visiting this area with limited time to search for silver ores and nuggets, select abandoned sites that will more likely produce detectable native silver based on past production numbers. You can detect these sites with the certain knowledge that highgrade silver was inadvertently discarded to the tailing disposal and nearby areas, sometimes in considerable quantity. The probability of successfully recovering specimen grade silver is sharply improved compared to searching for outback silver float, obscure prospects, or low production sites. To improve the likelihood of finding silver, try to identify areas where valuable silver was handled and transported. For example, look for evidence of surface veins, shafts, and storage areas where silver was graded, moved, and sometimes inadvertently misplaced. There are many plainly visible field indications of former mine buildings, mill sites, ore transport routes and abandoned trails. While quantities of silver were frequently discarded to tailing disposal areas, keep in mind that some highgrade silver was unknowingly included with waste rock for road and other construction projects. Hobbyists have also detected large specimen grade silver that was occasionally lost to spills on steep embankments, washouts, or sharp bends along the transport routes of the time. Incidentally, we occasionally see examples of careless or halfhearted retrieval techniques when only a few more inches of digging in tough ground would have unearthed quality silver that produced unmistakably solid, tight non-ferrous target signals that could not be mistaken for iron trash. A general suggestion to newcomers is to be thorough in all aspects of your fieldwork, examine abandoned digsites, and dig all questionable target signals until the target is identified. Briefly About Acanthite… As a related but slight diversion from the topic of searching for small native silver, depicted below is a small but massively structured example of acanthite / native silver recovered from the Kerr Lake area of northeastern Ontario. While selecting some reasonably photogenic small silver examples, I decided to include it here because valuable acanthite https://www.minfind.com/minsearch-10.html recoveries are a rather infrequent occurrence in my personal experience and therefore welcome additions to my collection. After some 30+ prospecting seasons, I’ve never detected acanthite as a stand-alone mineral. My acanthite finds have always contained some detectable native silver. For those unfamiliar with this mineral, acanthite is a dark silver sulfide (Ag2S) approximately comprised of 87% silver and 13% sulfur. Smithsonian Rocks & Minerals describe it as the most important ore of silver. Much of the world’s current silver demand is satisfied as a by-product from the refining of argentiferous (silver-bearing) galena. Galena, a lead sulfide, generally contains some small (< 1%) amount of silver in the form of microscopic acanthite inclusions as an impurity. Acanthite is occasionally misidentified as argentite by hobbyists, but the correct mineral classification when referring to silver sulfide (Ag2S) at room temperatures is acanthite. Both these silver minerals possess the same chemistry but different crystalline structures. Argentite forms in the cubic (aka isometric) system at temperatures above 177 degrees Centigrade (temperature slightly varies according to reference source). Below that temperature acanthite is the stable form of silver sulfide, and crystallizes in the monoclinic system (Smithsonian Rocks & Minerals 2012 American Edition, Eyewitness Rocks & Minerals 1992 American Edition, Wikipedia). The transformation of argentite to acanthite at lower temperatures often distorts the crystals to unrecognizable shapes, but some retain an overall cubic crystalline shape. Such crystals are called pseudomorphs (false shapes) because they are actually acanthite crystals in the shape of argentite crystals. Acanthite crystals frequently group together to form attractive dendritic (branching) structures embedded in light-hued carbonate rocks that range from rather intricate to massive. In the field, try to be visually alert to darker (typically sooty-black) acanthite that may be exposed while digging targets, trenching, or by chance encounters with recently exposed material. For example, the local township occasionally removes tons of tailings for road and other construction projects, resulting in fresh new surfaces for hobbyists to explore. Prominent Minerals Associated with Native Silver… Native silver, acanthite, pyrargyrite and proustite ruby silvers, stephanite, and other collectable silver minerals primarily occur in carbonate veins in association with gangue minerals such as quartz, chlorite, fluorite, barite, albite, hematite, magnetite and many other minerals related to relatively shallow epithermal deposits. Attractively structured native silver embedded in light-hued carbonates, or for example in association with other silver minerals such as acanthite and proustite, is highly valued by the mineral collecting community. For newcomers incidentally, structure refers to how the silver is formed, examples include massive or nuggety formations, plate, disseminate or particulate, sponge, highly crystalline, and various dendritic or branching patterns as illustrated by the native silver example in the multi-photo below. The native silver in this area is intimately associated with major cobalt-nickel arsenide deposits that include notables or collectibles such as safflorite, cobaltite, nickeline, and skutterudite. A number of these ores, typically arsenides and sulfides, produce perfectly good signals from VLF metal detectors. Solidly structured nickeline (aka niccolite), a nickel arsenide, is a fine example that can generate strong signals from both VLF and PI metal detectors. Moreover, it is not unusual for rockhounders to find surface examples of nickeline with its copper-green surface oxidation annabergite, and cobaltite displaying its pink-to-more infrequent reddish surface oxidation erythrite as depicted below. A wide variety of additional minerals can be collected from the mine dumps. These include more localized occurrences, for example, allargentum (silver antimonide), titanite (wedge-shaped, vitreous calcium titanium silicate formerly called sphene), native bismuth, chrysotile serpentine (asbestos), rutile (titanium oxide) and breithauptite (nickel antimonide), to more commonplace minerals such as sphalerite, arsenopyrite, chalcopyrite, bornite, galena, marcasite, iron pyrite, and so forth. A Final Word… In closing we should point out to interested readers that there has been a resurgence in active exploration for both diamonds and cobaltite minerals in the northeastern Ontario silverfields. The existence of diamonds has been widely known for years, and historically there has been a strong industrial demand for cobaltite for hardening steels and other alloys, paint, ceramic, and glass pigmentation, and in other various chemical manufacturing processes. Apparently now there is increased interest in cobaltite for the manufacture of batteries. Industrial demand notwithstanding, for many years cobaltite has also attracted hobbyists interested in recovering valuable crystals. I hope that both experienced mineral collectors and hobby newcomers have enjoyed reading about native silver and a few of the more prominent associated minerals in this area. Thanks for spending some time here, good luck with your rock and mineral collecting adventures, perhaps one day it will be our good luck to meet you in the field. Jim Hemmingway, October, 2019


 5 points
 -
Mitch, you did just fine on your short hunt! Thanks for picking up them great steaks for the club outing, there wasn’t one face without a big smile chowing down after a day chasing gold in the desert. Chet with his X-Coil, I gave his rig a minute of my time. He runs his 7000 the opposite way that I do, but again the 7000 will find gold anyway you want to run it. I will say his large coil was like a marshmallow on the end and his extra large test nugget gave (His Threshold was off, on his settings) me no clue, how it would run on my setting in Rye Patch. I’m interested in the X-Coil, but not interested in the slice and dice aspect, only plug and play...I to hope Minelab would get in gear and offer their customers some coil options or give their OK to a coil maker to use their Technology. Rick4 points
-
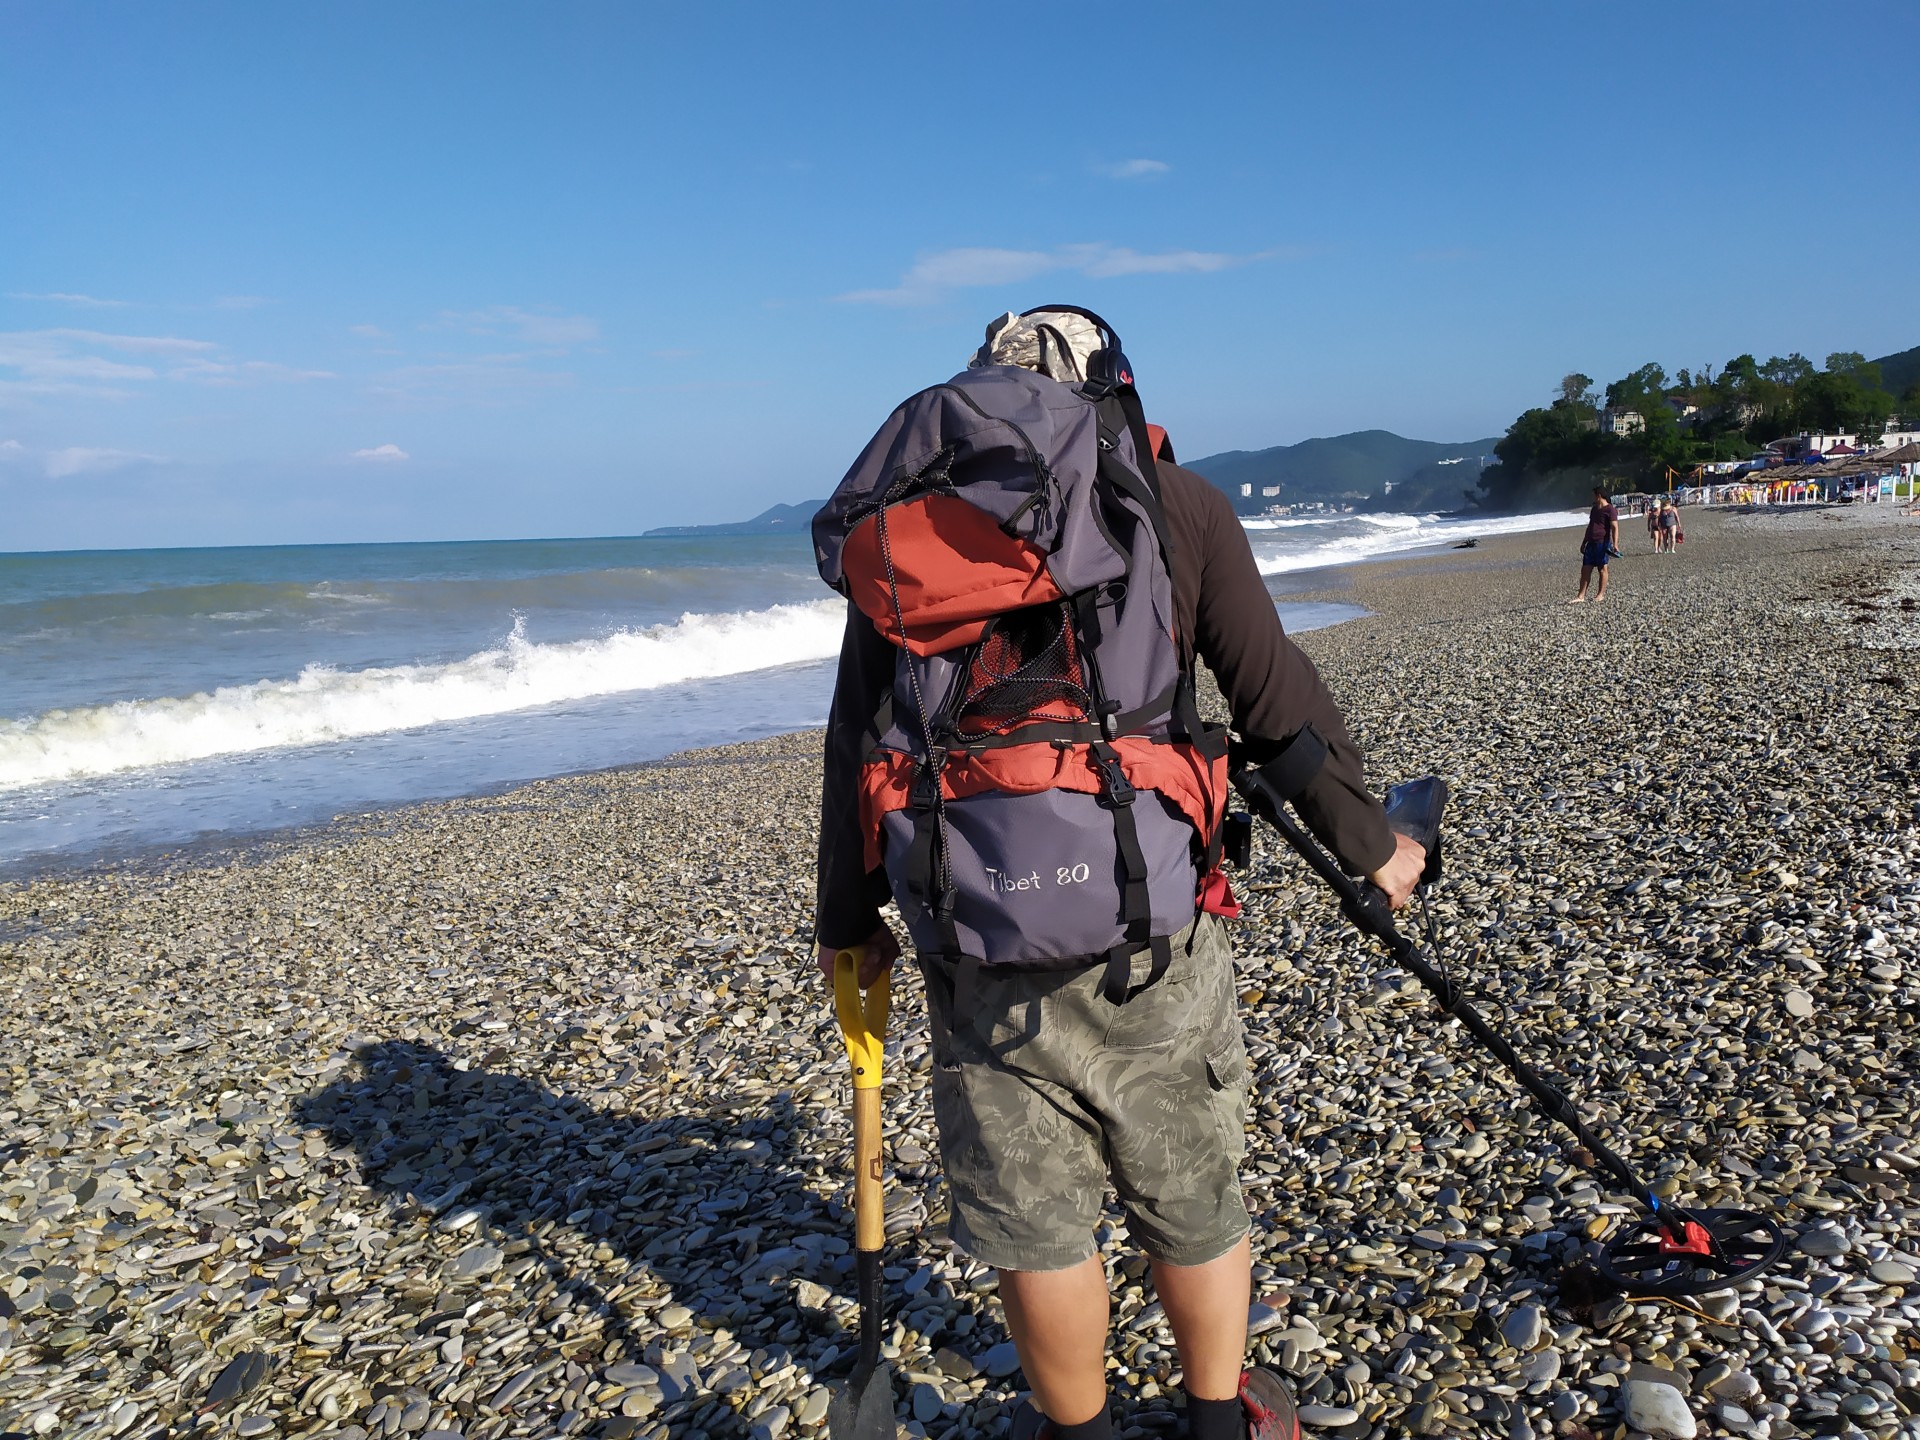
 Our first trip of 2004 to Moore Creek got a lot accomplished, but the big jobs remained ahead. I was contacted by my friend George, better known on the internet forums as seeker. He has a background with heavy equipment and offered to help out with the generator and bulldozer. George is a very accomplished and well traveled detectorist and this trip would give him a chance to try out his brand new Minelab GP 3000. And so we scheduled a another trip up to the mine. Our first attempt was aborted at Rainy Pass due to bad weather. It was some of the poorest flying conditions I have experienced in some time. We sat and drank coffee in Skwentna hoping for the weather to lift, but it never did. This is one of the frustrations of flying in Alaska that one faces from time to time. There is nothing much to be done about it but try again in the future. But the false starts are disappointing and you never get back the lost time. Yet another trip was scheduled for a couple weeks later, and this time we made it. My brother Tom was able to break away from work for this short weekend trip, and so it was my father, George, Tom, and I. This time the weather was better and so we made it into the mine with no problem. Then came the usual task of hauling our gear to camp and opening the place up. Every time we leave we have to try and “bear-proof” the place by covering all the doors and windows with steel. Every time we return we have to open everything back up. I want to make some heavy-duty hinged steel doors for covers to speed this process up. For now it is lots of work with hammer and nails. George took a look at the generator and after a bit of work with the fuel system got it going. The previous owners had rigged it to auto feed with a fuel pump out of a barrel. George hooked the original fuel tank back up and bled the fuel system and it finally fired up. We now had electricity to add to our propane stove and propane refrigerator/freezer amenities. Suddenly Moore Creek was starting to feel civilized; the microwave even worked! Aerial view of Alaska Range on way from Anchorage to Moore Creek Arrival days are always short days. We decided to look for a little gold. I gave Tom my Minelab GP 3000 and I tried the White’s MXT I had brought along just to see how it worked in the hot rocks. George had his new GP 3000 and my father his Tesoro Lobo. It was a bit of fun at the end of the day, but only Tom came up with gold, a nice 0.55 oz specimen. Tom has always had a knack for detecting although he has done relatively little detecting over the years. It must run in the family. The next day we got more serious. George wanted to try and start the old D9-18A bulldozer that we have sitting in camp. This unit had been sitting next to the trail going from the airstrip to the cabins during all those early years when we had made visits to Moore Creek. It apparently was abandoned as dead but in the last couple years the previous owner had finally got it running. A piston was replaced and they got a little trail work done before the unit started shaking badly again. They thought it might have a bent crankshaft, which would be bad news. Still, it was running when it was parked, so we figured we might as well try and get it started to see how bad it was. The fact that it is parked in camp makes it easier to work on than the one located over four miles by trail out of camp. These old bulldozers have a small gasoline engine referred to as a “pony motor” that acts as a starter for the main diesel engine. The first thing to be done is to get the pony motor running. They use a six volt battery instead of a twelve volt to run their own little electric starter motor. We hooked up a battery with a charge and determined the starter worked. We then checked for fuel… and there was none to the carburetor. It turned out the fuel line from the little gas tank to the pony motor was plugged up with rust particles. The line was so well plugged it was hard to believe they had used the pony motor to start the dozer. Nothing all that hard to fix but time consuming taking all the lines apart, cleaning them out, and reassembling everything, especially since many of the fittings were stripped or otherwise in poor condition. D9-18A bulldozer in camp The throttle controls were disconnected from the pony motor, so George sat up top and ran the starter while I worked the choke and throttle manually. The pony motor started and I immediately wished I had hearing protection on. That little motor was loud. It also became immediately apparent we had a coolant leak in the head. But it did not look too bad for a short try, and so George kicked in the clutch and turned over the big diesel. It cranked and my brother shot some starter fluid in the air intakes while I kept working the pony motor throttle. The big motor turned and we got some smoke puffing. It looked ready to start. So we backed off. We wanted to let the pony motor cool down as the short effort had it pretty hot. We also looked the big motor over and checked for coolant and found none. Off to the creek with buckets we went. We dumped the water into the system, and it promptly ran right back out of the bottom of the radiator. Well, we looked but the radiator is fairly well enclosed. We think there is a drain open or hose pulled. We sure hope so, and that the radiator is not cracked. I have to believe they drained it before walking away. We were tired of fighting with the unit, and decided a set of manuals would be very helpful at this point. The dozer seemed like we could start it, but I had no desire to hurt things more by running the unit without better information about the recommended oils, coolants, etc. We decided to round up manuals before making another try at starting the dozer so we could run the unit through a full pre-start checklist. And find out where that drain is. My father and I figured to start trail work up to the other bulldozer outside of camp and it was decided that George and Tom should go hunt for gold. It was hard to say when Tom would get a chance to visit again, and George had already done well in getting the generator going and a start on the dozer in camp. Dad and I figured we would go off and do some work and let them have a little fun. Prospecting can actually be pretty tough work, but looking for gold always beats working on equipment or clearing trails since you just might find gold. There is an old bulldozer trail up to the unit that the operators were following when they got the dozer stuck about three miles from camp. It is about 4.25 miles by trail to the dozer along the trail itself. It starts out in the woodlands at camp, rises above tree line into that nasty alder and willow zone one runs into in Alaska, and then up onto the clear areas above. The small mountains around Moore Creek rise a couple thousand feet above camp, to total elevations of around 3000 feet for the tallest. Once you get above the alders it is very open terrain and very easy travel whether by foot or ATV. Old dozer trail in wooded area above Moore Creek camp The old dozer trail was in pretty good shape but alders had grown into some lower stretches and willows choked off some upper stretches. These two plants are like giant weeds in Alaska, and the alders in particular grow at amazing rates in the long daylight hours. They are the bane of the Alaska hiker due to their propensity to grow outward horizontally from a slope before curving upward. Along trails they curve in from both sides and crisscross in the middle. You don’t hike through alders; you climb over and under them, and so they really slow travel. It is impossible to drive an ATV through them, and they rapidly grow into and shut trails off to ATV access unless a trail is constantly maintained. One secret of locating old trails in Alaska is to look where the alders are thickest. They love disturbed ground, and old trails and ditches are easily spotted by looking for lines of alders and willows on hillsides. My father and I headed up the trail with chainsaws. He walked on up ahead and I followed with the Honda 200 three-wheeler. He was pretty much just scouting ahead, while I followed up at a slower rate, making sure the trail was clear enough to easily get through on the three-wheeler. With the dozer over four miles away by trail and over a couple 2000 foot hills, we wanted to be able to drive there with fresh batteries, tools, oil, etc. We could have just bushwhacked on up and got to work, but it would be a case where something would be needed, and then you would be looking at a long hike to camp and back. The trail needed to be cleared for ATV access to the dozer. This proved to be a very wise decision. My father disappeared up the trail while I worked along. I would park the ATV, then clear on up ahead with the chainsaw. Then set the saw down, walk back tossing brush aside, and get the ATV to drive it up to the chainsaw. There was lots of back and forth but I was making pretty good time. There were long stretches that needed no clearing, and so after slowly getting though a thicket a sudden advance would be made for some distance. I was bringing the three-wheeler forward at one point, when the unit made a loud squeak and stopped like the brakes were on. A long period of rolling back and forth and cutting logs to get the rear off the ground and I determined a rear axle bearing was seizing up. I decided to hike down and get George to seek advice as I had no tools on me anyway sufficient to tackle an axle. I was about a mile out of camp but it was all downhill and therefore a short hike. I found George by the ponds above the cabins with his new Minelab GP 3000 metal detector. I told him what had happened. Then I finally asked him if he was having any luck. He said he thought so and dropped a heavy rock in my hand. I could tell by the heft this was more than one of our regular gold/quartz specimens. Amazingly, George has not washed it off yet. Gold was glinting thought the yellow mud caked on the nugget. I headed over to the pond and washed it off. I think I was almost more excited than George. It was a fantastic gold nugget about the size of a golf ball! Not just any nugget, but one with small fingers of gold creating a delicate pattern over the entire surface of the nugget. George's amazing museum quality gold nugget from Moore Creek Moore Creek has lots of smaller nuggets that are predominately just gold, but the gold here is very close to the original source. Even the smallest gold is not worn or rounded, but just as it appeared as the rock that enclosed it rotted away. This also means that much of the gold has quartz attached, and the larger multi-ounce pieces have generally been about half gold and half quartz. I had come to expect this, and was surprised and very happy to see such a large relatively solid chunk of gold come from Moore Creek. The fact that George found one means that more are out there to be found in the future, and that made me very excited indeed. We went back to the cabin, and the nugget weighed in at 3.74 ounces. This surprised George somewhat as it was heavier than he thought and so he was thrilled. Not a bad find for his very first nugget with his new Minelab GP 3000 and his first at Moore Creek! Bottom view of George's Nugget Another very good sign for the mine is that the nugget was found in virgin soil on the edge of what we suspect is a large chunk of virgin ground. The fact is that I and others had missed the nugget by the smallest of margins. We had all hunted the area getting just smaller gold. I’m sure I’d been within a couple feet of the nugget, and it was only a few inches down. Anyone could have found it, but George was the first to get right over it. In any case, that virgin area is looking pretty good right now. I figured George would be hot to go look for more gold after a find like that. But on hearing the problem with the three-wheeler he put his detector aside and we hiked up to the Honda. After a brief consultation we decided I should just get on it and ride it back to camp. It needed more work then we wanted to tackle there in the woods. So I got on and went. It squeaked, and would seize up but I would roll it backward to free it up and go on again. Then it seemed like it decided to work again and I cruised into camp without pause. We drained the oil out of the motor and got the Honda turned upside down. We got it apart enough to determine there was really not much we could do without a new rear axle assembly. One wheel had actually been welded onto the axle and the rest was in poor shape. We drilled a hole in the bearing carrier and pumped it full of grease. Then got it back together and I drove it around camp a bit. It seemed better, but it was obvious we had not repaired it. The bearing could totally give out at any time. Honda 200 ATV with trailer at old cabin in Moore camp Tom finally showed up and he had quite a pile of gold to show. He actually had not been doing very well, but got into a hot spot and found several specimens in a fairly small area. He had 0.19, 0.43, 0.53, 1.06, and 1.78 ounce pieces and so was feeling pretty good about it, but his eyes about popped when he saw George’s nugget. George was playing it all kinds of humble and stuff but we assured him we’d trade twice the normal type of gold finds at Moore for a fantastic museum quality piece like he had found. It is truly a find to be proud of. It was late and we all were tired so we cooked up some food and waited. It was starting to get darker, which tells you how late it was, and still no sign of dear old Dad. I learned a long time ago not to worry about Bud Herschbach in the wilds of Alaska, but still as it got even darker I started to wonder at what point we should go out looking. But then he finally showed up, and just as well as it was getting dark enough to be hard walking. My father can out-hike most people half his age, and had decided to go all the way up to the stuck bulldozer to check it out. He reported that a half mile up the trail from where I had stopped there was a very thick patch of willows where he lost the trail. He calmly described literally crawling through these willows and having “something very large” jump up a few feet in front of him and make a huge amount of noise moving off in the brush, but he never did figure out if it was a bear or a moose the brush was so thick. It was probably a moose. He is telling this and I’m thinking I would have had a heart attack right about that time but he refused to make much of it. He has run into a lot of animals in the woods in his years as one of Alaska’s pioneer surveyors. He finally made it up to the bulldozer and reported it looked in a lot better shape then he had expected and certainly better than the one in camp. It was buried to the top of the track on one side and to about half a track on the other side. On his return trip he found looking downhill that he had gone through far more willows then need be, and had picked out what he thought was the shortest route possible through the thicket and marked it with flagging on both ends. There was one day left to go on our three day weekend trip. After a good night of sleep Dad and I hiked up to do more trail work. We decided to save the Honda for now for the critical task of hauling heavy loads to and from the airport, like the big empty bottles of propane we planned on backhauling out this trip. I had decided to go on a hunt for more three-wheelers to fly into the mine. Honda three-wheelers are still pretty common in Alaska and can be had for very little money. Most importantly, we can fly them in easily in the Cessna 206. Being dependent on a single three-wheeler that could break down any moment did not seem like a good idea. I wanted some redundancy and more spare parts. We could also use more ATVs for the upcoming bulldozer project to make it easier to get multiple people with loads up to the site. This trip wound down with little excitement to report. We got the trail cleared all the way up to where the willow thicket started, and once through that it would be clear sailing. My father and I had had enough clearing for the day and so we figured we’d leave that last small but tough stretch for later. Tom and George had prospected most of the day, but the luck had run thin and only Tom had found a 0.35 ounce piece. Funny how quick you get spoiled finding gold that I now say things like that. Not long ago a third ounce nugget would have really seemed like a big nugget. Just over 8 ounces gold nuggets and gold specimens found at Moore Creek, Alaska Overall the nugget detecting was quite productive. Tom and George did most of the detecting and found over 8 ounces of specimens between them. George's 3.74 ounce nugget is his largest ever, and Tom's 1.78 ounce piece surpassed his previous largest of 1.64 ounce, found at Moore Creek on his last visit. While this nugget detecting is fun it serves a very serious purpose at Moore Creek. First, 50% of detected nuggets go to the LLC to help fund operations. Or, as in George's case, the finder has the option of purchasing back the LLC percentage which achieves the same goal. More importantly, every nugget find is plotted on maps. As of this trip almost 70 specimens and nuggets have been located totaling over 50 ounces of finds. The map is revealing certain "hot" areas on the creek. Certain zones are producing more nuggets than others. Some tailing piles have produced multiple finds, some none at all, and some just a single piece. Any finds at all increase the probability of a particular pile containing more gold from mere speculation to almost total certainty. Some areas that look very good have turned out to be not so good and vice versa. At Moore Creek it can truly be said that metal detectors are a vital part of our initial exploration program. Our short but really productive trip wrapped up and we flew back to town. Our generator is running, old dozer puffing, trail nearly cleared to the stuck dozer, and more. But this particular trip will always be remembered as the one when George found that beautiful 3.74 ounce gold nugget. It truly is a find of a lifetime and the nicest at Moore Creek so far. ~ Steve Herschbach Copyright © 2004 Herschbach Enterprises Steve's Mining Journal Index2 points
 -
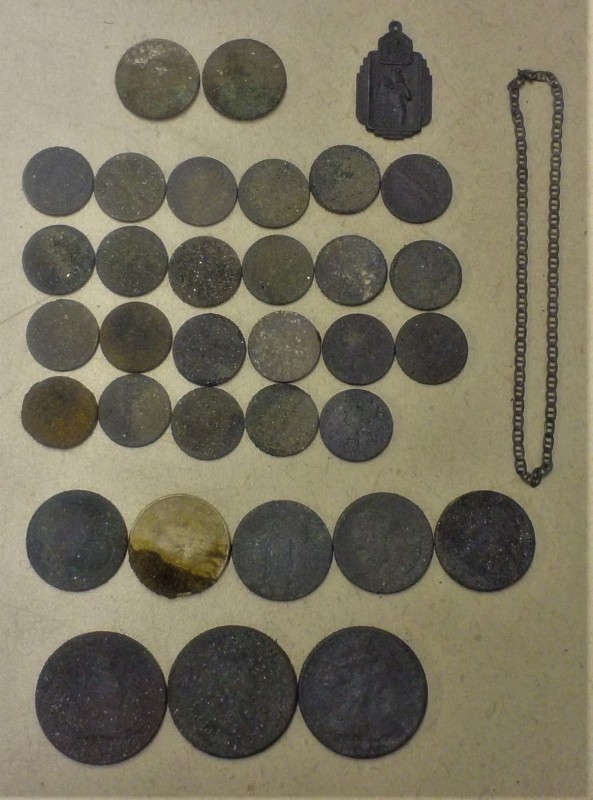
After finding a decent amount of silver on my favorite beach the other day, I had to get out there again. A storm had just passed and I wanted to see if the silver continued in my new area. I had a lot of competition, with 8 other detectorists. But they were all hitting an exposed area like piranhas 😄. I was alone in my area. I used the GPX for this section because I needed the extra depth. I wasn't expecting this good of a day. A total of 34 silver coins, a silver chain, a silver religious medal and a nice 14K gold and ice? cross. I can never seem to get a good shot of anything that sparkles with my waterproof camera. 137 coins for the day. My copper to zinc penny ratio was threw the roof at 62 copper to 2 zinc. That is what a good storm does for you 😊 I won't be able to get back until next week, but I'm hoping I can start where I left off. Fingers crossed.
 2 points
 -
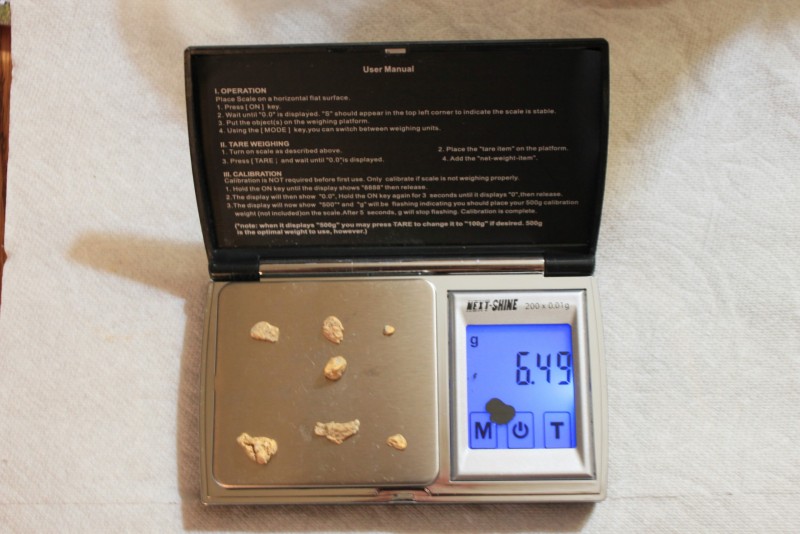
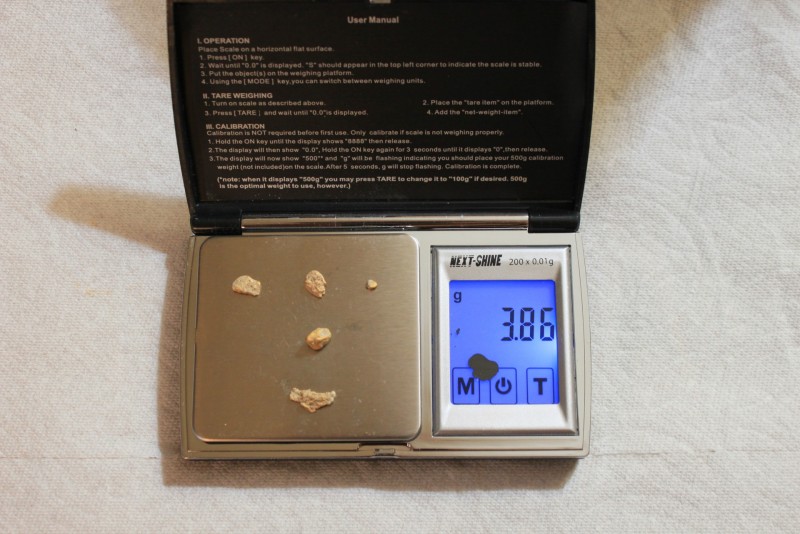
It was time for another Rye Patch trip. It was a group outing this time and I had invited Chet. He was already there when I showed up out in the field about 3 on Wednesday afternoon. It was an 8.5 hour drive and I had added a couple of hours onto it getting checked in to my cabin but I was there! Chet had not found anything so he said I'll follow you. We got set up and he said he would catch up on some things and it was near the end of the day so I headed up. Before I got up too far my first target gave me that nice, warm sound. Even with the little sleep I had I thought it was a good target. I scraped and it didn't move and down a bit farther it didn't come out of the hole and then down about 7" I had it in the scoop. I sometimes overestimate so I put on my 7000 navigation that it was 1 gram but later not to be. It is just .72g. It is the nugget on the top left on the scale. I looked around the area and saw old dig holes so I knew I had to stay. I circled and gridded in the late afternoon sun and I got another signal. This one was a little deeper at 8". The size slightly larger at .75g. That was it for awhile until another repeatable signal. I don't remember the exact depth but I think 5" and I didn't really know if it was gold. It is and it is .11g! I didn't have my phone with me but that was it. I was beat and so was Chet so we took the 35 minute ride back to camp. Overnight it was pretty cold at 17-19 so I left the lid on my coolers open in my car and outside. When I got up the drinks had frozen in both of them but we were off for the same location. This time Chet hit the area where I found those three nuggets. I walked up the hill as I had intended. We didn't move the cars all day. Chet was working the little bowl and I was up on the sides of the big gully and anything else that looked promising. I heard a promising signal in a little dry, side run and it had shale type rock around but the signal would go away when I scraped and scratched. I was into some harder rock and it stayed and stayed and then I blasted it with my pick and it was out. It is the nugget in the middle. A solid 1.5 g nugget! I didn't have my phone with me as it was affecting my detector. Down in the distance I could see Chet working his 17" X Coil very slowly over and over the area from the day before. He had been digging some deep holes. When I made it down to him he said he had found one down about 10" that I didn't get. He also found another smaller one. In addition he had dug some really deep holes where some type of metal pieces had sounded off for him. It was a good day. I had a nice nugget and he had a couple. Friday we started at a different location but soon I wanted to get back to 'the area' but a bit higher. We both walked a long ways checking piles, pushes and holes. I was heading back up the hill and hear that nice sound again. This was only 4 inches or so and out came a nice flatter nugget (.84g). When I looked around I saw someone's recent filled in dig hole but they didn't get this nugget. The trash was hiding it! Things die out in the desert but not like they do in Australia! Australia is one big kangaroo graveyard! Here is the total for this trip. (I didn't find anything with a half day Saturday.) If I add in the two nuggets from my last trip then I have about 1/4 oz of Rye Patch gold. Thanks Chet for the companionship and the stories. You have some really great ones about gold, jobs, life and I wish others could hear them. Mitchel


 2 points
 -
For the most part a lot of that EMI goes away if you water hunt once the coil is in the water. You didn’t just say drop a coin....i dig a few but for the most part am more concerned with targets around a penny and under. Steve posted a very good chart on that MDT thread talking about tiny gold bleeding in and out of the salt range. Most of us aren’t digging iron... but there is a trade off we are willing to make just because it takes time especially during recent drop periods. A lot of hunters won’t chase anything that drops thru the scoop or in the very low digits because of the value of the targets. Me.... I do just because a few smalls beats the price of change. You just ain’t going to get it all so you key into time versus pay off. For some that’s a easy disc pattern for others.... AM dig it till they drop2 points
-
Hmm...Vanquish fringe benefits for Nox owners, perhaps...2 points
-
I totally agree with you Steve about the misinformation White's is telling customers from the customer service representative at the factory and what they are advertising. Doesn't really give you a lot a faith of what you would actually be getting if you bought one today. I guess White's doesn't want us to worry about the technical side of the new product offering, they just want you to believe you will like it no matter what they say. Maybe Steve Howard will chime in. I have a regular TDI big box and I have found more older coins and relics than any VLF detector I have used in the past or any VLF that is available today. The TDI does have limitations, but you can cherry pick deep coins that VLF detectors cannot detect. It takes awhile for a person to understand and use the TDI, but like any other learning curve you encounter with any detector once you master it capabilities, this TDI in my opinion is amazing.2 points
-
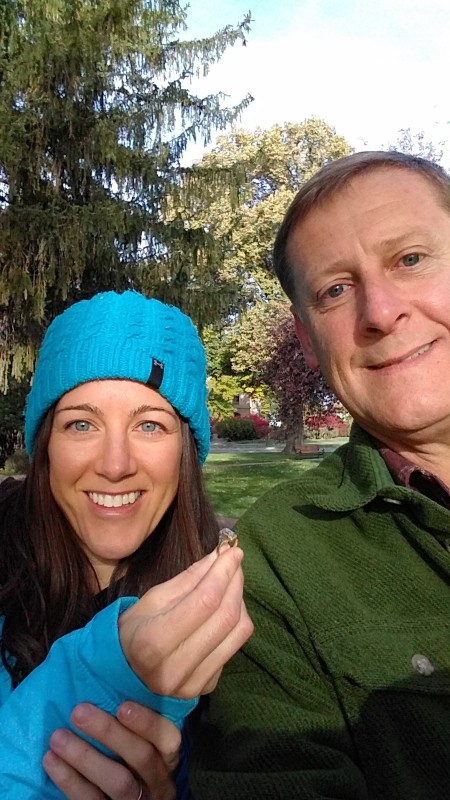
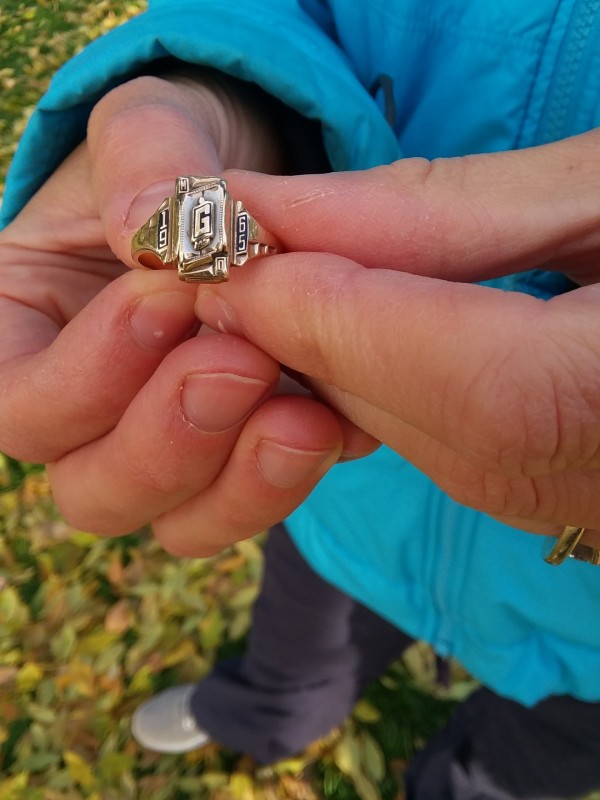
I'll let the nice email they sent me say it: "My wife and 2 daughters thought it would be nice to escape Los Angeles for a fall weekend vacation to Boise. During our visit we were playing in some leaves at a park when my wife noticed that she was missing her deceased mother's class ring which she holds very dear to her. While she hopelessly sifted through a sea of leaves, I immediately got online to see what my options were to get help on locating her ring knowing how much it meant to my wife. Gerry was very responsive to my call and email on a Saturday evening and did a fantastic job of explaining the process of recovery the ring. We agreed to meet at the park on Sunday morning with tempered hopes of locating the ring. Gerry was very friendly with myself, my wife and daughters while he searched for the ring with his metal detector. Within 20-30 minutes of searching in a leaves, he was able to locate the ring. My wife was ecstatic!! I can't thank and recommend Gerry enough considering he turned a stressful family event into a pleasant experience and demonstrated care, professionalism, urgency and integrity throughout the entire process." Thanks Again, Neil

 2 points
 -
 Many people have seen the ad copy in the Minelab GPZ 7000 brochure where I am quoted about how amazing the new GPZ 7000 is. Now you get to hear the rest of the story. This is a more detailed version of an email I sent to Minelab last fall regarding the new GPZ 7000. The background is I had been using the GPZ prototype for some time, but was underwhelmed. I was initially put off by the weight, and frankly it was just not my trusty old GPX 5000, and I was slow to shift gears. Yes, the machine performed, but I had not seen anything that particularly knocked my socks off, and had not been shy in saying so to Minelab. I had an opportunity to return to a location in northern Nevada I had hunted gold previously in 2013. On that visit a portion of hillside was pointed out as the location of several nice nugget finds, including some delicate specimen gold. I did what any prospector would do and concentrated on hunting this area hard with my GPX 5000. I knew I was dealing with an area hunted hard with previous Minelab PI detectors and hot VLF detectors like the Fisher Gold Bug 2. I was the first there with a GPX 5000 however so figured I was going to find something others had missed. I was running a 14” x 9” Nugget Finder mono and set it up in Sharp at Gain of 16 which is a reasonably hot setting. I was disappointed to find nothing but bullets, and so I switched to a used White’s GMT I had just acquired. This high frequency VLF detector was able to find two small and very porous gold specimens. Having found these, I again scoured the area but there appeared to be nothing else to find. I was not the only person to detect this location of course and so I just figured it was pretty well detected out. Delicate Nevada gold specimen found by Steve with White's GMT The Minelab SDC 2300 came out in 2014, and Chris Ralph and I both had units which we were using with great success on gold the GPX was weak on. Small, porous, prickly gold. An invite came to visit the property again in the fall of 2014, and Chris and I figured the SDC would be just the thing to succeed where the GPX 5000 had failed. We were field testing the GPZ 7000 prototype also by this time. Chris was tied up but I had a chance to leave earlier, and camped out a couple days in Humboldt County hunting with the GPZ. I was really pleased finding just shy of a half ounce (15.5 grams) of nice gold, including a solid 6 pennyweight (9.4 gram) nugget which was my largest with the GPZ to date. I was now starting to warm to the machine which seemed particularly well suited to the wide open spaces of northern Nevada. 15.5 grams of Nevada gold found by Steve with GPZ 7000 prototype - largest 9 grams The GPZ was of course a super secret project at that point, and so when I met Chris at the miner’s claims I had it carefully stowed away, and pretty much forgot about it. The plan was to hunt with the SDC detectors. I pointed out the location where I had hunted with the GPX and GMT to Chris Ralph so he could give it a go with the SDC. Frankly, I did not think he would find a lot at this point, but the new SDC 2300 certainly had a chance of making some finds there. I hunted another hot spot nearby, and my own SDC 2300 found four or five nice little specimen pieces. I was really pleased when Chris showed up and showed me two fat specimen pieces, weighing about one quarter ounce in total. Everyone was very impressed with the SDC 2300, and the gold it was finding in areas hunted over and over with PI detectors, and hot VLF detectors like the Fisher Gold Bug 2. The Minelab GPZ 7000 brochure quote by Steve We stayed the night but Chris had to leave the next day and it was good he went home with gold in his pocket. One of the claim owners also left, and it was down to just me and one claim partner. I stayed and hunted, finding another small specimen with the SDC 2300. I went a couple hours with no finds, and decided to wander over to the area where Chris had scored to see if I could do anything there. The claim owner and I puttered around awhile there then he decided it was time to go back to camp and grab some lunch. I was about to get going again with the SDC 2300 when I realized I had the new GPZ prototype still in my truck. The claim owner was over the hill out of sight, and since he had just left me I figured it was pretty safe to get GPZ out and give it a quick go. So I went back to my truck, switched out detectors, and headed to where Chris had marked his gold finds. Chris had hunted right where I had found the two specimens the year before with the GMT. I was a bit surprised I had missed two nearly 1/8th oz pieces, but they were deeper than the GMT was going. His two specimens were found only ten feet apart, and I could tell he had hammered the location. Every square inch of the dusty ground was covered with footprints. I fired up the GPZ and gave it a few swings, and was surprised to almost immediately get a nice signal exactly between the two little rock piles marking his find locations. I gave a few digs and revealed a nice specimen weighing about 3 grams! I know I had been over this location with a GPX 5000 and a GMT. Chris is very methodical when on a patch, and I know the SDC 2300 is more capable than the GPX 5000 when it comes to small specimen gold. How could this be? I suddenly realized I had something very special indeed in my hands. I wandered down slope, and right at the bottom of the hill where it started to flatten out I got another signal, and another couple gram specimen. Then only about 20 feet away I got another one. Now I was really getting excited. Less than ten feet away I got a real boomer signal, but it proved to be a bullet. Then a few feet, and another large signal. I dug deep into the hardpan, and knew at that point it has to be gold. I dug carefully so as not to damage it, and finally recovered a solid lump quite a few inches down. It was an 11.2 gram or just over one third ounce gold specimen! Gold specimens fresh out of the ground perched on GPZ 7000 The property owners were very gracious, and had told Chris and I we could keep all the gold we found. I appreciated that, but I also know that is easy to say when you do not think people will find very much, and the owners thought the ground pretty well detected. I was thinking at that point I needed to give them a share of the gold, but truthfully I did not want to part with this big lump, so I told myself I needed to find more gold. The problem was time was running out and I was worried the claim owner might come looking for me soon, and see me with the GPZ. So I started scanning with 7000 as fast as if I was in a VLF competition hunt. My goal now was to just cover as much of this area as I could in a short amount of time. Apparently speed does not hurt the GPZ all that much, because in short order I found another couple gram specimen. More frantic scanning, and another nice piece popped out of the ground. This was crazy – I know I had hunted this area! I expanded the area of the hunt, but the gold seemed to be on a very tight line heading down the slope. Some time passed, and another two or three gram specimen saw the light of day. Now I was getting really worried the claim owner would show up and see me with the GPZ. I had a pouch full of gold specimens, and was really amped up at that point. I had not found that many large chunks of gold that fast in very many years. To say I was stunned would be an understatement. I had to quit though, and so I hunted up the slope so I could go back and show the claim owner my finds, and bring him back to hunt some more. I just figured I would put the GPZ away, and go back to using the SDC 2300. I made a bee line up the hill to where my truck was parked, swinging all the way, when I got another good signal. I dug and it got louder. And louder. I was into the hard material now and knew it had to be gold, so I slowed up and worked the edges of the hole carefully. The last thing I wanted to do was ruin a nice specimen. Finally, about a foot down I grabbed a handful of loosened soil that screamed when I waved it over the coil, and I felt a lump drop into my other hand when I went to separate it. This one was at least twice as large as the big one I found earlier!! 0.79 ounce gold specimen just rinsed, found by Steve with Minelab GPZ 7000 I was having a Eureka Moment. This whole experience was mind blowing. I was finding gold right and left as if this location had never seen a detector before. The GPZ 7000 was working some serious electronic magic, and it seemed it was particularly effective on porous specimen gold at depth that other detectors have a hard time seeing. The GPZ 7000 was hitting this stuff not with weak, but with strong signals, like the SDC but with a coil size much larger than that on the SDC 2300. It was able to not only detect the kind of gold once only found with hot VLF detectors, but hit it at depths far exceeding what one of the best hot VLF detectors, the White’s GMT, could attain in this soil. I was literally shaking I was so excited. The large specimen looked to be all gold, with no rock showing, but was very porous in appearance. Not like steel wool but more like a lot of tiny pieces of gold all lightly stuck together. I could tell it was going to be spectacular when cleaned up, and it later weighed in at just over 24 grams or nearly eight tenths of an ounce. I decided then and there I had found the chunk I would give to the property owners. They certainly deserved it and I still had about an ounce of specimen gold I could take home with me. Steve's share of GPZ gold after initial cleaning - 0.85 ounce Photo emailed to Steve of 0.79 ounce specimen after cleaning People may wonder at this a bit that I would volunteer this piece up when I did not have to, but I believe in taking care of people that take care of me. The day I was having was as good as it gets for metal detecting. I just found 1.6 ounces of gold in less than three hours, was on cloud nine, and wanted everyone to share as much as possible in that experience. To say the property owners were surprised and appreciative would be the understatement of the century. It really just does not get better than that. All this happiness and great times were facilitated through the magic of metal detecting and the extreme capability of one detector in particular. Not to be overlooked however is the SDC 2300, which also shined very much along with the GPZ. My only regret is that I could not tell the claim owners the complete story at that time. Sorry friends, I hope you understand, but now you know the rest of the story! This article started as a thread on the DetectorProspector Forum. Extra information and details may be found there. ~ Steve Herschbach Copyright © 2015 Herschbach Enterprises Steve's Mining Journal Index1 point
 -
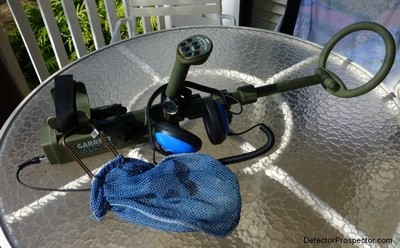 Well, back home safe and sound after a couple weeks in Hawaii with my wife. We visited the island of Kauai for the umpteenth time. We like the laid back vibe, made even more so by being familiar with everything. We do what we both like - she relaxes in the sun and I go metal detecting. And lots of walks and dinners together. The back story is told at Steve's Mining Journal about prior trips made to the same location over the years. Hawaii has always been a pet project of mine as it is the most difficult environment I have even encountered for a metal detector. There is of course the salt water. There is also literally military grade electromagnetic interference (EMI) from military installations plus missile and satellite tracking stations. Finally, there is a mix of non-magnetic coral sands and volcanic basalt derived sands and cobbles. Throw in the heavy surf and out of control tourists on surf boards trying to kill you... things can get interesting! If you stick to the tan to nearly white sands you can get decent performance from many detectors. But when the basalt gets involved is where things get fun. Most prospectors are familiar with basalt rocks and the challenge they present in gold prospecting. Well, just take the same hot rocks and douse them in really salty water and heavy duty EMI and you have Hawaii. Multi frequency VLF detectors like the Fisher CZ or Minelab Excalibur do ok in in the stuff but lack any real punch. They do best in the whiter sands, but the basalt sands and cobbles really leave them feeling gutless. I went to PI detectors early on, and overall probably had my best results with the various White's Surf PI models. Again, however, they worked best in homogenous materials. Places where the white sands and basalt cobbles mixed gave the Surf PI fits as it hit on the basalt cobbles. In darker sand beaches it was near impossible to keep the machine steady over the bottom in the surf, leading to lots of false signaling. I tried several Garrett Infinium detectors in Hawaii and got tantalizingly close to the detector I wanted. The Infinium as a ground balancing PI could tune out the black sands and hot rocks and eliminate many of the false signals. But it introduced just as many if not more by an inability to play well with salt water and EMI. The interference in particular made the Infinium almost unusable at times. I really wanted a stable Infinium, and confirmed this idea by using the White's TDI in Hawaii. It seemed to solve the issues I was having with the Infinium and so I waited for White's to make a waterproof TDI. And waited. And waited. I waited so long that Garrett had time to take what they learned from the Infinium and another model, the Recon, and build a next generation PI, the Garrett ATX. I was cautiously hopeful that all the noise I had made over the years had been heard, but frankly, I was not getting my hopes up too much. On top of that, the good old days are gone. I used to spend a couple weeks in Hawaii years ago and never see anyone with a detector. This trip I saw people every day! Ok, often the same guy but also more different people detecting than probably all my previous trips combined. The competition has gotten fierce by comparison to the old days. Hawaii treasure of another sort - beautiful beaches lit up at sunset! The Garrett ATX is the best PI detector I have ever used for difficult water hunting. Hands down, no comparison. I have to qualify that by saying that what makes it shine is the severity of the conditions. A person buying it and using it on clean white sands in Florida would probably have a less enthusiastic reaction. There is a lot of confusion regarding ground balancing PI (GBPI) detectors like the Garrett Infinium or White's TDI. They do not air test well against good VLF detectors and indeed do not really perform all that well against them in mild ground. People never really understand what detectors like these are all about until they get into difficult ground. The kind of ground where the best VLF detectors lose half their depth, the GBPI detector just keeps plugging along, and all the sudden now have a big depth advantage. Not because they go so deep to start with, just that VLF detector fare so poorly in really bad ground. GBPI detectors only really shine in the worst conditions. Let that sink in because it is very important. Anyone reading this should not get the idea these detectors are the be all or end all for all circumstances. But when the going gets tough, when other detectors fall on their face, a GBPI detector like the Garrett ATX can be the answer. Tuning a detector like the Garrett ATX can really bother some people. There is this resistance to doing anything that reduces the theoretical max depth of the detector. As soon as you start getting into reducing settings the feeling is that "well, yeah, but now it does not go as deep". The reality is that any machine that can be run maxed out in bad conditions has left some performance on the table. You may be able to max settings in benign ground, but you should have to back off of max settings in really bad conditions. That is why the controls exist - to compensate for bad conditions. The goal is to be set as high as possible while getting stable performance. The ATX is a powerful detector, and so it should be expected the machine has to be dialed back in severe conditions. The ATX has three adjustments that affect the depth. The Gain control is the simplest. You decrease the sensitivity of the detector to help compensate for conditions that are introducing too much noise. Just like the Gain or Sensitivity control on a VLF detector. This control was lacking on the Infinium and is a major reason why the ATX is superior. There is the pulse delay, which Garrett labels as a discrimination control. It is, sort of. Without getting all technical on you it is also a sort of sensitivity control, in that increasing the delay or discrimination also eliminates signals from weak conductor targets like foil, hot rocks, or salt water. This is really the only control you have on the Infinium to deal with false signals and it serves a similar function on the ATX. Finally, you have the ground balance. The ground balance is basically another type of discrimination circuit or filter. The signal produced by the ground is determined and then eliminated. However, this comes at a cost. Items that read the same as the ground signal are also eliminated, and items near to the ground signal will exhibit reduced signals. The White's TDI makes it easy to demonstrate this. You can turn the ground balance completely off, and when you do so the machine air tests far better than it does when you turn the ground balance on. This is because of the subtractive nature of the ground balance circuit on the TDI. Also, because it has a manual ground balance, you can see the effect of tuning the ground balance control closer to and farther from a particular target response. Instead of tuning out the ground the control can be manipulated to tune out other items instead. It is just a basic discrimination circuit. Different ground balance methods can affect items to greater and lesser degrees so the example shown by the TDI should not be taken as being the same with all detectors. But the effect is real and does exist to some degree on all ground balancing detectors, both VLF and PI. So why use ground balance? That should be obvious - to tune out ground responses. If there is no detectable component in the ground you would be better off without the ground balance circuit. Such conditions rarely exist, but they do exist. Absolute pure white coral based sands are one of them. The ATX at its hottest will detect salt water however, and new to the ATX is the ability to ground balance out the salt signal instead of the ground signal, but you are trading some sensitivity for stability doing it. Long round about way to explain that when the Garrett ATX is turned on with factory default settings the ground balance setting is at a minimum. The ATX should be tried first with the factory default setting and on many beaches you will not want to ground balance it. Just leave the discrimination (pulse delay) at zero, set the gain as high as possible while still allowing the machine to be stable, do a frequency scan, and go. In Hawaii at my location however I could not do this. I could on clean sand but not in the cobbles I wanted to hunt. But first, a total surprise. My ATX was almost totally immune to the EMI that I had previously experienced on Kauai without even doing a frequency scan. The frequency scan was basically redundant. That one thing made the ATX a huge advantage for me before I did anything else. I would not have believed it had I not had a White's Surf PI along for backup and sure enough, when I fired it up, the EMI was there. It was discernible in the ATX non-motion mode but even then nothing to worry about. I. Do not know what Garrett did or if I have a magic ATX but this one thing alone really floored me. It absolutely eliminated my number one problem with the Infinium. Basalt cobbles in sand on Kauai A detector with all controls set to max is in theory getting the best depth. But if it is not stable you cannot work with it, so you have to adjust back to find the best balance. The ATX is a very powerful detector and so I found a combination of settings that worked for me to get quiet, stable performance. This is in no way being advertised as a setting to for you to use! It is what I did for this location and other locations will take different settings. In general, the more powerful all your settings can be the better while still being able to have a stable running detector. So the ATX with factory default (minimum) ground balance, zero discrimination (pulse delay), and max gain would be at its most powerful. The worse the conditions, the more you may need to dial the settings back. The problem is with all the settings maxed out the ATX is very sensitive to small gold, but that also means it picks up salt water and hot rocks. I played with the gain control and the pulse delay (disc) control looking for a balance that left the detector running quiet. A discrimination setting of three and a gain of seven made the ATX submerged in salt water run like a VLF. I periodically reduced the disc setting or bumped the gain higher and noise was introduced, so settled on the 3 and 7 setting for my Kauai beach. Then I found a fat basalt rock buried in the sandy bottom and ground balanced over it, eliminating the signal. I would be the first to admit these settings were probably aggressive and of course costing me some depth in theory, but I got what I have always wanted in Hawaii. A PI detector running quiet as a VLF and by that I mean just purring along with a threshold sound, and when it made a noise, it was because I had a target under the coil. Here is another way to look at it. A very hot detector will detect salt water. It will detect hot rocks. And it will detect things you want. EMI can also be an issue. The trick is to reduce the signals from the things you do not want to hear as much as possible while enhancing the good signals as much as possible. It may be letting unwanted signals through will also increase depth on desired targets a bit. It may also be true that too many signals from undesired targets will inhibit success. You have to decide for yourself where the balance lies. If maximum depth is the goal then digging more undesired targets may indeed pay off. In my case I had plenty of targets, so the goal was quiet, efficient operation. I would not hunt clean white sand set like this. I would have the settings maxed out. I had a strategy in mind here, and my goal was to detect in the basalt cobbles. I was not tuning the machine for maximum performance in the easy stuff, but for maximum performance in the worst stuff. I wanted to detect the places where targets were more likely to have been missed by other detectors. Finally, after one go with the stock coil, I switched to the 8" mono coil. A few reasons. First, it is easier to handle underwater and fits in depressions better. It can be pushed through sand ridges and is less likely to move on the shaft. And I could find items edge on with it easier than with the stock coil. By that I mean turn the coil on edge and drag it in the sand and it acts like a pinpointer on small surface targets. The edge of a mono coil is very sensitive. A smaller coil is easier to pinpoint with to start with anyway. And honestly, I used the 8" mono because I was worried about sand getting in the twist locks and giving me problems, possibly even seizing up the rod assembly. The 8" mono and shaft assembly was my sacrificial lamb. If it got totally screwed up my stock coil would still be fine. Garrett ATX with 8" mono coil (goodie bag attached to arm strap, waterproof watch on handle) I may as well relate now that I did have issues with sand in the twist locks but not as bad as anticipated. The lower two twist locks seemed just loose enough that at the end of every outing I just worked them back and forth and the rod in and out and they cleared. But the upper one gave me problems. It got sand inside that refused to come out, even after taking it off and working on it under running water for a half hour. For some reason that upper most twist lock was just a bit tighter to start with and the sand would not clear out. Yet it never quit 100%. I lost most of the ability to twist the lock but it still twisted just enough to hold the rod in place. I am asking Garrett for advice on where to drill a couple holes or maybe slots to see if we can get these things clearing sand a bit better. Overall I actually am ok with them but they need improvement. In other types of sand it could be a big problem. I am going to see if I can get my upper lock to loosen up similar to the lower two and will report back later. The rod assembly got scored up quite a bit from being extended and collapsed with sand in the assembly. I will post photos later. Nothing that bothered me but some might hate seeing their expensive detector getting ground up like this. I have to say at the end of the day the physical design and the rod assembly in the water were nothing short of brilliant. I have given the ATX low marks for prospecting as being a duck out of water. The waterproof design adds weight, complexity, and expense not required for most dry land prospectors. But in the water the ATX felt really, really good on my arm. It is slightly negative so will settle on bottom if released. But not much; it is essentially weightless on your arm underwater. The rod assembly was a dream. I was working in heavy surf with 40 lbs of lead weight on. I steadied myself many times by leaning on the ATX with absolutely no fear it would break, and the rod never slipped. I could get in the shallows on my knees and shorten the rod down as short as I liked. And just right, no fumbling for the right holes, just loosen a twist lock or two and put it right how I wanted it. Better yet, due to the three piece design, I could also extend the ATX to be longer than any detector I have used underwater. I was in 6 foot of water with just my snorkel in the air, and easily detecting around me. I do a lot of breath hold recovery in deeper water and the ATX was just so easy to adjust for whatever depth I was working at. So easy and so solid and tough that I 100% forgive any little work needed to sort out the twist lock situation. This is one really great handling detector underwater in rough surf conditions that would leave other detectors in serious danger of breaking. The 8" mono was perfect for me. It stayed where I put it and I pushed it around a lot. I learned quickly if I wanted to adjust the coil position to be flatter all I had to do is turn the detector over and push down on the nose of the coil. Maybe not as easy as pushing down on the heel of a coil with a rod mounted in the center instead of the rear but no big deal, mainly because the coil stayed put. After two weeks of heavy use I never had to adjust the coil tension and it showed no signs of having any issue with all the sand it ran through. I had no scuff cover, and the coil shows no sign of cracking, just your normal scuffing from use. The epoxy appears much improved from the old Infinium days. A weak point - that tiny spring loaded rod lock, the one you flip to disengage the rod and coil assembly. The tiny spring popped out on me once. I took it apart, made the spring end ninety degrees again, and it worked for most of trip, but slipped out again last day. Not a big deal but needs beefing up. Be sure when twisting the rod and cams while cleaning to not hold the detector body. You will be twisting against that little lever. Hold onto the rods themselves and twist the cams. We need to find out what the part number is for the coil and headphones connector covers. Everyone should have a couple extra. Better yet, a couple spare caps like are fixed to the back of the ATX to cover the male headphone connection when not in use. One of these to put over the male coil attachment point inside the housing would be very helpful when rinsing and cleaning the ATX. Take the coil off, put the cap on, and now no worries while cleaning. I will find out the part numbers and pricing for those and get some and suggest ATX owners do also. I saw no point on beach hunting with all the competition. One guy in particular walked the beach a couple times every day with a Surf PI. I saw a couple Surf PI detectors at work, a Minelab Excalibur, and a Tesoro Sand Shark or Piranha. They all walked the beach and only the Excalibur guy ventured into the trough when it was calmer once. I spent all my time in the surf or deeper water with a weight belt and mask and snorkel. I recover targets by fanning or digging. And I went looking for mixed coral/basalt harder bottoms instead of deep sand. I played on the beach a bit and hit deeper sand underwater but basically all my finds came off of more solid bases. I am not going to say the ATX was some kind of super depth monster. That would be misleading and really missing the entire point. I have no doubt it was getting as good as depth as could be wrung out of the conditions. I was easily getting nickels down to ten inches in the basalt, maybe a tad deeper but honestly it is hard to tell recovering targets underwater while holding my breath in the surf. The real thing I am trying to relay here is the ATX was rock solid, just like using a good VLF above water, but in the worst detecting conditions I have ever encountered. It allowed me to just get on with the business of detecting targets and recovering them. If I was lacking for targets maybe fighting for another inch would be the name of the game but I never ran out of targets. Steve's Finds in Hawaii with Garrett ATX (Click on photo for larger version) The rings just banged! Nickels hit hard. By virtue of the ground balance system large junk goes low tone and I ignored many low tone targets. That cost me some dimes, copper pennies, and quarters but that is ok. Nickels, zinc pennies, and rings go high tone. As do sinkers, bottle caps, hair pins, and aluminum. Still, being able to ignore low tone targets upped my odds some. Though I dug a lot of low tones also just to learn more and frankly, because I have a hard time passing targets. You just never know for sure until you dig them and I was there to dig targets. Still, this photo shows my target mix skewed to high tone targets. With the exception of a few large items discarded at the trash can this is every item I dug over the two week period and about 50 hours of detecting time in the water. Another benefit with the ATX is the adjustable target volume and threshold, a real boon in an underwater detector. I had brought Gray Ghost Amphibian phones with me that started out loud enough but then got too quiet to hear, so I had to FedEx a set of Garrett phones in quick. I like the sound of the Ghosts better but not if I can't hear them. I surmise the sound chamber was filling with water and so will return them to get checked out. First time DetectorPro phones ever let me down. The Garrett phones have a lower tone but worked just fine. The volume and threshold control on the ATX makes them much nicer to use since they can be set comfortably for both above and below water use even though they have no volume control themselves. You can even set the volume on the fly easily while underwater. This is a very nice thing that most underwater detectors lack. I have read a few posts by people very concerned about the placement of the headphone connector. Total non-issue for me. It is under my right elbow and was never a concern at any time. Icing on the cake? The ATX retains all settings when turned off. Once I found my magic settings I was so happy with how the ATX was running I was afraid to change anything and did not have to. Just turn it off, turn it on, and ready to go. Everything is just the way you left it. This is very important with the ground balance setting. It is the one setting you have no idea where it is set. I wish and am suggesting that when the detector is manually ground balanced the LED indications reflect the entire range and show you where you end up at for future reference. Right now the LEDs simply follow to audio and reduce to nothing when the unit is ground balanced. But where am I and can I get back there? You have no idea and neither did I. All I knew was my ATX was running great and recovering targets at what I thought was good depth so I left it be. I used rechargeables exclusively. I kept rough track of detecting time and charged up about every ten hours. Again, it was nice being able to pull batteries out, charge, reinstall, and when the detector was turned on again no tuning was required due to the retained settings. I carefully looked for water in the battery compartments each time but never saw a drop. I have total faith in the waterproof integrity of the ATX after what I put it through. I just got back and blasted this report out but will probably edit it a bit to smooth it up over the next couple days. I will also post a more story like version with more details and photos on my journal in the next couple days. I am cleaning up a few of the rings. There is one very old class ring I thought was junk but is encased in sand and lime I am dissolving away and I have a couple silver rings to clean up. Once again the big diamond eluded me but no complaints here, it was my best haul ever for a beach hunting trip. In no small part due to the Garrett ATX but I will take some credit also for really hitting the water hard. So here are the rings. The bottom line is I just had my most successful trip to Hawaii ever. I recovered over a couple dozen rings with the ATX and half of those were gold or platinum. Some silver rings, a nice 14K bracelet, and a pile of coins and the inevitable PI junk. This despite bad weather early on and all the extra detecting competition. Eight Gold and Two Platinum Rings Found by Steve Herschbach with Garrett ATX in Hawaii Another view later after the better silver rings were cleaned up, and that fabulous bracelet Again though, do not take this as some kind of crazy ATX testimonial. Pay attention to my caveats. Beach hunters in clean white sand with tons of hair pins have less to be excited about here. But if you have black sand beaches or worse, the ATX is a machine to at least be aware of. I just can't help it though, I really like a detector that puts gold and platinum in my pocket! Things I most wanted? An indication of what the ground balance setting is and an ATX version of the 14" Infinium mono coil. Thing I liked most? The way the ATX handled in the water and the way it adjusted up to handle the conditions. My last detecting nut cracked - thanks Garrett and especially Brent Weaver for obviously listening to my suggestions all these years! I would like to learn more about this detector as there is much it is capable of. How exactly does it compare with factory default minimum ground balance mode versus PI detectors that have no ground balance at all? I tried the no-motion mode a bit but saw no real value for what I was doing - there has to be more to it that is of value in other situations. Most importantly, what combination of pulse delay, gain, and ground balance is optimum for various locations and targets? I found some that worked for me but I am not swearing they were the best settings possible. I admit to focusing more on detecting than fiddling and so it is hard to get me to stop and do comparative tests when detecting time is at a premium. I look forward to seeing what works for others and will add what I can as I learn more about the ATX myself. This article was promoted from a thread on the DetectorProspector Forum and those interested in the article will find additional information in the posts on that thread. ~ Steve Herschbach Copyright © 2014 Herschbach Enterprises Steve's Mining Journal Index1 point
 -
I'm getting ready for another gold nugget trip. I've been told where we are going to bring a VLF for all the bedrock. That is a style of detecting nuggets I don't normally do so I thought I would need practice with the 6" coil. I live in Santa Monica so where am I going to 'practice?' The beach of course. Waves have been very small for a week or more. I went out a couple of days ago with the 11" coil and got so few targets in the tide zone I detected back to my car in the dry sand. I prefer wetter detecting. That is what I did with the 6" coil for about an hour and a half. There still weren't many targets but I was going to dig everything I heard. It is a little weird going out there with such a little coil but I did it when I first got the 6" coil and I got 4 cheap rings that day but the conditions were better because of the waves. This afternoon I used Beach 2/F2 4/25 sensitivity/5 or 6 speed. I had just reduced to 5 (for the ring) when I got a slight negative target but it was repeatable. I turn up the negative sound so I can hear it and see it. I dug a bit and the sound was solid. It took several scoops and it was still in the wet sand hole. I was not fighting the waves but the hole was filling with water. My scoop is 6" and I was now down a full scoop and the number came in at a solid 10! Its been a long time with any of my coils for that sound. It came out of the hole and I swung over the pile and it was still 10 so I was hopeful. I might have hit it with the scoop. When I shook the wet sand away I saw it. It looked good now and it sounded good so ... please don't be a cheap ring ... haha There were lots of people about and I didn't want to answer questions so I put it in my pouch and hunted for another hour after I found it. It's a 14k Lee that is .1 oz (2.7g) with 5 little diamonds. It seems I'll have to use the 6" coil on the beach more often.
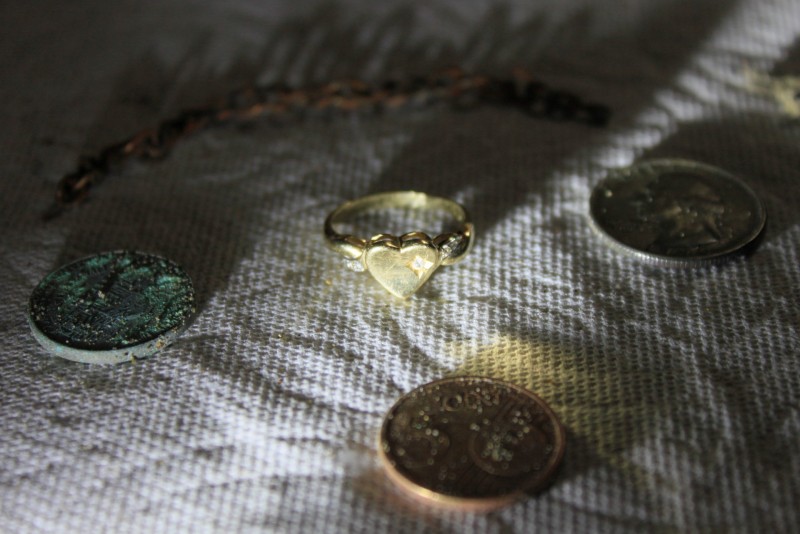
 1 point
 -
Fairly new to treasure hunting/metal detecting. Have had an old Garrett and Bounty hunter but never really messed with them. Then I stumbled onto a Tesoro Compadre. Bought it over the internet rather cheaply. What a piece of junk I thought as I took it out of the box. WRONG!!!!!! I've found more with it than everything combined. It talked me into a big brother so I picked up a Vaquero, which I'm still learning. Didn't ever think I'd get excited over a chunk of scrap in the dirt but here I am.😊1 point
-
A while ago, I posted about a using a Minelab Pro-Find 35 without a 9V battery. You can read more about it here: But I wanted to run the modification with NiMH batteries. However, due to space constraints in the Pro-Find, this was not possible without modifying the internal battery compartment (which I didn't want to do b/c it would void the warranty, I'm sure). So instead, the Pro-Find runs off of a LiPo cell. Well, I got a hold of a Garrett Carrot (Pro-Pointer AT) and given the extra space for the battery, I was able to run the 9V booster off of 3 LSD NiMH AAA cells. Works like a charm! The advantage is that I don't have to worry about "babying" the LiPo cell and worry about storing it with too little charge or anything like that. Not much else to say, except show you the pictures.
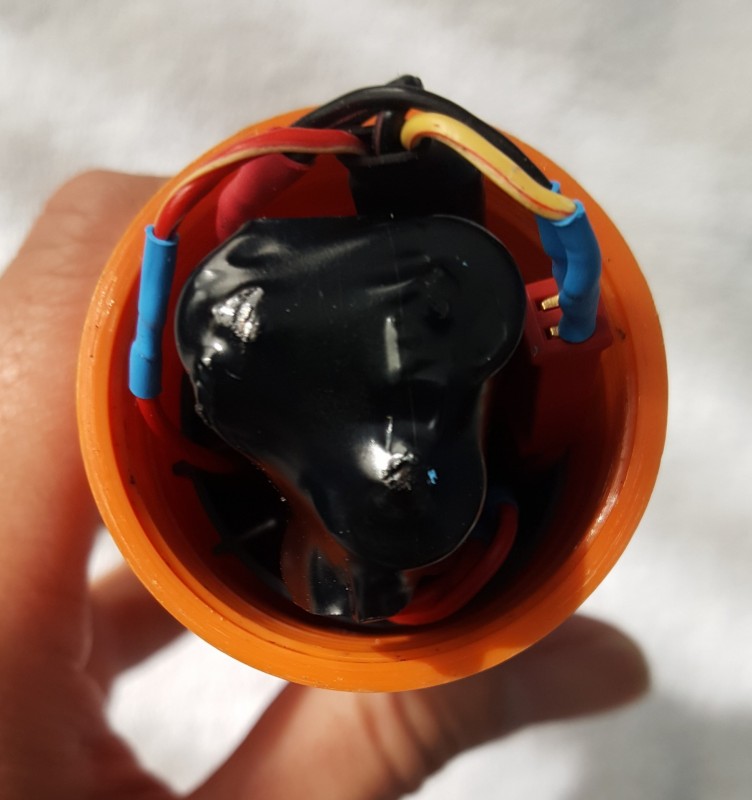

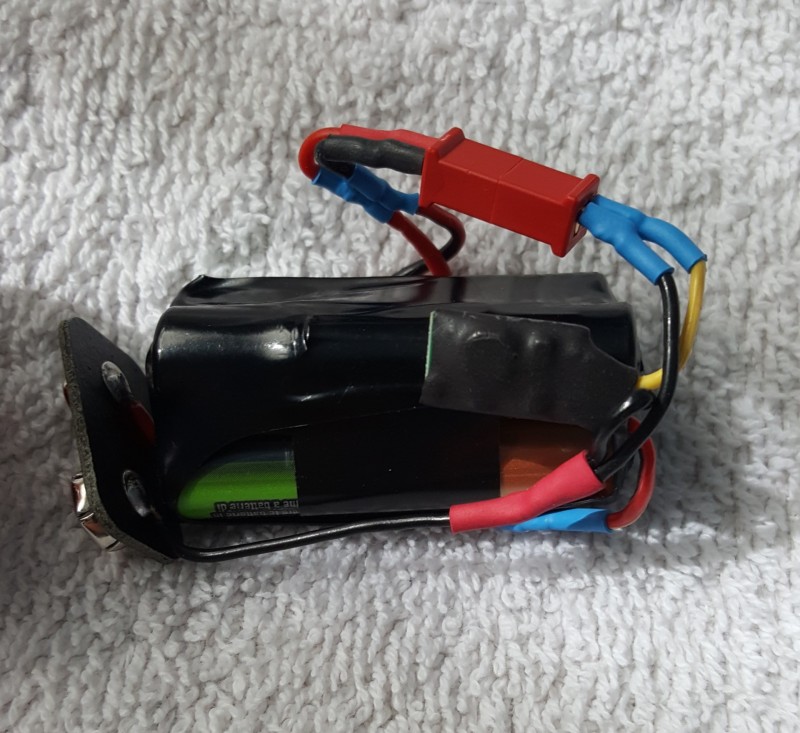
 1 point
 -
Just tripped over this site... really great stuff, check it out! http://demonocracy.info/infographics/world/gold/gold.html1 point
-
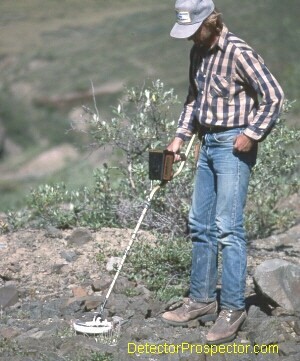 People talk about how long it took to find their first nugget with a metal detector. Usually the discussion revolves around how much trash they had to dig before they found their first nugget. Well, I probably come close to setting some kind of record for the number of years involved. My problem was not finding lots of trash, it was not finding gold! My first nugget hunt in 1973 taught me one thing about detectors at the time... they were nearly worthless for finding gold. I had my first metal detector, a White's Coinmaster 4. These old units could not ground balance, and had very poor sensitivity to small gold, even with the so-called Gold Probe accessory coil. I was panning 1/2 pennyweight nuggets from the little gully pictured at Moore Creek, and found I could not get a reading from those nuggets when they were placed directly under the coil. My next detector was one of the early White's Goldmasters. I figured I needed a nugget detector instead of a coin detector. Imagine my surprise when I discovered all the Goldmaster was in those days was the Coinmaster circuit board in a larger box! If you are shopping for a used Goldmaster do not buy one of these old ones by mistake. They were blue and about the size of a mailbox. And about as useful for finding gold. I was getting into dredging at the time, and decided detectors were a waste of time for gold. I got into business in 1976 selling mining gear and as a White's dealer. But my stock answer for people coming in looking for a gold detector was "Don't waste your money, you'll find more gold with a $5 gold pan". That was good advice at the time. We concentrated on selling metal detectors for finding coins and relics. My bias caused me not to keep up with changes in the technology, however. Reports of a large nugget finds would appear every once in awhile. I chalked them up to "Yeah, sure you can find gold with a detector, if it's big enough"! And the nuggets found were usually pretty big, not something likely to be found in my immediate area. Steve's First Nugget Hunt 1973 White's Coinmaster 4 with 4" Gold Probe Moore Creek, Alaska The first commercially available detector with ground balancing capability was the White's Coinmaster 5 Supreme. I was seriously into coin hunting, and purchased one of these new units. It was a very low frequency detector, and I found to my dismay that it really liked nails. One nice thing about the very old detectors was that they pretty much ignored nails, They Coinmaster 5 loved them and I was finding so many nails I took a dislike to the detector. But the depth of detection was amazing for the detectors of that time. I sold it to a friend who was a heavy equipment type miner. He found a gold nugget weighing several ounces with it at his mine. This should have clued me in, but once again I chalked it up to being a lucky find of a very large nugget. I went on about my dredging, sluicing, and panning. Finally in the 1980's I was also selling Compass detectors, and I hauled a Compass X-80 up to my claims and gave it a try. It had the capability, as my tests on smaller gold nuggets revealed it was pretty good. We were selling them now as nugget detectors, and some finds were being made with them. Unfortunately, I was not lucky enough to find any gold with the unit the one time I gave it a try. And it just reinforced my feeling about detectors as being a waste of time. It was not until June 18, 1989 that I decided to give metal detecting for gold another try. Compass had repackaged the X-80 as a nugget detector called the Gold Scanner Pro. Here is my log entry for that day: "Went to Crow Creek and used Compass Gold Scanner Pro. Found my first gold nuggets ever with a metal detector! Two nuggets within 10 feet of each other between Area #1 and Area #2 below old tailing pile at lower end. One nugget at 9 grains and the other at 4 grains, total of 13 grains. Also found two bullets." I was hooked! I COULD find gold with a metal detector. It only took me 16 years to find my first nugget with one!! I planned my first real nugget hunt. The destination was high in the Wrangell Mountains of Alaska on some bench deposits above a creek named Bonanza Creek. I had been visiting this area for years and had found lots of nice gold sniping the bedrock in the area. It seemed like a perfect spot to try my new detector skills. I used the Compass Gold Scanner Pro and I set my father up with a Fisher Gold Bug. I used the stock 8" round coil on the Compass, and outfitted my father with a 3-3/4" round coil that used to be available for the Gold Bug. We had a weekend to see what we could do, and so off we went on our first real nugget hunt. Bedrock Exposed by Oldtimers Bonanza Creek has several bench deposits high above the current creek level. These are remnants of stream deposits left high and dry as the stream eroded deeper into the valley bottom. They can often be spotted as flat areas on the valley sides above gold-bearing creeks. In some areas there is more gold in the bench deposits than in the creek itself. The problem for the oldtimers was in getting water up to these locations to work the gold deposits. Ditches many miles long were often dug to bring water along the valley walls from places father upstream to the deposits. They usually used "giants", a term for very large water nozzles fed by pipes with water from the ditch systems to wash the gold free of the hillside gravels. Large areas could be worked in this fashion, with the material being funneled into sluice boxes running down the hill. Much gold was lost in these sluicing systems due to the large volumes of material being washed through the boxes. However the best target for the metal detector operator is not the tailing piles, but the large areas of bedrock exposed by these operations. Nuggets lodged in cracks and crevices as the material was being washed down the hill, and original concentrations of gold in the bedrock were often missed. The only way for the old miners to get this gold would be to tear up all the bedrock and process it. The amount of gold to be had for this extreme extra effort was not much compared to what they would get just going on with their large scale washing operations. And so that gold is left to this day, waiting for someone to find it. Trying to scrape and pan crevices can produce some of this gold, but it is a needle in the haystack kind of search. Metal detectors are the perfect way to locate deposits of gold left in these old workings. The picture above shows a dark area of exposed bedrock we searched with our detectors. Bud Herschbach with Fisher Gold Bug & Steve with Compass Gold Scanner Pro We actually wasted quite a bit of time on bedrock along the creek before heading up to try the bench areas. We only found a few nuggets, and I now attribute this to the fact that most mining activity goes on near the water. People pan and sluice the material along the edge of the water, and dredgers work in the water. The area nearest the creek is the area receiving the most attention. One of the first things an experienced miner must do when getting into metal detecting is to lose this natural desire to stay near the water. What really makes detectors great is you need no water to find the gold, and so working away from the water actually will increase your odds of making finds overlooked by others. You have no choice in desert areas, but in stream valleys do not let the water distract you. Any exposed bedrock or material from the highest ridge on down has potential. We started finding gold, but it was one particular hump of a dark slate bedrock that really started producing gold. My years of coin hunting paid off as I have much better detecting habits that my father. I always keep my coil as close as possible to the ground, and do not raise it on the end of my swings. I am methodical and carefully overlap my sweeps if I feel I am in the gold. My father tends to have his coil off the ground a lot, and wander around with no set pattern. The number one thing he could do to improve his finds would be to slow down and develop better coil control. But as he has often noted, he does not have the patience I do with a metal detector. And he makes good finds nonetheless. Still, technique is important. My father was scanning along up a steep rise in the bedrock. He stepped up the rise with just a couple sweeps over the bedrock. I followed behind, carefully scanning every inch. The bedrock was nearly vertical at one point, and as I scanned the face I got a nice signal. My father was about 20 feet ahead of me when I yelled at him to look at the flat 4 pennyweight nugget I popped out of a crevice in the rock! It turned out to the largest nugget of the weekend, and in fact the largest nugget I had ever found up to that point prospecting for gold. Gold Found by Bud & Steve - from my notes: Large Flat Nugget - 4 dwt 2 grain Fat Pendant Nugget - 2 dwt 8 grain Dad's Big Nugget - 1 dwt 5 grain Sitting Bird Nugget - 16 grain Chunky Nugget - 16 grain Long Flat Nugget - 14 grain plus others total of 11 dwt 6 grain Grand Total 1 oz 4 dwt 12 grain "Great weather, great gold, GREAT TRIP!" Gold nuggets Steve found with Compass Gold Scanner Pro I had a fantastic time. Probably the most fun I'd ever had looking for gold. Metal detecting really appeals to my desire to just get out and walk around the hills. I went nugget hunting regularly after this trip. I tried new machines as they came out, and kept getting better results as the technology improved, allowing me to go back and rehunt old areas many times. My finds close to home really took off when the White's Goldmaster II was introduced, as the local creeks had lots of smaller gold on which the Goldmasters excelled. Still, gold dredging produced the bulk of my gold yearly. I dredged locally, and large nuggets suitable for detecting were rare, although I did finally dredge a 1 ounce nugget at Crow Creek in 1998. Then in 2000 a few things happened to make me really get serious about nugget hunting. First, I finally started getting bored with dredging. I had been doing it so many years it was becoming mechanical. It was mostly an equation. Run the 6" dredge for X hours at X location and get X gold. Dredging was also causing me to stay at the same locations for years at a stretch. I wanted to start moving around more and doing more pure prospecting. I was also finding my body was beginning to suffer from the years of cold water dredging. But the most important thing was those big nuggets. I decided that if I really wanted to see lots more really good-sized nuggets I'd better change my tactics. One 1 ounce nugget in 25 years of dredging meant I was going to die before I found a couple more! So I consciously set dredging aside and concentrated on metal detecting. I sold my 6" dredge and used the funds to buy a Minelab SD2200D. Paired with a White's Goldmaster I figured I could handle most anything. The Goldmasters are very hot on smaller gold, but suffer in highly mineralized ground. The SD2200D is not very good on small gold, but excels on larger gold in the worst of mineralized ground conditions. So the two make an excellent combination for varying gold and ground conditions. Finally, and most importantly, I started contacting miners I've met over the years looking for access to big gold creeks. The payoff was immediate. I found more pennyweight range nuggets in 2000 than I ever had in one year and found my largest ever with a detector at just over 8 dwt. Then in the summer of 2001 at Ganes Creek, Alaska I found a slug of 1/4 to 3/4 ounce nuggets and my largest nugget ever, a 4.95 ounce gold and quartz nugget. I was one of the happiest guys on the entire planet when that nugget came out of the ground! In 2002 I bettered it with a 6.85 ounce nugget and over 2 pounds of detected gold. So there you go. It took me the longest time to warm up to these 21st century prospecting methods. But I am ready now to let the past go and put my pan, sluice box, and gold dredge aside to concentrate on this exciting field of electronic prospecting. I'm more excited now about prospecting than I have ever been, and cannot wait for my next opportunity to test my skills in the field. ~ Steve Herschbach Copyright © 2002 Herschbach Enterprises Steve's Mining Journal Index1 point
 -
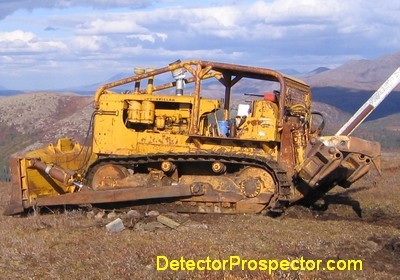 After returning from Moore Creek in July I put the word out that I was looking for Honda 200 three-wheelers. I was offered one in good condition and bought it, plus another one not running that I purchased for parts. My father came up with a Honda 110 that a friend gave him. Our little fleet was growing. I wanted to make sure that for our assault on the old bulldozer we had plenty of ability to transport people and tools the three miles over the mountain to where the unit was stuck in a bog. When we acquired Moore Creek some of the equipment we got was actually over the mountain at another creek named Deadwood Creek. In fact, that other location was where the bulldozer was coming from when it got stuck three miles out from our camp. There was another Honda 200 ATV over at that far camp, and so my father and I decided to fly up to Moore Creek, drop off one of our just purchased Hondas, and then fly over the hill and get that three-wheeler. This proved to be a true Alaska Bush pilot adventure. I’ve flown around Alaska with my father for 40 years now and we have seen some pretty exciting moments in that time. But in recent years usually the flying is uneventful and even downright boring. Every once in awhile though you tackle some new airstrip in a remote location and things can get very interesting, to say the least. This proved to be one of those times. We crammed a Honda 200 3-wheeler into the Cessna 206 and flew it into Moore Creek. No big deal there. My father had checked out the Deadwood Creek airstrip previously when we had a friend up to Moore Creek with a Super Cub. He figured he could put the 206 in and so we went for it. The strip is dozed over the curve of a hill and grown up with brush. It is always something to be making a landing for the first time on a strip like that, and this was no exception. We hit the ground going uphill, and then had to skid to the left to stay on what appeared to be the best route. You roll up over the crest and down the other side, so forward visibility is limited. We made it but it was one of the more exciting landings I've made with him in some time. Airstrip at Deadwood Creek, Alaska over the hill from Moore Creek We explored a bit, and then loaded up the Honda 200 three-wheeler to take over to Moore Creek. The unit appeared to have real low hours but had been sitting in the weather for years. Two tires were flat, and although it would turn over the fuel tank was full of rust and it would not start. Then came the fun part... takeoff. A Cessna 206 with two guys and gear is iffy on this strip. We ran flagging over the hill so we would know which way to go since we could not see over the crest of the hill. Not only does the strip run over the hill but it is not straight. We had to spend an hour breaking brush and even tall grass as it slows you down plowing through it. We rolled the plane on down to the lower end of the strip, which meant a takeoff run up a pretty good slope, leveling at the top, then hopefully getting off the ground as we rolled down the other side. We had a preference for one direction as there are ridges to clear both ways, but the one way the ridge is farther away. Plus, if we had to abort the crash zone was smoother that way. We would run into downhill sloping brush as opposed to falling into a small valley the other way. No, I'm not kidding, you plan your crash... just in case. Only problem was a tacking tailwind going that way. So we parked and waited a half hour watching a piece of flagging tied in a tree. It finally hung down straight indicating a lull in the breeze, and we went for it. After all the suspense, we got off with no problem. That, my friends, is what it is like flying small planes in Bush strips in Alaska. This scenario may sound insane to some but it is what you have to do to be able to see and operate in the vast 99% of Alaska that nobody else ever sees. You have to be willing to land on beaches and ridges and marginal airstrips just barely carved out of the wilderness. The secret to success is an old Alaska Bush pilot saying - “There are old pilots and bold pilots but no old bold pilots”. You have to know when to go for it, and when to just give it up and go back home. And dear old Dad has proven he knows how and when to make those calls. The stage was set for the next attempt to get the old bulldozer back into camp. However, before I would return to Moore Creek I planned on making one last nugget hunt at Ganes Creek. This trip was prompted by Steve Burris finding an incredible 33.85 oz nugget at Ganes in June 2004, right on top of the ground in an area heavily hunted by others in the past, including myself. It was the largest nugget found at Ganes with a detector up until that point, and highlighted just how easy it is to miss nuggets when dealing with an area the size of Ganes Creek. Seeing a picture of the nugget gave me a case of gold fever, and the desire to give Ganes just one more try. I put the word out I was planning a trip to Ganes Creek, and in short order a group of people signed up to go the same week. Half were local people I know, and the other half were visitors from down south, mostly from Arizona and Nevada. Some of these I knew by reputation and the internet to be knowledgeable nugget hunters and so it had the makings of an interesting week. I planned on meeting my father in McGrath as the group left Ganes Creek and going straight over to Moore Creek rather than returning to Anchorage. The stuck D9 bulldozer The Ganes Creek trip is a long story in itself, but one I’ll leave for another time. The short story is that we had delays getting both into Ganes Creek and out due to the smoke from the many forest fires in Alaska that summer. It also became apparent that the years and number of hunters at Ganes Creek have had an effect on the chances of finding nuggets at Ganes Creek. I actually was very pleased with the nuggets I found, but the fact is that most of the visitors from the Lower 48 had pretty poor luck finding gold. In the early days most anyone swinging a detector at Ganes Creek could find a nugget, but at this point I think only the very experienced or very lucky will be finding nuggets in the future at Ganes Creek. It also was obvious that nugget detecting experience elsewhere does not prepare people for nugget hunting tailing piles in Alaska. It is a different game, and requires a different set of skills. Some of the guys from down south were not too happy with their finds… or lack thereof… for the week. While I found some nice nuggets and had a good week at Ganes Creek, it was with a certain amount of relief that I found myself watching the rest of the group get on the plane in McGrath and head back to civilization. I count among some of the very best times of my life those times when I have been totally on my own in remote locations of Alaska. There is something enlivening about being totally dependent on ones self and the knowledge that there is nobody to bail you out if something goes wrong. So now what? The smoke from the forest fires prevented my father from making it over the Alaska Range to McGrath to pick me up for the trip to Moore Creek. It was morning still, and I faced the prospect of checking into a hotel and waiting it out. By the time I got supper and breakfast I’d be looking at a $100 bill. The smoke was thick in the area but had lifted since early morning, and it looked flyable to me. So I wandered over to Magnuson Air and asked Lucky if he thought he could get me to Moore Creek. It costs $250 one way to the mine from McGrath but I figured I’d be getting a $100 discount by not staying in McGrath. Plus, I’d be able to get to work at the mine instead of just killing time. Lucky figured we could make it to Moore Creek, and so I loaded my gear up into the Magnuson 206 and we headed for the mine. It was actually a nice, sunny day despite the smoke, and the smoke thinned as we got to Moore Creek. We landed at the mine, and then Lucky took off to head back to McGrath. I opened up the camp and did odds and ends work waiting for my father and cousin Bob to arrive. I hung around camp a bit the next morning half expecting them to show up, and was just getting ready to go up and clear trail when they did finally arrive. They had a tale of wandering mountain passes in thick smoke trying to find a way over the Alaska Range that sounded not a bit fun, so I was glad they had made it to the mine safe and sound. We cleared the last bit of trail to the top of the mountain and so were finally able to drive our three-wheelers all the way to the bulldozer. The trail is actually an existing bulldozer route that has grown up over the years and so along some portions is actually like an old road in the lower elevations but fades to a bare trail above tree line. Once you get above tree line the ridges are rounded and smooth and so it is pretty easy to get around on an ATV. Using Honda 3-wheelers to run supplies over hill to stuck D9 bulldozer We took a dual approach to getting the bulldozer unstuck. A combination of trying to dig it out and trying to get the old beast started up. The D9 is a 1950’s era model that uses a small gasoline motor referred to as a “pony motor” for a starter. So first step was to try and get the pony motor started. It uses a 6V car type battery and so we used the ATVs to haul up a battery plus some fresh gas. The first thing we discovered was that the small exhaust pipe sticking straight up out of the top of the dozer had not been covered, and when we cranked the pony motor over water puked up out of the exhaust pipe! We drained what we could, and then ran the battery dead trying to clear water out of the system. The battery did not last any time at all, actually. The old starter motor seemed to just suck it dead in very little time. We spent the rest of the day digging away at the lower rear track where it was sunk in the mud. If we could get the motor running, we could hopefully use the rear ripper hydraulics to push down and lift the rear of the dozer up, so that logs could be stuffed under the tracks. But since we had more people than we really needed digging seemed to be another approach to take while also keeping busy. The old bulldozer has a cable lift blade in front, which unfortunately cannot be used to do the same thing up front. It can only lift, not push down. We headed back to camp eventually and put the battery on a charger overnight. Dad and Bob decided to fly over to one of the nearby mines to borrow a jack and returned with a loaned 40 ton jack. Then back up to the dozer for more digging and work. We got the rear corner of the dozer dug out far enough to get the jack under it and this started an effort of putting rocks and timbers under the jack and driving them down into the muck until a solid base was created. It took a lot of work to finally get the rear of the dozer to lift a couple inches. And with that accomplished, we stuck timbers under the rear of the track, which when the jack was let down just sunk into the muck. Over and over we jacked the unit up, stuffed timbers and rocks under the track, and let it down to all sink right back to where we started. We got the pony motor clear of water but it still would not start before the battery ran dead. And finally after a couple days we ran out of time and had to return to Anchorage. Lots of digging, lots of work with hydraulic jacks and log sections This time I returned with my other partner John, along with more batteries as the single battery was not giving us any life before it ran dead, and having to return to camp to charge it overnight was taking too much time. Plus a new jack. I found there was no spark on the pony motor, and so I pulled off the magneto, cleaned up the points, and put it back together. And Pow, Pop, Pop, Pow! Smoke came out and more water came from somewhere and got the plugs wet but at least we had fire! But we ran the batteries dead without the motor actually starting. We spent more time digging, and more time pulling every part of the pony motor apart we could trying to get it to start. It would pop and backfire and do everything but actually run. Finally we gave up and once again we had to return to Anchorage, frustrated by our inability to get the motor running. The dozer was now so dug out that it would most likely drive out of the hole, if only we could get it running. The fall colors were out in full, and winter was coming fast. We needed to do something soon or winter would put things off for another season. I got a hold of my old friend Tom, who has worked with heavy equipment for many years. He is a very busy person, but he agreed to come up and try and figure out what was up with the pony motor. I was stymied at this point, and was worried about the delay. Overland permits for bulldozer travel off claim blocks can generally only be had in the winter months. The ground is softer in the warmer months and so travel when the ground is frozen protects the ground. If we could not get the dozer running before winter set in, we would most likely lose an entire season. The main limitation in the permits is the requirement that the ground have snow cover. We needed to get the bulldozer onto the claims while the ground was still frozen. Tom, my father, and I returned to the mine for one last try in early October. The snow could fly at any moment, and we not only wanted to try and get the bulldozer running, but also wanted to stake some more mining claims. We had our hands full, and this was likely to be the last chance with the bulldozer for the season. We made it to the mine, and settled in for the evening. And awoke the next morning to snow and thick fog. It was only a dusting of snow, but it covered the ground just enough to hide the trail to the bulldozer. Add in the heavy fog, and we were soon basically lost up on top of the mountain trying to find our way to the bulldozer. Luckily I had used my GPS on the previous visit to trace the trail. Even so, what the GPS said argued heavily with what our eyes were seeing. Were it not for the GPS I have doubts we would ever have found the bulldozer that day. Winter is coming - fresh snow at Moore camp But find it we did, and Tom proceeded to try and figure out why the pony motor would not start. We had over time eliminated almost every possibility, and when you get right down to it these old motors really are not very complicated. You need fuel, compression, and spark. The only thing that seemed weird was all the backfiring and that the carb would want to blow out backwards instead of pulling air. There simply seemed to be no options left, when I thought back on my previous work on the motor. Early on I had pulled the magneto apart to clean the points. Did I maybe not put it back together correctly? It is a simple thing to disassemble, but if you are not careful you can put it back together 180 degrees out of where it came apart. I wondered about this for awhile, and finally piped up with “you know, maybe I put the magneto back together backwards”. So we pulled the magneto off, rotated it 180 degrees, and put it back together. Tom got on the dozer, turned the pony motor over… and it fired right up! I felt a very strange combination of embarrassment at having been the cause of a lot of extra work, and happiness at having finally figured out what the problem was. Tom let the pony motor run a bit, and after a rough start it smoothed out and sounded just great, albeit loud as heck. Kind of like listening to a shotgun firing 3600 times per minute. Then he engaged the clutch to the main motor, and smoke puffed out the big stack. And puffed, and puffed, and then all the sudden our bulldozer was running! Smoke coming out of the stack - the D9 starts!! What an incredible moment! The main engine really sounded good, and Tom let it warm up for some time. Then he gave a pull on a lever, and the blade lifted. We have a ripper unit on the back of the dozer, and had filled the tank with fresh hydraulic fluid. Tom pulled another lever, and the ripper blade lifted up. Dad and I got all the remaining timbers we had and laid out a parking pad just ahead of the dozer on level ground. We had just enough logs to cover two track lengths. Then the moment of truth arrived, Tom pulled more levers and the bulldozer drove out of the hole. Whoops and yells and handshakes all around ensued. Tom parked the bulldozer on our logs, and powered her down. We drained and covered everything to the best of our ability for the winter ahead, and left the dozer for the next spring. It was amazing how everything finally happened in so short a period of time, but it was all the hours of preparatory work that made it all seem so easy at the end. Dozer up and out of the hole, ready to drive to Moore Creek next spring We did our claim staking, and closed up the camp for winter. The year 2004 at Moore Creek came to an end, and the snows of winter came shortly after we left the mine. Success could not have come any later that year. Events slowed, but I did get an Overland Permit lined up in anticipation of moving the bulldozer into camp in the spring of 2005. Travel within a claim block is covered under our mining permits, but since the bulldozer was off the claims we needed a permit to bring it into camp. The main limitation was that overland movement had to be while the ground was frozen and covered with snow, and so we were aiming for an early spring operation. We were planning for April, but the winter of 2004-2005 proved to be one of the heaviest snow years on record. Dad and I flew up to the mine in April, but the dozer had snow drifted over the seat. It was still too early, and so we took advantage of the snow, and asked our friend Mike to fly a load of gear up to the dozer with his Super Cub, which was on skies for the winter. He landed on the hill by the dozer, and left a battery, propane tanks, a heater, and tarps plus some miscellaneous gear. Dad and I planned on flying into Moore Creek just before the snow melted, and so getting that gear to the dozer would have meant lots of snowshoeing. Now we were set. We monitored the snow situation, and finally flew up in early May in my brother-in-laws Citabria. Our original permit expired the end of April but I was able to get a two week extension due to the extreme snow conditions. There was still a few feet of snow on the ground in places but in most areas there was less than a couple feet. We made some passes over the bulldozer, and I launched sleeping bags and some basic camping supplies out of the plane. I’ve done some of these “bombing runs” before and they are actually kind of fun. Dad does all the work, however. I just hold stuff out the door until he yells “Go”! and I let go of it. With any luck it lands halfway close to the target. Aerial view from Citabria of snow in the hills in early 2005 We landed at Moore Creek, and hiked up to the dozer on snowshoes. We planned on camping the night, and heating the motor overnight, but it was rather warm (relatively speaking) when we got to the dozer so we went ahead and tried to start her. And amazingly, it fired right up! I had been studying my D9 bulldozer manuals, but the fact is I have never driven anything even close to one of these monsters. I really had no true idea what I was doing, but just followed the manuals. That worked well enough in getting the unit started, but finally after warming her up I had to make the big move. We loaded up all the tools, batteries and other gear. I held my breath, put it in gear, and engaged the clutch. The next thing I knew I was driving a D9 bulldozer up a mountainside. I had been warned that no matter how big these things seem, driving into too deep of snow conditions could get you high-centered in short order. The snow was only a foot or two deep, but I could not tell really how deep it was, except for my what seemed like endless trips over the trail on the three-wheelers the previous fall. I just kept her going slow and forged ahead, and after a bit it actually seemed pretty easy. Dad and I both had grins on our faces as well drove along, with all the overnight gear we had pre-staged loaded on the bulldozer unused. Up the hill I went, and down the other side. Basically just a drive over the hill, and I got to being lulled into how easy it all was. Finally we were on our claims, and camp was only minutes away. I was on cruise control, just enjoying the ride. And then the dozer broke through the crust and muck started churning! Only a heartbeat seemed to pass, but next thing I knew we had come to a stop in the middle of the trail. Apparently the low flat bog areas which we were passing through just before arriving at camp had thawed under the snow. The only good news was that it was still frozen a short distance below, but the dozer was spinning on the frozen muck and could gain no traction to get up and out of the hole we were in. Still, we had made it 99% of the way into camp, and so could not feel all that bad about the situation. It was only a 10-15 minute hike to camp, and we got a good nights sleep. Then up and back to the dozer the next morning, to get out of our little situation. We took chains, cables, and clamps for camp with us, and a chainsaw. We cleared a bunch of alders ahead of the dozer and laid them down in front of it to make an exit pad. The we cut a big dead spruce and levered it over in front of the tracks with a long pry bar. We took cables and ran then through the tracks and around the log. I fired up the dozer, and when I engaged the clutch the front end climbed up on the log and what seemed an incredible angle. I half closed my eyes, and the front end came up out of the hole, and fell over out and onto the alder pile ahead of the log. We were unstuck and on the first try. Project a year in the making - D9 finally back at Moore Creek and Steve clearing airstrip I now was much more cautious heading into camp, as my inattention the day before had got us stuck. If it even threatened to get soft ahead, I drove over the alders next to the trail, which created a natural pad. The next thing I knew I was driving the bulldozer into camp, and when I finally parked it and got off it was one of the happiest days of my life. I literally wanted to kiss the ground! Dad and I hugged and shook hands and slapped each other on the back. In all our years I do not think we have tackled a project that took so long and so much effort as moving this D9 bulldozer into Moore Creek camp. And like all things difficult to achieve, the final success was all that much more satisfying. In all the excitement I forget to take any pictures, but here is a shot of the old girl back in camp later in the year, with me working on clearing and extending the runway. I have to finish this tale by thanking Bob, John, Tom, Doug, Mike, and most of all my father, Bud Herschbach, for all their hard work and contributions towards getting our bulldozer back to camp. There is no way I could have done it without them. Thanks guys! ~ Steve Herschbach Copyright © 2005 Herschbach Enterprises Steve's Mining Journal Index1 point
 -
Gentlemen we have yet to get our Simplex + . After we cross that bridge then we can confront our desires on what size coil that our little heart ❤️ wish to embellish . Here I am telling all of you this bull when I’m the world worse on waiting on anything.. haha Chuck1 point
-
The SDC will hit smaller gold than the GPZ and handles some hot rocks better that the GPZ struggles with. If you have larger deeper gold and lots of smaller gold then having both may be worth your while. If you prefer to concentrate on larger, deeper gold and only have so much time to devote to detecting, then a GPZ only may be the way to go. Some places however only have very small gold and so the SDC only may be the better choice. It all just depends on the person and situation, there is no right or wrong answer. Accessory coils are available that blur the line between the two models even further. Do you need a heavy salmon rod or a fly fishing rod or both? Do you need a little car or an off-road truck or both? Do you need a shotgun or rifle or both? The question is not what other people need, it’s what do you need? Only your own situation and circumstances plus how much money you want to have invested in detectors can determine that.1 point
-
Depends on the terrain in your area. In the brush and forest, Its easier to use 2300. Love my Z but i find i only use it most in the desert, although i have identified some spots in the woods to use it. 2300 was my first “good” detector and I have found my best and most gold with it. I have thought of going with the coiltek coils and dropping the Z but only based on what I have read I currently don’t think it is the route for me. Today I’m heading out with all 3. Nox, SDC and Z and after dinking around will pick the best to use. I have been in garbage lately so the Nox has helped me cherry pick.1 point
-
Try the link I just posted under the photo. 3.74 ounces.1 point
-
Welcome to the forum. Good luck!1 point
-
Hey, thanks to you all who have responded. I have local contacts in LA who are interested in meeting up with folks of local knowledge, and might be interested in a co/exploration of this claim. I have no idea whether this particular claim has been illegally prospected or not. And, honestly, anyone with half a whit about their head could locate this claim. I put out feelers to a "respected" group, but received back mostly a sales pitch for their detecting equipment and classes. Was not interested. I'm more grass roots. I am not interested in a bloody confrontational, tit for tat exploitation of my claim. Anyone with half a brain can figure out where it is. What they don't know is if anyone is watching it. This might seem a little bit confusing, but believe me, it is done so for a reason. Claim jumpers are scum. I'm offering, since I've received word, medically, that I may not be there in person for possibly another year, an opportunity to co\share\explore this claim, are there any out there who are interested? Or, maybe, I donate this claim towards a Group who will share exploration rights supervised within the group?1 point
-
Solid questions, Steve, and they deserve to be answered by Whites. I don't see any bias in those questions. Too many separate answers to a simple question. C'mon Whites...what's the story? Also, the patent application may be there, but has yet to be published. You can forestall publishing for up to 18 months after the application. Jim1 point
-
Great job Gerry! That was a nice bingo!1 point
-
Make sure to mark the location of the pot before you turn it. This messed up Phrunt when he bought a used Teknetics T2 that had a similar 'adjustment' -- the seller had not recorded the original position. I would use a scriber myself rather than a marker -- more precise and won't wash off or fade.1 point
-
Wow, This is some great news for those folks who have been patiently waiting for a Holiday Promo. Minelab just announced their Christmas Promo and there are 3 Gold Detectors to take advantage of. So if you have a favorite dealer who has always been there for you, then please go back to them. But if not and or you want to try a dealer who actually used the gold detectors and offers training, lets talk. Gerry's Detectors in Boise, Idaho (me) has them in stock too. Remember, I also offer the 3 Days Field Training for FREE with a GPX, SDC or GPZ-7000 purchase and yes you get the 19" coil with the 7000. My next training is at Rye Patch, NV and I do have 2 openings at this time. Holidays Promotions Sell Sheet Oct - Jan 2020.pdf Minelab Equinox 600 - FREE Minelab 6" DD Searchcoil included Minelab Go Find 66 - FREE Carry Bag and Digging Gloves Minelab GPZ 7000 - FREE 19" Searchcoil included Minelab Gold Monster 1000 - FREE rechargeable battery included Minelab SDC 2300 - FREE pair of Waterproof Headphones included As a VET myself USMC, don't forget the 15% Military Discount for you VETS or even active military. You have earned it and I'll make sure you get it.1 point
-
Welcome, Buckeye Tag1260! The Tesoros have produced a lot over the years and are still doing that. Please post some pics of your finds as you go along.1 point
-
What phrunt said. Larger coils are more reactive to the ground, and so the larger they are the more difficulty ground balancing. This is especially true of VLF and less so of PI due to pulse induction being less reactive to ground in general. In very bad ground, a VLF might not ground balance at all with a larger coil, and the solution is to go to a smaller coil. For detectors that can use a concentric coil, concentrics are more reactive, and switching to a DD coil will help.1 point
-
I’m hoping he was just chopping wood with it! I don’t plan on doing anything with it except possibly treating it for bronze disease. I do enjoy metal detecting for the different adventures it takes me on. Detecting nuggets in Alaska, Australia, and all over the western U.S. Detecting jewelry in Hawaii. Relic and coin hunting in the U.K. Some people specialize but I like doing it all, and that means no matter where I find myself there is some reason to go metal detecting. A nugget in the desert, a coin at the park, a ring at the beach, a relic in the field... its all the same fun and thrills for me. Greatest hobby in the world!1 point
-
I think MineLab is being seriously remiss in not; a. releasing an x-type coil and b. remaining totally silent on this issue which virtually every 7000 owner is interested in. Their dismissive silence is louder than they may realize.1 point
-
I'm going to some Southern California mountains with Jim. 😊1 point
-
Back when I got mine there was no real choice except the original Lesche digging tool. That made decisions like yours lots easier! Mine works great and apparently will never wear out so that’s it for me. I’m sure some of the ones you are looking at are great options also, but hard to go wrong with the Lesche. Available serrated on left or right sides.
 1 point
 -
I welcome! There are beaches equipped with wave barrier facilities. I do not know if there is such in your location but in Russia in Sochi almost all beaches are such. The distance from the shore to the wave cut is a search collection of jewelry. During the storm, the wave enters the shore by only 3 meters and a small part of the jewelry ends up on this edge near the shore. Aluminium does not get into the tank behind the wave cut with a bonus. Where there are no wave barrier structures there everything is very bad. The wave comes to shore for tens of meters. Something pulls off the shore, something throws away and so many times. Concrete barriers under water pass along the edge of the boon and they are not visible, they do not project to the surface. Looking for or diving is now only where there are wave cuts. In the photo of alluminium from the shore where there are no wave barrier structures. Only 3 hours! It 's worse in the water! Good luck under the reel. With respect. ps: A, yes.. everything to the fact that if you look for where there are structures protective from waves, the search area is significantly reduced.
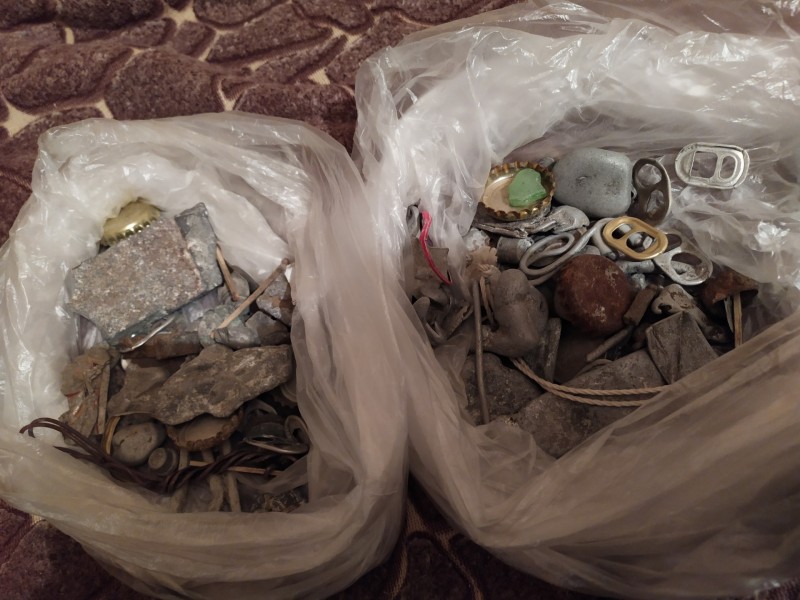
 1 point
 -
I'm wondering if the new coil is simply an eliptical DF. Whites holds the patent on the DF. Jim1 point
-
 There are a few key things to know about headphones for use with metal detectors. The most important thing is to know that some detectors operate in mono, and some in stereo. If you mismatch headphones you can end up with audio in one ear only, or none at all. In fact, this has happened to me. I took my White's DFX out to do a little detecting, and grabbed an old pair of Fisher Phones I had around, and when I got out I found the phones would not work on the DFX. So most detector phones have a stereo/mono switch, or are specially wired to work either way. Make sure your headphones match your detector for stereo or mono operation. But best case is to only use headphones that can do both so you can use them with any detector. You never know when they might get put to use on a different machine. In a situation where you are determined to use a mono headset on a stereo detector or vice-versa plug in adapters can be purchased at most electronics supply houses. 99% of the detectors out there have a 1/4" headphone plug, but many generic headphones have a 1/8" plug. Sure, you can use an adapter, but it just adds a weak spot in the system. So get a 1/4" plug unless your detector is one of the rare 1/8" models. Again, pay attention to the mono versus stereo issue. The good news is that if you make a mistake there is almost always an adapter that will fix the problem but it is best to try and get the correct match. Does your detector have a volume control? Many do not. It is best to buy headphones that have their own volume controls, so you can use them with detectors that do not have a volume control. Again, you never know when you might switch detectors. Ohm matching can be important, and generally higher ohms is better. This is not always true however and some detectors do work better with lower ohm rated models. It is usually easy to determine what the headphone ohm is but almost impossible to know what the detector rating is. I therefore recommend that you should have your detector in hand and be trying the headphones before you buy them instead of going by specs on this point. Things to look for: 1. How do they sound? Are targets sharp and clear to your ear? If not, you can now pass on this set and try another. Different headphones match up with different machine and different ears in such a way that nothing short of trying them can sort this point out. They either sound good to you personally, or they do not. It does not matter what your friend likes. Some detectors allow you to change the pitch from high to low. Try different pitches with your detector to see what sounds best. How do faint targets sound to your ear? People have different frequency responses, some like low tones and some high, and the type of speaker wired into the headphone can make this sound vary a lot. Get a set of headphones that make faint signals as clear as possible to your particular ear. 2. Assuming they sound good, how adjustable is the volume? A good match will give you the ability to fine tune the sound with the volume control on the headphone. In other words, the volume control will have some range. If you have very high ohm headphones and use them on a high volume machine that has no volume control, the headphones may be so loud you have to set the volume on the headphone nearly off. And then tweak it within a fraction of a turn. Some headphones are too powerful for some detectors! The volume control should run from off at one end and too loud at the other, with lots of adjustment in between. 3. How many volume controls are there? Some people like two, one for each ear. This can be great if you have poor hearing in one ear and need to compensate. I personally prefer a single control that works both ears at the same time, so I do not need to fiddle two controls. So this is a personal preference thing, but your headphones should have one or two headphone volume controls. A note on setting your headphones. Turn the detector volume all the way up, if it has a volume control. Turn your headphones all the way down, then turn on your machine and wave it over a large metal item. Turn the headphones up until the loudest sound you will get over a large item is not so loud as to damage your hearing. Now, set the threshold sound on your detector for a faint buzz. You should now be able to hear faint variations in the threshold, but going over a 55 gallon drum will not damage your hearing. Metal detector headphones showing 1/4" 90 degree jack, coiled cord, padded muffs, and dual volume controls 4. How well do the phones exclude outside noises? Normally, get a set of headphones that will exclude outside noises like running water, wind in the trees, or anything else that might distract you from the detector sounds. Sometimes it may be advantageous to use phones that let you hear outside noises, like in bear or snake country. Or maybe in real hot climates bulky units get too warm. But from a pure detecting standpoint sound excluding headphones are best. Earbuds are perfectly acceptable however for quieter locations. 5. How well do the headphones fit and feel? Imagine they are going to be on your head for 12 hours. Something that feels good initially can feel pretty bad in a few hours. Beware of headphones that are too tight or that have too little padding. I prefer phones that completely cover my ear and seal to the side of my head. I do not like the kind that squash my ear but people's preferences vary. Make sure your headphones are comfortable for long hours of use. 6. How tough do the headphones appear to be? This can be hard to gauge sometimes, but in general avoid anything that looks to have cheap construction. The number one failure point is the cord, so make sure it is strong and well anchored so it cannot pull out. Headphones that feature a 90 degree plug are often desired to reduce strain and prevent the plug from pulling out due to a simple tug on the cord.Some top end models feature replaceable cords so you can carry a spare. I prefer to simply carry a complete spare set of headphones. 7. Finally, be aware that the newest metal detectors are coming equipped with built in wireless headphone capability. Early versions have either been standard Bluetooth, which is too slow, or some faster proprietary method. Standard Bluetooth has a significant lag between detecting a target and the actual audio response heard in the headphone which is bothersome to most people. The problem with proprietary is that you are stuck with very limited options as to headphones. The best option currently for most people is aptX Low Latency (aptX LL) Bluetooth, which is fast enough that most people are satisfied with the speed, and options abound in the choice and style of headphones. To sum up, if buying headphones at Big Box Inc. at the least you'd probably want a set with a stereo/mono switch, 1/4" jack, and volume control/controls just to make sure it will work on most any detector. But remember that headphones are like tires for an expensive sports car. They are one of the only important items on a detector you can customize for optimum performance, the other being search coils. Finding the set of headphones that is just right for you can make a real difference in detecting success, so it deserves some effort in getting the right set. This is where a local dealer with a good selection who is willing to let you try them all out on your detector can really help you out. ~ Steve Herschbach Copyright © 2009 Herschbach Enterprises1 point
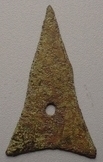
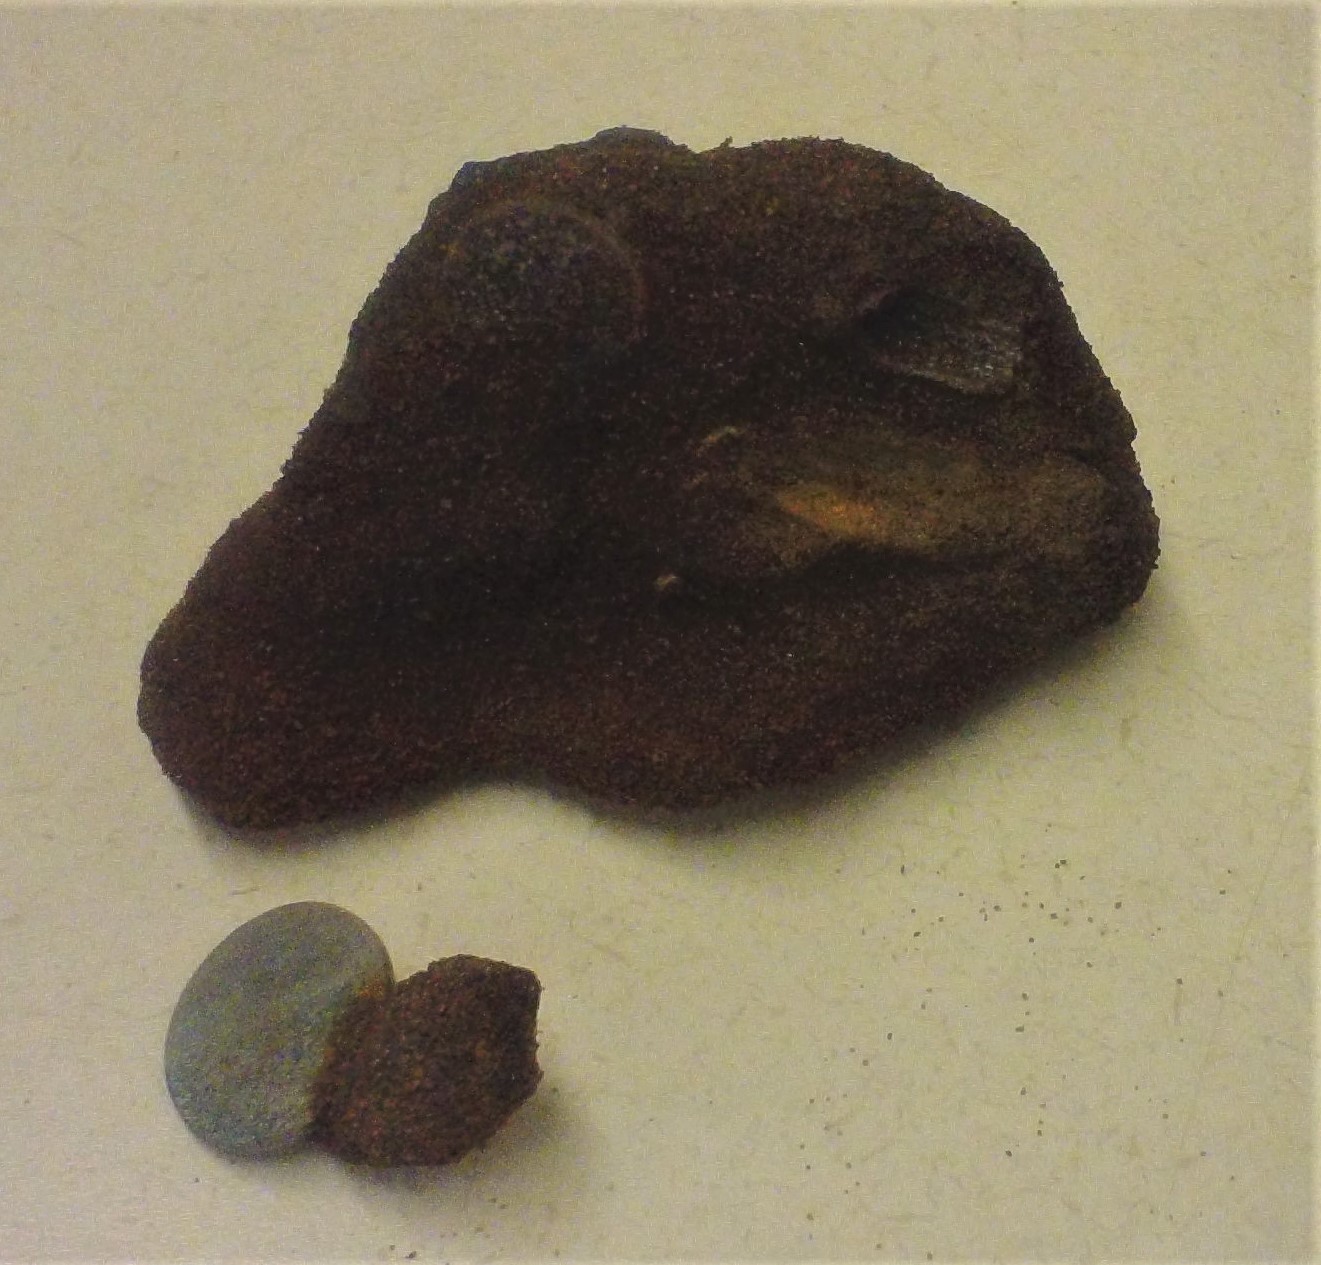


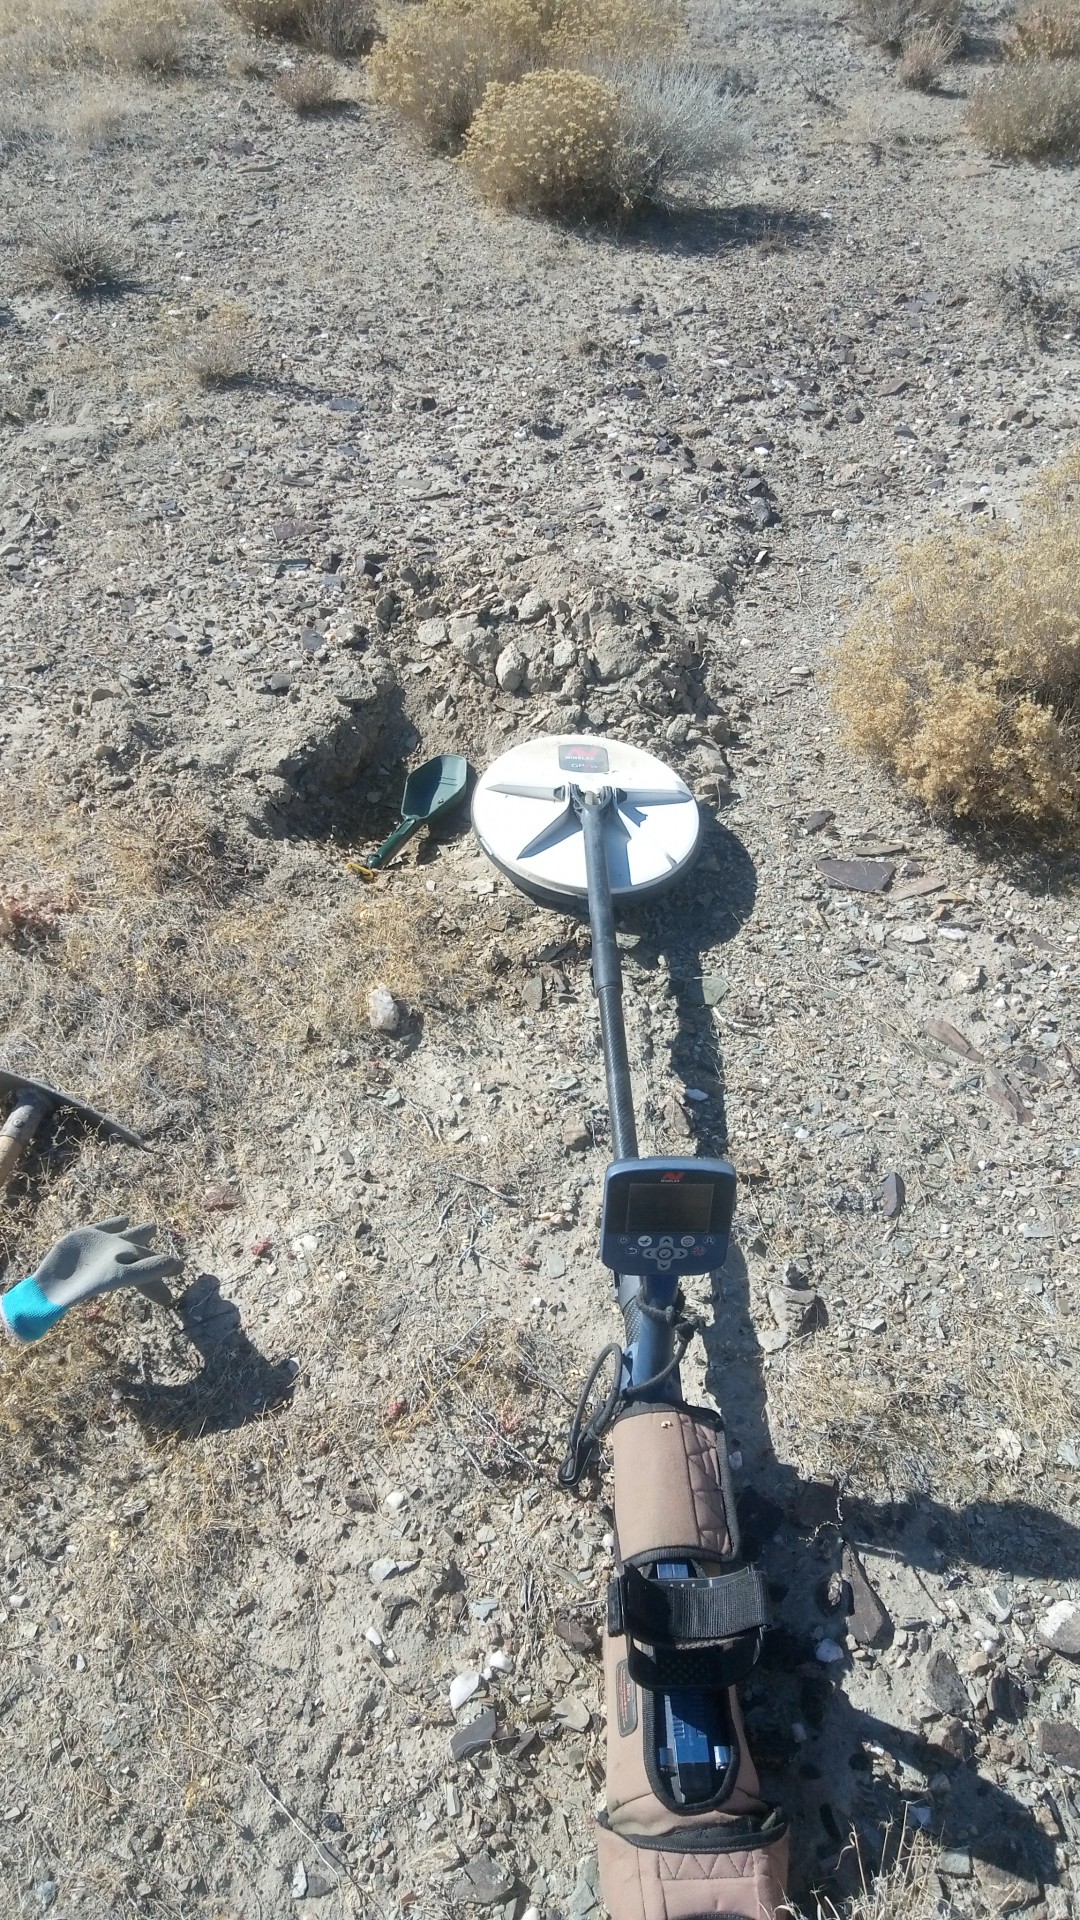

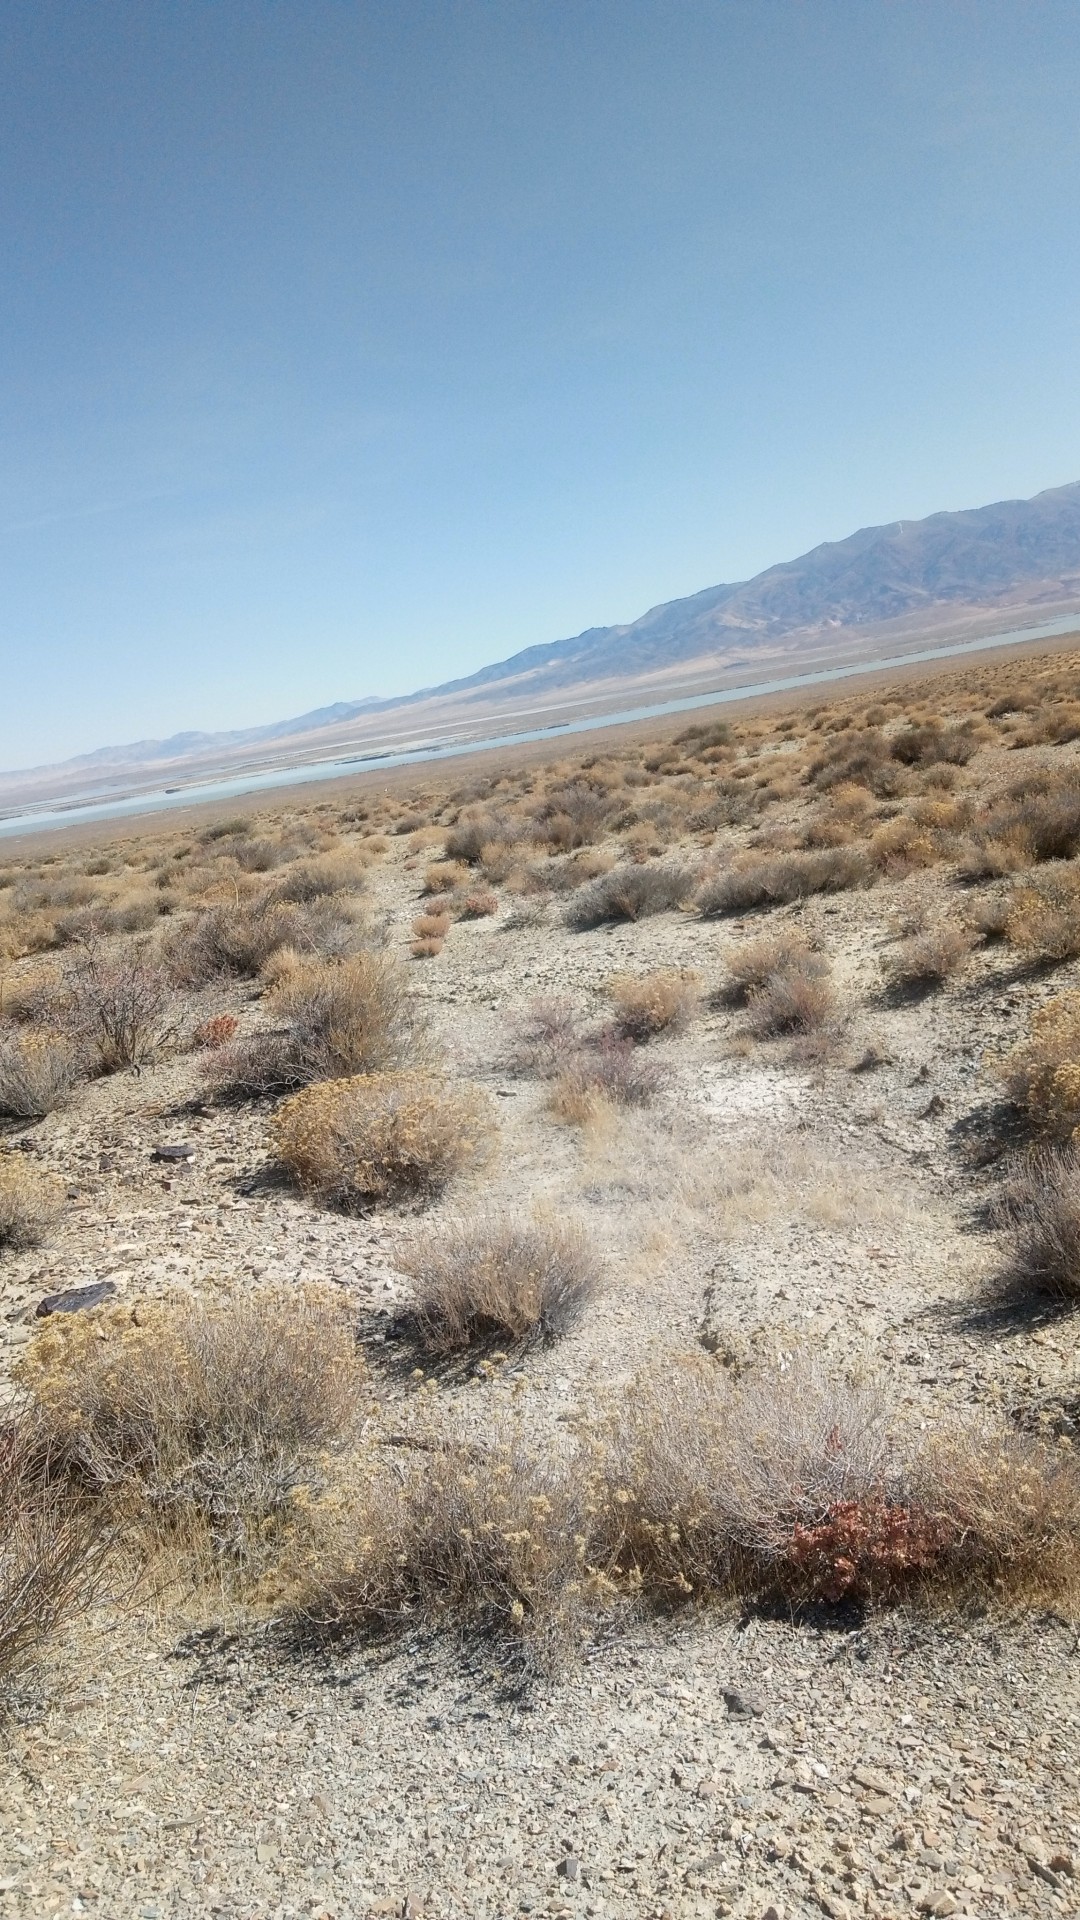


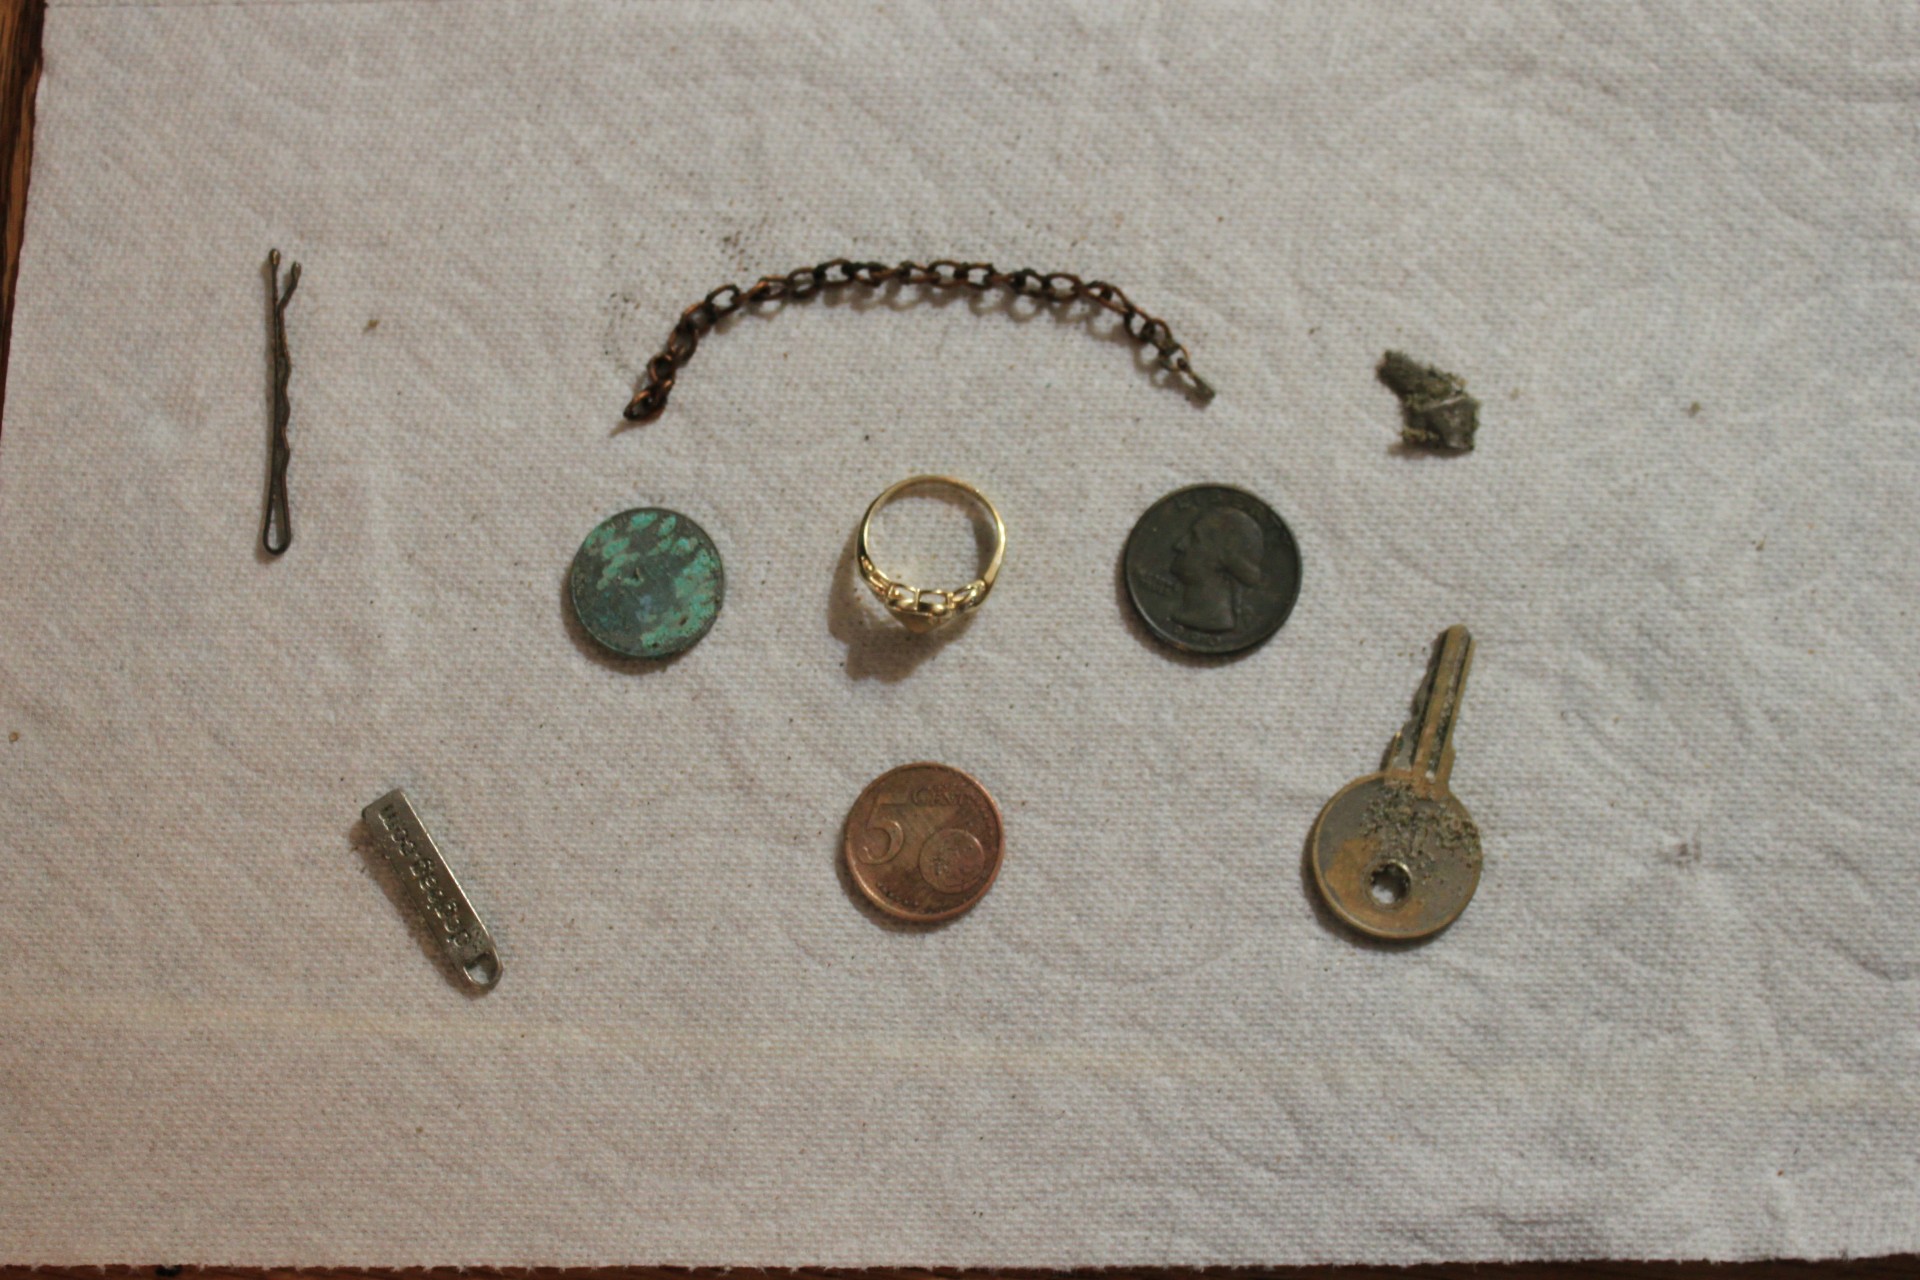


.thumb.jpg.ac5e8ee36e43bcab745dbc623fcf1874.jpg)