I've been a longtime fan of the White's Goldmaster series, but I was really annoyed when White's put the machine into the XLT packaging. I like to keep weight off my arm, but more importantly I work some very steep hills where putting a machine down can be a problem. The unit will simply roll to the bottom of the hill. I also work in muddy conditions a lot and so I do not want to set my detector down in the soup.
A little history. Prior to 1990 the White's Goldmaster was a simple T/R detector housed in a blue aluminum box. Those old obsolete models should be avoided by all but collectors because they could not ground balance. Around 1990 White's introduced the Goldmaster II, which featured a new black paint scheme. These black box models since 1990 are all quite capable 50 kHz nugget hunting detectors. The Goldmaster II used a S rod design that allowed the control box to be mounted in several locations on the rod, plus removed completely and either chest or hip mounted.
This design was popular with prospectors. I still remember clearly the huge fuss when White's introduced the Goldmaster 4/B around 1998 and put it in the same one piece control box as was used in White's coin detecting models. This was no doubt partly a cost saving measure but also to accommodate a much larger circuit board as the Goldmaster series made the move from analog to digital. The Goldmaster 4/B was an hybrid analog/digital design that preceded the microprocessor based White's Goldmaster GMT.
The dealer network raised a fuss and Jimmy Sierra in particular was incensed by the design change. He prevailed on White's to make a run of "chest mount only" models that basically took the handle and pod assembly and stuck it in the middle of the control box. A cumbersome design if there ever was one. It was also basically kept secret from anyone but Jimmy's dealers and so the chest mount only model is a rare Goldmaster indeed. This move coincided with Fisher introducing the Gold Bug 2, which at 71 kHz was hotter than the 50 kHz Goldmasters, plus had the hip and chest mount options with an even more compact design than the Goldmasters. Goldmaster sales plummeted and the Gold Bug 2 took over. The very unpopular Goldmaster 4/B was replaced by the 48 kHz GMT, a totally new microprocessor design.
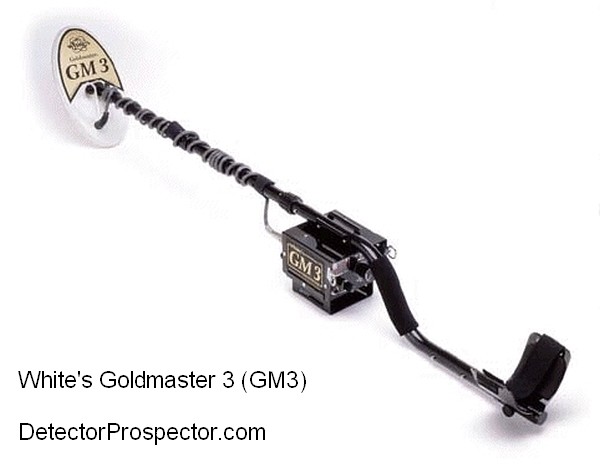
White's Goldmaster 3 (GM3) - last analog model, last with removeable control box
Starting about 1990 the sequence was:
White's Goldmaster II (1990) - new 50 kHz model, on S rod with removeable control box.
White's Goldmaster V/SAT (1994) - added Variable Self Adjusting Threshold (V/SAT) control, on S rod with removeable control box.
White's Goldmaster 3 (1996) - Added frequency offset, boost options, three piece rod standard (optional in previous two piece models), on S rod with removeable control box. New DD coil replaces concentric coil used on previous models. Widely considered the best analog Goldmaster.
White's Goldmaster 4/B (1998) - Added meter on a pod for iron discrimination, non-removable coin detecting type box design.
White's GMT (2000) - Completely new 48 kHz microprocessor model, non-removable coin detecting type box design.
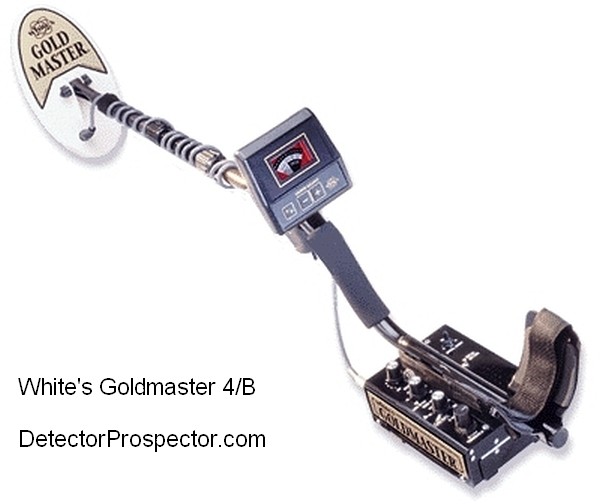
White's Goldmaster 4/B with the new "coin detecting" control box design
I really wanted a new White's GMT. The automatic ground balance and LCD iron readout are very good. So I thought about what I might do to get what I wanted. A GMT to chest or hip mount. White's makes a chest mount version, but it has the darn handle/pod sticking out the front where it blocks vision and is prone to getting hit while digging. And for hip mounting it bumps into things.
White's Jimmy Sierra GMT chest mount
I went ahead and bought the chest mount version, but the following conversion can be applied to the standard model as well. I went with the Jimmy Sierra special chest mount model as a starting place since the rod assembly is already a separate item. 2011 Update: White's does not make their chest mount version any longer.
First step... take it apart! Here is the unit in parts, with a close up of the main board:
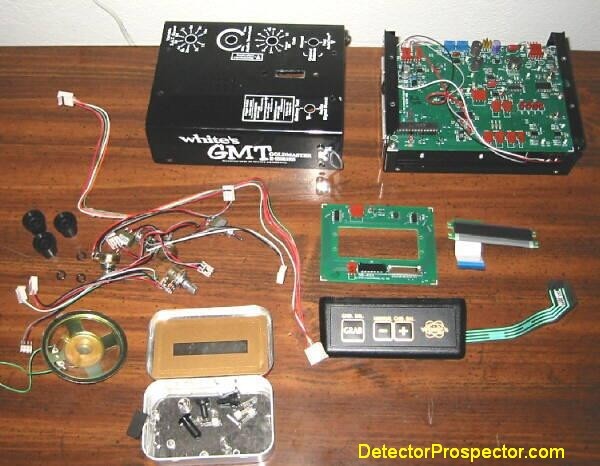
White's GMT components disassembled
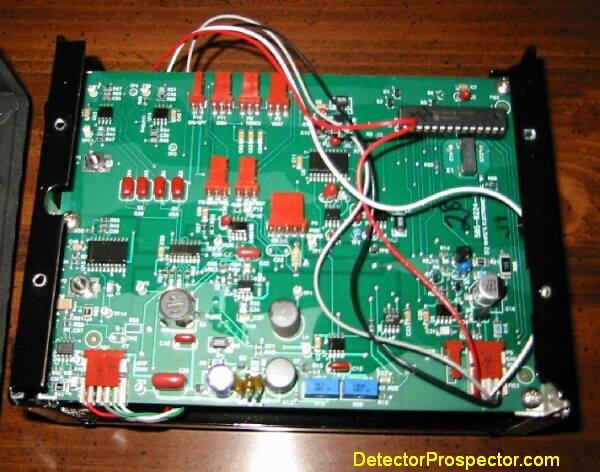
White's GMT circuit board
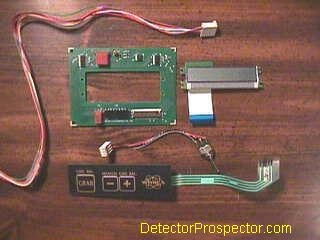
White's GMT pod contents
The main board is clearly marked with what plugs where. Nice for reassembly. I took the pod apart, and ground the touchpad mounting down to just the pad itself as it was glued on too well to pry off. The LCD plugs into a mini circuit board in the pod, along with the trigger switch. Then a long cable runs through the handle and to a plug in the center of the main board.
I wanted to chest mount the unit with the coil cable and headphones running out the right side. This meant the LCD would have to be mounted on one side. That particular side does not have enough room to flush mount the LCD into the case, so I decided to cut a hole in that side and mount the LCD on the outside of the case. This meant the mini circuit board would have to be mounted inside the case lid where the speaker resides. I am a headphones guy anyway, so out came the speaker.
You could flush mount the LCD on the other side and retain the speaker, but then the coil cable will exit on the left. Good for lefties, however! You might even be able to do it the way I did and keep the speaker, but my fingers are not the most adept, and I figured I could use the extra work room.
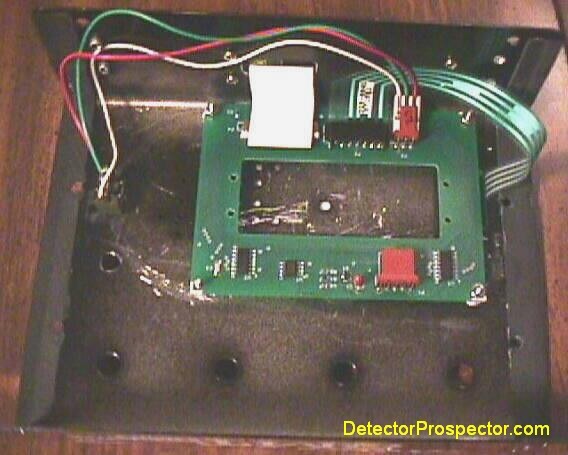
Mounting the pod circuit board
The picture above shows the positioning of the mini circuit board inside the lid. The white ribbon cable runs out to the LCD. The green ribbon cable runs out through a hole I cut in the lid to the touchpad. I glued the touchpad on the outside of the case. More on that in a minute. The wires run to the new trigger switch location. I mounted the board on short spacer posts.
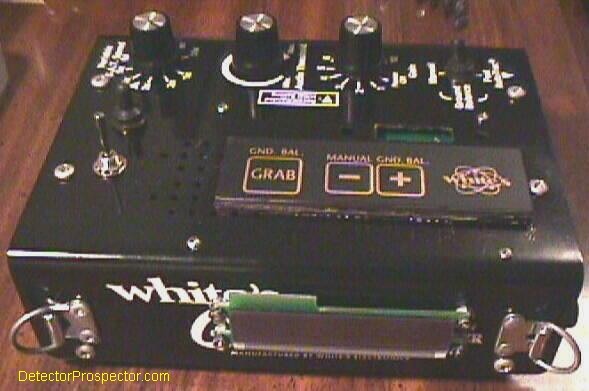
Mounting the touchpad and LCD display
The picture above shows you where we are heading. The LCD is mounted outside the case. The LCD was mounted using the hardware that originally mounted it to the mini circuit board. A D-Ring has been repositioned to the left. The touchpad is glued down partially covering the speaker holes. The rectangular hole in the case was left after removing the handle. You can see the new trigger switch location. I'm going to replace this switch with one of the rubber capped types.
The touchpad covered the battery check/audio boost switch, so it was relocated to a position below the trigger switch. I had to lengthen the wires to do this, the only soldering involved. As I look down at the LCD, I can easily operate the switches and pad with my left hand. The switches are set so I can push down on them to activate the battery check or iron id accumulate mode.
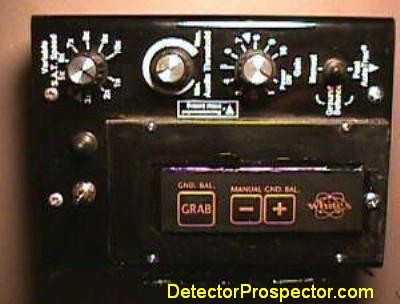
Relocated touchpad
I cut an aluminum faceplate to cover all the leftover holes and glued it in place. Painted it all black so it would look halfway ok. If I had it to do over again, I would make the faceplate at the same time as I was mounting the touchpad. It was hard to make the faceplate after the fact, and I had to dismount and remount the mini circuit board to drill the bolts mounting it through the faceplate. Better to glue down the faceplate and pad as a unit, THEN drill the holes for mounting the mini circuit board.

Relocated LCD display
This turned out to be the hardest part. I originally figured I would be able to find some kind of clear plastic box to glue over the LCD to protect it. I cruised aisles in Lowes, Kmart, and Fred Meyer for hours looking for any kind of little box I could cut down and use. Finally I decided to make one.
I got a piece of oak trim about 3/8" thick and made a bezel. I found a piece of thin plastic and made a window for it, and glued the window onto the bezel. I cut the original LCD stick-on window (the one that says "% probability of iron") down and glued it in place over my window. Finally, I glued the whole assembly over the LCD.
Imagine my surprise when I tested it out after the glue had set up and the LCD was missing half its pixels! I was bummed. I took the case apart and wiggled everything. The unit was working fine, just the LCD was acting funny. Finally I pried my carefully placed cover off and looked the LCD over. No obvious problems. It was still just barely readable, however, so I figured the heck with it, and glued the cover back on. After it set up, I tried it again, and now the LCD was almost totally blank!
I was using a glue called E6000 that bonds most anything. I decided that somehow the fumes from the glue had somehow "poisoned" the LCD. So I put a lamp on the unit and blew air in it periodically. And behold, the LCD slowly came back to life! Whew!! I cruised the net looking for info on this weird problem, but never did find anything.
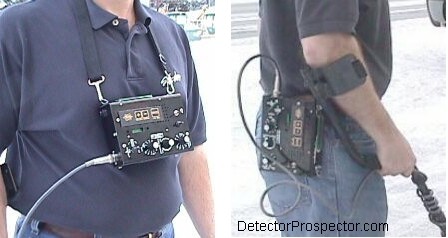
GMT conversion chest or hip mount
So here is the final product. Actually, as you can see, I took these before I did the trim work. The chest mount is just for show. I need to rig up a full harness. But I'll tell you what... I really liked it. Everything right there where I need it, but well out of harms way. The alternative hip mount setup is better than the original by far, but I liked the chest mount so much I will only use it like this where there is no trash to deal with. I'm still looking for that spot!
So there you go. This is not for the faint of heart. It was the first time I had done a mod this extensive, and it was a somewhat scary feeling to be tearing a brand new detector apart. Kiss that warranty goodbye! But now I have a unit I really like that will work well on steep slopes and other odd spots. Not to mention give my arm a break. The GMT is very well balanced, but every ounce counts when you are at it for 10 or 12 hours at a time.
A final note. You could leave the pod on the handle and route a longer cable from it up the coil cable and to the control box. But I wanted the pod off the handle entirely, and adding more cables seems like a way to ask for more problems down the road. I know another guy that has now done this mod after seeing mine, and a third is at work on his. Maybe some people going to all this effort will tell White's that their old box design was better.
Postscript: After the above post was made I took my new White's GMT chest mount to Ganes Creek, Alaska for a real world nugget hunt. The unit worked as I hoped and then some. Here is a picture of it and the 1.89 ounce gold nugget it found for me!

1.89 Oz nugget found with White's GMT chest mount conversion
~ Steve Herschbach
Copyright © 2002 Herschbach Enterprises
-
 6
6
-
 1
1