Jim Hemmingway
-
Posts
251 -
Joined
-
Last visited
-
Days Won
1
Content Type
Forums
Detector Prospector Home
Detector Database
Downloads
Everything posted by Jim Hemmingway
-

End Of The Season At The Cabin
Jim Hemmingway replied to IdahoPeg's topic in Detector Prospector Forum
Hello Peg…the distant photo looks to me to be more wolf than coyote, but that is only an impression. It is possible that it could be a hybrid despite that in natural environments historically we observe that wolves do attack and kill coyotes. But here in Ontario a highly unusual phenomenon has occurred in recent natural history. The Grey Wolf of Algonquin Park has mated with our traditional Eastern Coyote to produce a new species classified as the Coywolf. These animals reproduce and grow to approximately double the size of the Eastern Coyote. The adult male Coywolf generally tips the scale at about 80 lbs. Barking, howling and yipping is typical nightly Coywolf behavior, particularly as the summer season advances to autumn. Field studies indicate that these animals exhibit typical coyote behavioral patterns, and have quickly migrated across the eastern part of the continent to the Atlantic coast. The last article I reviewed a few years ago was about the Coywolf population in Chicago, so indications are that this animal is able to migrate and adjust to different habitats similar to coyote populations. At the moment I have no idea how far west Coywolf populations have been established. The link below briefly overviews the Coywolf activity in Ottawa, Ontario. https://www.cbc.ca/news/canada/ottawa/residents-wary-afraid-increased-coyote-activity-1.4158127 On a different note, congratulations on a successful season Peg, your gold looks just dandy and your claim looks like a bit of heaven. All the very best to you over the winter in Florida, and let’s hope that you can find some of that elusive Spanish Gold!!! Jim. -
Odd Beach Find?
Jim Hemmingway replied to Kevin Walenciak's topic in Rocks, Minerals, Gems & Geology
Hi Kevin… I think that oldmancoyote and Jeff have probably nailed down the more likely alternatives for you, given the location. Its moderate depth in Florida sand leads me to suspect that it is probably a manmade ferrous object that may have reached that depth over some number of years with the ensuing obvious corrosion. As Steve mentions, it is difficult to assess just what types of corrosion products exist on your sample. Iron metal corrodes to rust and manmade rust is a form of iron oxide called maghemite, which frequently does react to metal detectors depending on its physical characteristics, the ground conditions, the type of metal detector, and how it is operated. I very much doubt that a chunk of magnetite would naturally occur in your area. As mentioned above, limonite is a generic term describing a number of hydrated (containing water) iron oxides that can present themselves in different ways and in vastly different environments. A good example is to recall driving along a highway that has been blasted / cut through pre-existing igneous rock that could be comprised of any one of several different types of rocks. Iron is a very abundant element and in all probability does exist within such rocks. Upon exposure to weathering, even trace amounts of ferrous material will oxidize to form a natural rust on the exposed surface of those rocks. This is a good example of why limonite is described in mineralogical texts as “Nature’s Rust”. It is typically the goethite constituent that produces generally brown soils in temperate regions around the globe. My limonite samples produce no effect on a PI metal detector and very little on a VLF detector. It exhibits relatively little magnetic susceptibility and incidentally can be characterized as having a fairly low magnetic loss angle, thus permitting it to occupy a somewhat similar area to magnetite on VLF ground phase readouts. But it simply has no ferromagnetic strength that is comparable to magnetite or maghemite. Hence, I rather do think something metallic within your sample has produced the signal. The photo below depicts another commonplace example of what is described as amorphous (without shape) limonite. The F75 GB45 compensation point should ensure that all iron oxides produce only a negative threshold signal and that is the case. This sample does not react to my TDI Pro at the sensitive 10 usec pulse delay, small mono coil, full gain, and with ground balance turned OFF.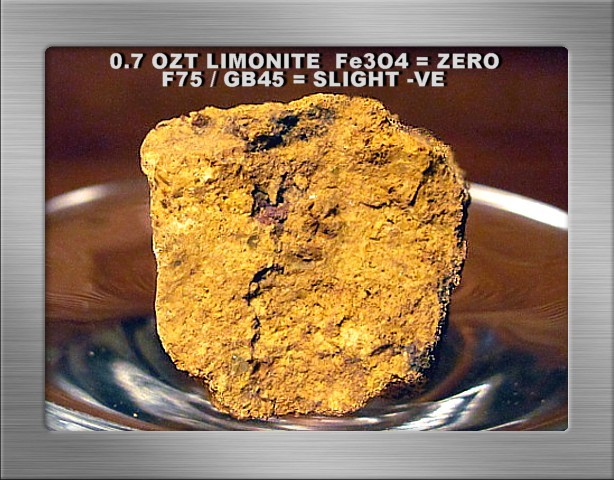
-
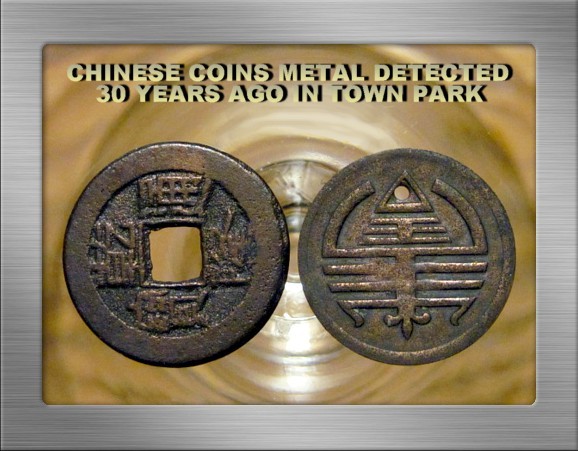
Hi Cal_Cobra… well I suppose you might call it a bust, but frankly I enjoyed reading your post and viewing your relic finds. I find that my interest in relic hunting has increased a good deal because of the contributions to the forum from you and others. On occasion some remarkable coins and artifacts are recovered, and that is exciting. But I think what attracts me most to relic hunting is the historical significance of the artifacts and how they were used by North America’s native residents, our colonial forefathers, and the following generations who lived each phase of our history. Then too, pursuing the identification of relic finds is a challenge, not to mention the accrued knowledge about these artifacts and related activities from so long ago. All this is to let you know that your contributions are much appreciated by us. Incidentally, I’ve found a few of the old Chinese coins over the years as depicted below. It’s all quite interesting to me, please keep up the good work, and thankyou for the just excellent illustrative photos………………..Jim.
-
Hi William… here in northeastern Ontario, we do most of our prospecting for native silver in the motion all-metal mode. There are occasional exceptions where excessive trash is encountered as described further below. Let’s take a look at how we operate this unit up here. The motion all-metal mode, that conveniently features a target ID, is deeperseeking and more sensitive to ground conditions and to small nuggets than are the discrimination modes. This mode is particularly effective for searching over rough, variable terrain where ‘low and slow’ scanning is necessarily dictated by such conditions, for example, poking the coil between and around boulders. We also prefer its comparatively unimpeded target-sizing ability to better assess what is happening beneath the searchcoil. When searching in the motion all-metal mode, use as much sensitivity as the ground conditions will permit while maintaining stable detector operation with a reasonably smooth threshold hum. Adjust the threshold as low as possible but still able to hear a faint mosquito-like hum. Many senior hobbyists have experienced hearing loss, therefore it is even more important to adjust the audio pitch to a level where you can most easily hear faint target signals. Set it appropriately and leave it alone. I use NuggetBuster headphones to help me hear weak target signals. The original F75 provides two features to ground balance the detector. The manual GB effectively does it all, including slight GB adjustments to offset neutral GB settings to perhaps enhance depth / sens to small nuggets or possibly to subdue various ground / hotrock effects. The ground balance procedures are described in the manual so we won’t go over it here. (a) The important thing to remember at all times, particularly when searching over tough ferromagnetic ground, is to ground balance to the same elevation above the ground that you will be scanning the coil. Otherwise over tough ground you will undoubtedly experience false signals. (b) If the ground mineralization prevents you from obtaining a ground balance, you must either switch to a smaller coil (DD coils are more effective at reducing the effect of tough ground) and / or reduce sensitivity. For nugget hunting you will likely be using a small sniper coil anyway, so reducing the sensitivity is the only remaining alternative to achieve a good ground balance. The alternative ground balance procedure is to use the autograb feature by pressing and holding the “trigger” forwards while bobbing the coil a few inches as described in the manual. It’s convenient, fast, and accurate. The autograb GB feature can also be used to supply additional information about a suspect target, but the technique described below benefits from using a concentric coil rather than a DD coil. Prior to disturbing the soil, pinpoint the target and do an autograb GB over it. Pump the coil four or five times but no more, and allow the software to function as designed. Note any movement on the ground balance scale readout. We find that positive signals from rusty iron, cobaltite, niccolite, and pyrrhotite generate significant GB reductions frequently shifting from typical search mode GB86 readouts right down into the GB40s. Positive diabase “hotrock” signals produce a relatively small GB reduction. But fortunately native silver samples free from either cobalt or nickeline contaminants will generate little or no downward movement to more conductive GB values. You will experience some questionable responses at times that will require some interpretation based on your knowledge about local minerals and field conditions. The GB information provided by this technique can be ignored if in doubt, or it can be used in conjunction with target ID and target-sizing to evaluate suspect signals. We practice this procedure to eliminate unnecessary digging in difficult rocky substrates. In a prospecting context, we utilize iron discrimination in areas where hotrocks or ferrous targets are excessive to the point where effective detecting is either inefficient or no longer enjoyable in the motion all-metal mode. We all encounter areas that are so inundated with blaring signals from small bits of iron trash such as tiny nails and tacks, non-descript shards, and interminable wire scraps that effective detecting in the motion all-metal mode is frustrating or next to impossible. In such conditions we use smaller coils to help with separating target signals, and we make good use of small iron discrimination or iron tones. Try adjusting to small iron discrimination levels initially as suggested above by Steve, give it a go and make any further adjustments according to what you can tolerate. This will depend on the amount of trash you’re willing to dig. Using iron tones or iron discrimination will result in overlooking deep non-ferrous targets that occasionally do target ID as iron. But it is a necessary compromise to at least enable us to enjoyably detect excessively trashy sites. Hotrock discrimination is somewhat different from small iron discrimination in northeastern Ontario. By and large we deal with non-conductive mafic hotrocks, diabase is usually the culprit that can produce either positive or negative signals just depending on circumstances, while conductive pyrrhotite hotrocks are mostly responsible for producing positive signals. There are other minor conductive nuisances, for example infrequent bornite and even more rare graphitic rocks. Pyrrhotite signal elimination is straightforward. Large samples may target ID into the low foil range, but most of it is eliminated with mid-to-upper iron range discrimination. This material in abundance renders entire sites unsuitable for detecting with either VLF or PI units. Discrimination settings do vary according to how each discrimination mode processes our non-conductive diabase “hotrock” signals. For example, all discrimination modes eliminate signals from negative diabase hotrocks at a zero discrimination setting. However while both the DE and PF modes require a discrimination setting of “1” to eliminate positive diabase signals, the higher gain JE discrimination mode requires a full iron discrimination setting of “15” to achieve the same result here. Hotrocks in your area may vary considerably from our experience. The only other suggestion that occurs to me at the moment is to equip your F75 with a small coil for gold nugget hunting. Small coils are far more sensitive to small nuggets than is the stock DD coil. There really is no comparison. The 6½-inch elliptical sniper concentric coil is superior in my estimate, although the 5” round DD is a very close performer over my ground. A further advantage to these small coils is that they permit using higher sensitivity settings in prospecting country because they obviously see much less ferromagnetic ground mineral than do the larger coils. I hope the foregoing will be of some use to you. There undoubtedly will be differences in the ground conditions, the hotrocks, and the trash levels in your areas. Good luck with everything William, and welcome to the forum!!! Jim.
SF.JPG.3e5e1f1525de2b984b01be06895f3756.JPG)
-
Hi Norm… both these minerals are fairly common in the areas that I explore, but there is normally no gold associated with them. That aside, I did like viewing your photo layout, particularly the doubly-terminated, stubby little quartz crystal located at the bottom edge. Commonplace quartz in its various color schemes is my overall favorite mineral, in part because specimen grade samples are fairly easy to find and quite durable. The cubes presumably are iron pyrite. Iron pyrite abundantly occurs in quite a variety of environments because it forms under a wide range of conditions from high temperature ore veins to coldwater sediments. Interesting to see that a couple of your examples are transitioning to an iron oxide, nature's rust generically called limonite but that possibly may include maghemite. I’d like to find something similar for my mineral collection. As mentioned above Norm, that little yellow nugget in the middle of your display is the best indicator of where to search for gold. Hobbyists should look for gold where gold has previously been found, preferably in quantity and detectable size. I consider that to be the first principle of metal detecting for precious metals and put it into practice to search for native silver in northeastern Ontario. Jim.
-
Whites Spectra V3i Ground Test
Jim Hemmingway replied to EL NINO77's topic in Metal Detector Advice & Comparisons
Hi EL NINO77… thankyou very much for producing this excellent video that illustrates your multi-frequency metal detector’s responses to a wide variety of targets in your test garden. I found it particularly interesting because I’ve always enjoyed using White’s coin hunters, although I’ve no firsthand experience with the White’s V3i. I won’t discuss the pros and cons of test gardens other than to mention to you that obtaining stable, correct target ID on deeper targets, say beyond four or five inches (depending on target size and shape) in my highly iron-mineralized magnetic susceptible test bed is not possible. Thus I recognize the potential value of your multi-frequency pinpoint bar graph to assist with target signal analysis. That feature strikes me as a quite valuable tool to help with the decision of whether “to dig or not to dig” depending on just what type of targets one wishes to recover from a site. I do think that relative side-by-side test plot depth comparisons are viable, despite that we realize that those depths may or not reflect depths obtained in real world scenarios where targets naturally settle into undisturbed ground. In natural undisturbed ground, the electrical continuity of the soil and the naturally occurring magnetic susceptible iron mineral fraction of the soil remain intact. These conditions should provide a depth advantage over disturbed test plots generally. I mention this because my ten-year-old disturbed ground test plot targets still do not generate depths or target ID reliability that can be had on similar undisturbed ground targets recovered in this same area. The foregoing comments are not intended as a criticism but rather are just some observations from my test plot and general area. I do think test plots are a valuable aid to learn more about one’s detector within the constraints as described above. And incidentally, our observations from disturbed ground test plots can be directly applied to detecting other real world scenarios where the ground is disturbed, for example urban renewal projects. We learn not to trust target ID on penny-to-quarter size targets beyond shallow depths in such conditions. Thanks again for the effort required for you to produce this instructive video. It takes a lot of work just to get to the point of producing a coherent video. I found the video easy to listen to because there was no background wind noise, and your voice came across pleasantly clear and your thoughts were perfectly understandable at all times. We look forward to the next one!!! Jim. -
(6 Inch Coil) Beginner's Luck?
Jim Hemmingway replied to GB_Amateur's topic in Minelab Equinox Forum
Hi GB_Amateur… thanks for sharing your recent coin hunt with us. I thoroughly enjoyed reading this presentation and particularly appreciated that you provided a detailed description of your observations and thoughts at the time, and the settings utilized with operating your detector. It was such an informative and interesting read, thankyou. Congratulations on your coin recoveries, the silver coins are always a welcome addition to our collections, and especially that handsome Barber dime. It appears to be in remarkable shape, not bad for a coin that is 106 years old and has likely spent most of those years in the ground. I would think the war nickel ought to clean up nicely too. I’ve found a few over the years, and have been quite pleased with how easily the stains were removed using a brief (mild solution) electrolysis followed by a very light finger application of a silver cleaner (Goddard's Long Shine Silver Foam) / water paste followed by a warm water rinse. Of course I’m not at all concerned about any associated value when employing such methods, but just want the coin to look nice. Below is a photo of a very ordinary but fairly representative dug example that I've cleaned using the described technique. Thanks again for putting together this excellent post, including the nicely illustrative photo of your coin finds………………………Jim.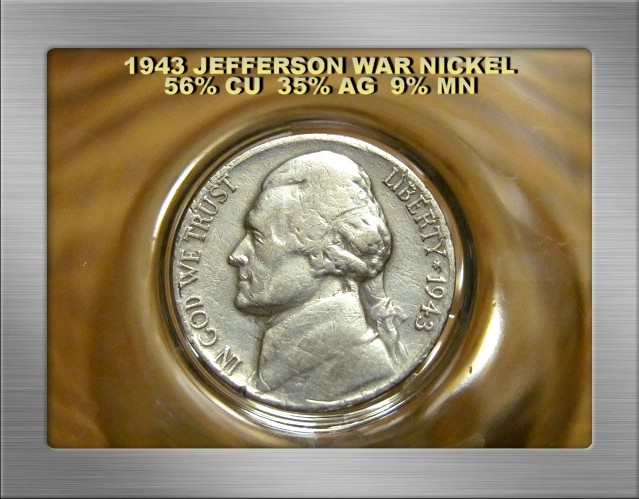
-
Granite is not a metaconglomerate. Rather, it is an intrusive (plutonic) igneous rock normally comprised of quartz, orthoclase feldspar and another dark material, for example biotite (black) mica............ Jim.
-
Hi Simon… I realize that your T2 is somewhat different from the F75. But let me describe how I operate the original F75 to deal with issues related to EMI. The original F75 version is very much subject to erratic behavior in areas where EMI is present. Hunting urban areas in zero discrimination with the stock 11” DD coil is frequently impossible. I avoid using this coil in urban environs because it is quite vulnerable to EMI issues (extra windings / antennae effect) compared to the 10” elliptical concentric coil, and this is especially true when compared to any of the smaller coils. So don’t hesitate to switch to a smaller coil, preferably a concentric coil if the ground conditions permit. An added benefit if hunting micro jewelry, is that the smaller coils, particularly the 6” elliptical concentric coil, is quite sensitive to small stuff compared to the stock 11” DD coil. In fact I put it to good use for hunting naturally occurring native silver in rocky environs. It’s not unusual to find sub-grain material with this coil. If using a discriminate mode, avoid JE mode in EMI areas. It is extremely high gain, and therefore much more sensitive to EMI than are the DE or PF search modes. Another very useful technique, if necessary, is to increase the iron discrimination level until erratic behavior settles down to an acceptable level. Do this while moving / holding the coil on the ground, and not while waving it around in the air. Keeping the coil to the ground much reduces EMI instability because it reduces the coil’s antennae effect. Adjusting the sensitivity control is not necessarily the final step in stabilizing how the machine behaves in EMI environments. Do as you please with it. Keep in mind that you may wish to limit iron discrimination to about 6 or 7 and no more as Steve describes, depending on your preference. At that point, if necessary, you may wish to experiment with decreasing the sensitivity control to achieve stability. Of course for prospecting applications, and low trash urban areas, the first choice is to search in the motion all-metal mode. It is much less vulnerable to EMI than are any of the discriminate modes. It makes a huge difference. In closing, I should add that in remote prospecting areas, my original F75 is normally as quiet as a churchmouse regardless which search mode, settings employed, or the type / size of coil that is used. On rare occasion we do experience an intermittent EMI induced instability from what I suspect is the local microwave tower. These occasions are always temporary, rarely lasting more than a half-hour…………….. Jim.
-
Thanks Steve for posting this instructive video from Gerry, his presentation was kept simple and straightforward, very easy for casual hobbyists to understand and retain. I enjoy his contributions to this forum because they’re knowledgeable and frequently creative. His technical information is always top-shelf. Jim.
-
Hi Gerry… thanks for an interesting post about native copper from Michigan’s copper / silver mining district. Prices vary with obvious physical characteristics but is especially true with structure. The beautiful dendritic specimens are surprisingly expensive at our mineral auctions. No firsthand experience but I’ve been told that naturally occurring native silver with copper in the same piece pushes pricing much higher. The sample you’ve displayed looks pretty good to me. It’s fairly typical, I wouldn’t want to put a price on it but I’ll bet the hobbyist who found it is just delighted with it. The example below isn’t worth much either, but like many other minerals of modest value, I’m satisfied just to have it in my reference collection. From Michigan’s Keweenaw Peninsula some 30+ years ago, together with some chlorite mineral and calcite crystals………………..Jim.

-
Hi Gerry… congratulations on a very appealing find. Your specimen is attractive precisely because the gold contrasts so nicely with the white, crystalline quartz. I would avoid any form of hydrofluoric acid treatment that would attack the quartz crystals for that reason alone. A rock tumbler could damage both the gold and the quartz depending on the abrasive material utilized. The gold notwithstanding, we don’t want those handsome quartz crystals irretrievably damaged. It really is better to avoid any treatment to naturally attractive samples such as this one. That said, what you want is easily achieved with very little risk of damage. First option before attempting the technique described below for such a small sample, might be to try swirling the specimen for a few moments in a vinegar / table salt solution. I doubt it would attack the quartz crystals but ought to brighten the gold. Similarly, oxalic acid will remove iron stains without damaging the quartz. It is the standard treatment for this purpose used by serious collectors. From the photo at least, the gold could be somewhat delicate, but you might safely use a light gauge circular wire brush without incurring any serious damage. It's a bit risky on such a small sample. These wire brushes are normally supplied with small handheld rotary tools (dremel for example), and without checking mine, I think they’re about ¾ inch diameter or so. Use a slow speed setting, and only allow the brush tips to touch the high points of the gold. Apply no pressure. This will produce an attractive light luster, particularly on the gold high points. The silver sample below is much larger of course, but in appearance is somewhat similar in shape and structure to your gold specimen. It looked very much like your sample insofar as the silver was quite dull with no luster worth mentioning. Below is the final result after using a circular wire brush, but where some light pressure was applied because the sample was sufficiently durable to support it without risking damage…………….. Jim.
-
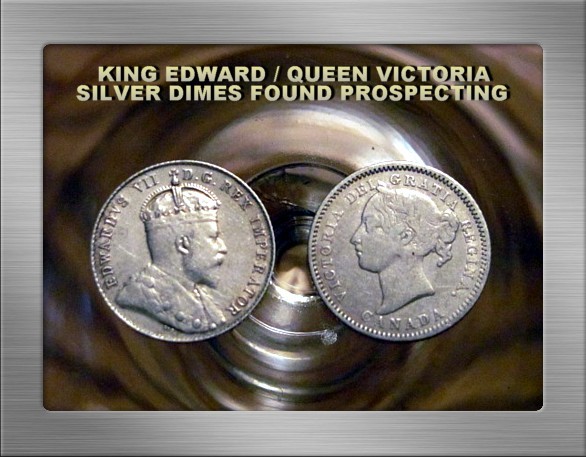
Hi Gerry and everyone... after some 32+ years hunting in northeastern Ontario’s silver country, I have found a few odds and ends, lots of iron relics, older bottles, but only three silver coins. Incidentally I re-bury interesting iron to examine how my detectors react to them once they’ve had a chance to continue the rusting (maghemite formation) process for a few years. When I first ventured north to hunt native silver nuggets and ores, I used to explore widely by utilizing the old abandoned trails and roadways that once serviced the bustling mining camps of the time. Usually I would be hiking about with my old Garrett ADS Deepseeker (equipped with either a seven or twelve inch concentric coil) turned ON. One late afternoon I got a nice little signal and found these two handsome coins together with some large one-cent coppers, obviously a small coin spill from an unfortunate miner. The third silver coin was a 1905 King Edward half-dime found in the tailings of a former high production minesite located within the town limits of Cobalt. I haven’t bothered with a photo because it was slightly bent, but similar to the two dimes in the photo below it was lost in very nice condition. These finds lead me to think that payroll coinage must have come directly from the mint in Ottawa, but that’s speculation, as I’ve never researched it. I think we’ve all experienced finding something nice right at the beginning of an outing (water hunting is a good example with jewelry) and can’t find another good item the rest of the day. And vice-versa too of course. As a water hunter, coin hunter, and prospector I’ve observed this short-term pattern as just described many times. But I’ve only experienced it once over the long-term. I’ve never found another silver coin in that area over the past 30 years……………. Jim.

-
Relic Hunt With The White's GMT 24K
Jim Hemmingway replied to Gerry in Idaho's topic in White's Metal Detectors
Hi Gerry… a very insightful contribution, I found myself admiring your presentation of this detector’s potential versatility, goldhunting notwithstanding. I think it generally can be said that metal detectors, within certain constraints, are indeed versatile instruments. I appreciated those photo illustrations because they do strengthen your relic hunting comments. Congratulations on those interesting relics too. I especially liked the ornate bottle top and the old pocket watch, those are nice keepers. I once found a similar-looking pocket watch, albeit damaged, some 25 years ago while hunting silver here in Ontario. Came across a trashy area downhill from the dilapidated ruins of an old cabin out in the woods, and decided to probe for old bottles. It was mere chance that my aluminum probe happened to strike the watch instead of the many rusty tin cans, and that I bothered to check out a non-bottle “clink” for lack of a better description. But that too is a phenomenon of treasure hunting, the operator is the decisive factor in achieving a successful outcome. And finally Gerry, I think that regardless of the detector model, that you will get the most out of it for whatever application you pursue. It was similarly a genuine pleasure to read about your gold picker recoveries using the White’s V3i. It is fascinating to read your knowledgeable posts and to benefit from your lengthy, successful experience in the hobby. There is no doubt in my mind that you are the most valuable “keeper” that has come our way on this forum. Thankyou for your many helpful contributions, you are appreciated perhaps more than you might realize…………….. Jim. -
My 24K Finds, Posts & Comments
Jim Hemmingway replied to Gerry in Idaho's topic in White's Metal Detectors
"Gerry, I always enjoy reading what you have to post and I believe you inspire newbies and well-seasoned individuals of the hobby that their is coins, jewelry, relics, nuggets and treasure in general to be found no matter what detector brand they are using. Ultimately it comes down to the individual on how well they know their detector and its limitations and then to use that knowledge in a productive area to have success." That goes for me too Gerry, I think your contributions are very knowledgeable and fair. Genuine expertise is self-revealing, and we appreciate all that you do to help us and to promote the hobby. Jim. -
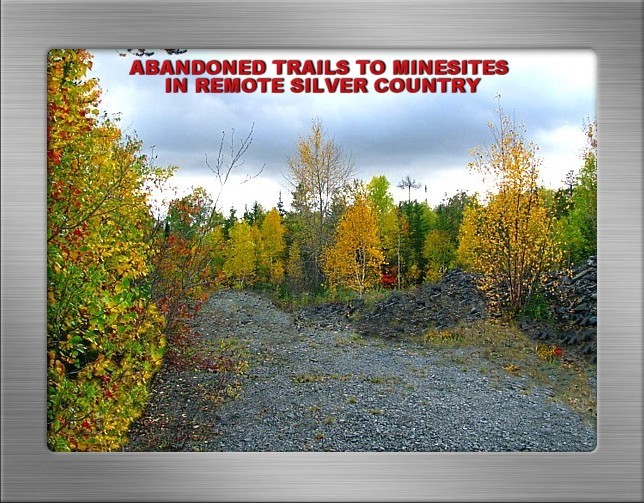
Abandoned Trails In Silver Country
Jim Hemmingway replied to Jim Hemmingway's topic in Rocks, Minerals, Gems & Geology
Thanks for the comments everyone, glad you enjoyed the article. PM sent to you Chuck, thankyou for the interest................. Jim -
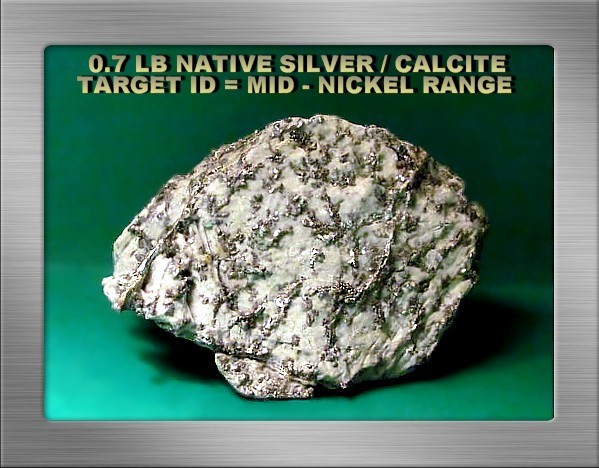
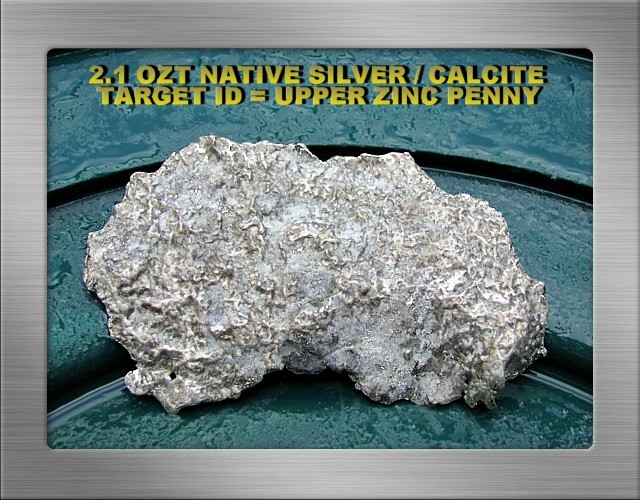
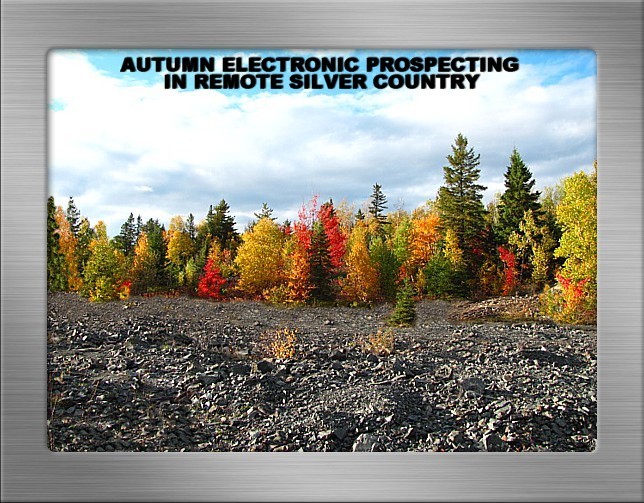
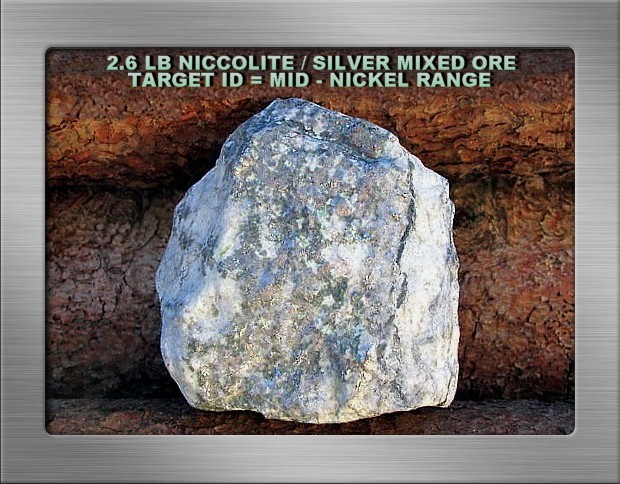
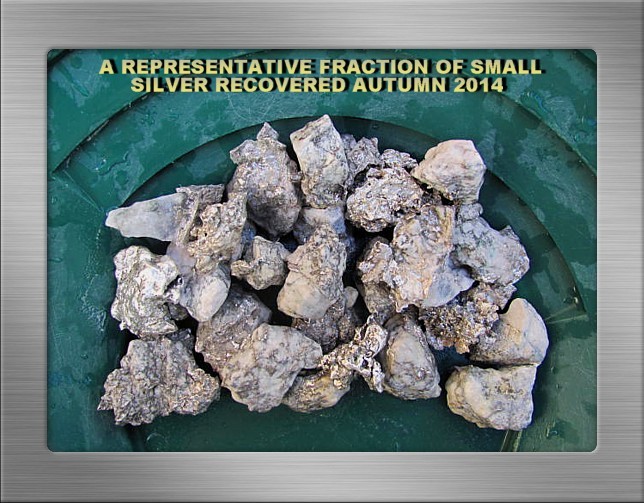
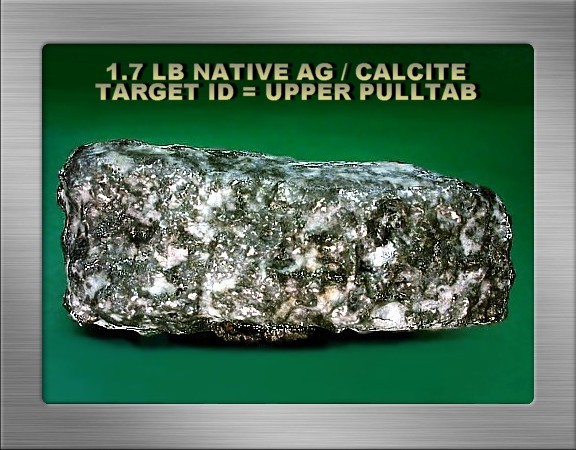
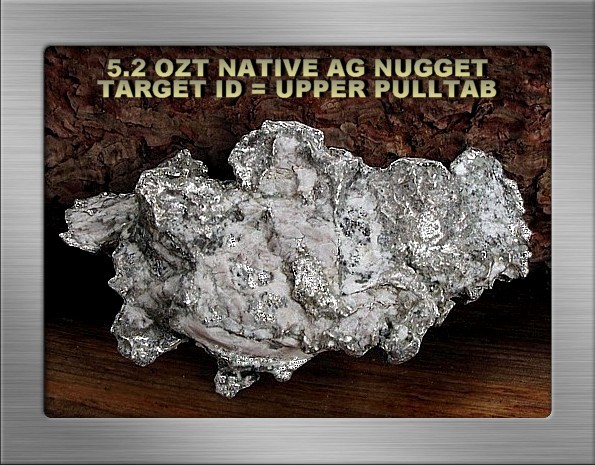
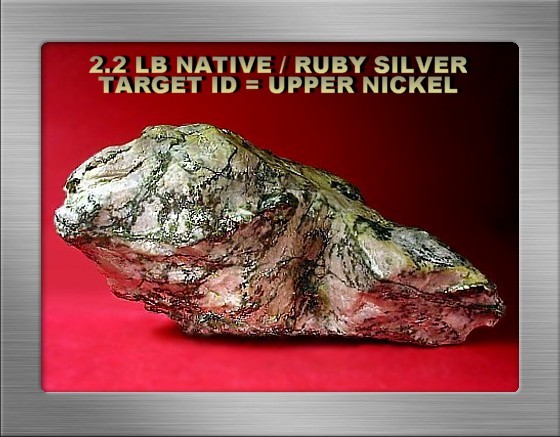
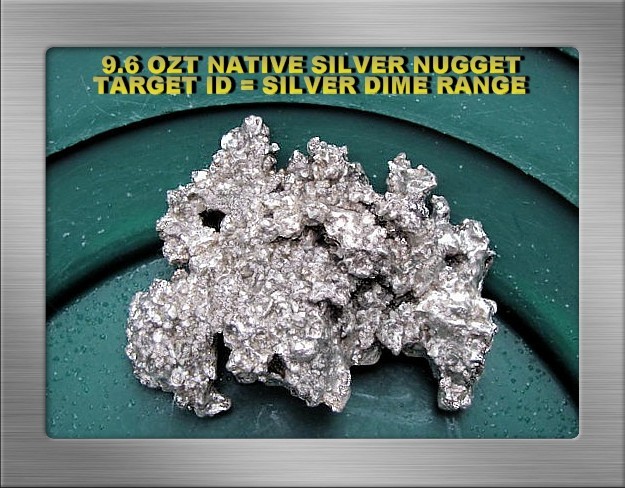
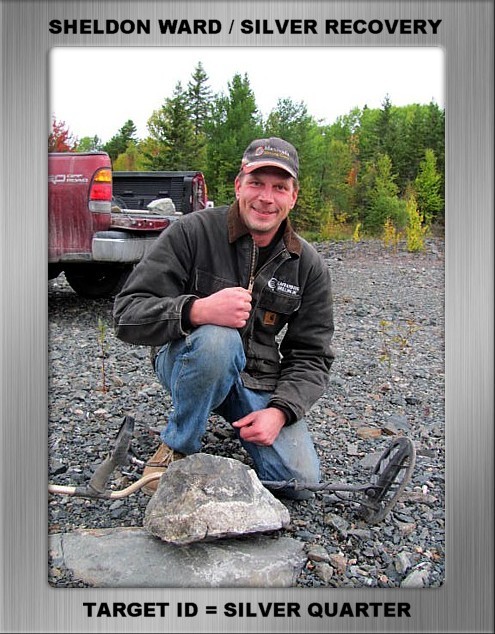
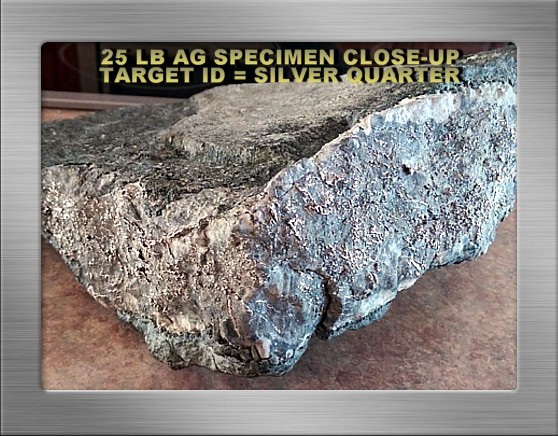
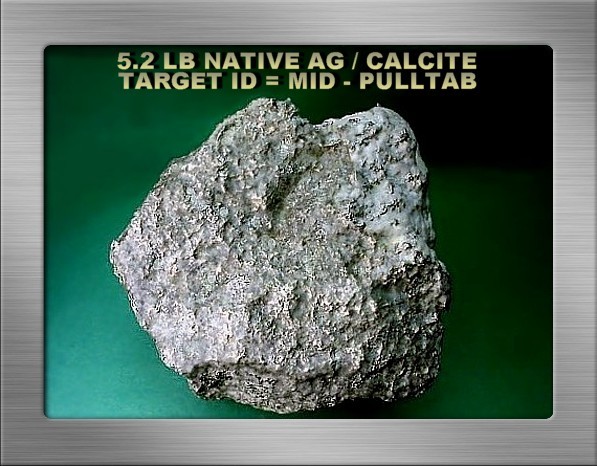
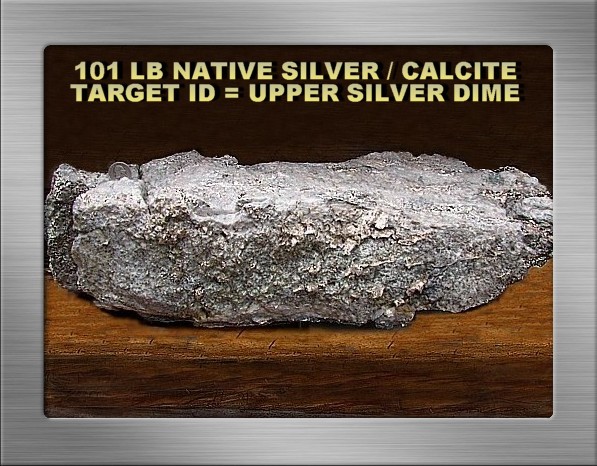
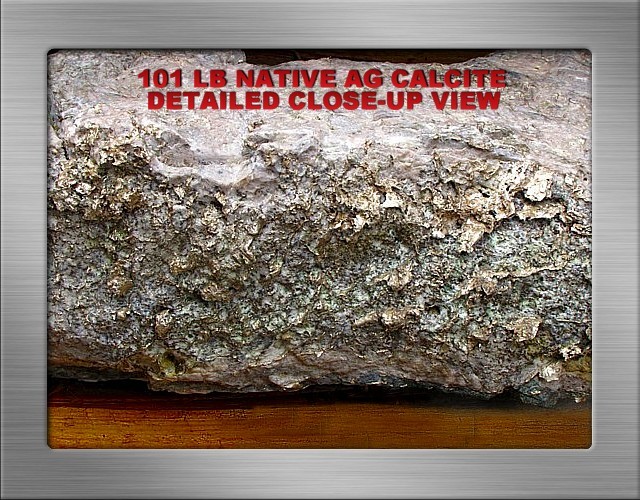
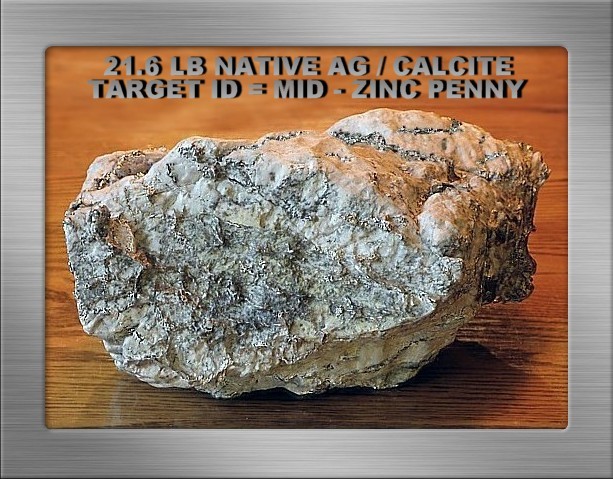
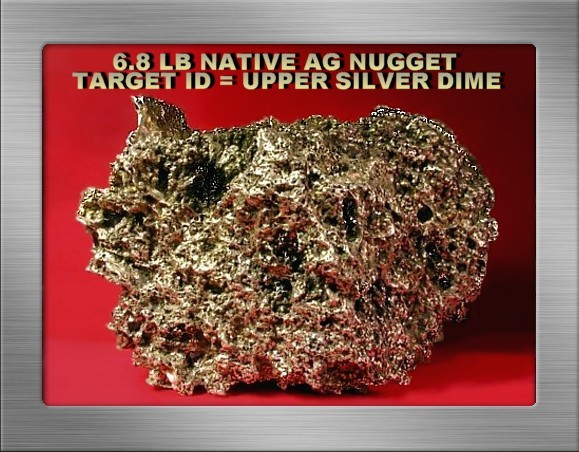
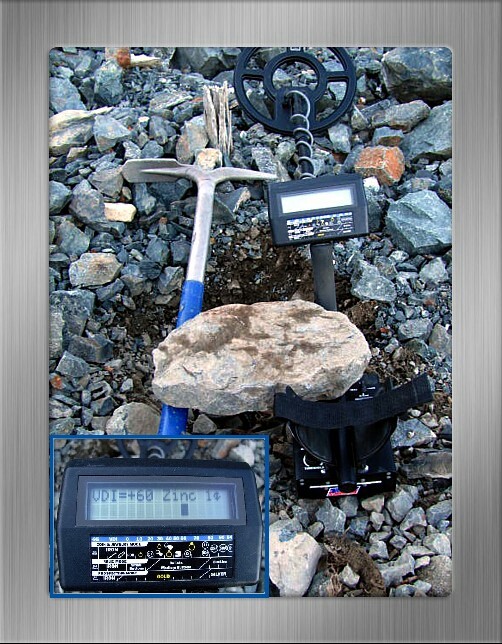
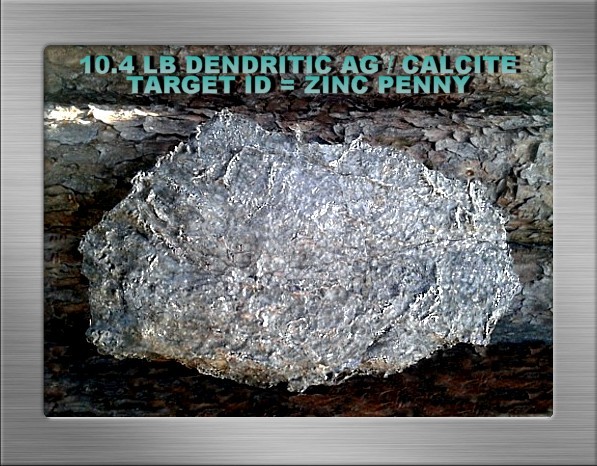
Abandoned Trails in Silver Country Introduction… Silver country represents a small part of a vast, heavily forested wilderness perched on the sprawling Precambrian Shield here in northeastern Ontario. Away from the small towns and villages, and widely scattered farms and rural homesteads, there exists a largely uninterrupted way of life in the more remote areas. There are uncounted miles of lonely country backroads, overgrown tracks leading to abandoned mining camps, innumerable rough timber lanes, and a virtually infinite tangle of winding trails that reach deeply into the distant forests. Nothing in my experience has been so completely companionable as the soft forest whisperings and the beckoning solitude that reigns over this ruggedly beautiful country. This is where my carefree days of autumn prospecting have been agreeably spent for many years. We returned again this year to unbounded, satisfying autumn days of kicking rocks, exploring and detector-prospecting adventures, followed by evenings spent evaluating silver ores while savoring hot coffee over blazing campfires. Irrespective of silver recoveries, the flaming autumn colors of the boreal forest are the real treasure of the season. They persist for only a few short weeks, reluctantly yielding to the autumnal yellows of the tamarack, birch, and aspen in sharp contrast to the deep conifer greens. Scenery as depicted below accentuates your enthusiasm to get into the field, and pretty much ensures that an autumn prospecting trip to silver country is a memorable experience. General Discussion… Unprecedented, persistently wet conditions eliminated any potential for a banner season, but nonetheless we did manage to find considerable worthwhile silver. In addition to an assortment of rich silver and associated minerals, my friend and occasional partner Sheldon Ward recovered a large, very high conductive native silver ore that we’ll take a closer look at shortly. Most of my quality silver finds were fairly small, although a specimen grade silver ore at five pounds was found during the final week of the trip, and frankly I felt very fortunate to get it. Larger material was recovered, for example a 24-pound highgrade silver ore from the same area, but these invariably were mixed ores co-dominated by cobalt and various arsenides, most notably niccolite as illustrated below. On a more positive note, we both found plentiful small silver generally ranging between one-half and ten ounces that added real weight to the orebag over the season’s duration. It is much easier to find small but rich, high character silver than is the case with larger material. Even so, specimen grade detectable silver in any size range is becoming increasingly difficult to find at many of the obvious, readily accessible sites nowadays. The photo below is a pretty fair representation of the overall quality, although anything below a half-oz was excluded from this shot… such are not terribly photogenic beside larger samples. Some rich ‘nuggety’ ores were HCl acid-bathed to free the silver from carbonate rock, and all samples were subjected to a rotary tool circular wire brush to remove surface residues, followed by a dish detergent wash and rinse. By way of a brief background explanation to readers unfamiliar with this prospecting application, we search for more valuable coin-size and larger pieces of silver. Natural native silver target ID is determined by physical and chemical factors such as silver purity, types of mineral inclusions, structure (for example, dendritic, plate, disseminate or particulate, sponge, nuggety or massive), size, shape, and the profile presented to the coil. Virtually all natural silver from this area will target ID from low foil up to a maximum of silver dime range. Only infrequently over the years have we found isolated, rare examples of our naturally occurring silver exceeding that range. The specimen depicted below is a commonplace example of silver typically recovered here. It isn’t terribly large or particularly handsome, but it is mostly comprised of native silver by weight. Its target ID is a bit elevated from the usual, but consider that even small changes to some of the more influential factors listed above can significantly alter target ID. I tend to pay minimal attention to it when evaluating samples. It was detected adjacent to an abandoned mining track that leads directly to a former mill site at the mining camp scene depicted above. No treatment required other than a leather glove rubdown followed by a soapy wash and rinse, in fact it looked quite presentable fresh out of the dirt. The darker material you see is heavily tarnished native silver that I intend to leave undisturbed. Ground conditions also play an important role in determining target ID, and refer to factors such as the strength of non-conductive magnetic susceptible iron minerals present, ground moisture content, proximity of adjacent targets, and disturbed ground. These factors sometimes contribute to good silver at depth producing a VLF target ID within the iron range. Probably the best photo example available to me is a specimen found a few years back at good depth in tough magnetic susceptible diabase. It produced a predominantly iron target ID on the Fisher F75. It was detected in a fairly low trash area, the signal was suspect, and it was checked with the groundgrab feature. In this instance, there was no ground phase reduction to more conductive values as would be anticipated over rusty iron or a positive hotrock, and so the target was dug. The general rule of thumb over questionable weaker signals, regardless of groundgrab results, is to remove some material to acquire a stronger signal and target ID readout before making a decision to continue digging in our difficult, hard-packed rocky substrates, or to move on. If there is the least doubt, we dig the target to learn what actually produced the signal. The specimen depicted below was found by eyesight while hiking along an old abandoned rail track. In the field our rock samples seem more attractive or valuable than they do once we return to camp, where we tend to view them far more critically. If they don’t look to have good specimen grade potential, my samples are either abandoned in an obvious place for others to find, or given away to visitors back at camp. But that’s just me, most hobbyists are more resourceful with unwanted samples, they’re refined by some, subjected to treatments, or slabbed, and ultimately sold. In any case, this rock didn’t terribly impress me and was placed with other discards on the picnic table. But nobody other than my wife seemed much interested in it, and that is how it came to be included here. In its original condition, it could only be described as nondescript, with very little showing on the surface prior to treatment. It did produce a broad solid PI signal, despite that the few surface indicators were non-conductive dark ruby silver pyrargyrite and to a much lesser extent what I suspect is the black silver sulfosalt stephanite. To see more, it was acid-washed to expose silver and associated minerals, cleaned-up with a rotary tool, followed by a dish detergent bath and clean water rinse. Both these minerals produce a good luster that makes them a bit more difficult to distinguish from native silver in a photo. But in reality it is easy to see the differences and do some simple tests to confirm if necessary. The acid treatment revealed that the sample does have a good showing of dendritic native silver, a timely reminder that metal detectors see what we initially can’t see inside rocks. Abandoned Trails, Minesite Tracks and Roadbeds… Abandoned, frequently overgrown trails, mining tracks, and roadbeds provide convenient routes to prime detecting sites that otherwise would be much more difficult to access. But the important thing is that most such routes were built with discarded mine tailings to considerable depth, and contain good silver more frequently than you might think possible. Some snake through the bush to more remote areas, but the vast majority of these now abandoned routes were built to service existing minesites at the time. They were used to transport discarded rock to the tailing disposal areas, and silver ores to storage buildings and to mill sites, and generally to service other mining camp requirements. We know from research and experience that silver was misgraded, inadvertently misplaced, or lost directly from spills to eventually reside on, within, or alongside these now abandoned trails and roadbeds. These mine tailings… frequently containing rich silver… were also used to build storage beds, minesite entrances, loading ramps, and as noted… routes to facilitate waste rock transport. All these offer excellent, obvious prospects to search with a suitable metal detector. The nugget below, with several other pieces, was found in the tailings adjacent to the abandoned track in the photo above. Some good weather following a horrendous week of persistent heavy rainfalls prompted me to head out late one afternoon for some casual detecting. I had sampled those tailings earlier in the season but nothing by way of thorough searching. And while the silver was generally small, it had been surprisingly good quality. So I was looking forward to a few relaxing hours of detecting… nothing ambitious that late in the day… just happy to get out of camp. That particular spot formerly housed silver storage beds, and was now replete with large rusty nails. I should have used a VLF unit, as things would have gone much more quickly. VLF motion all-metal detection depth in that moderate ferromagnetic substrate would pretty well match Infinium equipped with the 8” mono, with the further advantage of target ID and groundgrab features to assist with signal evaluation. If conductive pyrrhotite hotrocks had also been present, I would have switched over to my F75 or MXT to take advantage of target ID. But I stayed with the Infinium primarily because I enjoy using it. By comparison it is slow going, but that isn’t such a bad thing over potentially good ground. It silences what can be described as VLF ground noise, in addition to sizable non-conductive mafic hotrocks in this area. It also has some limited high conductive iron handling capability, for example elongated iron such as drillrods or rail spikes at depth that VLF units using iron discrimination modes misidentify with perfectly good signals and non-ferrous target ID readouts. More information on this subject can be found at… http://forum.treasurenet.com/index.php/topic,384975.0.html http://forum.treasurenet.com/index.php/topic,385640.0.html Nearly all the signals proved to be nails, plus one drillrod with a perpendicular profile to the coil. The silver below produced a low-high signal in zero discrimination and a good high-low signal in reverse discrimination (maximum available pulse delay setting) at maybe eight to ten inches depth. The exposed silver was unusually tarnished and the remainder partially embedded in carbonate rock. It was acid-bathed to free the silver, cleaned with a rotary tool silicon carbide bit and circular wire brush, followed by a detergent wash and rinse. While searching one such abandoned route with his Fisher F75 equipped with the stock 11” DD elliptical coil, Sheldon Ward found a large highgrade silver ore comprised of a thick calcite vein containing massive dendritic native silver. The vein material weighs about 25 lbs, and was attached to a mafic host rock. It generated a moderate but broad signal from several feet depth, requiring an hour of hard pick and shovel work to recover it. It possesses an unusually elevated target ID in the silver quarter range. After 30+ years searching this area recovering numerous silver ores and nuggets, I've seen only a small handful of silver produce a similar target ID. On site we obviously have the benefit of closely examining the vein material, but it’s more difficult for readers to evaluate the silver based on photos only. Outdoor photos do tend to make native silver look much like grey rock, and unfortunately this one is smudged with dirt. I’ve added an indoor photo from Sheldon that displays the vein material after it was separated from the host rock and cleaned. Sheldon if you happen to be reading along here, congratulations on your many superb silver and associated mineral recoveries over the past year. Nothing that your dedication and persistence achieves in the years to come will ever surprise me. WTG!!! Persistence Pays Dividends… Let’s wrap things up with a tale about the rock sample below. It was recovered at the edge of a tangled overgrown trail near a former millsite just a few years ago. Its recovery exemplifies that the more you work towards your objective of finding silver or gold, the more likely your probability of success will correspondingly improve. I’d been searching that particular area for two days without meaningful results while evaluating a newly purchased Garrett Infinium for this application. The second day had again been filled with digging hard-packed rocky substrates for iron junk, worthless or otherwise unwanted arsenides, and plenty of conductive pyrrhotite hotrocks. As the sun was reaching for the western horizon, I decided to make one final effort before heading elsewhere the following day. Methodically working along the old track towards the mill, lots of old diggings were plainly visible. But previous hunters had ignored an area with a scattering of large, flat rusty iron pieces and other miscellaneous modern trash. I moved quickly to clear it away, because daylight was fading fast beneath the dense forest canopy. My Infinium soon produced a surprisingly strong high-low signal that practically vanished in reverse discrimination… a promising indication of naturally occurring ores. I dug down a foot before my Propointer could locate the signal. Probability says that it could have been any number of possible targets altogether more likely than good silver. But fickle Lady Luck was more kindly disposed towards me that evening. The rich, finely dendritic piece depicted below was in my gloved hands just as twilight was stealing across that lonely abandoned trail in remote silver country. A Final Word… A special mention to my friend Dr. Jim Eckert. I hadn’t seen much of Jim recently, but happened across his trail late one overcast afternoon in the outback. I was about to hike into a site when this fellow came flying down the trail on a motorbike, and despite the riding helmet I recognized him. We had a good long chat about this and that… Later in the season, one bright sunny afternoon at the site of my short-lived testhole diggings, Jim stopped around to show me a recent specimen find comprised of native silver and crystalline stephanite. We talked mineralogy and other interests many hours until finally the sun was going down. These were highlights of the trip, and I want to say how much I enjoyed and appreciated having that companionable time together. Thanks to everyone for dropping by. We hope that you enjoy presentations about naturally occurring native silver, particularly since it is different from what many rockhunters normally encounter in their areas. All the very best with your prospecting adventures… perhaps one day it will be our good luck to meet you in the field…………………… Jim. Reposted July 2018 Detector Prospector “Rocks, Minerals & Gems”
-
Benchtesting Rocks & Minerals With An F75 Metal Detector
Jim Hemmingway posted a article in Best of Forums
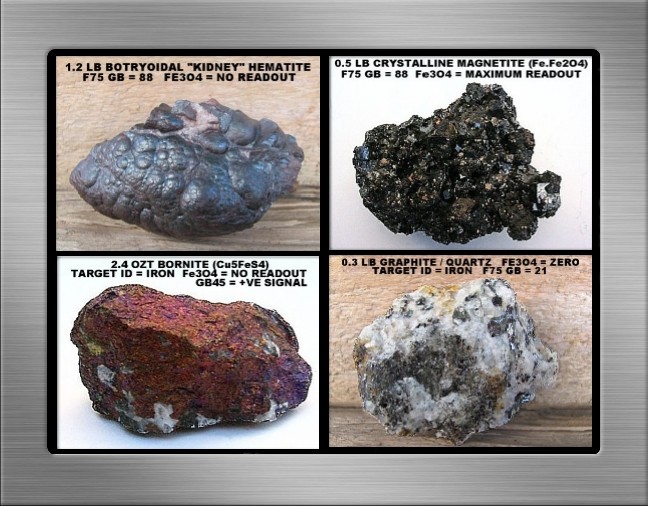
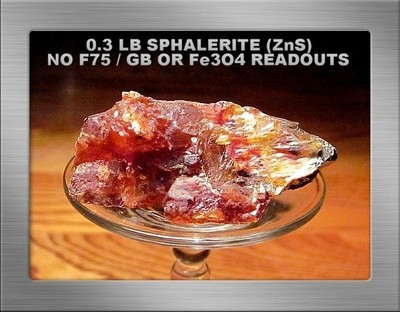 Benchtesting Rocks & Minerals with an F75 Metal Detector Introduction From the earliest time when we were aware of our surroundings, most of us looked for pretty rocks. We wondered what interesting or valuable minerals might possibly comprise them. Now as adult hobbyists, I doubt if any of us hasn’t benchtested an interesting rock from curiosity, and wondered what actually produced the signal. Although a sensitive benchtest usually has little in common with how marginally conductive rocks and minerals respond to metal detectors in the field due to ground effects, we can learn and become familiar with how rocks and minerals in our respective areas respond to metal detectors in a benchtest. A sensitive metal detector’s electromagnetic field penetrates rocks, usually generating either a positive or a negative signal in response to whatever material is in the rock. We can sometimes determine whether such signals should be investigated further, or whether worthless iron minerals produced them. I’d generally describe my benchtest results as worthwhile and informative, but that notwithstanding, I look forward to doing a benchtest because I think it is an intriguing study on its own merit. That said, how do you conduct a benchtest? I’ll describe my methods and hopefully we’ll see what you think about it. Benchtest Requirements and Techniques Benchtesting ideally requires a visually displayed, fully calibrated, manually adjustable ground balance that covers the entire (soil) mineral range from salt to ferrite. As a minimum, the detector should feature a threshold-based true motion all-metal mode, and preferably an additional true non-motion all-metal mode for significantly improved sensitivity to borderline samples. Visual displays in either of the true all-metal modes are essential for target ID, Fe3O4 magnetic susceptibility and GB readouts. I prefer a small (concentric) coil to promote detector stability and improve sensitivity to the rock sample, to ensure uniform sample exposure to the coil, and to minimize EMI (electromagnetic interference) especially if benchtesting at home. Elevate the sensitivity control as high as possible while maintaining reasonable detector stability such that you can clearly hear changes to the threshold. To check for a target ID, move the sample back and forth across the coil at a distance that produces the best signal but does not overload the coil. To determine ground balance and Fe3O4 readouts, advance the sample toward the coil, back and forth to within an inch or two (depending on sample size and signal strength) of the coil’s electrical sweetspot. Ensure your hand does not come within detection range of the coil to avoid creating false signals. If you extend your fingers to hold the sample, this is not an issue when testing larger samples. If necessary use a plastic or wood food holder that can firmly grasp small samples. Benchtests should be conducted utilizing a minimum of two widely diverse GB control adjustments. Initially I prefer the same GB control adjustment that is typically required to keep my detector ground-balanced to the substrates in my prospecting areas. It’s a personal preference that works for me. That particular GB control point (F75 / GB86) is more likely to improve any rock or mineral sample’s signal strength compared to using a more reduced (more conductive) GB compensation point. The next step is to use a dramatically reduced GB control adjustment (F75 / GB45) as suggested by Fisher Research Engineering. This setting ensures that (obviously weathered) oxidized samples do not generate a positive signal from any type of non-conductive iron mineral inclusions, particularly maghemite mineralization that may be present within such rocks. It follows that this second benchtest will, if anything, slightly subtract from the sample signal strength, particularly with low grade and otherwise marginally conductive samples, compared to the first step of the benchtest at GB86. As a general rule, I do not recommend the F75 / GB45 compensation point for benchtesting (non-oxidized) mafic samples that are dominated by constituents such as common magnetite or other black minerals that normally support highly (non-conductive) elevated GB readouts. Such samples can produce strong negative threshold responses at the reduced GB compensation point. It will be difficult or impossible for the signal from a marginally conductive substance to successfully compete with those negative threshold signals. For non-oxidized samples Fisher Research Engineering suggests using F75 / GB65 rather than the F75 / GB45 compensation point, since obvious iron mineral oxidation should visually be absent from such samples. With the above discussion in mind, extremely fine-grained, unweathered magnetite that occurs in pyroclastic material (for example volcanic ash) can drop into the GB45 range, but it is extremely rare. Unweathered volcanics do frequently drop into the GB70's due to submicron magnetite, but the recommended F75 / GB65 compensation point will eliminate those positive signals. The arsenopyrite sample depicted above is a good example of a commonplace mineral that we encounter in the silverfields of northeastern Ontario. Generally field examples could be described as marginally conductive and many are low-grade. A good many react with only a mild positive signal, and sometimes not at all to a benchtest depending on which GB compensation point is used. The high-grade, solidly structured sample above produces a strong positive signal in either zero discrimination or true motion all-metal mode with the ground balance control adjusted to the GB compensation point required for our moderately high mineralized soils. As noted, that’s approximately F75 / GB86, although in the field, of course, it varies somewhat depending on location and coil type / size employed. The response is not as strong as a similar size and shape metalliferous sample would produce, but it does generate a surprisingly strong benchtest signal that would be readily detectable in the field. Even with the GB control dramatically reduced to more conductive values (F75 / GB45), to ensure that any positive signals produced by non-conductive iron mineral inclusions should now only produce a negative threshold signal, it is no surprise that this (non-oxidized) specimen continues to generate a strong signal. For those readers unfamiliar with detector responses to such minerals, the same general response scenario described above with arsenopyrite applies to other marginally conductive minerals such as galena, pyrrhotite and to a lesser extent even iron pyrites. Ordinary iron pyrites is generally innocuous, but maghemitized pyrite, pyrrhotite, and the copper sulfide ores, particularly bornite and chalcocite, can be a real nuisance in the field due to magnetic susceptibility, magnetic viscosity, and / or electrical conductivity, just depending on what minerals are involved. Such variable responses from arsenopyrite and many other mineral and metalliferous examples clearly infer that signal strength and potential target ID depends on a sample’s physical and chemical characteristics, including the quantity of material within a given rock. These factors include structure, size, shape, purity (overall grade), and magnetic susceptible strength of iron mineral inclusions. Moreover, the VLF detector’s sensitivity, the GB compensation points employed, the coil type and size, and the sample profile presented to the coil further influence benchtest target signal strength and / or potential target ID readouts. Incidentally, neither of my PI units will respond to the arsenopyrite sample depicted above, even with a TDI Pro equipped with a small round 5” mono coil, the GB control turned off, and a 10 usec pulse delay to deliver its most sensitive detection capability. That result is typical of most, but certainly not all sulfides and arsenides that occur in my areas. Higher grade and solidly structured pyrrhotite, an unwelcome nuisance iron sulfide, and collectible niccolite, a nickel arsenide, are commonplace mineral occurrences here that do respond strongly to PI units, although their respective VLF target ID ranges are quite different. As a related but slight diversion, the photo below depicts a handsome example of the widely occurring mineral sphalerite. It forms in both sedimentary beds, and in low temperature ore veins. It is interesting to collectors because it possesses a dodecahedral cleavage which means that it breaks smoothly in twelve directions, and it is usually triboluminescent, meaning that it gives off a flash of light when struck sharply. Like many desirable minerals lurking in prospecting country, unfortunately sphalerite doesn’t react to metal detectors. A Final Word The foregoing is intended to illustrate that sensitive metal detectors can be utilized as a supplementary tool to assist with evaluating rocks and minerals. There is no question that the benchtest has serious limitations, particularly if trying to distinguish positive signals produced by some types of iron mineral inclusions from weak conductive signals. That notwithstanding, a positive signal that persists below the F75 / GB45 compensation point cannot be confused with iron mineral negative threshold signals produced at that same compensation point. Therefore a positive signal merits further investigation. Such signals are almost certain to be generated by a marginally conductive mineral or a metalliferous substance. On the more interpretive side of a benchtest, we need to point out that weak positive signals from lower-grade samples of minerals such as arsenopyrite, galena, pyrrhotite, chalcopyrite, and doubtless a few others, may disappear well before the GB control is reduced to the F75 / GB45 compensation point. We learn early that benchtests are frequently equivocal and require interpretation based on any further evidence that might support the benchtest result. Look for iron oxidation in addition to structural or other physical evidence as described above that could explain why a sample reacts as it does to a metal detector. Jim. This article was promoted to an article from a forum thread. Additional information may be found there in follow up posts.
 -
Thanks everyone for those appreciative comments above. I do enjoy responding to Gerry’s knowledgeable and interactive contributions to this forum. That’s not always possible for me because I’m not familiar with the western goldfields where Gerry conducts his training sessions or otherwise pursues gold nugget hunting. Gerry… I have no interest in straying too far off topic, but felt I should respond to your comment highlighted above. The specimen posted earlier is only one of many sizable native silver recoveries made over the years. It’s a nice find, but I would like to show you an additional few examples from Ontario’s silverfields. The first two samples depicted below are pretty much in a natural “as dug” condition. I’ve included a third smaller example because its size is more than compensated for by its solid nugget structure and high purity, a rare find in this area. All these could easily have been detected with a White’s MXT metal detector. It was only a matter of chance that a different prospecting-capable metal detector was utilized when these samples were found. For hobby newcomers reading along, the photos are not intended to suggest that anyone can reasonably expect to head out and detect large specimen grade silver in this area. My intent is to point out that the potential does exist, particularly if one has experience in the area, is a competent metal detector operator, and is willing to persevere and physically work. I don’t have a decent photo for the larger sample below. It’s just too lengthy to get sufficiently close with a camera to reveal detail. I’ve included an additional section close-up photo that helps in that regard. The entire calcite matrix is inundated with massive dendritic native silver of high purity, and incidentally, all the silver is electrically connected. There are no other mineral inclusions to subtract from the specimen’s appearance or value. To date Gerry, it is the most valuable thing I have found with a metal detector………………… Jim.
-
Hi Gerry… thanks for a timely post highlighting White’s Metal Detectors, an American company that historically has set an innovative engineering standard by which all other metal detecting products have been compared. And for those eye-catching photos depicting a variety of extraordinary recoveries using a White’s MXT metal detector, they illustrate the ultimate in successful treasure hunting. I currently have a White’s MXT 300 and an assortment of coils used primarily for prospecting native silver ores and nuggets in northeastern Ontario. Aside from silver float searching in natural environs where bedrock is generally near the surface, we contend with an abundance of iron and other trash signals in the abandoned mine tailings. We also struggle with conductive pyrrhotite hotrocks, niccolite, and cobalt minerals that generate good positive signals from both VLF and PI units. Those conditions make the MXT’s 13.88 kHz operating frequency, target ID meter, discrimination modes, and particularly the motion all-metal prospecting mode featuring iron probability, VDI and ground phase readouts an excellent choice. The MXT and wide selection of coil types and sizes is ideally suited to this application, and especially so because the most desirable targets weigh ounces and more. Below is an excerpt from a recent article entitled Recreational Prospecting in the Silverfields of Northeastern Ontario. It describes a rewarding field experience a year-and-a-half ago utilizing the White’s MXT 300 equipped with a 12” diameter concentric searchcoil to successfully recover large native silver. A Tale of Two Target Signals Late one afternoon, an elongated signal, correctly indicated by the MXT’s iron probability readout, proved to be a sizable iron bar that was removed from several inches below the surface. Rechecking the immediate area produced another signal that was slightly offset to one side and perhaps a foot deeper. It consistently read at 20% iron probability, and resulted in the large silver sample you see below. It was a special moment to find it so close to the surface, and to realize that the encouraging audio signal and target ID had been produced by silver. If the iron bar hadn't first been removed, that silver signal would have been entirely masked by it regardless of coil size or type. The overlying shallow iron bar had produced a completely dominant, blaring signal. The specimen below was HCl acid treated to remove excessive carbonate rock. It was cleaned with a rotary tool silicon carbide bit, followed by a soapy wash and rinse to produce the silver specimen depicted in the photo below. While not exactly a handsome sample because the silver is embedded in a dark blue-grey carbonate rock, it is a fine example of massively structured dendritic native silver that accounts for most of the sample’s total weight.................... Jim.
-
Hi Foreverteachable… those coins look to be in pretty good shape. To retain full value, the normal procedure is to not clean coins. Leave it to the experts. However, you’ve indicated that you don’t intend to sell them and have gone ahead with some rudimentary baking soda (sodium bicarbonate) cleaning. Those coins are still encrusted with primarily black sulfide staining, but there is a reasonably mild treatment process that will clean them nicely for you. In my experience, all cleaning methods, whether chemical or abrasive, subtract from the surface integrity of silver coins to some extent. We prefer to minimize any visual damage as much as possible. Since presumably you’d prefer to remove the stains, below is the procedure that I’ve utilized over the years for silver coins that really had limited or no numismatic value. This technique initially involves limited, mild electrolysis followed by a dilute application of silver cleaner paste and water mixture that is gently applied with the fingertips, subsequently rinsed and carefully dried. Electrolysis apparatus can easily be set-up using household items. It requires preparing an electrolytic cell using either a battery or light charger with the silver to be cleaned as the cathode (-ve terminal) and use a stainless steel utensil (spoon) as the anode (+ve terminal). The cathode produces much more bubbles than does the anode, so don’t mistakenly misconnect your apparatus, in fact initially do a test run by cleaning some unimportant small item. A clean nut or screw or whatever is handy will do so that you can clearly see the difference in bubble formation just to confirm you’ve got the electrolytic cell connected properly. If you employ electrolysis many times over the years, you will see that the anode (spoon in this example) will deteriorate and gradually dissolve. Any plastic or glass container of suitable size/volume to accommodate the silver sample can serve as the electrolytic cell. A few tablespoons of baking soda or table salt dissolved in sufficient warm water to cover our sample will do as our electrolyte. For a DC current I prefer a two amp “trickle” charger, but any decent DC power source in the six to twelve volt range is more than adequate. Alligator clips are handy for attaching the lead wires from the power source to the anode and cathode. One point to remember is to always remove your silver coin prior to disconnecting the power source, otherwise you risk plating your silver with whatever +ve ions may be present in solution. Generally coins require a few moments to a half-hour treatment to loosen scaling or sulfide stains, it varies with how encrusted the coin may be. The silver paste / water mixture can then easily lift and remove the stains. When the electrolytic solution becomes “dirty” replace it. My experience is that excessive build-up of metallic ions from the utensil (spoon in this example) can result in plating them on to the silver cathode (coin). Incidentally, do not use the same electrolytic cell water to treat coins of differing metal compositions. Doing so will produce undesirable electrochemical reactions that risk serious damage to your coins. Here’s my understanding of the chemical reactions that take place. An electric current is applied to cause both oxidation and reduction in our electrolytic cell. The positive anode attracts negatively charged ions (atoms with a negative charge are called anions) that move towards it when an electric current is passed through the cell. Oxidation occurs at the anode and oxygen is produced. The negative “silver coin” cathode attracts positive charged ions (called cations). At the cathode, reduction takes place and hydrogen gas is produced. Anions such as sulfide are drawn from the silver and these migrate toward the positively charged anode by electrolytic attraction. Moreover, the hydrogen production at the cathode further acts as a mechanical cleaner to remove incrustations on the silver. Between that action and the loosening or removal of sulfide ions, the silver paste and water mixture can easily complete the cleaning process. Just remember to not use more treatment than absolutely necessary to achieve a satisfactory result. Perhaps others can add their experience here, but I think the foregoing is more than sufficient information if you wish to try this method. As stated earlier, dug coins in good condition would be better left untreated for professional evaluation. All the coin examples portrayed below received the treatment described above. Good luck with your coin hunting, it’s a satisfying and intriguing pursuit that can endure for a lifetime. Jim.

- 3 replies
-
- 5
-

-

-
- minelab equinox
- coin detecting
- (and 1 more)
-
Hi DDancer... many thanks for this highly descriptive and interesting insight into your trip to the Kalgoorlie area. Excellent illustrative photos, and appreciate your expertise with the rocks and minerals. You managed to find some gold, and you certainly dined like a King!!! Doesn't get much better than that IMO, thanks for sharing it with us. Jim.
-
Thanks Stephen for sharing your comparison information between those two units. Good report!!! Jim.
-
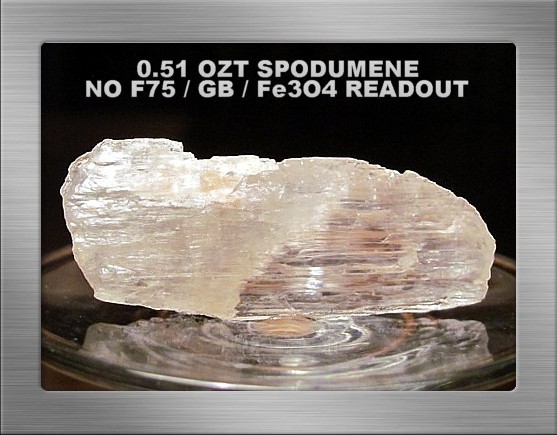
Hi Simon… I see my PM comments about the Smithsonian Institute Rocks & Mineral guide may have influenced you in selecting that video. I agree with you that most minerals are rather attractive, and chasing after them in the wilds introduces an element of intrigue. However many of the minerals we hobbyists encounter in the field are a considerably lower grade than either museum quality or what we see in mineralogy texts. I think with persistence that you will eventually find some rhodonite. I’ve been reading about rhodonite occurrences over in New South Wales. Apparently there have been some exceptional gem quality, deep red crystals recovered at Broken Hill, measuring up to five centimeters in length and embedded in galena. The photo immediately below is a lithium aluminum silicate called spodumene. Color variations are labeled differently. This colorless, opaque to translucent example is further identified as cymophane. It came to me years ago from a California mineral collector who wanted to trade for some native silver. The second photo is because you seem to like native silver!!!
-
Thanks JW for those kindly remarks, and thanks too for all your informative contributions to this forum. I enjoy reading your superb photo-illustrated field reports, the back and forth dialogue between you and Simon, and Simon’s enthusiasm for all things related to prospecting. I agree with you that the pursuance of rocks and minerals is primarily about the adventure and discovery. However we can have it both ways John. I like to see my specimens residing on the shelves, they’re like old friends and each one has an associated good memory. The GB compensation point for the F75 of GB45 essentially accomplishes the same thing as your Falcon except that obviously it doesn’t have the 300 kHz Falcon’s extreme sensitivity. Iron mineralizations will produce a negative threshold response, therefore conductive positive signals produced as the sample is advanced towards the coil should be investigated. The potential issue is if the sample contains both a highly reactive iron mineralization and a conductive substance. Then it remains to be seen which will have the dominant signal. The mortar and pestle is a better solution for such suspect samples, detectors can only tell us so much..........................Jim.