Search the Community
Showing results for tags 'detector review'.
-
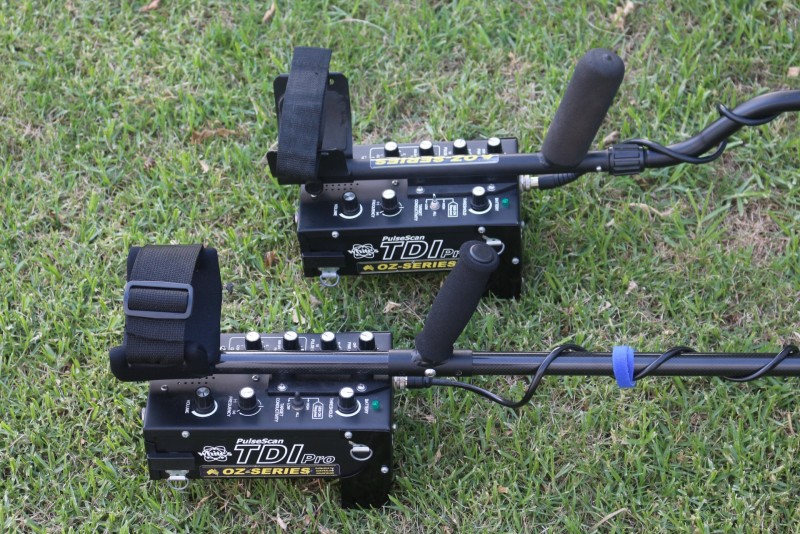
The passing of a friend unfortunately has led to me taking ownership of a modified Tdi Pro. My machine is mounted on an Anderson shaft and is factory spec. My old mate had his machine modified to smooth out the threshold and to add some sensitivity. The specifics related to the modifications are not known by me, other than that they were conducted by 'Luke'..Oz Digger.. This happened some time ago. So the modified machine is probably not a keeper, I don't want two Tdi Pro machines.. The opportunity to do a comparison cannot and should not be ignored. My intention is to focus on small gold performance, the threshold smoothness, the ability to use gain, basic performance and handling characteristics under different circumstances. The machines will use the same fully charged battery pack, same coil, same targets, same test location and conditions on the same day etc. Trying to minimise external variations. I'll start with the usual useless air test. Later I'll follow up with in ground testing on the actual goldfields in mineralized soil. Test coils will be with a small coil and a large coil. Targets will be gold only. The 1 grain ingot, the half gram gold coin, a half sovereign gold coin. Some real small sub gram nuggets to see how small we can go.. There is a process involved so I'll take my time and do it right. Any specific questions or suggestions, speak now or forever hold you peace.. I'm only doing this once. Once it sold it will be too late to revisit.. All the best.
- 33 replies
-
- 6
-

-
- australia
- detector review
- (and 1 more)
-
Hi, I've just joined the forum and looking for some advice from the experts! I want to take up an old hobby again but I'm not sure where to start.. what detector to buy.. do I need a pin pointer etc. All advice would be very welcome! I live in South West France , so rules here are quite strict on where you can detect. I have researched the local coastal beaches and lakes, which are legal so I would like to buy a waterproof detector that's good in salt water and fresh, but I am also surrounded by vineyards, so looking for a good all rounder. I did have a budget of around €300- €400 but after reading a lot of posts I realise I need to spend a little more to get something decent on a hobby/intermediate scale...so looking around €500 max With my search so far I've come up with 2 possibilities, Garrett AT Pro and a Minelab Vanquish 540 but there are so many options out there I've got a bit lost..! I would love to hear from anyone with any advice or recommendations for what would suit my needs best.. Thanking in advance
-
I live in AZ, we have a lot of Hot Rocks and tiny gold. I've been thinking of getting a Gold Detector. I have narrowed it down to 3. Gold Bug 2, Gold Monster 1000, and the XP Deus 2. I'm a beginner, but would like to advance with the detector I choose. $1500 is the most I can go, even though a PI detector would be excellent. Any thoughts on this would be greatly appreciated.
-

Detailed Review Of White's Goldmaster 24K
Steve Herschbach posted a topic in White's Metal Detectors
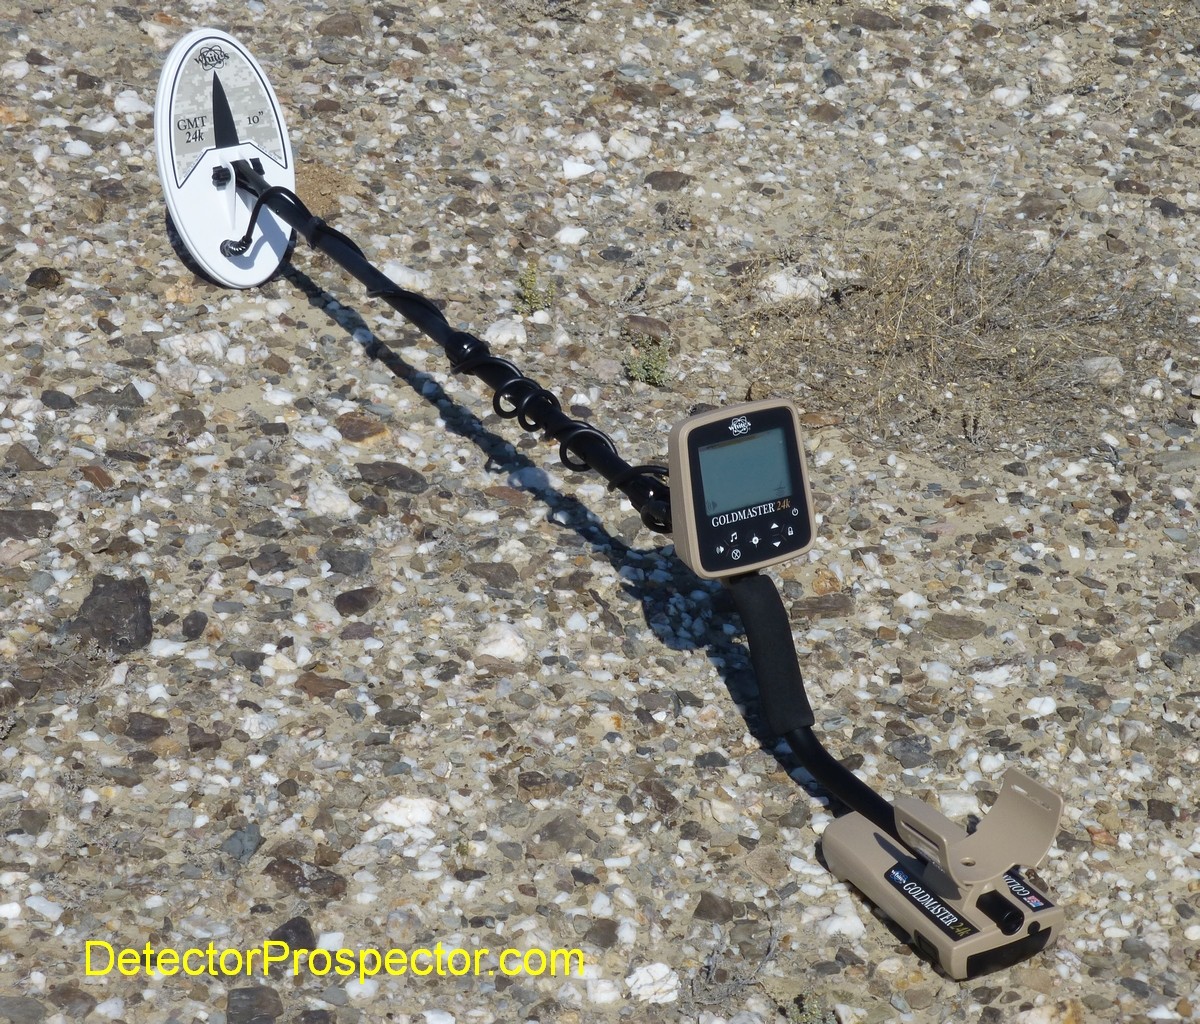
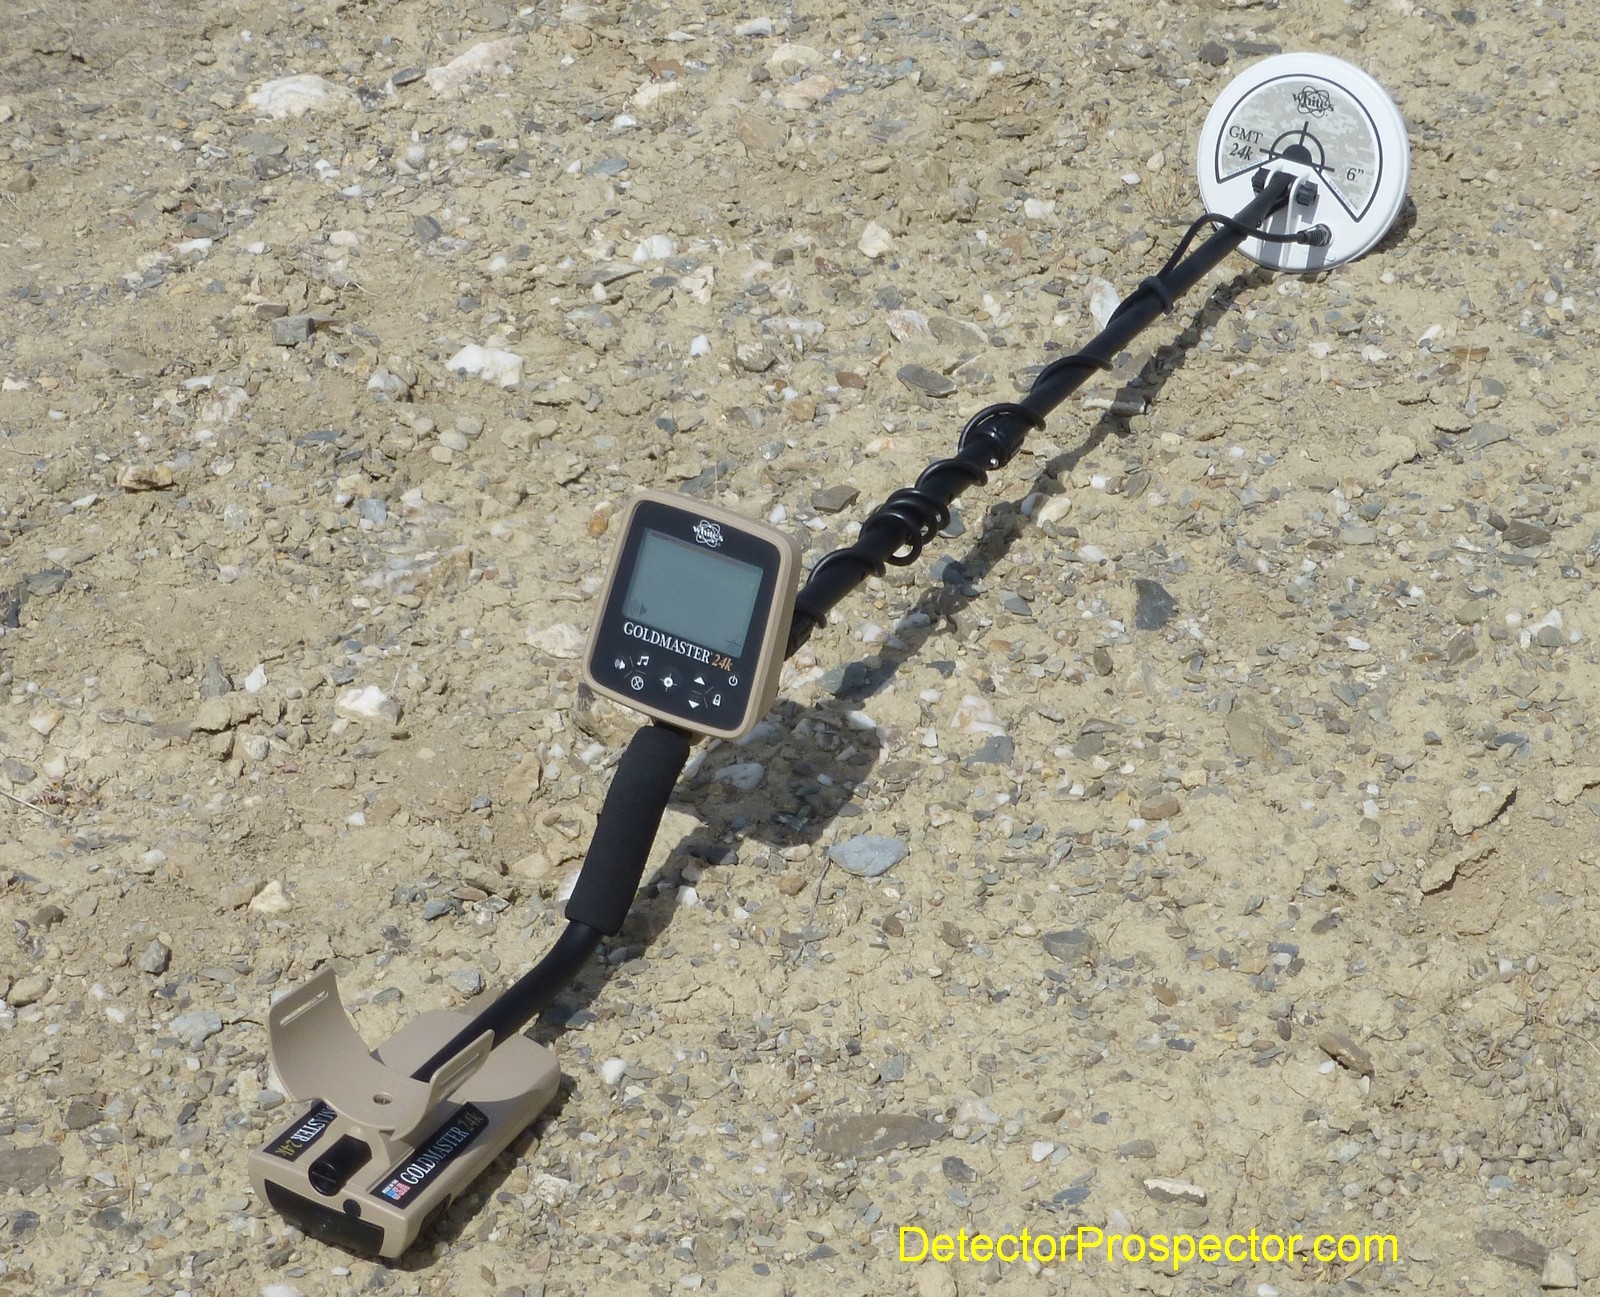
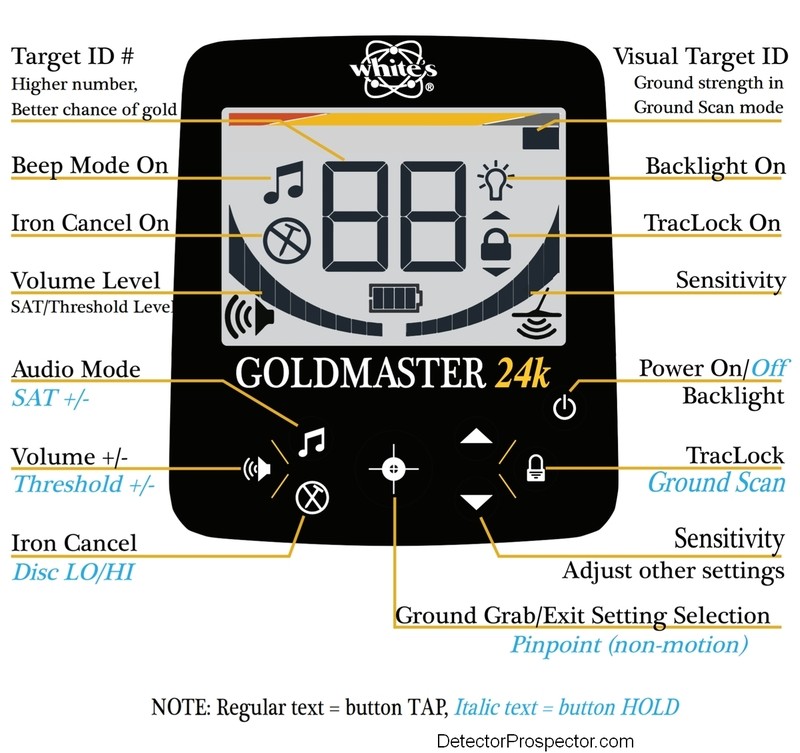
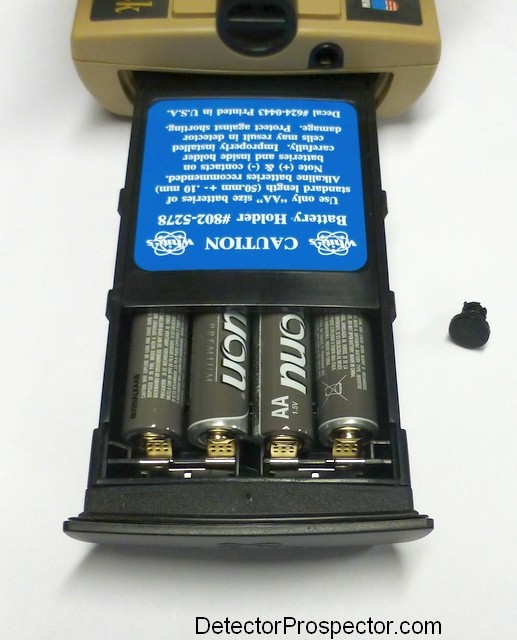
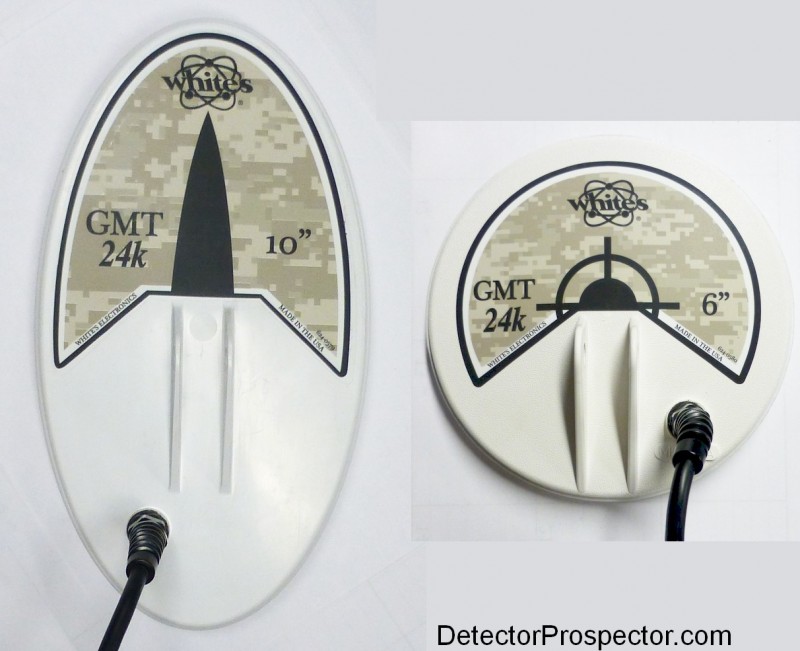
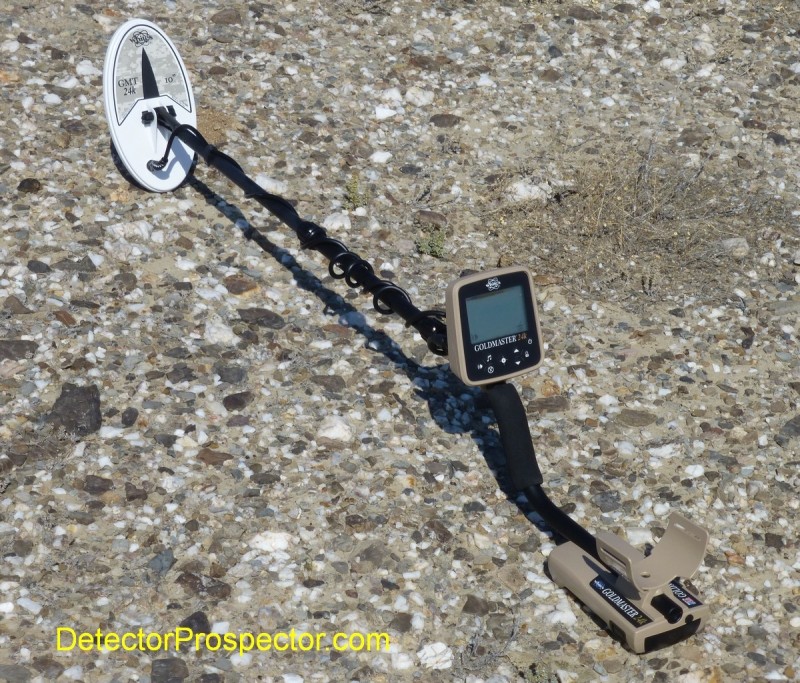
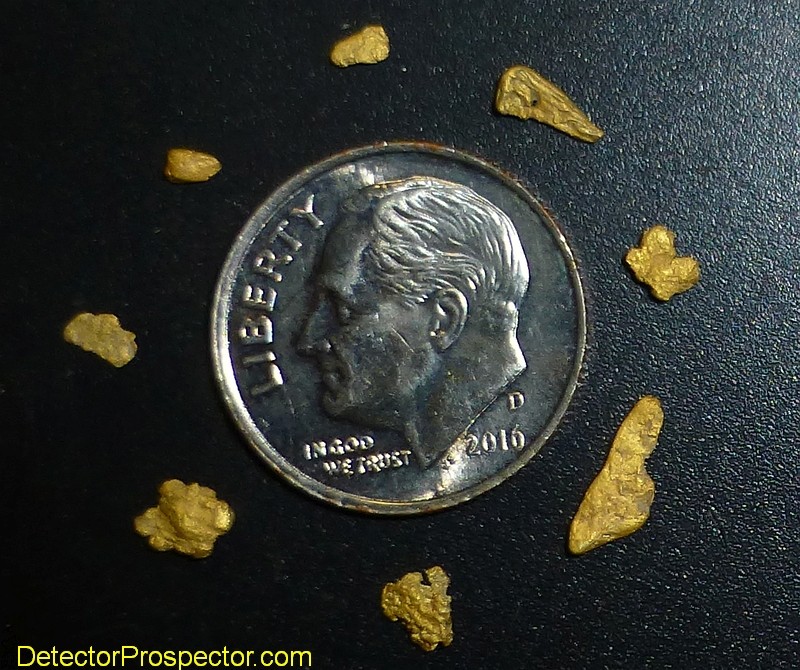
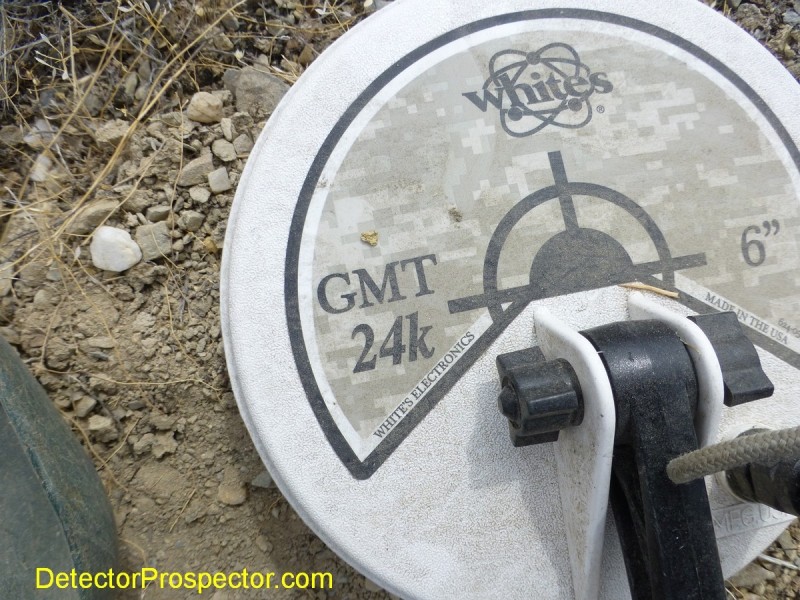
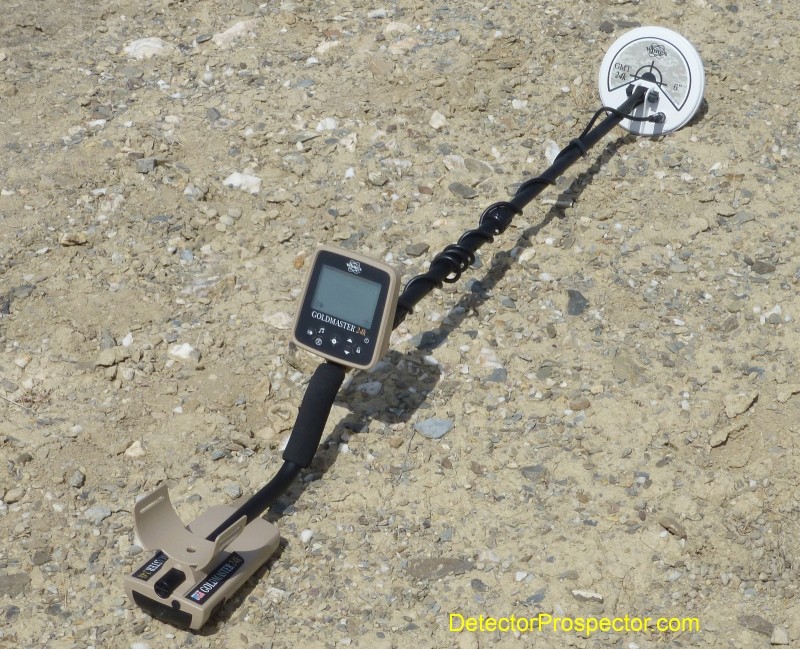
The White's Goldmaster 24K is a new 48 kHz gold nugget detector released in the fall of 2018. Production models started shipping in September and White's forwarded one to me to check out. What follows are my thoughts after a couple days of detecting for gold on several northern Nevada nugget patches. The Goldmaster 24K marks a break with the past as White's moves from the older metal box designs of the past to newer plastic cases. The Goldmaster 24K physical design is the latest in the evolution of the MX series. The control box itself is derived directly from that used on the White's MX5. The control pod / display originated with the TreasurePro and later used in the MX Sport and MX7 designs. Basically the Goldmaster 24K is in the same housing and rod design as the White's MX7. Manufacturers face a difficult design choice these days. In general users want metal detectors to be as light as possible. However, weight is not everything - balance matters every bit as much. The problem is that a metal detector search coil is basically a weight on the end of a long stick. Coils can only be made so light due to engineering constraints requiring a certain amount of copper wire, and a reasonably robust coil housing. The coil therefore has a lot to do with determining the final ergonomics of the detector. If the coil weight is not balanced at the other end with some kind of offsetting weight, the detector is nose heavy. This in turn creates torque everytime the detector changes directions, which puts stress on the operators arm. The detector can be made as light as possible, or can be perfectly balanced, but it is almost impossible to do both in one detector. Any detector that weighs less than 3 pounds is almost certain to be nose heavy because enough weight does not exist to balance the weight of the coil. In order to have enough weight to work with it appears the minimum is about 3.5 lbs for detectors that are well balanced. The extra weight is almost always in the form of a battery box located under the elbow. White's has gone this route is the MX series designs with a battery box holding 8 AA batteries under the elbow acting as a balancing weight. This results not only in a well balanced detector but a detector with enough batteries to operate for multiple days between charges or battery changes. White's Goldmaster 24K metal detector for gold prospecting Another big choice manufacturers have to make these days is whether to use a straight rod or a "S" rod design. Users tend to be evenly split as to which they prefer, and so this is a choice the manufacturer cannot possibly win. About half the people are going to be unhappy whichever way you go. Industrial type users like beach hunters and prospectors tends to prefer straight rods. Coin, jewelry, and relic hunters seem more inclined to "S" rods. I have used many detectors with either setup, and have been happy with both or unhappy with both. The deciding factor for me has been more about the exact size, shape, and angle of the hand grip than the actual rod design. I do not have over-sized hands, and so I tend to prefer a smaller diameter grip. Other people like a larger grip. I went into all that detail to be sure the reader understands that weight and balance is very much a personal preference item. Getting a detector to fit right for everyone is like making a pair of boots that fits everyone. You can't do it. Therefore when I say that the MX physical design as employed in the Goldmaster 24K is a very good fit for me don't take that as meaning it will be great for you. Yet it is a very good fit for me, and quite comfortable on my arm, with just enough forward weight to keep my elbow in the arm cup without having to use the arm strap. The design is also lighter than the White's GMT by nearly half a pound, so the Goldmaster 24K is both well balanced and lighter than what came before. The Goldmaster 24K with 10" elliptical coil and with batteries installed weighs 3 lbs 7 oz (3.4 lbs) or 1562 grams on my digital postal scale. The Goldmaster 24K has an IP54 rated enclosure that has a high level of protection against dust particles, and a fair amount of protection against water. The coils are waterproof, but the detector itself is not submersible, so keep that display pod out of the water. The "S" rod is a three piece design with excellent quality twist locks that create a firm, wobble free rod assembly when fully engaged. The armrest position is not adjustable but it is well placed. The 24K is powered by eight AA batteries in a battery holder that pops out of the rear of the battery box. The 24K is supplied with eight alkaline AA batteries, but rechargeable batteries may be substituted for use in the battery holder. The 24K can get up to 40 hours operation using high quality alkaline batteries and while using headphones (external speakers use more power). The Goldmaster 24K does have a speaker built into the rear of the display pod, and there is a female 1/4" headphone jack directly above the battery door. White's thoughtfully includes a small plastic plug to insert into this hole when not in use. White's 24K battery holder and headphone jack location The Goldmaster 24K comes with a 5.5" x 10" DD coil as the stock coil. A 6.5" round concentric coil is available as an option. Scuff covers for the coil are not included with the detector or when you buy an accessory coil - they are separate optional items. The 5.5" x 10" DD search coil weighs 14.5 oz or 412 grams. The coil is 1" thick. The 6.5" round concentric coil is 3/4" thick and weighs 13.1 oz or 370 grams. Therefore the 24K when outfitted with the 6" concentric weighs in at 3 lbs 5 oz (3.3 lbs). White's possibly has a 13.5" x 8" DD available soon that weighs 1 lb 8 oz or 682 grams. Finally, a version of the 4" x 6" Shooter DD is in the works also. Neither of these coils is available for sale as of March 2019 (edit - they are now), so for now the GMK has one accessory coil (the 6" concentric) available for purchase. Do note that all pre-existing coils for other White's Goldmaster or GMT models are not compatible with the Goldmaster 24K. The 24K pumps about 50% more voltage to the coils than previous models, requiring tighter tolerances in the new coils. The coil connector has been changed to prevent confusion. 5.5" x 10" DD search coil and 6.5" round concentric coil for White's Goldmaster 24K The Goldmaster 24K shares many functions with the White's GMT model but there are differences. The most obvious being that the GMT uses knobs for control adjustments. The 24K uses a sealed touchpad which is more water and dust resistant, but some controls have secondary functions that necessitate having the Quick Guide near at hand when learning the detector. The 24K like the GMT does of course have a sensitivity control, and like on all hot VLF detectors it is a critical control. The solution to most problems regarding metal detector instability, or interference, is to reduce the sensitivity. The 24K features both automatic ground tracking, or a fixed ground balance, adjusted via a tap of a "ground grab" button. In this case the pinpoint button doubles as a ground grab when given a quick tap. Ground tracking can be a great function for variable ground and people new to detecting. Personally I prefer to lock the ground setting (via the "Lock" button) and update it manually via the ground grab function. I did use the ground tracking however, just to try it out. It is lightning quick, taking just a pump or two to track into the ground. Ground grabs are instantaneous. The White's GMT allowed for a locked ground balance to be tweaked up or down manually, via plus or minus buttons on the control pod. The 24K takes a slightly different route by allowing a "ground balance offset" to be dialed into the detector. The ground balance offset is a powerful feature, and so deserves some explanation. Prospectors often prefer manual ground balance because they can choose their own setting that for various reason might be different than what a machine will choose using a preset function like ground grab. Ground grab may be set to deliver a very neutral ground balance. The prospector may prefer that the balance be slightly positive to help enhance tiny nugget signals. They may want to choose a ground balance setting halfway between the ground itself and some pesky hot rock, which may mean adjusting either positive or negative from the neutral setting. This might require that the operator first do a ground grab, then hit the plus button a couple times to manually offset the ground balance. The 24K has a "Follow The Black Sand" mode like on the GMT, but it is now called Ground Scan. Ground Scan is enabled by pushing and holding the ground balance "Lock" button. While in Ground Scan the "Up" and "Down" buttons create a ground balance offset. This offset is retained when you leave Ground Scan mode, and will be applied both when doing a ground grab, and even while in ground tracking mode. The Ground Scan / Follow The Black Sand thing is intended to allow a prospector to locate and trace shallow magnetic sand deposits, that might indicate potential gold concentrations. This is a rarely used function, but including the offset ability means this function may be accessed more often just to create these ground balance offsets. With the GMT you could ground grab, and then manually tweak the setting, but the tweak had to be applied every time the ground grab is performed. Now the offset can be dialed in and automatically applied. The real zinger however is that this also allows the 24K ground tracking function to be directly tweaked - very, very rare indeed. Almost every detector I have ever used has a preset ground tracking circuit that puts the ground balance where it wants, end of story. With the White's Goldmaster 24K you can create a tracking offset, to deal with hot rocks in a way that simply can't be done with most other ground tracking systems. Really cool White's! White's Goldmaster 24K detector with optional 6" concentric coil The 24K has the volume control the GMT lacks, which is quite handy for those who want to run without headphones, but not necessarily at full volume. There are 8 levels of volume plus two boost settings, Boost 1 (b1) and Boost 2 (b2) that kick in when you adjust the volume control above 8. The GMT features a Variable Self Adjusting Threshold (V/SAT) control, that governs the rate at which the audio resets itself when passing over a target, or ground variations. The GMT has a knob that runs from 1 to 10, and on the Goldmaster 24K the SAT setting has been simplified to three settings - off, medium, and fast. The default setting of medium is all most people will ever need. However, in extreme low mineral ground the off setting can enhance weak signals, although the detector may need very careful coil control, and slower coil sweeps, to allow the circuit to keep up. Conversely, extreme high mineral variable ground may require the fast setting to smooth out variations in the ground signal. The threshold control itself is interesting. Normally on an old school threshold based all metal detector the all metal mode, and threshold, are one and the same. The Goldmaster 24K like some newer digital models appears to employ what is referred to as a "reference threshold". The threshold may be adjusted, but appears to be disconnected from the all metal channel, and is instead layered on in parallel. The SAT control above does directly affect the all metal channel as described above. Yet it does what it does whether the threshold is present or not. Reference thresholds often exist for the sole purpose of nulling, or going silent, when passing over items that have been discriminated out, but this does not happen when the Iron Cancel (see below) is engaged. While bench testing in all metal with the SAT set at zero, I thought I might just be able to hear a waver in the threshold. I would be interested in hearing from other nugget hunting experts on this matter, because in my opinion the threshold as it exists on the Goldmaster 24K, is not coupled to the all metal channel in the manner one would observe on the GMT for instance. The only effect seems to be with threshold completely off the 24K will no longer give any ground feedback at all if out of ground balance. Based purely on what I am observing in actual use I would say the 24K is a silent search detector, with a reference threshold added, as opposed to a true threshold based all metal circuit like on the GMT. The difference is subtle, but there for my ear at least, and if there is a connection there between threshold and all metal channel, it is too minimal for me to discern while in actual use. Now we get into the real meat of where the GMT and Goldmaster 24K part ways. The GMT has an iron (ferrous) probability meter as does the Goldmaster 24K. The GMT meter is merely a bar graph - far left means 10% chance of ferrous and far right means 90% chance of ferrous. Somewhere in the middle means 50% chance of ferrous. The Goldmaster 24K puts a blacked out block at the top of the screen with similar positioning, but the actual percentage numbers display out as a "target id" number. This is not a target id number as thought of on coin detectors, but instead intended to be a display of the odds that an item is non-ferrous. White's Goldmaster 24K controls and display screen If you look at the display above there is a colored bar at the top of the 24K LCD meter - red on left, wide yellow middle, and dark gray on right. The three colors taper one into the other to indicate overlap. The red on the right indicates the probable ferrous range, and dark gray indicates items reading too high to probably be gold, but more likely a copper, brass, or silver item (high conductors) or certain ferrous items that "wrap around" and "read high". These include hardened steel items like large bolts, almost any washers, ax heads, etc. In theory this scale could be used for coin detecting, but the coins with few exceptions like a nickel tend to bunch up all on the right. The intent really is to be more of a ferrous/non-ferrous meter, but I do think I could make do with this for some general detecting scenarios. In air tests a nickel read 88, zinc penny 95, dime 96, and quarter 97. The Goldmaster 24K has an Audio Mode button, that engages and disengages something analogous to the "Iron Grunt" feature on the GMT. Engaging the Audio Mode replaces the normal VCO type "zippy" audio with a simple high or low beep. Any meter reading below 50 will deliver the low "ferrous" beep and anything 50 or higher a high "non-ferrous" beep. Since the gold probability range runs much lower, this is helping the operator concentrate only on the high probability targets - anything with over a 50% chance of being non-ferrous. This "over 50% equals non-ferrous" audio mode could be useful for direct hunting in some situations. However, when pushing the detector hard in all metal mode, and then switching the Audio ID mode on, I found that I would have to reduce sensitivity, or encounter quite a few false signals in mineralized ground. That being the case I was more prone to using this as a ferrous check, by engaging the button for a quick audio reading, then back again to all metal mode. The Audio Mode as I described it above acts much like the Iron Grunt feature on the GMT, but on the GMT the ferrous audio alert only kicks in when there is an 85% or greater chance of the item being ferrous. It is not a certainty on how the percentages correlate, but the 24K audio ferrous tone does kick in at readings of 50 and below (greater than 50% chance of being ferrous). Borderline gold targets can read lower than this however, down into the 40s and even lower. A 30% chance of gold is still pretty good odds. So what to do now except read the numbers? White's has addressed this with another control, the Iron Cancel button. Engaging Iron Cancel activates an adjustable iron rejection setting. The default is for anything reading 15 or lower to simply not beep. This corresponds to the solid red area on the bar graph display at the top of the meter. Borderline or mixed content items will break up or give erratic readings. The best part however is that the setting can be adjusted from 0 all the way up to 62. This allows the operator to completely block out a chosen range of low end readings that is either more conservative or more aggressive than the Audio Mode preset. As noted before, the threshold, if any is used, will not blank over rejected items - they are simply ignored. I noted above that highly conductive items and some steel items can read at the very high end of the scale, typically 95 and above. If the goal really is gold, it is very unlikely that readings this high will be gold, and so White's also offers the ability to block out this high end range. Tapping the "lock" button while in the ferrous adjustment mode, will automatically block all readings of 94 and higher, which is where most iron high end false signals will occur. Other controls on the Goldmaster 24K - a pinpoint function, frequency shift to help avoid electrical interference, or for running two 24Ks close together, a backlight for the meter for low light conditions, and finally, a factory reset. To perform a factory reset, hold the down arrow when turning the detector on. FD will display on the screen when the detector powers on. Now press the pinpoint crosshair button. The FD will clear from the screen, and the detector has been reset to default factory values. White's Goldmaster 24K with stock 10" x 5.5" DD coil Now for the part everyone has been waiting for - how does the Goldmaster 24K at finding gold? When I test nugget detectors I tend to concentrate on smaller gold. First, because it is more plentiful, and easier to find in limited time frames for testing purposes. Realistically small gold also challenges the detector the most. A metal detector must be tuned as hot as possible to find very small bits of gold. Yet this also causes problems with mineralized ground and hot rocks. It is not so much the small gold sensitivity that matters, but how the metal detector handles the ground while tuned up for tiny gold. This is why air tests are minimally useful for nugget hunters. They can reveal theoretical information about how small or how deep a detector can find gold under perfect conditions. Air tests give no indication however of how the detector will handle bad ground, and hot rocks, when tuned to the max. A detector can air test extremely well and fail completely in the field. Therefore when you see my metal detector test reports, pay attention to the smallest nuggets I find, not the larger ones. The 10" DD coil is a good all around nugget hunting coil, with DD coils having the advantage for handling difficult ground. It was the 6.5" round concentric that wowed me, however, and after I got it on the detector I really did not want to take it off. The 10" DD will be a better choice for really bad ground, but lacks that magic edge on the tiniest bits of gold. I also appreciate that concentric coils are easier to pinpoint with, and generally have better ferrous identification performance compared to DD coils. One nice thing about the 24K being well balanced is the 13.5" x 8" coil is less nose heavy than would be the case for an unbalanced detector. This is the coil to use for covering ground in search of larger gold nuggets. For medium to milder ground, and the smaller gold, I really do like that little concentric. In particular there is a lot of grass growing in some desert areas, and the 24K with 6" coil was perfect for mowing through the grass to keep the coil on the ground. This is another area where an "S" shaft has the advantage. A straight shaft detector wants to roll to the side when forcing the coil against resistance, where a balanced "S" shaft being in line with your arm does not produce that kind of rollover torque. The 10" x 5.5" DD coil was a little more prone to false signals when bumped hard than the concentric coil, to the point where I could run higher sensitivity with the concentric on this particular ground. The ground in lots of Nevada is rather mild, often with alkali (salt) content, and it may or may not have bad hot rocks. This particular location had two types of hot rocks to deal with. The bottom line is I was able to run the concentric at full sensitivity of 10, and in audio boost 2 (b2) while in all metal mode and SAT set at medium (default). Even with the machine maxed out like this the detector ran well, and as I said before falsed less than the DD coil would if I attempted the same settings. White's new XGB ground balancing system really does seem to do a good job finding a setting that works well with both hot rocks, and the ground, by tracking multiple ground balance points. I liked to engage tracking, run over a mix of ground and hot rocks, and then lock the setting. I was scrubbing and pretty much digging everything. The Goldmaster 24K with the little concentric is hot as a pistol, and as usual if you give me a hot detector I was able to find some really tiny gold. The eight nuggets below weigh a total of 8.3 grains (not grams - 480 grains per Troy ounce). The largest nugget is 1.8 grains and the smallest are in that under 1/10th gain range. Now, none of these were super deep because you can't find tiny gold super deep, but they were all good zippy targets - and I was not using headphones! Gold nuggets found by Steve with new White's Goldmaster 24K - smallest under 1/10th grain The proof is in the pudding, and there is no doubt the Goldmaster 24K can find the gold, and some really small gold at that. I am not going to try and convince anyone that there is some kind of magic breakthrough here - at the end of the day the 24K is a hot 48 kHz single frequency metal detector just like the GMT in many regards. Some oldtimers may still prefer the GMT for its threshold being tightly connected to the all metal channel, while the threshold connection on the 24K is weaker. Although the Goldmaster 24K can be run hot and noisy, all its design features point to a detector that is intended to be set up as quiet as possible, and this may even mean running without a threshold. I did not see any evidence that this would really hurt the performance at all. This kind of quiet hunting tends to appeal more to people new to nugget detecting, especially those who cross over from coin detecting. Add this to the lighter weight and lower cost package, and White's has done a great job producing an alternative to the admittedly long in the tooth GMT. Steve Herschbach DetectorProspector.com White's Goldmaster 24K Data & User Reviews White's Goldmaster 24K Quick Start Guide White's Goldmaster 24K Advanced User Guide White's Goldmaster 24K XGB Ground Tracking Explained White's Goldmaster 24K & GMT Compared Little gold nugget on coil fresh out of the ground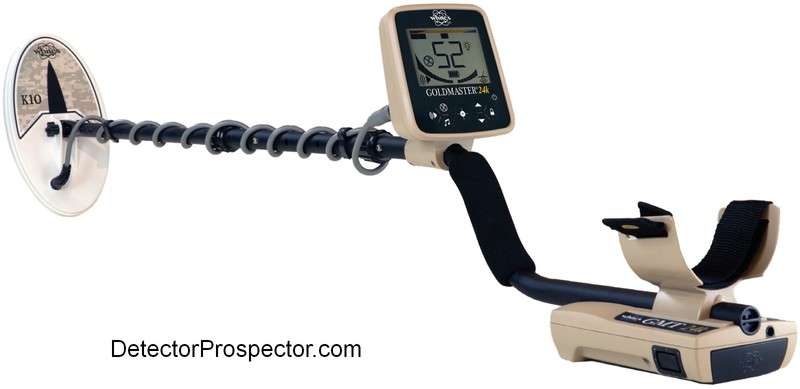
-
Hi Everyone. I am new to this forum but have been gold prospecting and metal detecting for many years. I have used machines from just about every major maker of metal detectors with except XP. I recent bought a Equinox 600 and have been testing it out. I have been making a lot of test comparisons with my fishers etc. And I realized today that the 600 does not have a true all metal mode like my fishers. Closest setting is Park 2' with iron detect turned on, but thats it. The 600 is not as sensitive as my F70 on small gold either when using the 15 hz setting. It says in the manual that single freqencies (machines) may have an advantage over multi freqs in certain situations. That fact really Shocked me. What's the point of using a multi freq machine if it is not superior in all situations? I tested the 600 against my Fisher F44 and F70 using the standard 11 in Dd coils on the fishers and the standard 11 in dd on the equinox 600. The fishers out performed the 600 in just about every test. The one exception was on wet sand saltwater beaches, The 600 was slightly better there using beach 2, but that's it! The F44 with sensitivity turned down was almost as good. The F44 is lighter by a half pound, which matters a lot in all day hunts And finally it may be my familiarity with Fisher products but the fishers handle much better then the minelab 600 (coil wabble) That said, The minelab is not a bad machine but I'll take the fishers over it any day.
-
Just had my first so he's an infant but I want to get him a detector when he can walk. I know the go find and mini hord. But I'm looking for a specific gold vlf for a kid. there may not be one on the market mabye I will just pick him up a monster but that's pretty heavy for a kid. Any thoughts I only nugget shoot.
-
I have to give Garrett 10 stars on a scale of 1 thru 5 because 5 stars is simply not enough. I sent my Axiom in to have them give it a look because I have had some issues with the audio cutting out mostly. The last time I had it out was in a location plagued with really bad EMI not to far from a military base, it wasn’t a problem in the morning but by afternoon it got a little noisy and hard to use. I’d sent Garrett a detailed explanation of what I was experiencing and they went to work. Testing it over and over my Axiom seemed to function as it should have but they didn’t simply stop there, to be sure they replaced the circuit board and most of the internal electronics and added the latest firmware update and continued testing until they were certain it was as good as it could be, this is to me the best solution as I much prefer one carefully examined over a new replacement, I have complete confidence it’s perfect after all the tests and work they did, a new detector is probably just as good but we all know no matter who the manufacturer an occasional subpar unit shows up from time to time, even then we’ve all at some point wondered if our unit was working at peak performance… how can you know. Well great customer service is the best answer to that question and without doubt Garrett is the answer they have the customer in mind and stand behind their product. If anyone is local enough to me and was considering the Axiom let me know and we can meet up and you can try mine out, I have in addition to the 11” mono and 13” DD coil an 11” DD coil too so you can get a pretty good idea of what will work best for your detecting style… you can also try my 6000 and the 5x10 gold hawk if you like, I don’t have the new nugget finder coil yet but I’ll have one when inventory catches up with demand.
-
 What does a Veteran Detectorist think of all the gold detectors? I’ve been hooked and chasing gold nuggets for 25 years with a metal detector. I really don’t care who makes it or where it’s from, as long as the detector can find me more gold. I’ve used most all of the popular gold detectors manufactured and or sold in the US in that same 25 yrs. I’ve watched metal detector manufactures grow, seen them make a few duds, helped a couple introduce some fine detectors to the industry and I hate to admit it, but have watched a couple big name manufactures close their doors. I think it might be fun to share my spin on the brand that seems to just keep getting bigger and stronger – Minelab. Yes there’s a few guys out there who have been using detectors longer than I and maybe they don’t agree with me. No worries, I’m not trying to outdo anyone or prove a point. I just want to share what I have experienced and if someone feels different and wants to take the time to do a write up, that’s even better. It adds to the discussion and conversation of what we here on DP love, detecting for gold. Chuck had asked if Minelab had made a gold detector that was essentially not much of an improvement. Jason gave his input and history of Minelab detector and how he ranked them. I got to thinking, as a Minelab dealer for 20+ yrs and one who was even using their technologies and products in the field with success, before I became a dealer, I feel some more light could be shed and even going back before Jason was on board. Minelab SD-2100. In 1996 I was blown away with the introduction of the SD-2100 and it's power (depth) over a VLF. Yes, it was a heavy detector but I was young and enjoyed digging deep holes. Definitely deserved a 5 star rating as this was the deepest detector I had ever got my hands on. Minelab SD-2200d. The year 1998 a new version, the SD-2200d come along and the depth was on par with the 2100, but the 2200 had some discrimination, which worked ok. This detector did not knock me off my feet, but I did use the DISC in some areas of Oregon to get good gold in trash. I'd rate it a 3 Star. Minelab GP-Extreme. 2000 was a good year and the introduction of the GP-Extreme with DVT (Dual Voltage Technology) allowed for greater improvements on smaller and finer gold than the SD's. Minelabs claim of nuggets 55% deeper than an SD-2200d (wonder why they did not say SD-2100?). I was pretty happy with their claim and my success…when I found an Extreme that ran properly as some of the early ones were noisy. I would give it a 4 star. Minelab GP-3000. The issues of the GP-Extreme were cleaned up and an improved GP-3000 came out in 2003. Again, no big jump in depth, but cleaning up the internal noises allowed for cleaner smoother operation, clearer signal response and a few more nuggets. In my opinion the GP-3000 earned a 3 star. Minelab GP-3500. Only 2 years later in 2005 and the GP-3500 was in my hands. Again, no big depth difference in any types of gold, but the Ground Tracking Button was added to the top of the hand grip. This change was nothing I wrote home about, but it was an improvement. I'd rate it a 3 star at the time. Realize from the SD2100 (I never owned an SD-2000), up through and including the GP-3500, the coils, shafts and power supply were the same, so in reality it's hard to get a big increase in depths. The GP series with the DVT was better at smaller/rougher gold but depth on big gold was all pretty close and I felt in some cases the SD's could get a little better depth on solid nuggets. Today, finding a good clean SD-2100, SD-2200, GP-3000 or GP-3500 and it runs properly, at a decent price, would be a wise move for someone on a budget wanting to step up to a PI. That’s why I am willing to take some of the older units in trade, but the price has to be right. Minelab GPX-4000. 2006 was the GPX-4000, yes a new series "GPX" and there was improved capabilities again on smaller gold, specimens and crystalline gold. New lighter battery, digital readout tuning and more timings. No claim of extra depth from Minelab but I felt the adding timings, and digital adjustments were in fact getting me a few more pieces of gold. I give the GPX-4000 a solid 4 rating of 5. Minelab GPX-4500. In 2008 we were offered the very popular (even to this day), GPX-4500. I personally did not see a big difference in depths and or did Minelab make any claims of such. But it did have SETA (if I recall, a smoothing filter?) and added Timings, improved battery with built in Amp and a better waist belt, for what that’s worth. Even though this machine was not a wow factor for me, it did prove the test of time and to this day is a fantastic PI detector. In fact it was fazed out in the US and then later brought back at a better price point. At the 2nd better price point, certainly a 4 star, maybe 5, but at 1st when came out in 08, I rate it a 3 out of 5. Minelab GPX-5000. Fall of 2010 we get the new improved GPX-5000 with 2 added Timings and some other fine tune adjustments. No big depth differences for most folks, but the 2 timings did have their merit and some folks to this day prefer a 5000 over a 4500. If I was looking at price differences today, I think the 4500 is a better deal at $2600 vs the $4000 price point we see for a GPX-5000 today. Realize the 5000 was priced $5800 and stayed there for a few years with great sales. I don’t recall Minelab stating any depth gains of the 5000 over the others, but I could be wrong? I did find more gold though as the Fine Gold Timing was good for certain kinds of gold. I would rate the GPX-5000 a 3 star. Minelab GPX-4800. Came out about the same time as the GPX-5000 while they tried to faze out the GPX-4500. The 4800 in all fairness a relabeled 4500 in my opinion and it did not sell well, or last long. Still a good reliable detector though and event today finding a used one at the right price is a good move from a VLF. This was in my opinion, Minelabs 1st flop of a gold detector introduction. I rate it at a 1, but performance at a 3. All 4 models of GPX detectors use the same power cords, battery (although the 4500,4800 and 5000 battery have built in amp), same headphones and shafts. Heck even the coils, shafts, headphones are all interchangeable with the SD and GP series as well, nice bonus for us all these years. An interesting spin on the GPX gold detectors, is they are now the most desired detector of the serious Relic Hunters back East. Those East Coast dealers are finally getting to make some money selling a multi thousand dollar unit that performs above all others at depth. SDC-2300. Introduced in 2014, I felt this was a good breakthrough for Minelab and the gold nugget hunting community. Easily the coolest looking most compact gold detector Minelab has made to date, but heavy and awkward. Well we learned to deal with it, as it’s simplicity and performance for the majority of gold (small gold) was a big win. The 100% waterproof had a liking as well and I enjoyed a few nice water hunts with it on some black iron sand beaches with gold & diamond success. No it’s not a deep PI on big gold and Minelab never claimed it was, but boy did and still do, many people have fun and gold finds. I rate the simplicity/performance of the SDC-2300 a solid 5 star. GPZ-7000. Early 2015, a Field Staff Expert and I took a prototype GPZ-7000 to Nevada to test the 40% more depth claims Minelab was touting. Another easy to see benefit of the GPZ was the simplicity when compared to a GPX and we liked it as we also realized most customers felt the GPX detectors were not easy to understand with the 250K variables of timings/sub timings/options/settings. The easier to set up and run 7000 was going to be easier to train and in fact we were worried it might be too easy and nobody would take the training. That eventually went away, as we realized most people still did not have an understanding of proper coil control, a good beep form a bad one and difference from ground noise and a real target. Did we find the 40% depth increase claim to be true? Well no measuring sticks were used, but I know for a fact the 7000 sees a variety of gold deeper than any other previous bigger PI detector I or any of my Field Staff have ever used. Our biggest complaint about the detector was the actual weight. In fact my 1st prototype did not even have the swing arm, which is almost a must for most folks. I rate the GPZ-7000 a solid 5 of 5 stars. I will say this though. Early on, I would have rated it a 4 as I had not spent enough time testing the settings and getting it dialed in like the settings I currently use. Today, I feel the performance of the GPZ-7000 is easily a 5 star. GPX-6000. Introducing in late Spring or early Summer 2021 the most impressive of all GPX-6000. The claims of XXX depth over a variety of gold is impressive to say the least. The ergonomics and feel from my Staff that played with it seems to be a 5 star. The User Friendly cleaned up turn on and go (somewhat like a GM-1000) operation rates a 5 star. Now we just need to get it in our hands and in the field for some actual real prospecting. Then we can rate the stars on Performance vs what Minelab claims. Again, I know some folks will have differing opinions than what I have mentioned. I also know their soils and detecting ground or overall detector knowledge will be different. I realize a few people have higher expectations than some of us and or not as fast to sell their old to try the new, technologies. But when I look back at my 25 yrs of using Minelab detectors, I find very little faults in their claims of depth increases. I’ve also found each new gold detector actually was an improvement over the other (minus the 4800) in some way or another. Do I justify each of us running out and purchasing the next new model? Heck no, I don’t know your income level or how high on the fun scale you rate detecting and digging up gold. But for me, I have found enough gold to pay for all my different Minelabs and I consider detecting to be my #1 passion. In my eyes, Minelab has been the most consistent metal sensing detector manufacture in the last 25 yrs and will probably continue to do so. Each new unit they have come out with has produced more gold for my staff and I. We all expect this new GPX-6000 to do just what we want. That’s to find more gold, with a better ergonomically designed and user friendly detector. Will we find a particular nugget that one of our other detectors may hit at stronger, or a little deeper, or in a certain EMI or soil condition? Could happen, but I don’t worry about the rare anomaly occasion, I look at the overall variety of gold I pursue and chase. I’ll go out on a limb and rate the GPX-6000 a ---- shooting star. Would love to hear your responses. The video is some of my guys and I putting a spin on one of Minelabs 5 Star rated gold detectors.
 -
 My first impression was that this is a completely different detector from the previous 705 model and much more similar to the Equinox 700 pod configuration but without Multi-IQ. I have used the older X-Terra 705 with the 18.75Khz. Gold Pack coil and was curious to see how the new X-Terra Pro would perform on some smaller nuggets. I also liked that this detector had a manual ground balance and the Equinox 700/900 VDI numbers. So, the Equinox 6" coil was used for this testing using the 15Khz. Park 2 mode on both the X-Terra Pro and the Equinox using nugget sizes of .03 and .05 Gram. The X-Terra Pro and the Equinox could easily hit on both nuggets. As suspected the X-Terra Pro did have a decrease in target sensitivity when compared to the Equinox when I tried it in the Park 2 multi-frequency mode. Ground handling capabilities on both detectors were as usual for a VLF, no new breakthrough in this regard. I'll will have to admit I was surprised that this detector at it's price range could be used also for prospecting. I would like to hear any feedback if anyone else has used the X-Terra Pro for nugget hunting with any success. If this detector had a small coil and a selectable 18, 45, and 71Khz. frequency option I would call it a Goldmonster 2000. Yes, it would also be a waterproof fully submersible GM2000.

-
Kindly identify this mineral,
-
Thought this was a great demonstration video of these four detectors.
-
Ok, I admit, this has been the worst week in years, thanks also to the fact that I am now limited by law to hunt in very few spots on my coast among the thousands available before. But preparing the Deus 2 in a scuba configuration for tomorrow morning, I'm really feeling like I've got it all wrong. Wrong coil due to the only 11 "available, no need of the ws6 headphones and last but not least, this horror shaft lenght! So the almost funny question is: how did You manage to dive with it? Shorter lower stem's lenght doesn't allow to hunt without upper shaft falsing noise. If I extend in the correct position the upper shaft part, there's no way to reach the coil area with the arm and to dig properly, not to mention the bonephones connector's cable contact with the shaft. The last forced option is to collapse it and have to literally face the remote among the forearm and the elbow. Can I be more pissed than usual?....Of Course...Apparently.

- 8 replies
-
- 2
-
-

-
- beach detecting
- xp deus 2
- (and 1 more)
-
Well as we're getting flooded by video's of Deus Deux VS "All contenders" and to chase away the overindulgence of Christmas. I sold the Equinox and the CTX. What have I done??? Anyways, a few batteries less to keep charged and the much needed space in my brain feels liberating. When Two-sy arrives I get to put all my efforts in understanding this new kid. And it keeps me from thinking "The XXXX could have found this also,... The XXXX would have sounded different,... etc etc. Tommorow I get to break out the old X-terra 705 with the elliptical for a relic hunt. Single frequency rules guys !!!!
-
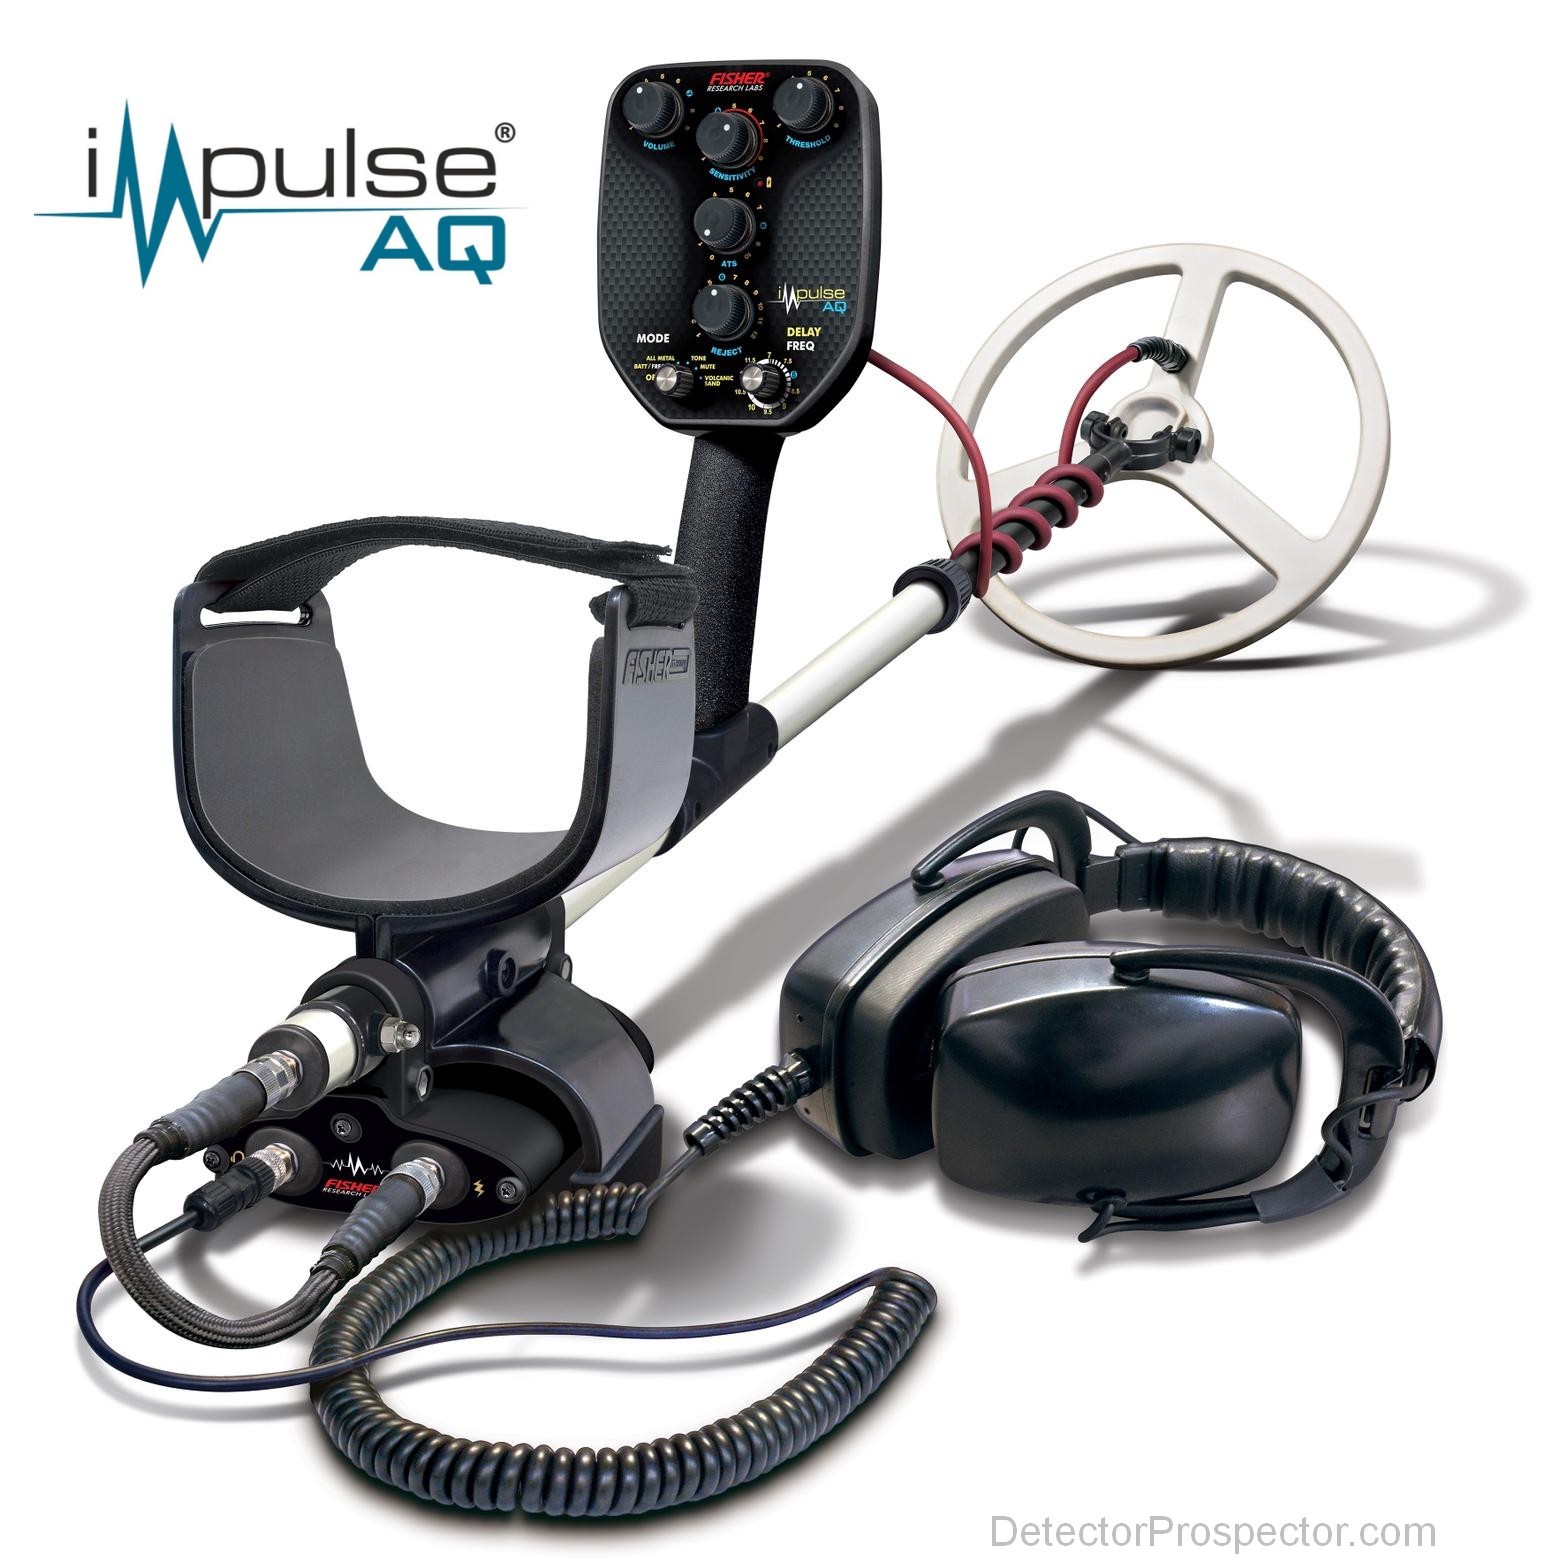
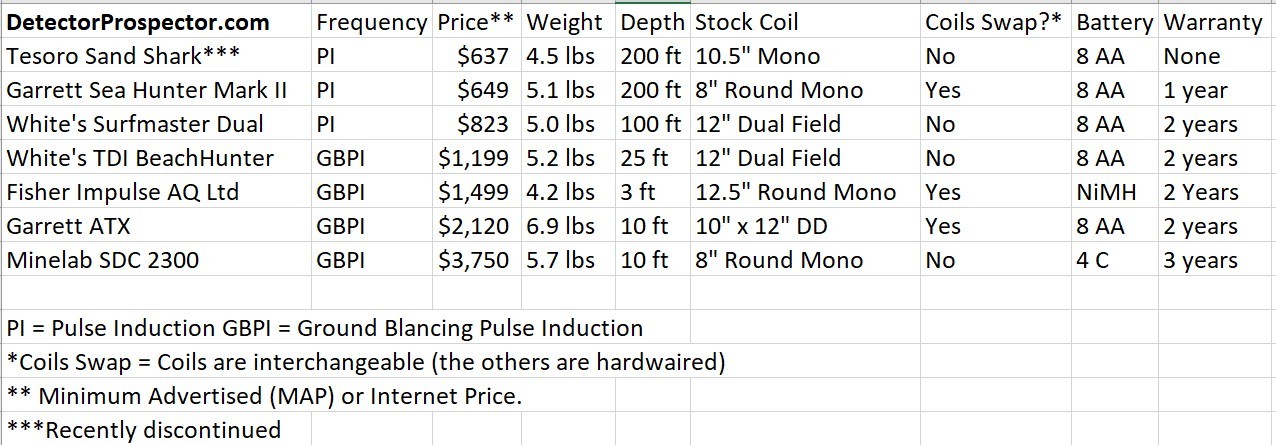
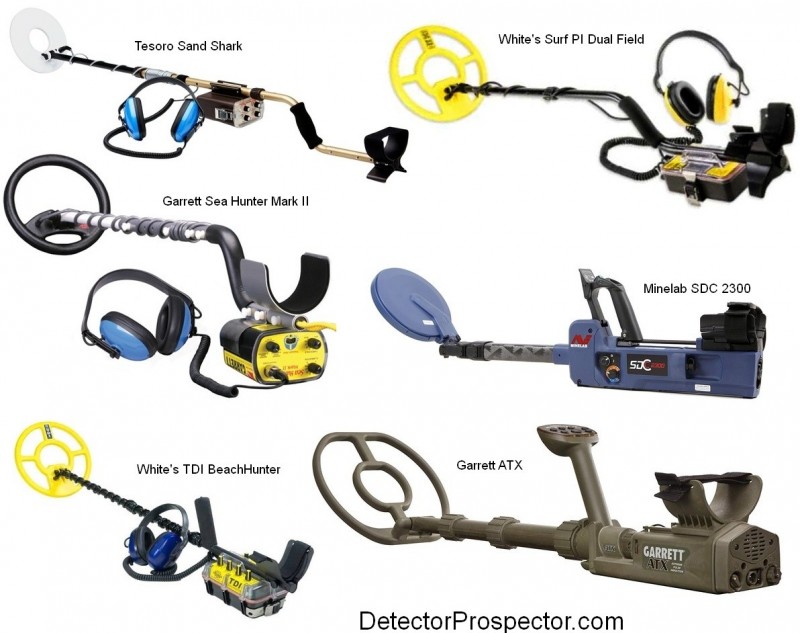
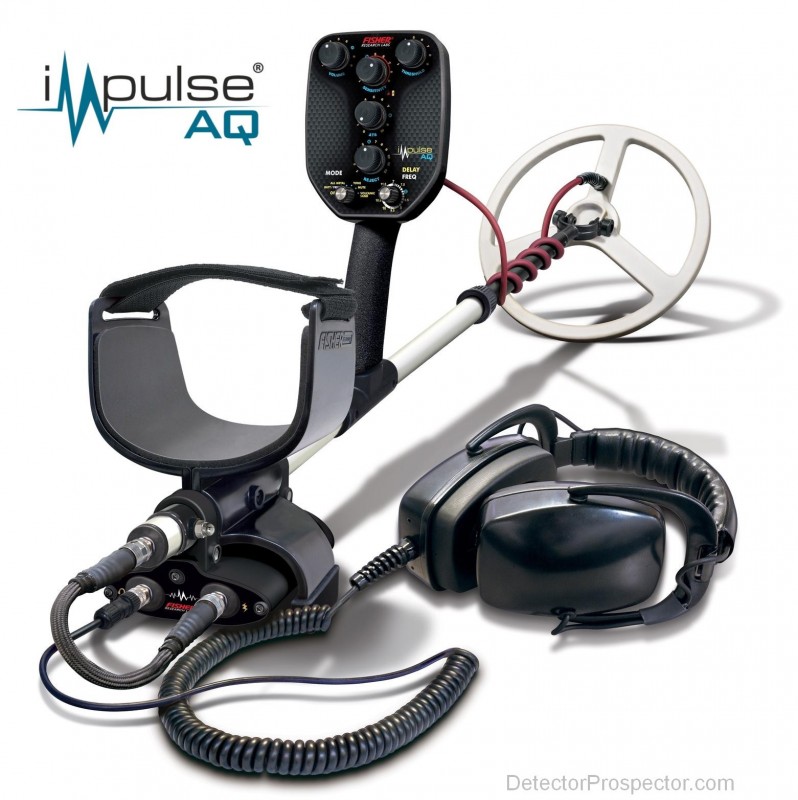
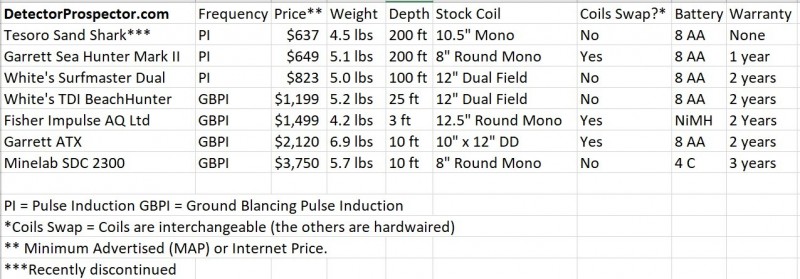
The waterproof pulse induction field is very limited at this time. It divides into two classes. Pulse induction metal detectors that ground balance, and those that do not. A pulse induction (PI) detector by its nature tends to ignore mineralization, so much so that in milder conditions a PI works fine without a ground balance circuit. As I noted above however a PI is not immune to mineralization. A non-ground balancing PI detector will sound off when raised and lowered over true black sands. The more concentrated the magnetite, the more intense these signals will be. The bottom line is that on real bad black sand beaches even a basic pulse induction will sound off if the coil height is varied too rapidly over the beach. In the water with troughs and depressions false signals are all but impossible to avoid. The most extreme situations require a ground balancing pulse induction (GBPI) metal detector. Pure white non-magnetic coral beaches - most any detector will work well Even a hint of mineralization - a multifrequency detector has an edge over single frequency VLF where there are both saltwater and magnetic minerals. Moderate mineralization - you want multifrequency or pulse induction. Severe mineralization - at some point a ground balancing PI (GBPI) is required. The above conditions grade from one into the other seamlessly. Hot rocks are a wild card as hot rocks in a normally mild beach can cause false signals on a PI detector that lacks ground balancing capability. Finally, I should note that PI detectors with ground balancing capability have a crude sort of tone discrimination that can be used to advantage. Fully submersible pulse induction metal detectors Here are the current mainline waterproof PI detector offerings: Bounty Hunter - no PI Garrett - Sea Hunter Mark II (PI) and ATX (GBPI) Fisher - Impulse AQ Minelab - SDC 2300 (GBPI) Nokta/Makro - no PI Teknetics - no PI Tesoro - Sand Shark (PI) (Discontinued) White's - Surfmaster Dual Field (PI) and TDI BeachHunter (GBPI) XP - No PI Finally, here are the key specifications for comparison: Fully submersible pulse induction metal detectors
-
 Hello, I would like to jump back into metal detecting hobby, however as technology made a huge jump I have many doubts regarding new equipment available. The more I read the more I cannot choose and decide what's best bang for buck and best for my purpose and terrain. Could you please help? I will try to describe all necessary information below. Around 12-13 years ago I bought my first detector which was Minelab Musketeer Advantage Pro. It was recommended to me by a person who had Minelab Sovereign and I have to tell I was pretty happy with it as it was kept simple - adjustable power and discrimination were basically the only settings used daily. There were no number indicators like my friend had in Sovereign, just the sound of what's under the coil (or might be). I also loved the way that I had battery back that lasted me 2 full days of detecting (2x8/10h) and even if they would run out of power I still had backup case for 8xAA batteries that I could switch in less than 30 seconds. Musketeer also was pretty heavy and reliable, I cannot count how many times I dropper it or it hit a tree trunk heavily and nothing ever happened or broke. I do not know how deep in searching it was, but I have never been really checking that and comparing to others. These are my memories with it. As I would like to jump back into this, I have read many thread on multiple forums, watched countless videos with comparisons etc. and I am really stuck with what to choose now. What did I check so far (among others): 1) Minelab Equinox 800 - seemed complicated, but after some reading and videos I understand how most of things work. Packed with tons of options which I worry I will not know how to use in reality. Sound seems strange and not like in Musketeer or Sovereign. People write good reviews, however some field tests I have seen show that it does not detect that good and deep as others, especially on ancient/medieval coins or artifacts and some military stuff (eg. belt buckle). What I really dislike is battery that lasts around 10h and in field or 2-3 day trip there is no way of changing it as in my old Musketeer (why?!). I have read that it is also very vulnerable to hits and needs reinforcement. It is supposed to be able to work in water, I thought about some shallow rivers here, but again I read that is has many leaks and issues with that. Equinox 800 seemed at first as obvious choice after using a Minelab previously, but field tests for European stuff disappoint a little? I am really unsure, maybe I just got into this race for best machine and people fighting over 0,5cm of depth? Point that for me if you think that's an issue. 2) Rutus Alter 71 - local, Polish manufacturer. Works in a strange way that I cannot compare or simply describe here, maybe some of you are familiar with this stuff? Many people in Poland have them and say that it is at least as good as Equinox 800, furthermore, tests I watched shows that it can be better in some ways and just little worse in different. Unfortunately this detector is discontinued since this October. It does not have multifrequency, but can be adjusted manually from 4 to 18 kHz by 0,2kHz (madness?). 90 levels of sensitivity, 120 discrimation levels, feels too much and a lot of clicking... I just want to search and dig, not play with it whole day. 😞 The good stuff? It has AA batteries, easily replaceable in field and lasting little longer than Equinox 800. I just don't know about it, of course it's cheaper than Equinox 800, but not sure if I can handle it... 3) ORX and DEUS - I never had any experience with such models and brands, but I read that they are considered as top detectors. I am unsure about their reliability and how easy it is to use them? DEUS is supposed to be for experiences operators only, but after knowing how to set it up and outperforms other detectors (many people claim it this way). I also read that DEUS 2 is supposed to be released, but in such scenario I can always be waiting for next stuff that will be released to stay on top of equipment. Now, I am mostly interesting in coins/buttons/buckles from belts and other artifacts. In general I guess like universal detector, not like smallest stuff only as you can always encounter here something that is bigger and not necessary shallow in the ground (eg. sabre or bayonet). Terrain that we have in Poland is really different, the region I live close by has a lot of limestone rocks (I guess that's English name for it - check pictures), rocky soils mixed with sand mostly. We also have heavily mineralized and iron black soils. Forest is well, forest. 🙂 I think I can say I will be using this detector more or less like this: - 30% fields unused for 10-20-50-100 years (very bushy) - 30% used fields - 30% forests - 10% for little wet ground, kinda swampish in forests, maybe riverside or very rocky/difficult terrain To sum up, I would love something that will last me good couple of years, be as simple in use as possible with all that modern stuff and settings, reliable/strongly made (bushy areas or rocks) and will allow me to work for as long as possible. I also want, like everybody 🙂, best performance in finding stuff (good depth coverage and identification of nice stuff). Sounds like a dream detector, but why a man cannot dream? I am having a difficult time deciding, I hope that your insight or opinion will help me as I think I suffer from overthinking and I am kind off overwhelmed by modern technology in detecting and all that can go wrong with me not setting equipment right and losing interesting stuff in the ground. Polish terrain conditions are also not easiest with all trash in the ground (iron/aluminum) and the soil itself. If I could give you any more details that would be necessary for you to advise me on detectors, just let me know. Thank you all for your time in helping me out!
 -
 Hello, and apologies in advance for being a complete noob. My goal is to find interesting antiques on some land that I've inherited in New Zealand. I'm sure you all have insightful opinions on which detector to purchase, however I need to purchase with cryptocurrency and newegg.com is the only site I've found where I can pay with crypto, and also have it delivered to NZ. Please compare and contrast: Garrett AT max Minelab Equinox 800 Teknetics T2 / or omega 8500 Fisher F19 TX-850 Gratefully accepting opinions on which to buy, or alternatively another place to buy a metal detector with crypto in NZ
 -
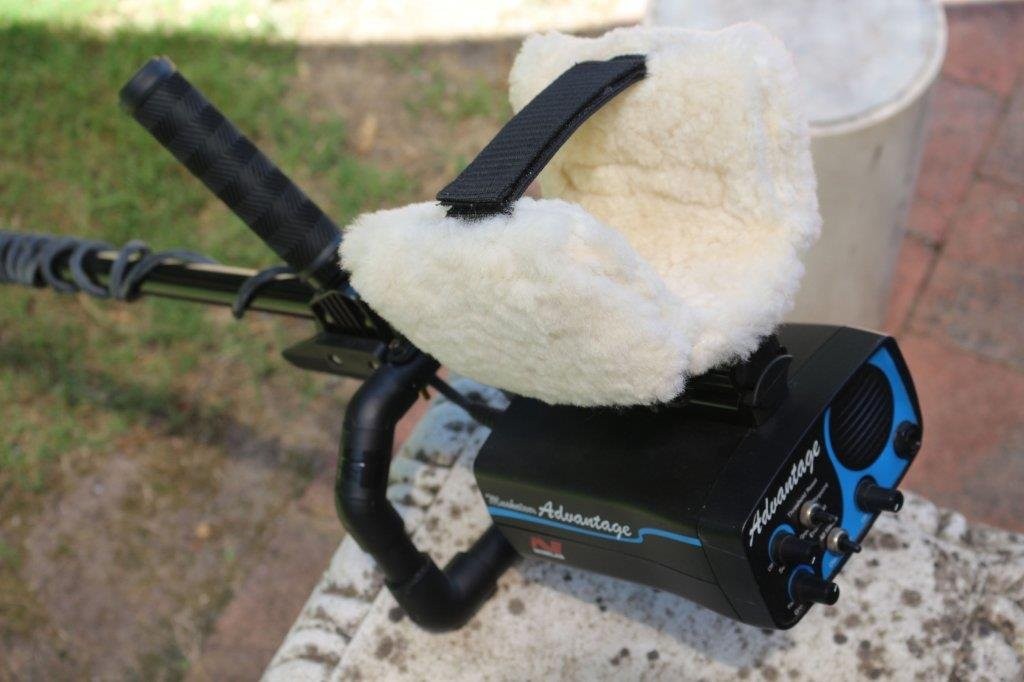
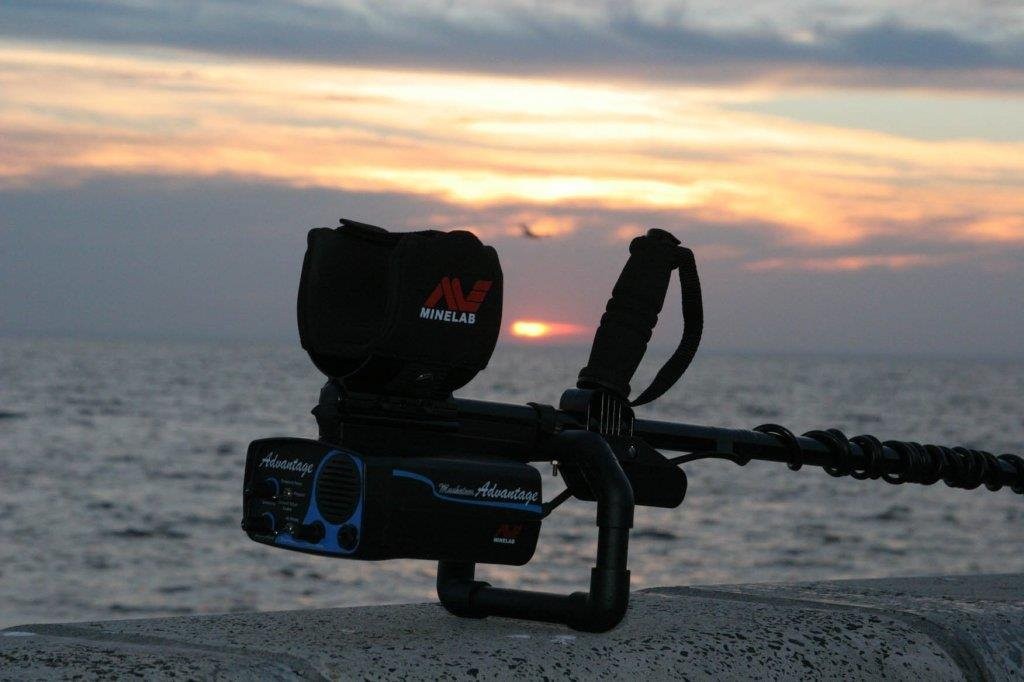
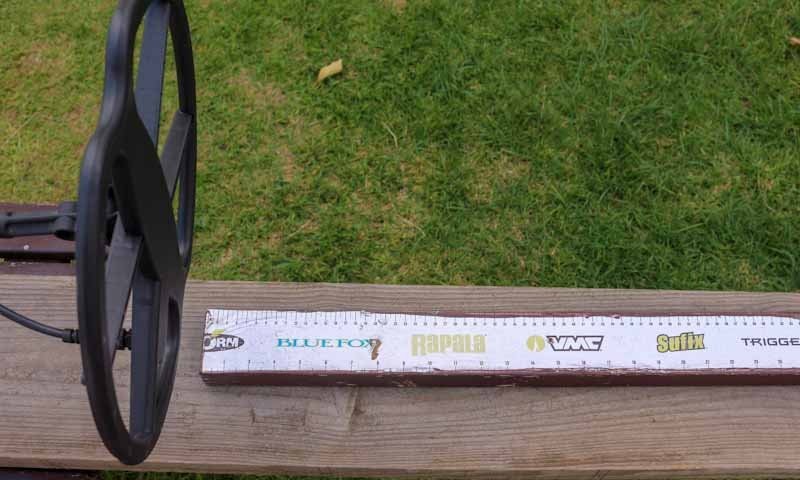
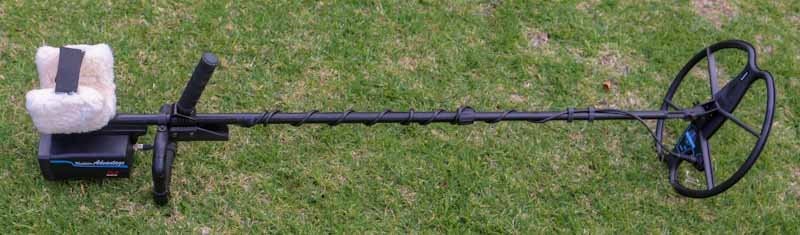
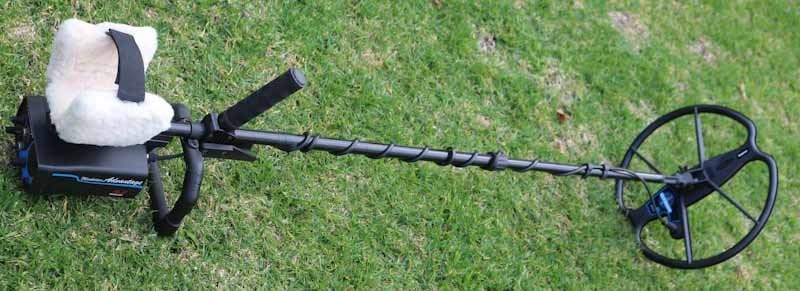
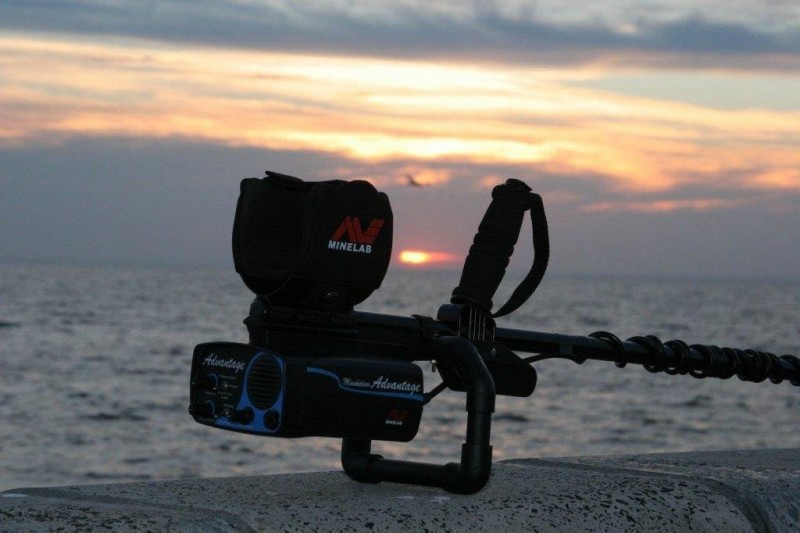
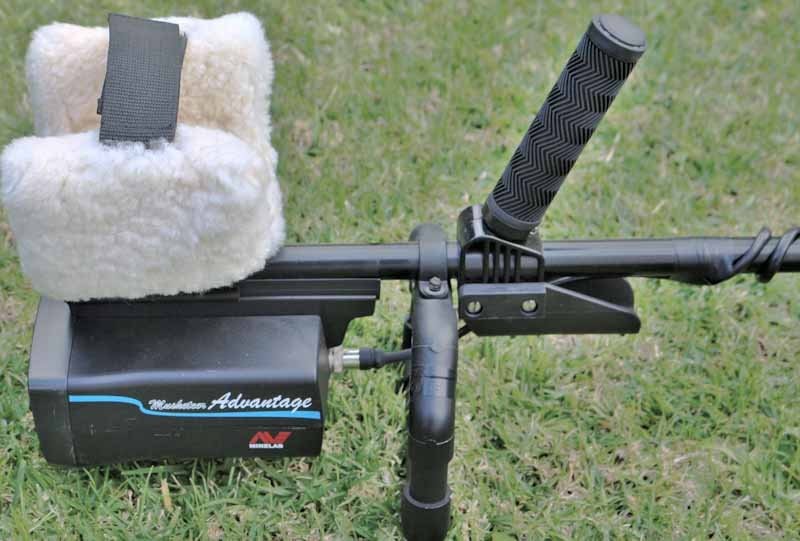
For a long time my Minelab Musketeer Advantage was my top dry sand beach detector. It ate up large areas of sandy beach quickly, key factors were speed combined with depth. Decent disc, mated with that strong good target signal compared with the 'spitty' disapproval of trash.. simple audio no meters etc, fast and efficient. An Explorer Se Pro handled the wet sand until the White's Tdi took over that role. The old Musky sat unused for a long time whilst the Xl Pro and MXT saw plenty of action. The purchase of a Ultimate 13 coil has rekindled an old love affair and breathed new life into the Musky. Good size and performance combined with light weight has turned into a winning combination. This rig balances beautifully and the coil feels as if it is floating in the air, the detector is weighty but the balance more than compensates. With the Musky mounted on a GPX upper and under the sheepskin cuff, balance is perfect. Switches have rubber boots to keep sand out and the machine is off the ground on a DIY stand. I only use it on the dry beach sand, sports fields, parks or other low to medium trash areas covering large areas. This setup just covers ground fast. Flexible fast, moderate or slow sweep speed, it doesn't care. Simple audio disc, when in doubt dig it out. Fast and deep. We have many modern digital lightweight detectors to choose from but this old analogue machine still performs and with a modest investment, that Ultimate 13 coil has breathed new life into the Musky. I'll get a few more years out of her yet. All the best, Karelian

-
Hello everyone!! I am new to this forum. I have been doing soem serious research. I live in Fl. I will be searching mostly beach, homesites, and parks. Jewelry and coins. I really am NOT concerned with prospecting or relics.I have narrowed down to three detectors (see below). I am not wanting to pay $$$ for features I will not use. Is the multi IQ (minelab) really worth it/necessary for what I want, or would I be okay with a single frequency? TIA for any input Fisher F75 Vanquish 540 equinox 600
-
 Hello detector prospectors, last May, a group of gold prospecting friends and me tested and compared our gold detectors at a creek in Switzerland. We are experienced gold prospectors, but no detector experts. We use our detectors to check our spots, where we hand-sluiced etc. i.e. we check the freshly opened bedrock or clay layers. So we don't need to optimize our detector settings for absolute maximum depth etc. We rather switch them on briefly to check after a long hand-sluicing day or so, when we are tired and have no "fresh brain" to really optimize settings etc. But it works very well to find hidden pickers in bedrock crevices or clay. So as we are no detector experts, you may cut us some slack for our rookie mistakes. But we tested honestly and simply show, what we did. The creek gravels in Switzerland have low mineralization, so the results may be different to USA or Australia gravels. I was personally surprised and impressed by the old Tesoro Lobo Super Traq and the Whites Goldmaster GMT. Funny: when I planned to do this post, I had in my mind to maybe buy a "new old" Whites Goldmaster GMT, because my old broke. I guess I would prefer it to the Goldmonster, after this tests... But unfortunately, White's Electronics closed. Than I read the post about the new Garret Goldmaster 24k, which is great news for me... But anyway, here is the video. I hope you don't kick me out because of our rookie mistakes 😄. Enjoy:
 -
Hi Everyone, I get on a plane in a few hours, and as a parting gift I've updated my Nugget Detector Review with my thoughts on the new GPX 6000, plus the upcoming Garrett Goldmaster 24K. Thank you all for the well wishes, and when I get back, I look forward to seeing how the GPX 6000 saga played out in my absence. Good luck to everyone trying to put a few nuggets in the poke! And one more thanks to Chase Goldman (Hugh) for keeping an eye on the spammers while I am gone. Steve Herschbach
-
 I used the Nox 95% of the time and the GMX the other 5%.The GMX was new so I gave it a few spins to try to find where it likes to hunt. I hunted about 40 hours in the water too but mostly in the turf .
 -
Reading a recent thread reminded me of the Nautilus and how it was perceived and received by detectorists here in the UK. My detectors of choice are GPX-5000 and Nexus MP/Ultima, with a selection of coils. Prior the Nexus my favoured VLF being the Nautilus DMC-IIB. At the time, relatively few UK detectorist had heard of the Nautilus and of the few who had and went on to purchase, most gave up on it. They couldn't get their heads round the necessary coil balancing or get to grips with the unique way it could ID iron and the way the batteries were exposed on the underside was a total turnoff. Nevertheless, as a lot of readers will know, the Nautilus was a very good detector, deep with good iron discrimination. The fact that some expressed negative opinions, didn't and couldn't change the fact that the Nautilus DMC-IIB was a very good detector. I have recently ordered the Nexus 21" Concentric coil for use on my GPX. This coil is like two coils in one. With just the outer coil in operation it's a 21" mono (no discrimination and max depth), when both the inner and outer are in use, discrimination comes into play. Two cables come from the coil into a small box, this in turn connects to the GPX coil connection. The little box has a two position switch for maximum depth (mono) and discrimination (Hot Ground) by using both the inner and outer coils. I will let readers know my opinion in due course.
-
Which metal detectors have the most reliable target ID numbers? Target ID is a function of depth - the deeper the target, the more difficult it is to get a clean target ID as the ground signal interferes. Other items directly adjacent to the desired target can also cause inaccurate numbers. The more conductive the item, the higher the resulting ID number, but also the larger the item the higher the number. Silver is more conductive than gold, so a gold item will give a lower number than the same size silver item. But a very large gold item can give a higher number than a small silver item, so numbers do not identify types of metal. Gold and aluminum read the same and vary in size so to dig one you dig the other. Only mass produced items like coins produce numbers that are more or less the same over the years but a zinc penny will read lower than a copper penny due to the change in composition. In general iron or ferrous targets produce negative numbers or low numbers. Aluminum, gold, and US nickels produce mid-range numbers. And most other US coins produce high numbers. Other countries coins, like Canadian coins with ferrous content, can read all over the place. The scale applied varies according to manufacturer so the number produced by each detector will vary according to the scale used. The 0-100 range for non-ferrous targets is most common but there are others. Minelab employs a dual number system on a 2D scale with thousands of possible numbers, but they are now normalizing the results produced to conform more closely to the linear scale used by other manufacturers. White's Visual Discrimination Identification (VDI) Scale Increasing ground mineralization has a huge effect on the ability to get a good target ID. Ground mineralization is nearly always from iron mineralization, and this tends to make weak targets, whether very small targets or very deep targets, misidentify. The target numbers get dragged lower, and many non-ferrous targets will eventually be identified as iron if buried deep enough. Small non-ferrous readings and iron readings actually overlap. That is why any discrimination at all is particularly risky for gold nugget hunters. If you want target ID numbers to settle down, lower sensitivity and practice consistent coil control. The target number will often vary depending on how well the target is centered and how fast the coil moves. Perfect ground balance is critical to accurate target id. Outside issues factor in. Electrical interference is a common cause of jumpy target id numbers. In general small coils will often deliver sharper, more consistent target id returns. Higher sensitivity settings lead to jumpier numbers as the detectors become less stable at higher levels. The interference from the ground signal increases and interference from outside electrical sources also increases, leading to less stable numbers. Higher frequency detectors are inherently more sensitive and are jumpier. So lean lower frequency for more solid results. Multi frequency detectors act like low frequency detectors and tend to have more solid target numbers due to the ability to analyze a target with different frequencies. Another issue is the number of target categories, or ID segments, or VDIs, or notches, or bins (all names for the same thing) that a detector offers. For instance here are the number of possible target id categories or segments each detector below offers: Fisher CZ-3D = 7 Garrett Ace 250 = 12 Minelab X-Terra 305 = 12 Minelab X-Terra 505 = 19 Minelab X-Terra 705 = 28 Minelab Equinox 800 = 50 Minelab Manticore, Fisher F75 and many other models = 99 White's MXT and many other models = 190 Minelab CTX 3030 = 1750 Fewer target categories means more possible items get lumped together under a single reading, but that the reading is more stable. Many detectors will tell you the difference between a dime and a quarter. The Fisher CZ assumes you want to dig both so puts them under one segment along with most other coins. People who use detectors with many target numbers usually just watch the numbers jump around and mentally average the results. Some high end detectors can actually do this averaging for you! But I think there is something to be said for owning a detector that simplifies things and offers less possible numbers to start with. The old Fisher CZ method still appeals to me, especially for coin detecting. So do detectors like the Garrett Ace 250 or Minelab X-Terra 505 for the same reason. The problem is that as people strive to dig deeper targets or smaller targets the numbers will always get less reliable. But if you want to have a quiet performing metal detecting with solid, reliable target numbers look more for coin type detectors running at lower frequencies under 10 kHz or at multiple frequencies and possibly consider getting a detector with fewer possible target segments. And with any detector no matter what just back that sensitivity setting off and you will get more reliable target numbers. ads by Amazon... Detectors often use tones to identify targets and often use far fewer tones than indicated by the possible visual target id numbers. The X-Terra 705 for instance can use 28 tones, one for each segment. However, most people find this too busy, and so simple tone schemes of two, three, or four tones may be selected. I think it is instructive that many people often end up ignoring screen readings and hunting by ear, using just a few tones. This ends up just being an ultra basic target id system much like the simpler units offer. Reality is that most people do not need or care about huge numbers of target numbers. For many just three ranges suffice, low tone for iron, mid tone for most gold items, and high tone for most US coins. The meter could do the same thing, but for marketing purposes more is better and so we get sold on detectors with hundreds of possible target ID numbers. Perhaps this is a digital representation of an old analog meter with its nearly infinite range of response but the reality is we do not need that level of differentiation to make a simple dig or no dig decision. Finally, a picture often says it all. Below we have a shot of the White's M6 meter. I like it because the decal below illustrates a lot. You see the possible numerical range of -95 to 95 laid out in the middle. Over it is the simplified iron/gold/silver range. Note the slants where they overlap to indicate the readings really do overlap. Then you get the probable target icons. -95 is noted as "hot rock" because many do read there. The M6 can generate 7 tones depending on the target category. I have added red lines to the image to show where these tones sit in relation to the scale. It breaks down as follows: -95 = 57 Hz (Very Low) Hot Rock -94 to -6 = 128 Hz (Low) Iron Junk -5 to 7 = 145 Hz (Med Low) Gold Earrings, Chains - Foil 8 to 26 = 182 Hz (Medium) Women's Gold Rings/Nickel - Small Pull Tabs 27 to 49 = 259 Hz (Med Hi) Men's Gold Rings - Large Pull Tabs 50 to 70 = 411 Hz (High) Zinc Penny/Indian Head Penny - Screw Caps 71 to 95 = 900 Hz (Very High) Copper Penny/Dime/Quarter/Dollar Note that the screen reading of +14 is noted as being a nickel or ring but it can also be the "beaver tail" part of an aluminum pull tab or the aluminum ring that holds an eraser on a pencil, among other things. The best book ever written on the subject of discrimination is "Taking A Closer Look At Metal Detector Discrimination" by Robert C. Brockett. It is out of print but if you find a copy grab it, assuming the topic interests you. Always remember - when in doubt, dig it out! Your eyes are the best target ID method available.
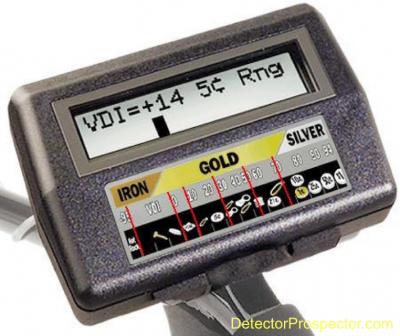


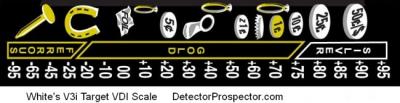
-
 This was our first test with her out in the Mojave Desert, and all I can say it is very easy to walk about detecting with this one. Firstly, there was no stooping over with a scoop to pick up bad targets with this detector, they were all the real thing! And GeoSense works amazingly well, love being able to go with her automatically and easily keeping up with wherever I detected, it was a breeze. I've detected with others that were unwieldly and hard to control in the desert, but I can say this one is really something special. We walked for a couple miles on the edge of a dry lake looking for meteorites and she really showed her stuff. She almost seemed to know her way over the salty ground, and picked up anything I threw at her. She easily found nuggets of every size left behind by many others, and was very quiet and hardly made any noise anywhere I went, even in the most briny parts of the ground covered with white salt, underneath the buzzing high tension power lines that cross parts of the dry lake, and even going over hot rocks did not seem to bother her much. She's quite a detector and we are finally really lucky to have one like this! All I can say is wow, everyone should have one like this for detecting! June is a great detector dog, we rescued her from the pound, and one day I hope to find a GPX 6000 too. Happy April 1st!
-
It is mind boggling that almost all my buddies and other people I see hunting or talk to have a Nox.The same thing could be said for the Garrett At series.Almost everybody I know has had one and I have seen guys I don't know using them a lot before the Nox came out.With Garrett the At pro was the most common.On this Forum I would bet that most have had a Nox. Even though I used the X-terra I never saw that many being used around here even though it seemed to be popular around the world.The At pro was more popular compared to it in the US probably because of Garrett marketing and it being all terrain and cheaper compared to the 705 version.For the turf I would take the X-terra any day because it could be tailored to more hunting situations.The x-terra and the Nox sound very alike which made it easy for me to gel with the Nox.