


NCtoad
-
Posts
808 -
Joined
-
Last visited
Content Type
Forums
Detector Prospector Home
Detector Database
Downloads
Posts posted by NCtoad
-
-
Another advantage to lowering the sense is that you'll get some nice modulation on the deeper stuff. Just going from 20 to 17 will do that and it still goes very deep.
-
Wow, that barber's in great shape. I just found my first one about week ago and it's not nearly as nice as yours. Congrats!
-
I've had signals that were clipped while using no disc (all metal, horseshoe button engaged) and while doing a 360 degree swing on the target, I'll hit an angle where the signal will be a solid high tone. This in park 1 or park 2 with iron bias at zero on both. At almost all other angles of the my 360 degree swing, I'll hear iron and see negative numbers. I'll just get that one sweet spot where it'll high tone (5 tones). I think every time this has happened it's been a rusty old nail. Now if I do a 360 degree swing and get mostly high tones with just a few iron grunts, it's usually a coin with iron in the hole.
-
I haven't heard anything, but I'd love to see a small (6"or 8") concentric coil come available.
-
10 hours ago, Nakky said:
Left has more material under the bolt.
Nakky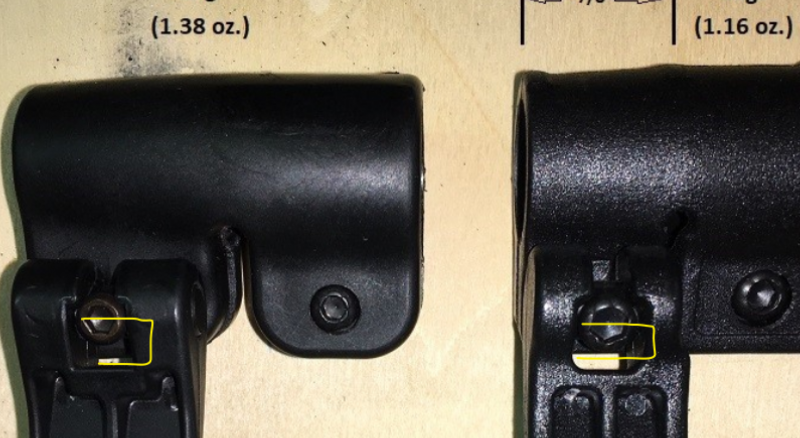
I like the looks of the one on the right, but the one on the left looks like it has more clamping surface and looks like the camlock itself is beefier.
-
Forgot to add: Does your rod use the OEM cuff or do you supply your own?
-
4 hours ago, steveg said:
Thanks for the kind words, everyone!
NCtoad -- yes, that was the whole idea for the design...to design/procure a cam lock that was very strong/stable/secure, and thus permit the elimination of the button/pin and hole design as was included on the Minelab stock middle shaft. YES, my design permits/provides infinite adjustment length -- again, a huge part of why I designed it the way I did. I got "spoiled" from years of swinging Explorers and, now, the CTX -- and I grew to LOVE those secure clamping cam locks which allow infinite adjustment ability at the simple "flip of a lever." I wanted to emulate that, with the Equinox. ?
You asked about pricing; I'm thinking at this point that there are going to be a few different options of shaft available (with customizable options of course, but I'll just ignore that, for now). Here's what I'm thinking for rough pricing for the more "standard" options...
I'm thinking that my "standard" shaft will come without a threaded butt-end of the shaft to accommodate the future, optional counterbalance system. This will be just an upper shaft with cam lock, plus holes drilled for the arm cuff and the control box, and a non-threaded "end cap" on the upper end. Preliminary pricing for this "standard" shaft will be $75-ish plus shipping without the lower rod, and roughly $119 or so plus shipping, with the lower rod also included.
For the same upper shaft, but with the inclusion of the threaded butt-end of the shaft (for future compatibility with the planned/optional counterbalance system), and a threaded end cap, $85-ish plus shipping without the lower rod, and $129-ish plus shipping with the lower rod included.
As I said, the shaft is designed so as to NOT require the button holes. However, the lower rods already include the spring buttons, so it's easy to allow the shaft to also utilize that spring button, just by drilling appropriate holes in the shaft. As such, any customer who WANTS the button holes included on the shaft for any reason, will be able to request that as one of the custom options. For that option, that would add $5 to $10 to any of the above prices.
This is kind of what I'm thinking at this point.
Let me know if you have any other questions...
Thanks for your interest!
SteveThanks Steve!
-
That looks awesome! I take it without any holes for a pin to set into, the shaft is not only stronger, but infinitely adjustable in length. Any idea on the pricing?
-
Thanks, just ordered it.
-
I have the first book and would like to order the new one. Where do I order one from?
-
I used my 6" coil yesterday at the only cellar hole I've found near where I live. I've been through this place with a few other detectors: F70, mojave, compadre and my nox with the 11" coil. My nox has the updated software version.
So yesterday using the 6" coil I got quite a bit of falsing with VDI's in the zinc penny range (19-21). This also happens to be indian head penny range and the only coin I found at this site was a 1906 indian head, but I found it with my tesoro mojave.
I would get some solid zinc signals in one direction, but always iron grunts in the other and sometimes iron grunts with the zinc signals. I dug these in hope of an indian head with a nail next to it, but it was always a nail and there are tons of nails at this site. I was running park 1, sense anywhere from 16-23, iron bias anywhere from 0-9, recovery speed anywhere from 5-8 and 50 tones.
-
I'm another fan of the stock headphones. They've held up well and the case is really nice and protects them while traveling to the hunting site.
-
On 10/15/2018 at 10:12 PM, Tiftaaft said:
Installment #2 to my hunts and review thread for the 6" coil.
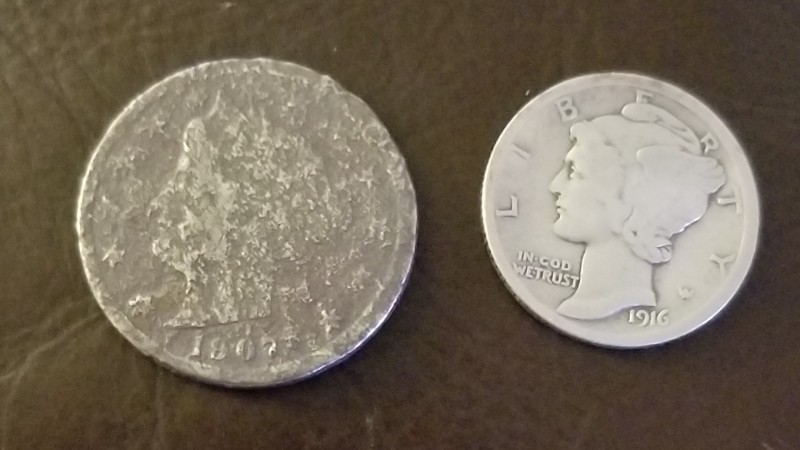
Back out at the pounded park today at lunch. about 45 minutes hunt time, bookended by the V Nickel within my first few targets, and the Merc on the last target before turning off the machine. I give the credit for both these finds to the 6" coil.
The V Nickel was about 5" around some roots and around the 11-12 tone I received, were some other mid conductor trash (can slaw, a pop top, and some deeper iron that I left in the ground). But in between all those competing tones, the 6" coil narrowed in on a quieter but solid nickel tone. This is my second V and the ground is really hard on nickels in my area, but at least I can make out the date on this one. 1907.
The merc was only a few inches down, and no doubt I (and others) have been over the top of this coin many times. It was surrounded by all kinds of iron tones... a few pieces I dug out were a few rusted nails, and a two wire fence nails, the ones that are "u" shaped to capture the fence against a wooden post. But between all those grunting iron tones, a solid 25-26-27 tone kept ringing through. 1916 Mercury dime. (And my 2nd Quest for Silver completed... about a week after it started :)).
I am really learning to love this coil.
I was running the E600 with original firmware in Park 1/50 tones/sensitivity 20/recovery 2 (4 on the 800) and IB 0. And I was making an effort to swing slower than I normally do (though this was probably faster than others... I have a bad habit of swinging too fast).
Tim.
I'm curious as to why you're not running the highest recovery speed. On my 800 I hardly ever go below 5 and am usually at 6 or 7 in my trashy parks.
-
That is a really, really nice end result! I've been following this thread from the beginning waiting for the end result. I had never thought of kevlar as a shaft material, but it seems like a great, high quality choice for top performance. Thanks for posting all the pics and the step by step process.
-
I had to send my mojave in a while back because it was so noisy. Got two messages from Rusty at Tesoro...one on my cell and one on my home phone that it was a bad coil and they replaced it and it was on its way back to me. When I opened the box, there was also a handwritten receipt of what had been done to it and he mentioned in the note that they had included a new battery compartment cover! How often do you experience that today?
-
I"m thinking of a scoop for creeks around where I live and found this one that looks very sturdy for rocky/gravel bottoms:
I asked a fellow member on the FMDF who has one and he thinks it's a great scoop for tough conditions.
-
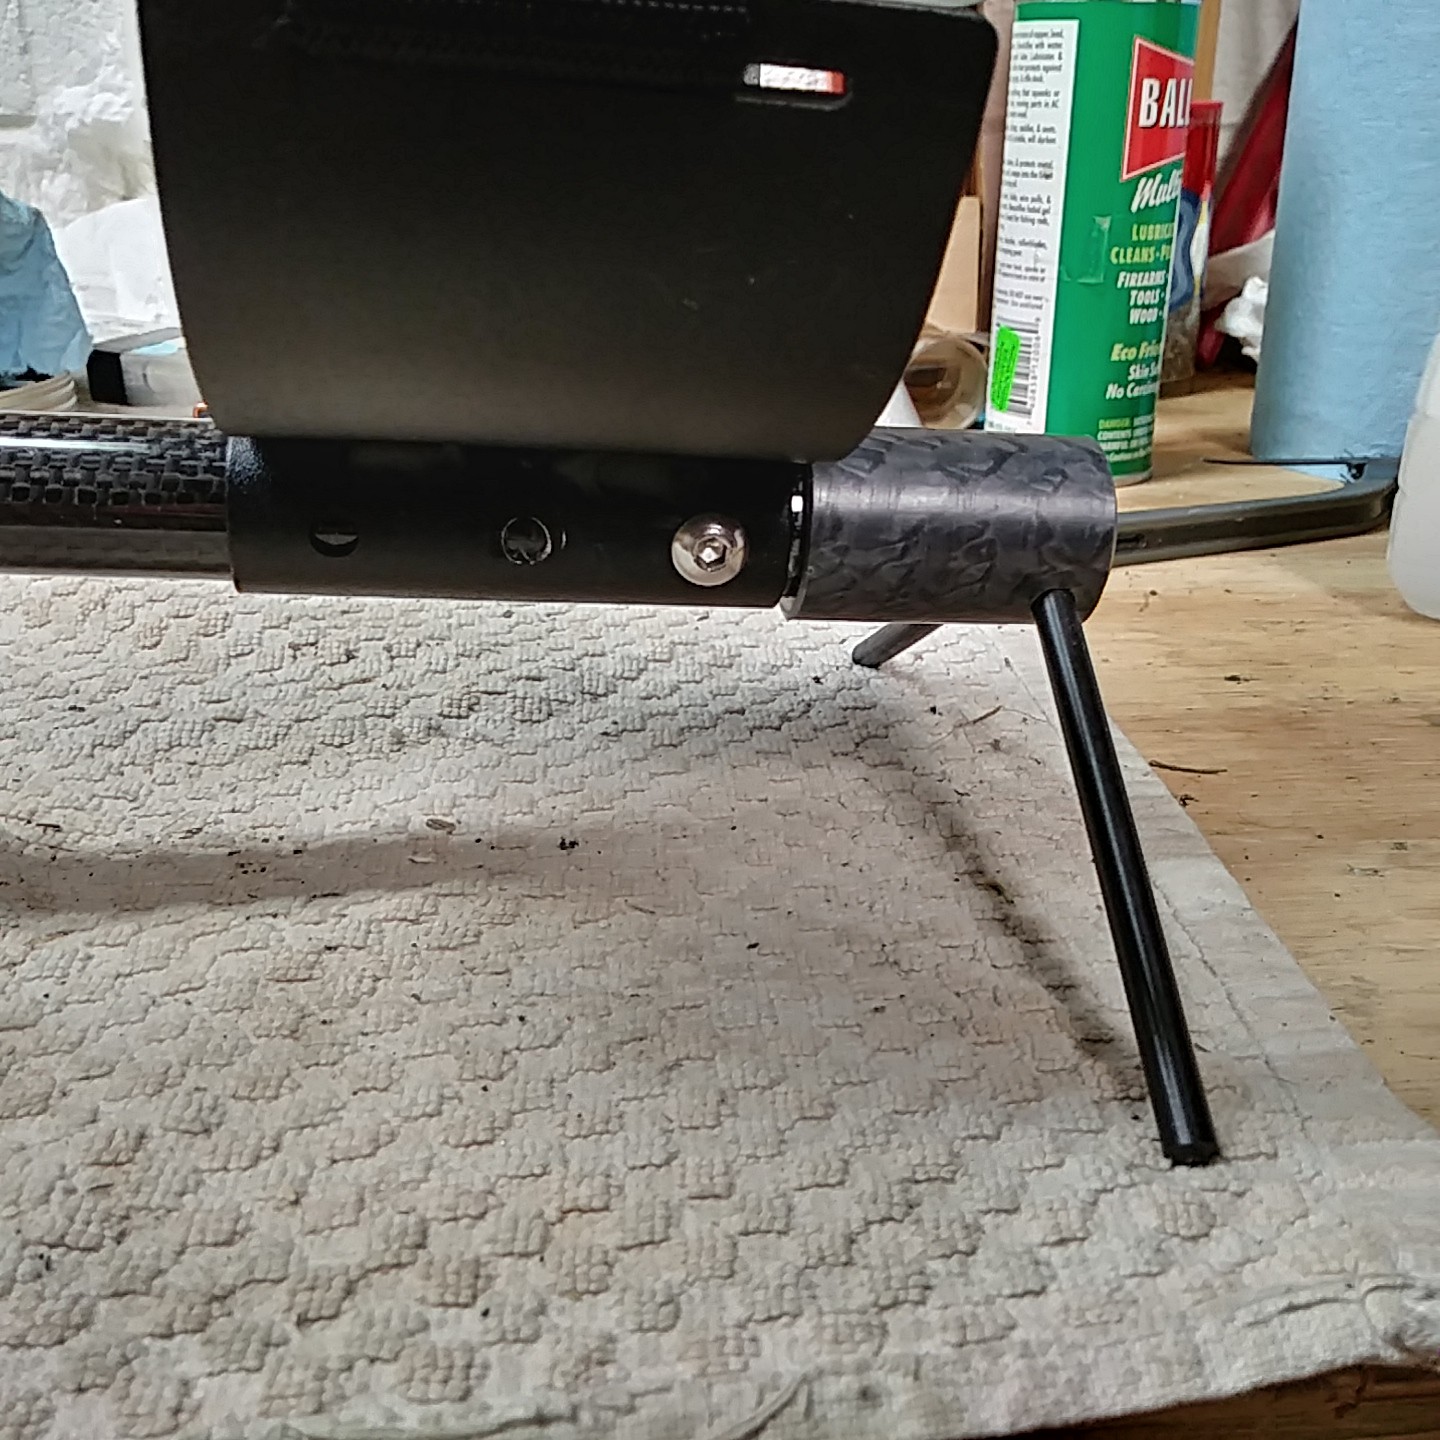
I bought the Anderson shaft mainly because he includes a carbon fiber lower rod and a sturdy metal arm cuff. With the minelab cuff and the anderson rod the weight was almost exactly the same with the minelab rod just very slightly lighter. With the anderson metal cuff It was slightly heavier than the stock rod, but not noticeable IMO. I like it because it's rock solid now. Even though my stock rod seemed tight once I shimmed the cam lock, it still felt like something was loose when swinging. It might have been the arm cuff (I shimmed with tape too so it was a tighter fit on the rod). The one thing about the Anderson is that if you use his cuff, there's no built in stand on the underside. I ended up making one out of nylon round stock and delrin and now I'm very happy with it.
-
Congrats on a very cool find!
-
That's some great information Randy thanks for posting! Lower sens settings on the nox will still get pretty deep. I've found 8-9" lincoln cents with the sense at 17 or 18. This in moderately damp ground though. I guess the ticket for drier conditions would be to lower the sense, especially in mineralized soil.
-
19 hours ago, Chase Goldman said:
Actually, set up properly, the Equinox is the PERFECT tool for a trashy park, if you hope to snag keepers that would otherwise be masked by the trash, due to its high (and adjustable) recovery speed. If you are not hearing the machine gun bursts of trash target then you are not going to hear the keepers either because the silence you would hear with slower detectors is just the recovery circuit playing catch up while you pass the coil over that keeper target. Some suggestions:
First of all, you need to figure out what your objective is. Grab all jewelry, nickels, clad, and silver. Or just cherry pick the high conductors. That will tell you what mode to use. For example, if the trash is indeed modern (i.e., aluminum can slaw, pull tabs, freshness tops, twist tops, crown caps) then just try notch out everything below 20 and go for the clad and silver because you will be hard pressed to pick out the gold rings and nickels amongst all that mid-teen stuff without a trained ear (after awhile you can start to tell the difference between a nickel and a pull tab and a gold ring and a crown cap by tonal quality) and will just be digging it all. Sure you will give up on gold and nickels, but you will lower the audio fatigue as you just listen for the the high conductors to ring out. If you are just going to cherry pick high conductors, then keep it in Park 1. Depending on the ferrous situation you might want to consider lowering the iron bias as that may exacerbate high conductor masking in iron, but that will also create more iron falsing. Avoid the "2" Park/Field modes if there is a lot of modern mid-teen trash, those modes which are optimized for mid-conductors and you will just hit that trash harder.
Key is DO NOT MODE HOP and DO NOT TONE HOP. Pick an objective, pick a search mode and stick with it otherwise you will drive yourself insane. The only time I will switch modes during a hunt is if I want to use an alternate mode to interrogate a specific target (i.e., see how the target sounds in Park 2 vs. Park 1 for example for a mid teen target. Pick the tone setup that you are most comfortable with. I prefer 50 tones because it gives me a lot more information about the target than just a visual number. I think of TID number as a Black and White television - sure you get a single tone corresponding to that number in 50 tones but the audio "quality" not just tone gives you so much more information than a number. Is the tone sharp or pinging with steep rising an falling edges (likely coin) or is it soft an long (freshness cap) or distorted (bent pull tab) or unstable and flutey (rusted crown cap). Just a wealth of info - I call that Color TV! 5 tones gives you less audio fatigue but also less information, it is like having a TID display with 5 numbers on it. You need to decide which is the best tone setup for you, learn it and stick with it.
Other strategies to consider to reduce fatigue:
- Consider lowering sensitivity. If the park is really trashy, it is likely that keepers missed by other detectorists with slow machines are just sitting there at the same shallow trash depth. No need to light up the machine with all that trash and ground noise as the higher conductive targets will be "visible" even with lower sensitivities. Also, avoid the tendancy to lower reovery speed to compensate for the depth loss as that will likely just result in more ground noise plus you will lose a key performance attribute that enables you to separate the keepers from the trash.
- Consider hunting in single frequency (5 khz). Tnsharpshooter and others have run some single frequency tests and have found that running single frequency at 5 khz really helps shallow high conductors pop out of the trash vs. multi IQ. Give it a go and see what you think. Be advised though, once you go single frequency - it doesn't really matter which mode you are in as the only thing that then differentiates the Park and Field modes are the different user settings. It is the unique multi IQ profile (including the multifrequency weighting and target signal processing) that gives each of the Park/Field modes their unique personality. You also lose some other "performance" enhancements that Multi IQ brings to the table like precise and forgiving ground balancing, no iron bias setting is available in single frequency mode, and of course, if you use the lower single frequency, you will be less optimized for mid conductive keeper targets too (besides the mid-conductive trash). But that is what metal detecting is all about - managing and balancing the tradeoffs.
- Consider removing some of that trash. Getting the trash out of the way will help uncover even deeper, older targets. This takes a lot of time (and multiple visits), effort, and finesse. You don't want to be digging up the entire park and destroying the landscape, but if you have a large beer can impeding your view, then by all means get it out of there. Use pinpoint to interrogate probable trash targets to get an idea of depth and size of the trash and make a call as to whether it makes sense to get rid of it to see what else may be hiding there.
HTH HH
What a great post and I agree with everything said especially lowering sensitivity. The OP never stated what sense he was using, but I suspect it was at least the factory default of 20. Lots of times I go down to 15 or 16 and still have dug coins at 7-8". And if you're looking for gold, you can probably go lower than that...most modern gold dropped in parks and ballfields isn't very deep...at least the gold I've found.
On another note, Chase, are you the guy that wrote the Equinox book?
-
On 8/2/2018 at 5:22 PM, NCtoad said:
Received my anderson shaft today and just put it together. I do have the shaft twist...it's very slight, but if I tighten the screw pretty tight it's pretty much rock solid. But that screw is small and the surface area that makes contact with the lower shaft is very small and I just don't know how it will hold up over time. And I don't want to strip that screw as it's plastic. My main concern is with the lower rod on the closest hole to the head unit and with the head unit on the lowest hole, the detector is still about 1/2" higher (longer) than with the stock set up where the lower rod is on the 4th hole from the top. I'm 5'10" and don't have exceptionally long arms so it feels that the detector is still just a little long for my tastes. There's plenty of room in the upper rod for more holes. I wonder why Anderson didn't drill more for shorter people. For people shorter than me or people with long arms this shaft would be too long unless you like swinging way out in front of you.
I also weighed the detector totally stock and with the new shaft and anderson cuff. It's slightly heavier now, but it seems a little better balanced. Hard to tell for sure on the balance because I don't have two to compare side by side...one stock and one with the anderson set up. I'm just going by remembering what the stock setup felt like before I changed it over to the Anderson.
My only other gripe is that I originally took the Anderson cuff off as I wanted the stock one with the "feet" on it. (The Anderson doesn't have any feet on it's cuff to help keep the detector upright when you set it down.) As I slid it off the screw holes in it were not deburred and scratched the shaft pretty badly...it's just superficial, but it looks bad. I ended up putting the Anderson cuff back on because with the detector head in the lower hole the minelab cuff was up near my elbow...there's no adjustment for it, only one hole. The Anderson cuff has three adjustment holes and on the lowest one it feels good.
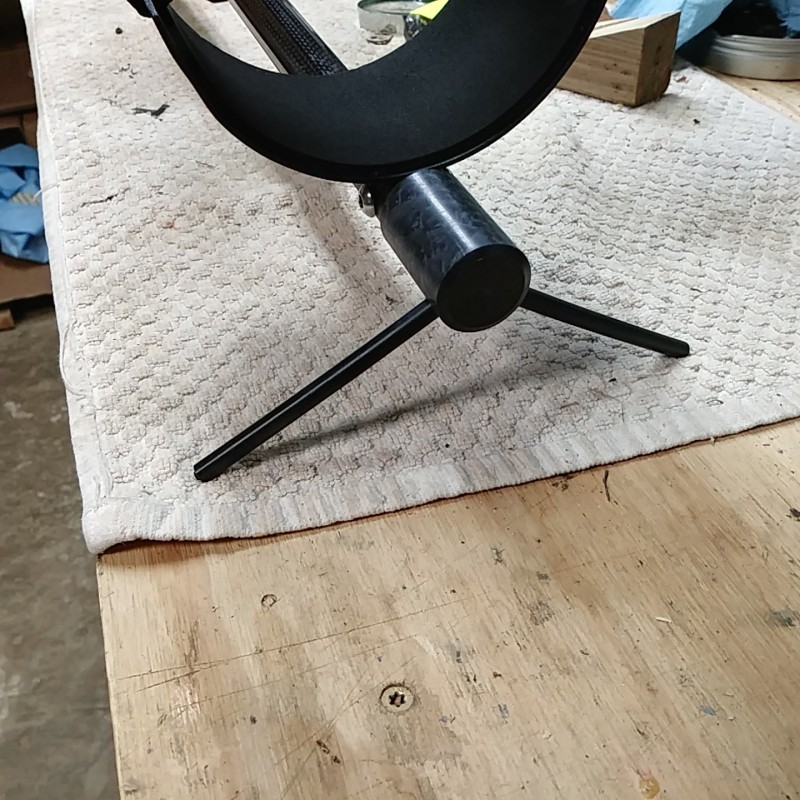
Ok, had my first hunt with the new Anderson shaft yesterday and it's rock solid, no looseness or creaking. As mentioned in my previous post, I ended up using the Anderson cuff which doesn't have a built-in stand. I really like the built-in stand of the minelab cuff and missed it while detecting yesterday. So last evening I made one for the Anderson shaft. This also covers up the scratches I made to the end of the shaft when I switched back and forth between the minelab and Anderson cuffs. I think my stand will make the detector much more stable when I set it down on the ground.

-
Received my anderson shaft today and just put it together. I do have the shaft twist...it's very slight, but if I tighten the screw pretty tight it's pretty much rock solid. But that screw is small and the surface area that makes contact with the lower shaft is very small and I just don't know how it will hold up over time. And I don't want to strip that screw as it's plastic. My main concern is with the lower rod on the closest hole to the head unit and with the head unit on the lowest hole, the detector is still about 1/2" higher (longer) than with the stock set up where the lower rod is on the 4th hole from the top. I'm 5'10" and don't have exceptionally long arms so it feels that the detector is still just a little long for my tastes. There's plenty of room in the upper rod for more holes. I wonder why Anderson didn't drill more for shorter people. For people shorter than me or people with long arms this shaft would be too long unless you like swinging way out in front of you.
I also weighed the detector totally stock and with the new shaft and anderson cuff. It's slightly heavier now, but it seems a little better balanced. Hard to tell for sure on the balance because I don't have two to compare side by side...one stock and one with the anderson set up. I'm just going by remembering what the stock setup felt like before I changed it over to the Anderson.
My only other gripe is that I originally took the Anderson cuff off as I wanted the stock one with the "feet" on it. (The Anderson doesn't have any feet on it's cuff to help keep the detector upright when you set it down.) As I slid it off the screw holes in it were not deburred and scratched the shaft pretty badly...it's just superficial, but it looks bad. I ended up putting the Anderson cuff back on because with the detector head in the lower hole the minelab cuff was up near my elbow...there's no adjustment for it, only one hole. The Anderson cuff has three adjustment holes and on the lowest one it feels good.
-
I hope it's not twisty as I just ordered one a few days ago and should be here today. I got the Anderson over the Pluggers because the Anderson comes with a carbon fiber lower shaft which is hopefully a better spec shaft than than the plastic stock one. Which should prevent any twisting or wobbling.
-
1 hour ago, Tnsharpshooter said:
Maybe this will help explain.
This pic here has clad dime and nickel.

Nickel reads 13 when swept using park 2.
Clad dime reads 25.
If I use pinpoint over the nickel, 13 comes in window, and if I keep pinpoint depressed and move coil over clad dime, 13 remains in rhe window, yet detector sounds off alerting user of metal under coil.
If I use pinpoint over the dime, 25 pops in meter, holding pinpoint and getting coil over nickel, 25 is still in meter, yet detector sounds off on nickel(metal) for user.
That's what I was trying to say above, but it wasn't very clear. Numbers don't change in pinpoint mode. Whatever it's reading when you hit the pinpoint button is what it stays at until you hit detect mode button.


Silver, Gold & Diamonds, Oh My!
in Minelab Equinox Forum
Posted
Congrats on your first gold ring! It's a nice one too being 14k instead of the lowly 10k stuff?