


steveg
-
Posts
1,207 -
Joined
-
Last visited
Content Type
Forums
Detector Prospector Home
Detector Database
Downloads
Posts posted by steveg
-
-
If you are getting readings of "2" on a quarter, after a factory reset, there is something wrong. I'd contact Minelab's repair center (Detector Center, in Pennsylvania).
Steve -
3 hours ago, Yooper said:
Correction, WOULD NOT HESITATE to to order from Steve. Need more java this morning.
Posting messages prior to a morning cup of Joe is sometimes problematic for me as well! 🙂
Thank you for the kind words!
Steve -
1 hour ago, fishnmaine said:
i’m pretty sure he ships internationally
Yes, I do ship internationally. And in the case of the lower rods, I can sometimes do so fairly affordably, depending upon the country. Since a lower rod can be shipped in a shorter package, there are some cheaper shipping options available (international shipping can sometimes be expensive), and with some countries, packages under a certain value are often subject to lower customs fees/duties (with just a lower rod order sometimes falling below these limits).
But bottom line, despite the added expense in many cases, I do serve a sizeable number of customers internationally.
Thanks!Steve
-
14 hours ago, Chase Goldman said:
Had the great fortune to get out with Bob again to explore a new time machine, er field. I've commented before on Bob's situation being a detectorist's paradise. He lives in an area steeped in history dating back to Colonial times and older if you take into account the artifacts of Native American presence that pre-dated the Colonists. Furthermore, he has convenient access to history right out his front door or he can choose from a number of permissions that each are unique in terms of the finds they produce both in type and timeframe. Finally, from a technical perspective, the digging is ideal consisting vast flat farm fields of harvested soybeans or corn and sandy unmineralized soil. The choices that are available for selecting an outing is like having a time machine you can you can dial back to just about any point in US history. Pre-Colonial or Colonial - no problem, War of 1812 - it's there, Civil War - not plentiful, but definitely present, Victorian - check, early 20th century - you bet.
This time out was a new field that had a mixture of almost all of the above and we were able to benefit from what it was willing to give up.
It was a long, exhausting but fantastic digging day and I appreciate that Bob let me accompany him on the new field and appreciated his advance research and surveys that enabled us to efficiently tackle the immense acreage.
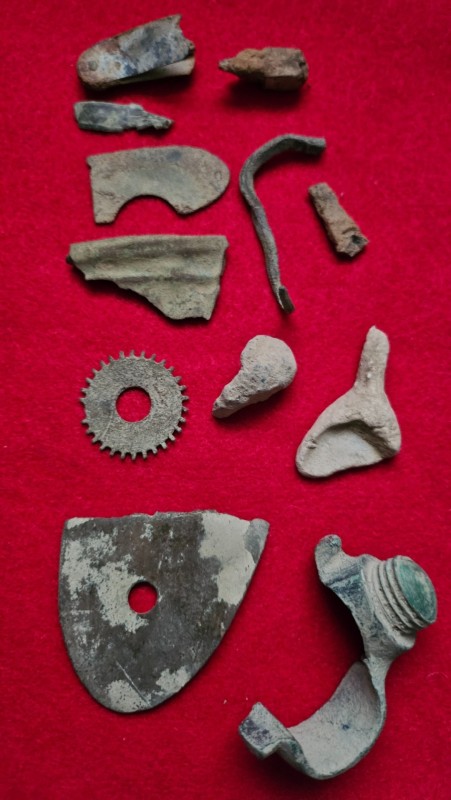
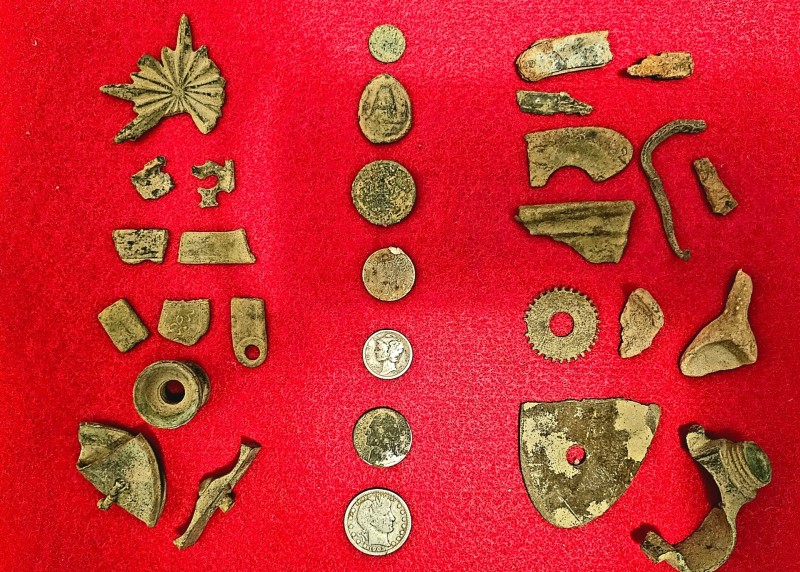
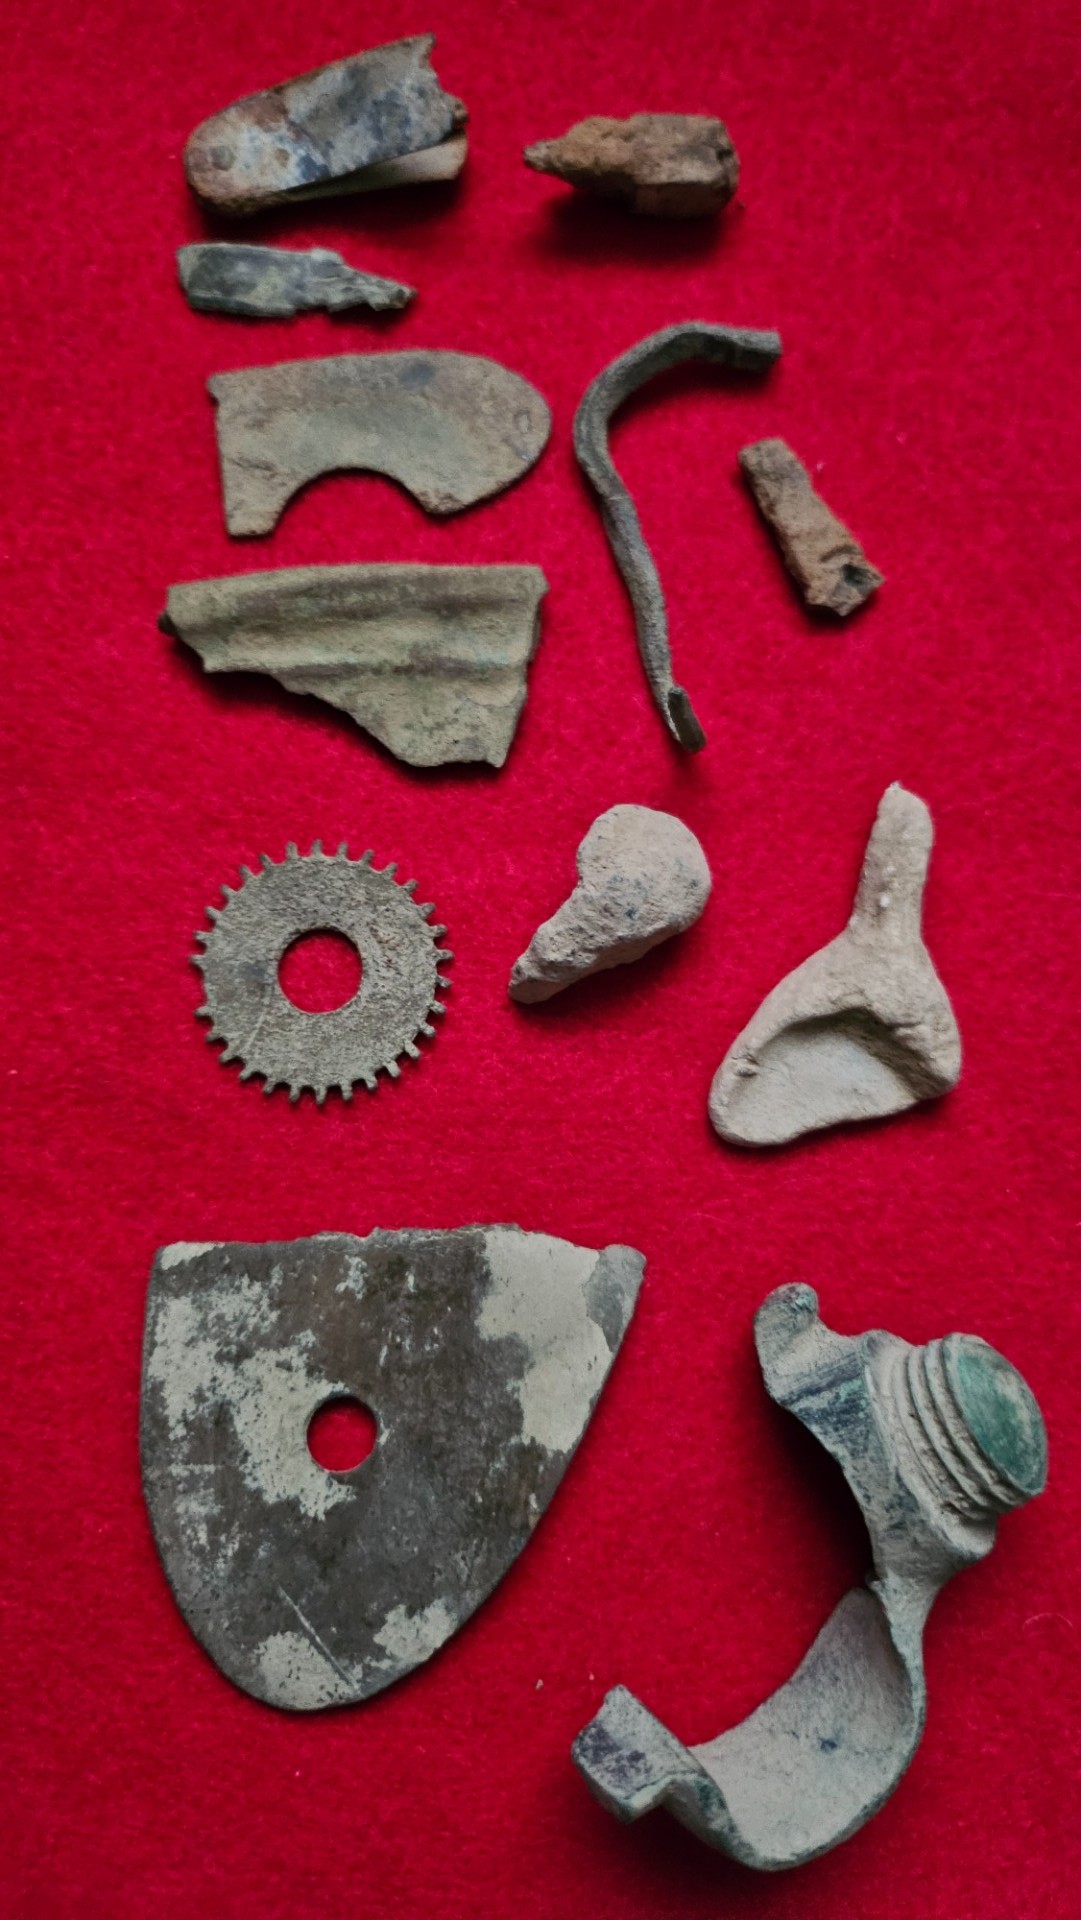
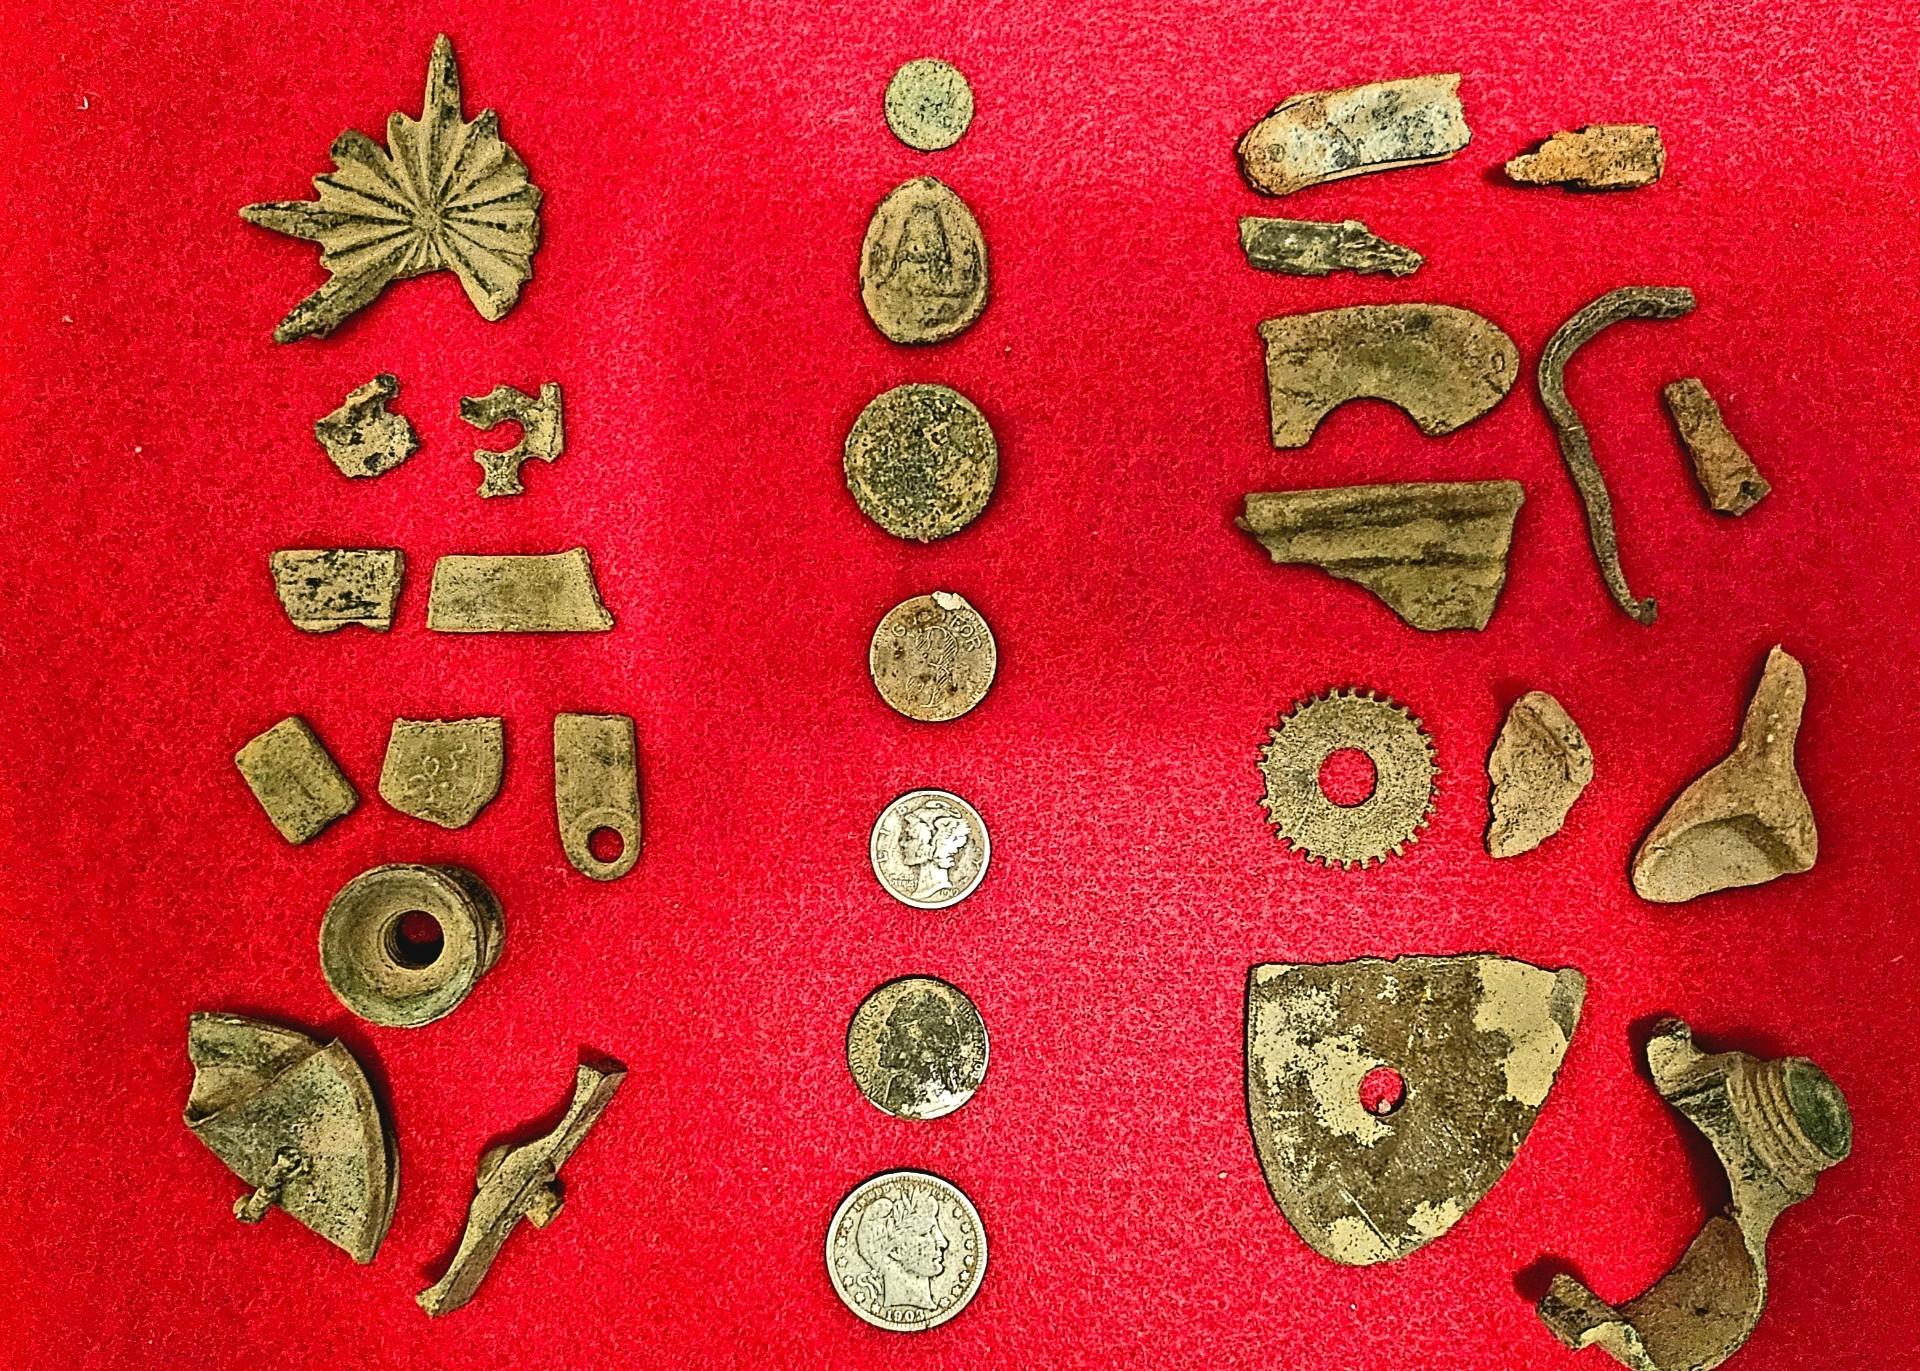
Bob had been out already getting a few targets in an adjacent area we had hit previously waiting for me to finally get there after my 2 hour drive. I was able to get the day going by digging a keeper flat cuff button on my first recovery. At that point it was game on for both of us. Bob got on the board with the first coin, a very nice 1907 IHP. We both dug a few brass whatzits and then Bob dug a rare (to this area) dropped Minie Ball. Great, we were less than an hour in and covered Colonial, Civil War, Victorian, and early 20th century. It's unusual for a site in that area to give up finds that spanned such a wide time frame. That increased our motivation because we knew that there were going to likely be additional surprises. And we were not disappointed. We recovered mostly a lot of miscellaneous brass targets, some identifiable, others had us scratching our heads. I managed a couple of firsts and was elated.
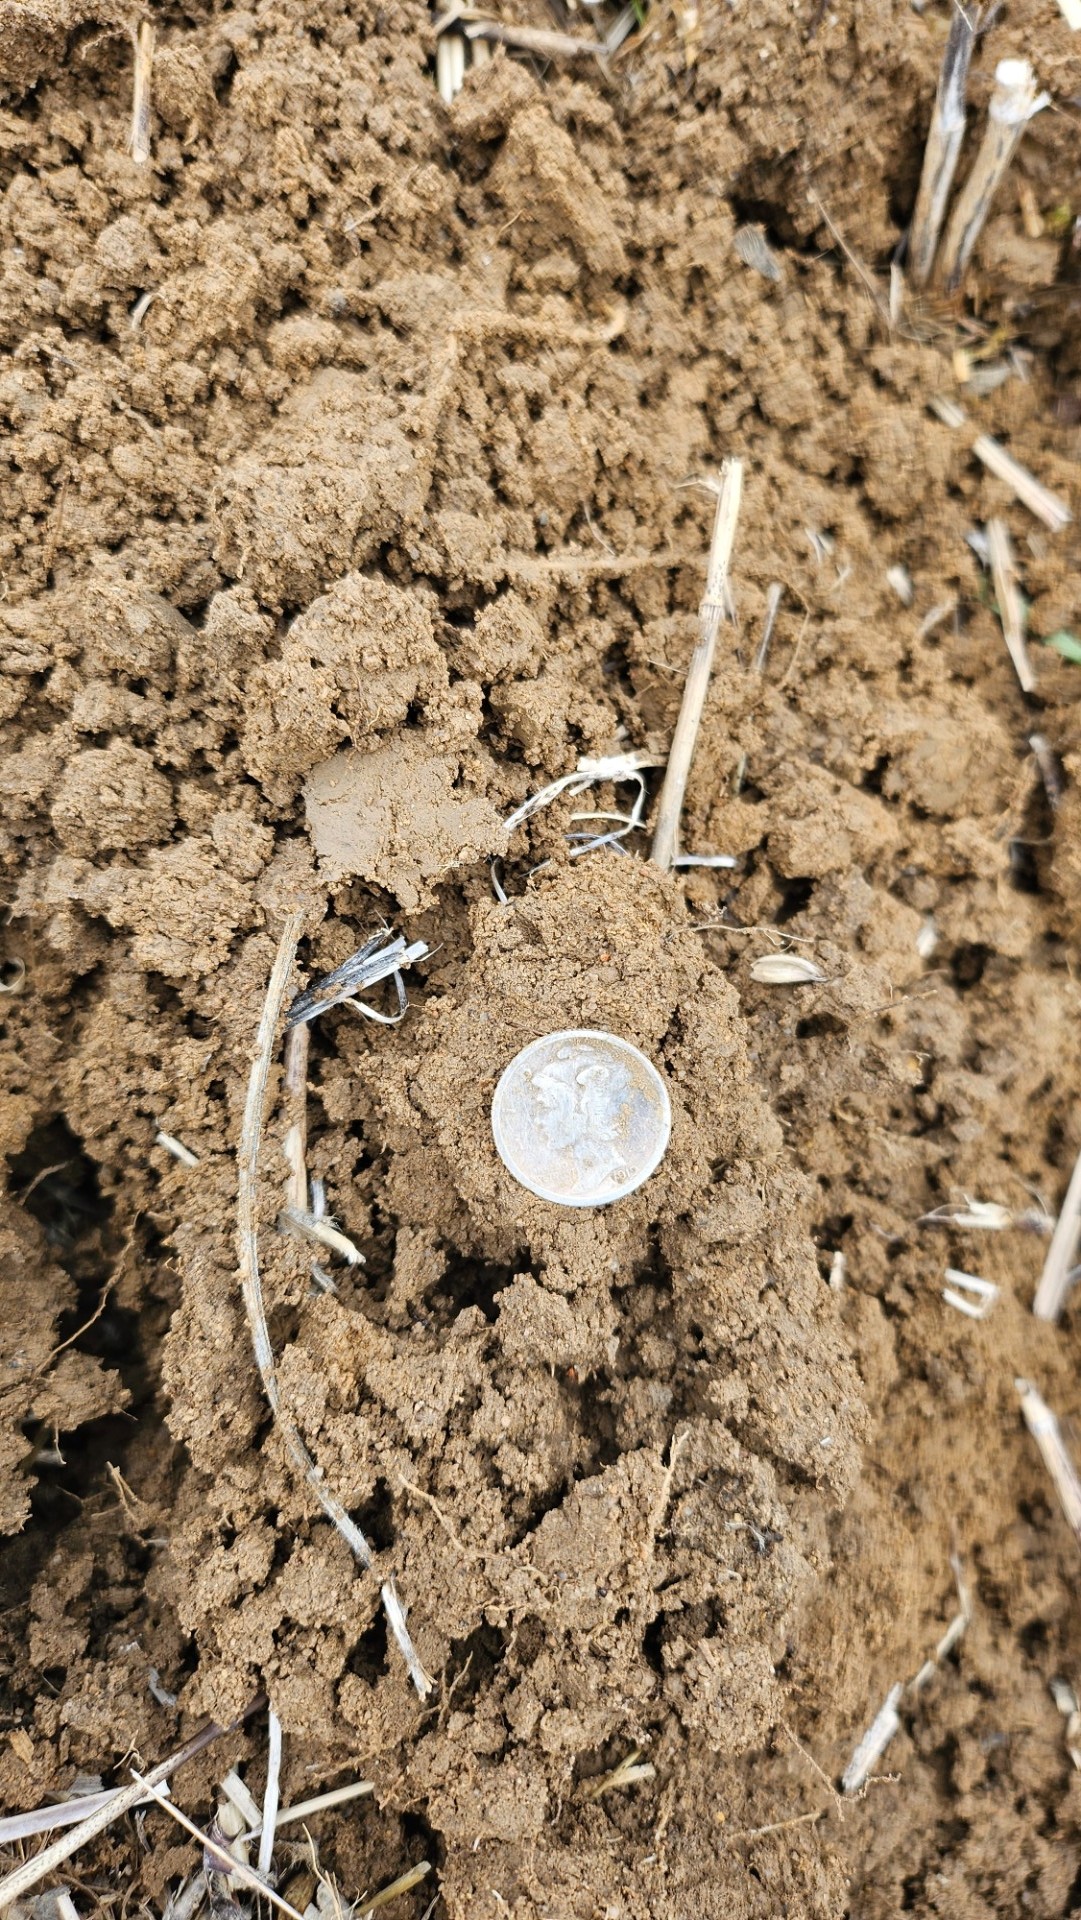
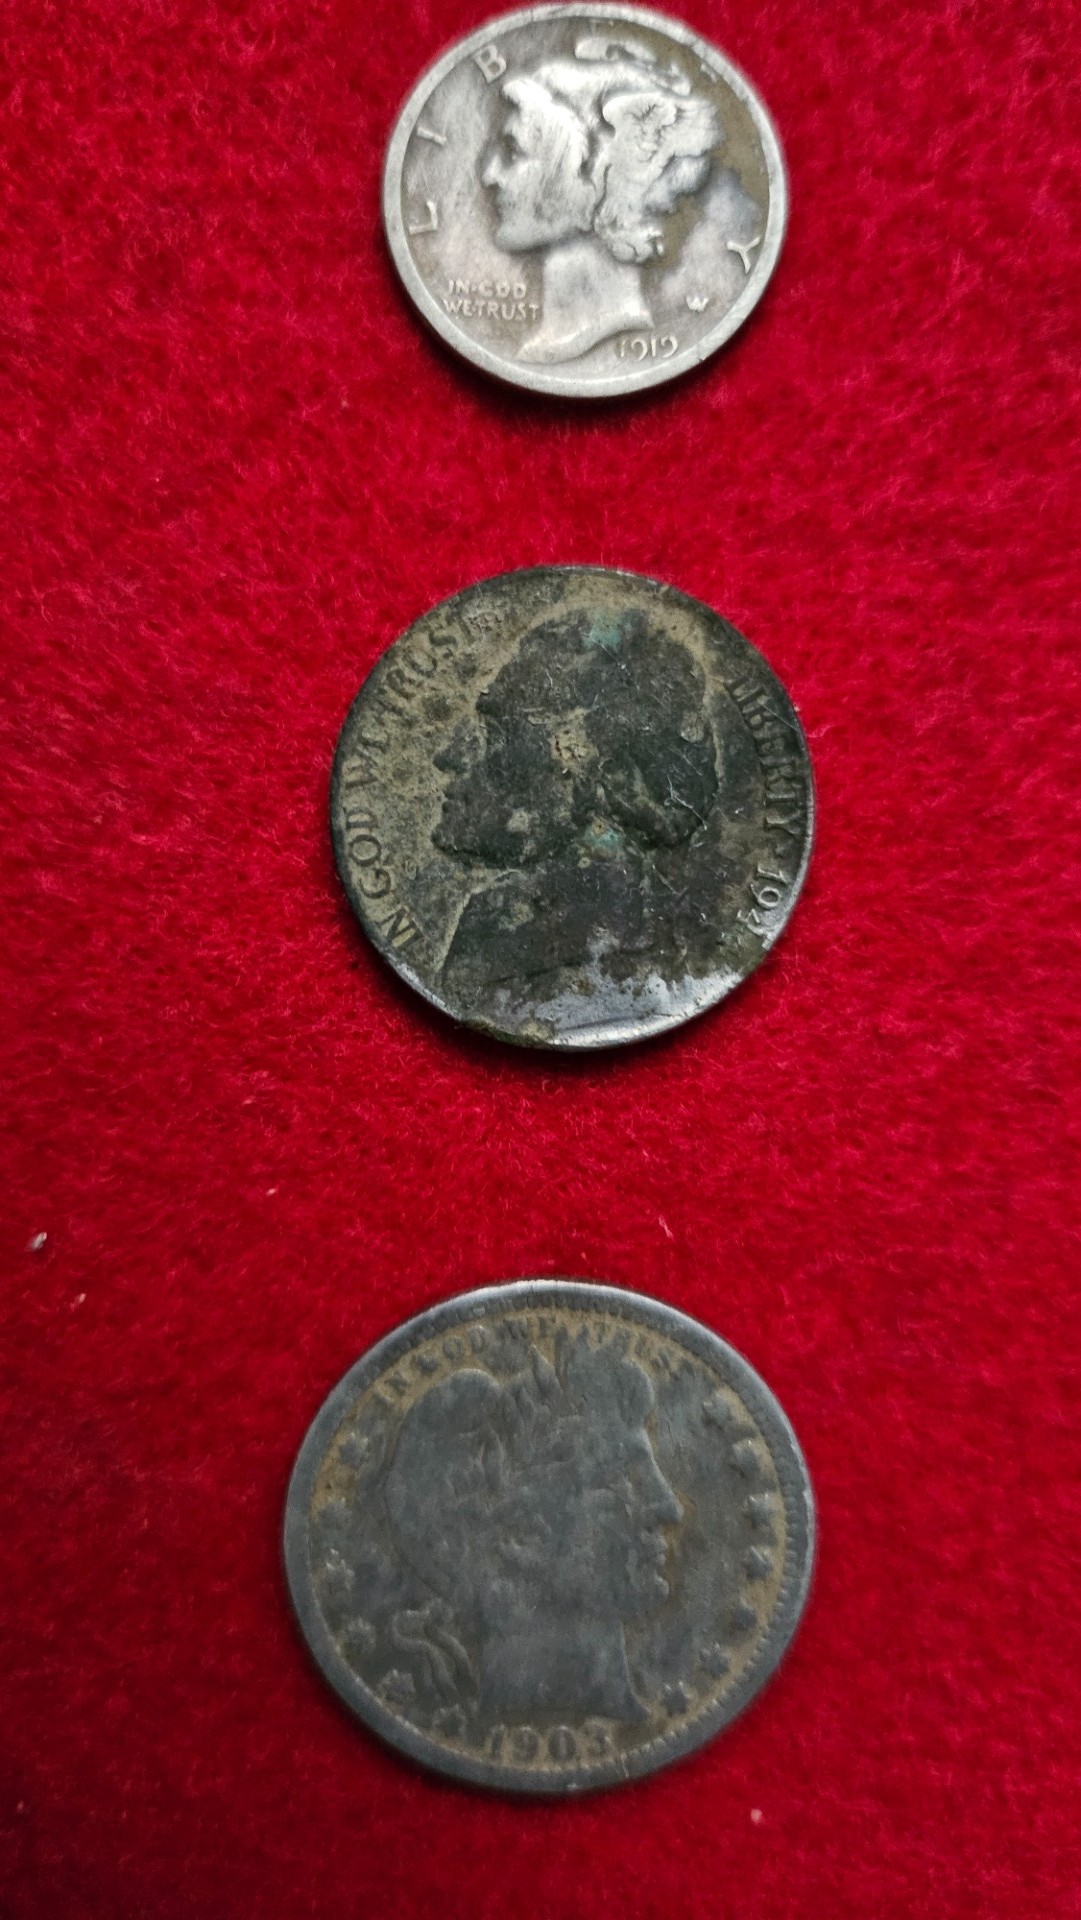
I managed to get on the silver board with a Mercury dime to keep my silver streak alive, dug some miscellaneous brass stuff including a heel plate and some pocket knife parts and briefly chatted with the adjacent property owner (really nice guy)

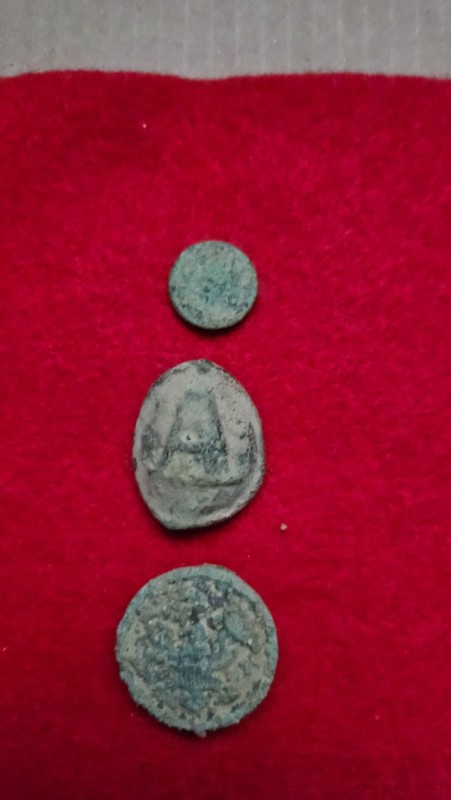
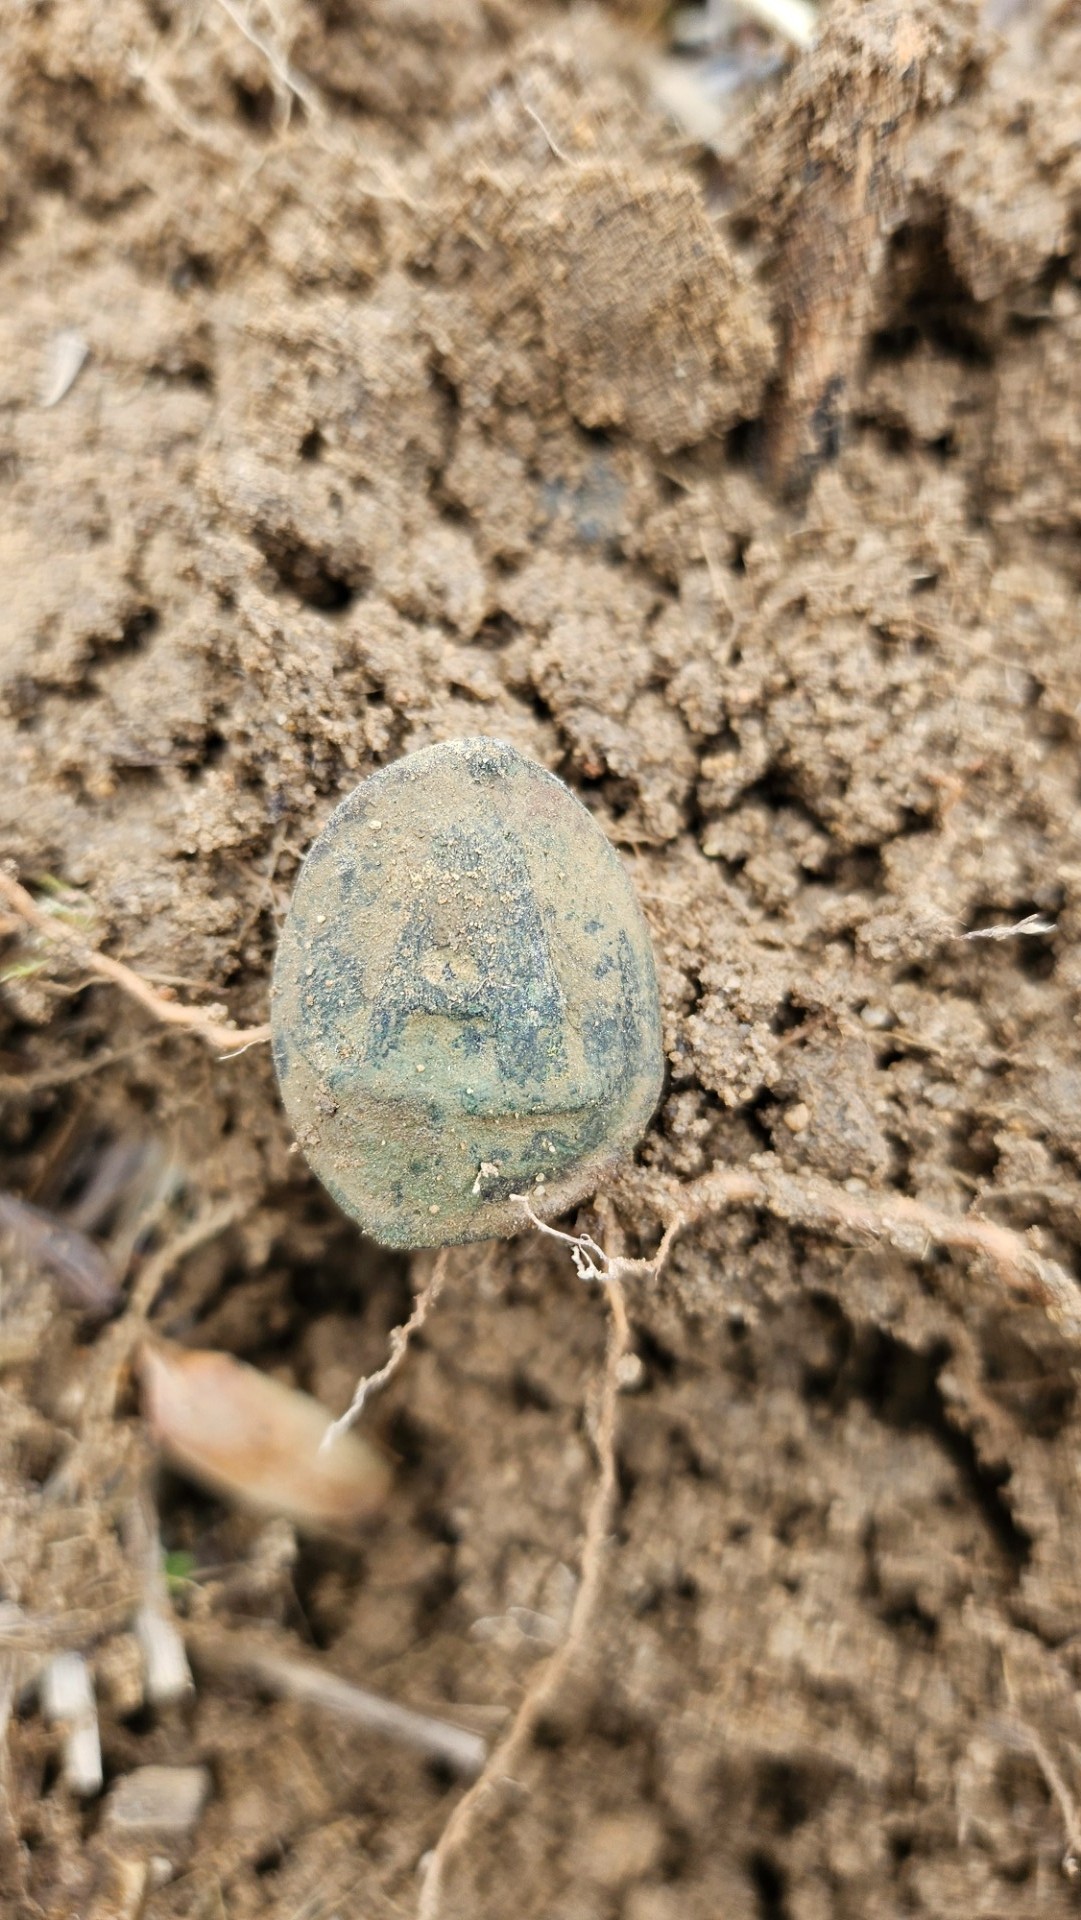
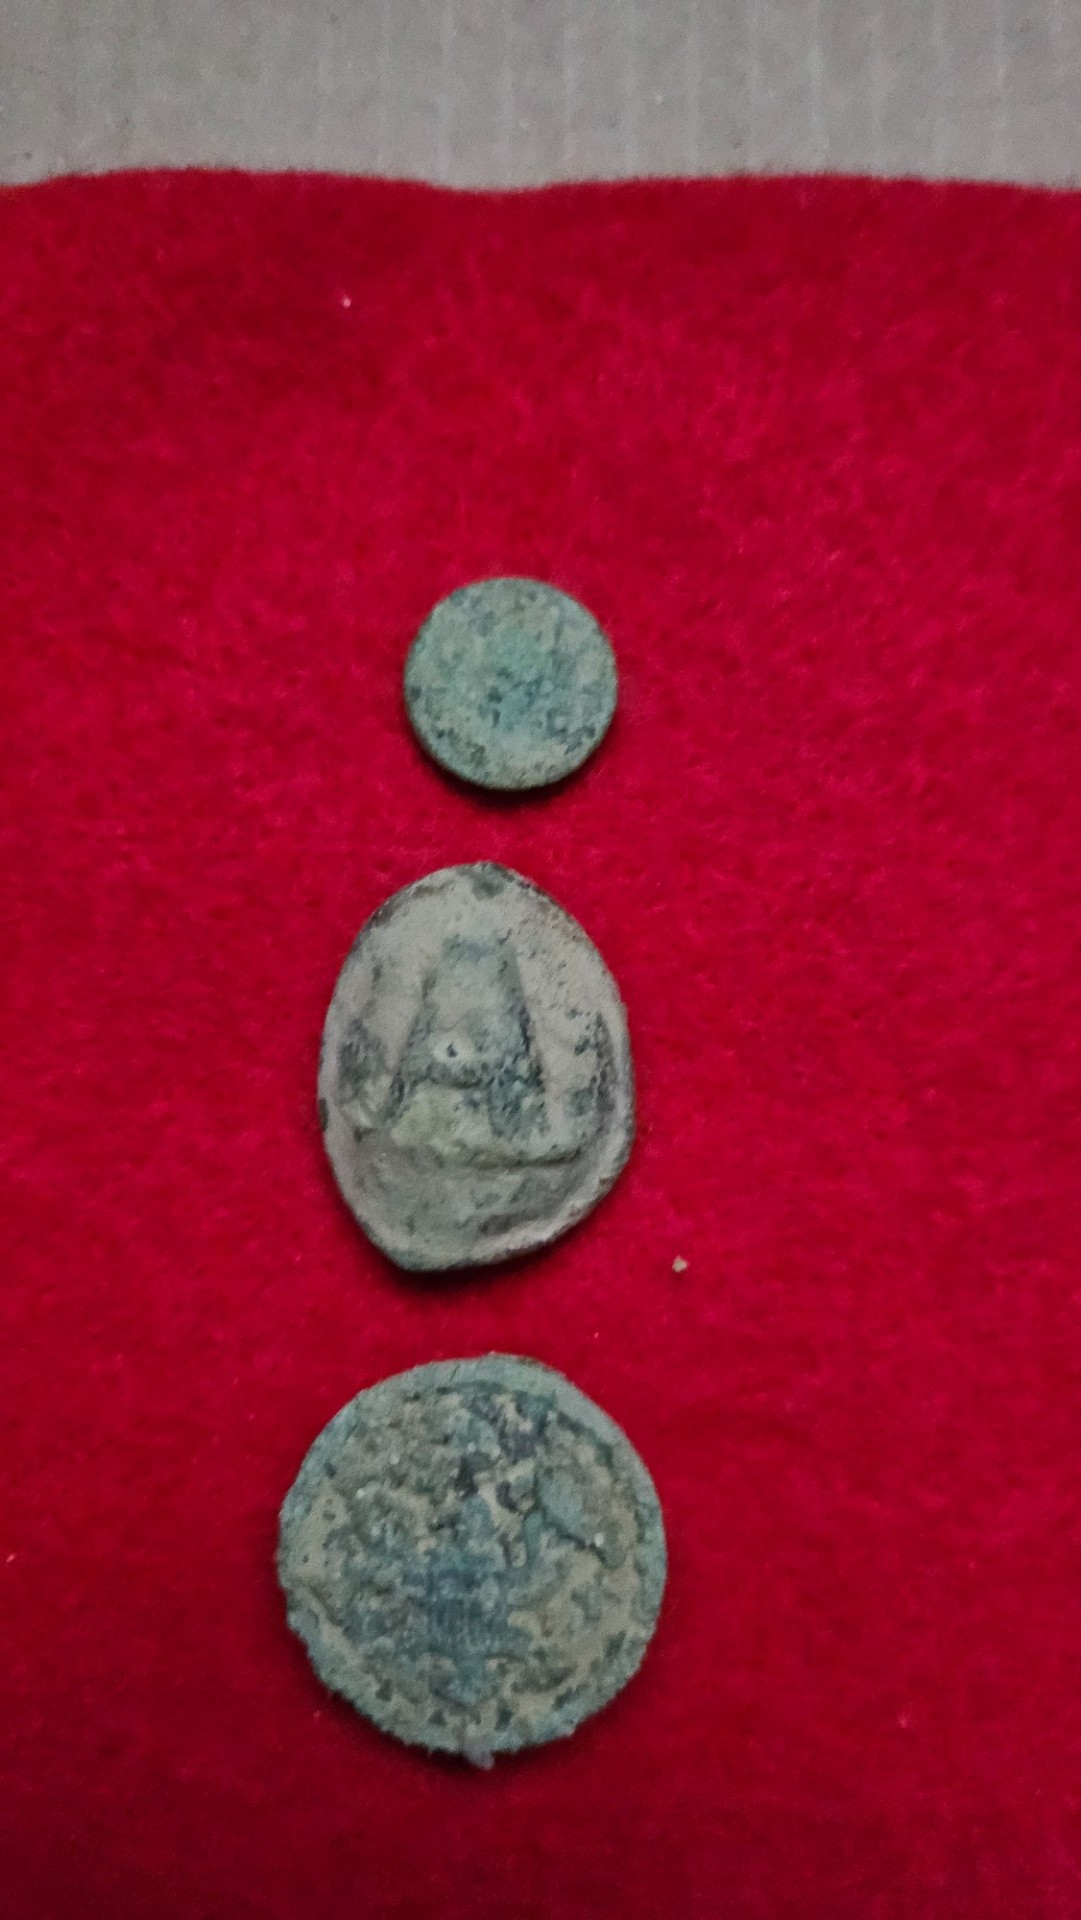
Then we headed to an iron hotspot that Bob had previously identified. There we started alternating horse tack finds that confirmed the area was likely a stable. I got a nice star shaped decorative piece and a part of a fancy bit boss. Then I got surprised with one of my firsts - a Civil War Block A coat button face that once belonged to a Confederate Artillery Officer. Only my third Confederate civil war button piece and first Civil War artillery button piece.

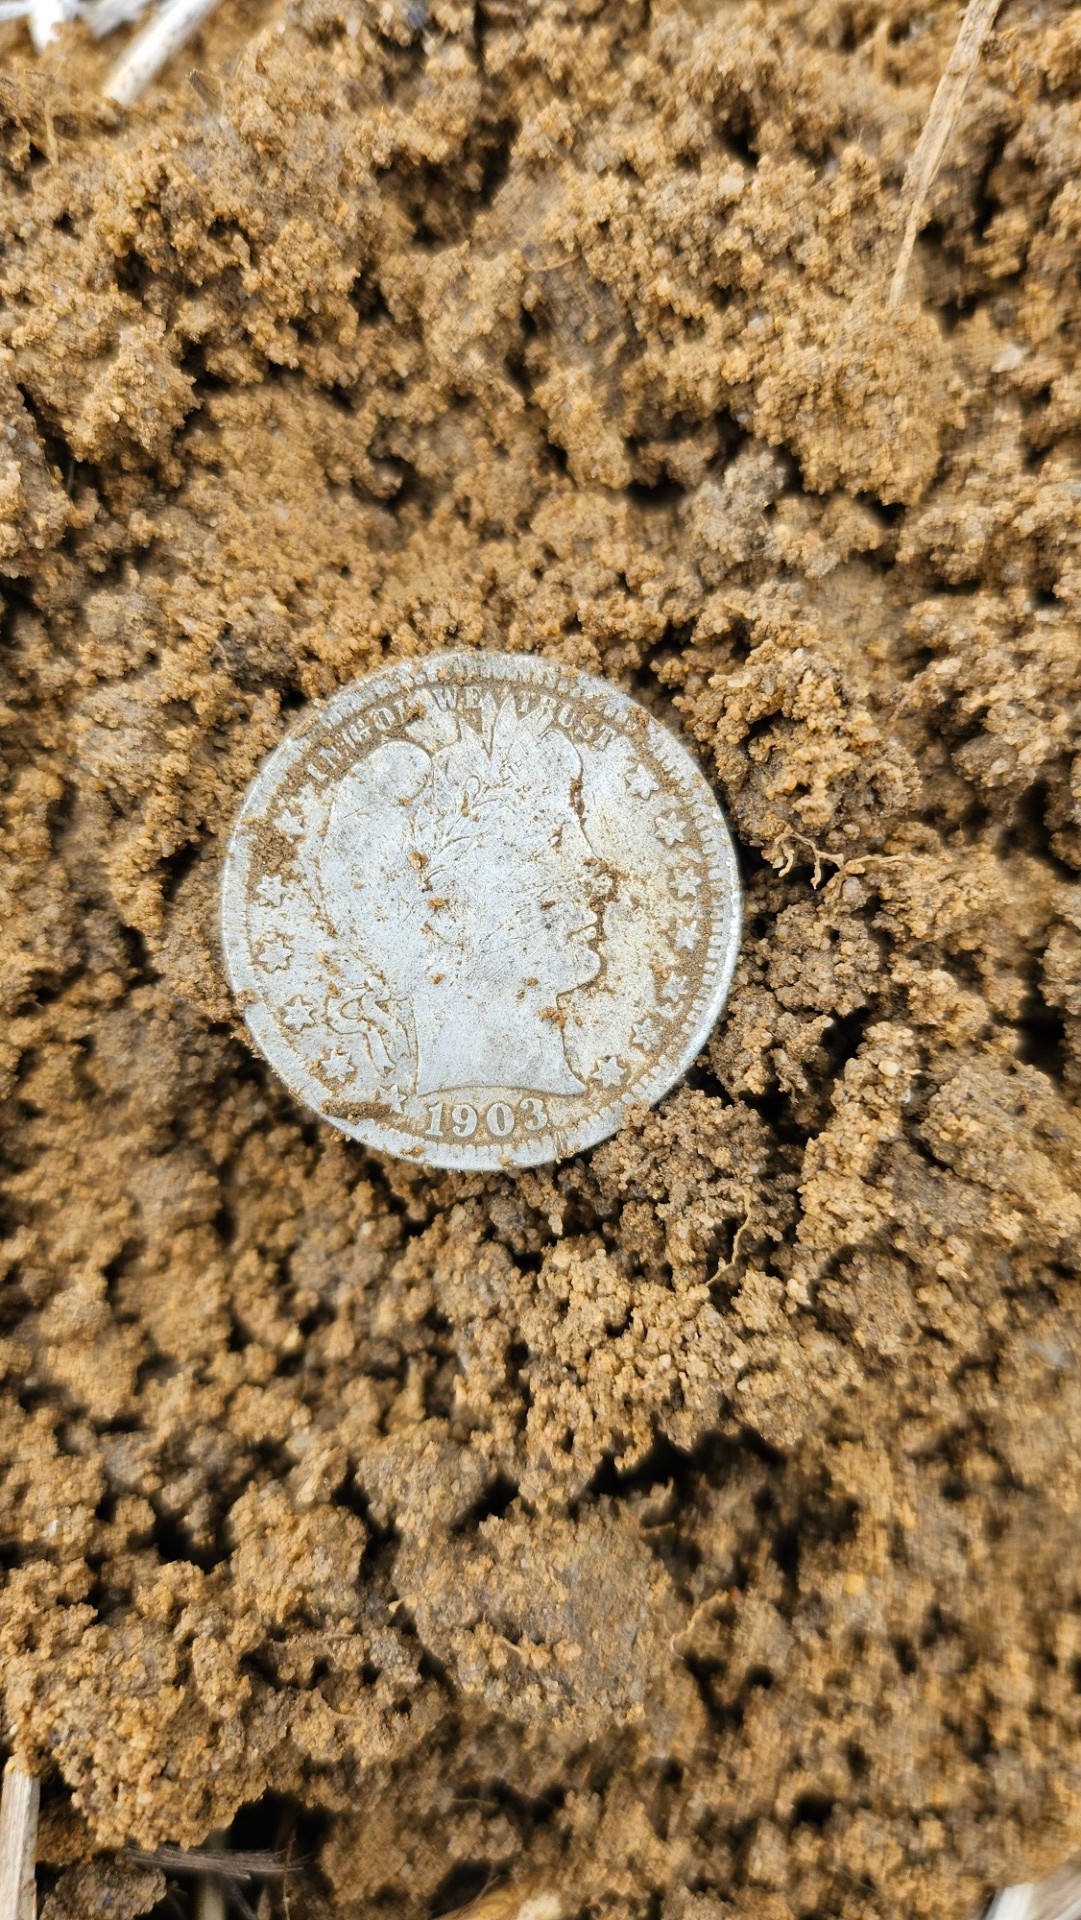
I recovered some more miscellaneous brass and aluminum junk. I then recovered a local aluminum trade token that rang up as a 91. Then my second "first". I have recovered a lot of silver coins and especially silver quarters of many varieties (Capped Bust, Seated, Standing Liberty, and Washington) but never a Barber. In fact, I mentioned my Barber drought to Bob when I recovered the 1919 Merc. We started detecting an old road bed on the site and I finally broke my Barber drought with a 1903 Barber quarter. A common date, but I was as happy getting that one under my belt as the Spanish 2-Reale I recovered a month earlier.

I wrapped up with an early 1900's Army General Service button and a 1944 P silver war nickel and Bob came home with an early 1800's silver spoon handle. Hadn't had a three-silver day in quite awhile. It made the post-hunt coffee taste great. Thanks, yet again, Bob, for giving me the opportunity to add some firsts and bucket listers to my collection. Tested some new gear that Bob has also discussed including the RCDigs mount on the standard shaft and also some limited testing of a tilted RCDigs mount variant for @steveg's excellent Carbon Fiber shaft setup that I primarily use for beach and water hunting. I need to get some more swing time but I like both set ups a lot. No more worrying about the remote popping off, and the angled variant I am using on Steve's CF shaft system provides great visibility of the screen and accommodates the Deus 2 waveguide aerial well. Until next time - Happy Hunting.

Chase --
OUTSTANDING! Glad you are happy with the mount thus far, and WOW -- what a terrific collection you unearthed!
It's funny that you say that about the Barber Quarter! The was the most elusive quarter for me, as well! I, like you, even have dug a couple of Seated quarters, but just couldn't dig a Barber! Finally, I did, and of all places it was in the front yard of a house my sister bought, a few years back. Before she moved in, I hit the yard, and there it was, right next to her front porch!
I thought I was the only one who had a Barber Quarter as their "white whale," LOL!
Steve -
Colonel --
Thanks for providing your thoughts! Good stuff, and sounds like you haven't had any issues, or see anything that needs to be changed, which is what I was hoping/expecting (since 90% of it is not "new," but instead the same as the "standard" RCDigs mount). I have marked you down for a second one, once we're ready to begin production...won't be long!
Thank you!
Steve -
Wow, F350, NICE hunt! I love seeing the old stuff!
That cuff link IS unique; very cool. And I've never heard of "900 coin silver," used in making silverware. My experience thus far has been that .900 silver is used for coins, and of course .925, i.e. "sterling" is what silversmiths used for silverware and such. So, this is a new one for me...
Cool!
Steve -
Thanks, F350! I appreciate your kind words, and your thoughts on the mount. I am so glad to hear you are pleased with it thus far!
Yep, they will be available soon; I know there are a number of loyal "RCDigs mount" users out there, and for some, they like it so much that moving to a shaft that doesn't "mate with" their RCDigs mount is enough of a negative that for them it offsets some of the advantages that my shaft otherwise offers. So, looking into the possibility of having a version of the RCDigs mount that DOES fit my shaft, simply made sense to me. Fortunately, it turned out that the gentleman who builds these is a VERY nice guy, and was quite willing to tackle the project, being very open to the idea of us collaborating a bit on how to optimize the design for my shaft. He's quite talented, and very easy to work with, and I'm glad that this allowed the project to come to fruition.
There's no doubt in my mind that, while adding incremental improvements (locking mechanism, for example) to the stock XP mount design is helpful, and works well for many, the better way to tackle the issue is a complete redesign of the manner in which the control box attaches to the shaft. The XP solution simply is inadequate, from my view, but during the design of my shaft, it was readily apparent that the investment required to create a fully redesigned, injection-molded mount would have pushed the cost of the shaft beyond what I felt was reasonable (due to the expense of purchasing such a complex injection mold). So, ultimately, I decided to forego that, in favor of the simpler (and less expensive) XP-style mount, but with added locking mechanism. But, that said, I still felt that a full redesign would have been the better solution, were it not for cost. Fortunately, this mount offers the type of redesign that I felt was optimal, and at a fairly reasonable upgrade cost ($40 shipped)...
Thanks!
Steve -
7 hours ago, relicmeister said:
What I like about the RCdigs RC mount is that 1. no worries about losing the remote 2. The ability to tilt 3. Offers good protection of RC 4. Remote comes out easily to use it wrist mounted. 5. Nicest piece of 3-D printing I’ve ever seen. I think it also makes for easier attaching of the antenna for water detecting.
relicmeister -- I agree with all of your points, and just wanted to emphasize point #5. I am generally not a fan of 3D-printed parts, particularly with anything that requires strength, and longevity. While a professional-grade printer can do a good job, when it's used by someone with professional-grade knowledge, let's just say that many of the things found for sale on ebay are NOT of this level of quality.
As such, I am very hesitant to endorse anything 3D-printed, and that's why all of my plastic parts, that are used on my shafts, are either injection-molded, or CNC-machined from engineering-grade plastics.
WITH THAT SAID, the RCDigs mount quality is as high as I've seen, with any 3D-printed item. And I think the popularity of these mounts attests to that. In speaking at length with the guy who produces these, it's clear he KNOWS what he's doing, and has equipment that is up to the task. And the results speak for themselves. I'm duly impressed...
Steve -
F350 --
Your points on the galvanic corrosion potential were well-taken. I will ponder this.
Thanks!
Steve -
F350 -- THANKS for the post, the comments, AND the video.
I hear you, on the galvanic corrosion. Proper, frequent lubrication of the screws/brass inserts for those using the unit in the water can help, but ideally, I agree that those metals would be of the same composition (screw, and insert, both being EITHER brass, OR stainless). I will bring these points up with the producer of the mounts, when we speak (probably this evening).
As for the routing, YES -- the intention on my version of the mount will be to allow the wire to go up/through the shaft, and exit through a slot in the bottom of the mount, and then up through the tube in the side of the mount.
One caveat -- which will have to be shown in a set of instructions -- will be that the plastic "connector" that attaches the coax/waveguide/antenna wire to the top of the remote will not fit through the slot on the bottom of the mount; only the wire itself will fit. SO -- to install the wire through the shaft and through the mount, it will require the mount to be removed, the wire to be fished through the shaft and out through the top of the middle shaft, AND THEN have the mount installed, with the wire fitting into the slot on the bottom of the mount AS you install the mount.
And of course, my mount SCREWS ON, so the wire will be "twisting" as you twist the mount to screw it into the shaft. FOR THAT REASON, you will NOT want the bottom of the antenna wire attached to the coil, during mount install. You will want it UNCONNECTED, until you get the mount screwed in. That way, the antenna wire can kind of "turn" in tandem with the mount, as you screw in the mount, and any "twists" which may end up in the wire can be "un-twisted" before attaching the antenna wire to the coil (if that makes sense). The good news is, that once you have it all installed, up through the shaft, and through the mount, there won't be alot of need to go through the install process very frequently.
Steve -
Hey all, interesting thread.
A few things.
Yes, I will be offering a verstion of the RCDigs mount that will screw into my round shaft. It will be available once testing is complete.
F350 -- can you elaborate on what you mean by "there is no way to get the waveguide through the mount?" I am of the understanding that you CAN do that (and I don't have access to the video that you referred to; do you have a link?) We designed my version of the RCDigs mount to allow that -- but I thought that his current design already DOES allow that. Where are you finding the issue of being unable to get then antenna wire up through the shaft, and then through the mount?
Also, I would like to note that I agree with Chase's post entirely. Chase said:
"the XP design of the mount is fundamentally flawed because the objective to provide a mount that enables quick attachment and removal of the remote also results in high stress concentrations that cause the mount to gradually lose its ability to maintain a secure grip on the remote and eventually results in mount failure regardless of the material used (but some 3D printed materials are especially ill suited for this application - see Brad's pic)."
This is correct. XP's mount is fundamentally flawed for these reasons. My mount is injection-molded, so won't have any issues to the degree that the red one does, in Brad's picture, but with that said, yes -- cracking will still be possible over the long haul even with mine being injection molded, due to "repetitive stresses," as Chase noted.
And yes, he's right that the locking mechanism on top is indeed a "band aid" to an otherwise flawed design, and that an entirely different design (such as the RCDigs mount) is a better option. While the locking mechanism on my mount does help, in terms of securing the remote, it's still just an attempt to improve incrementally on an underlying bad design.
One thing I WILL say though, that Chase did not mention, is that while it is true that repeated installs and uninstalls of the remote onto/off of the mount WILL produce cyclic stresses that may eventually cause mount failure, I did address that to some degree in my mount. I did so, in the fact that my mount easily unscrews entirely from the shaft, no tools required. What I envisioned with my mount, was that when the need arises to "uninstall" the remote from the shaft, you have the option (with my mount/shaft) of leaving the remote locked onto the mount, and instead, unscrewing the whole thing from the shaft -- mount AND remote. Leaving the remote installed, and removing the remote/mount as a unit, helps reduce those "cyclical stresses" due to install and uninstall cycles of the remote to/from the mount that Chase referred to.But, bottom line, yes, XP's mount is a flawed design, and the RCDigs mount, or some idea akin to it -- i.e. a COMPLETE overhaul of how the remote mounts to the shaft -- is the way to fully resolve the issues the XP mount presents...
Steve -
OUTSTANDING!
Steve -
Tony --
That's funny, LOL!
Steve -
Tony,
And by the way, that "ghettoed" setup is actually pretty slick. With a cam lock on there, that allows you to lengthen or shorten the "lever" (the section of shaft that the weight is attached to), you can absolutely "adjust" for the different coil sizes/weights you may be using. So, lighter coil, slide the counterweight (and tube) IN a bit; heavier coil -- slide the counterweight BACK, away from the handle. The other way to do it, of course, is change the weight, as you change coils. BUT -- if your weight is fixed/not adjustable, as in your case, then adjusting the LEVER LENGTH achieves the same thing.
That's pretty slick, Tony! Nice job!
Steve -
Tony,
Yes, the "carrying a piece of lumber" analogy is one that I use, so that's probably where you saw that.
And YES, exactly -- on that setup you have there, if you used a lighter weight, you would need to slide it farther back (away from the handle/fulcrum) to have the same effect; a heavier weight would not need to be located as far back. Exactly correct.
Thanks!
Steve -
Tony,
Just FYI (though it's a moot point with the Manticore as the handle location is fixed/non-adjustable) -- moving the handle BACK (i.e. toward the rear of the shaft) would actually worsen the balance of unit.If you think of the see-saw/teeter-totter analogy (which is roughly applicable, since the physics of the situation revolves around concepts of levers/fulcrums), then the handle is your "fulcrum." On one end of the machine, you have a (relatively) heavy coil, and on the other end (the butt end) you have very little weight at all -- only the arm cuff, and the adjustment rail for the cuff. THIS is why the EQX/MC and many other machines are nose-heavy -- there is much more weight (coil) at one end of the "teeter-totter," and almost none at the other end.
Along these lines, if you were to slide the handle (the fulcrum) back toward the butt end of the shaft, you would be INCREASING the amount of leverage that the coil is using against you -- because you would be lengthening that "lever." If you want better balance (without applying any counterweight), you would want to SHORTEN that "lever" that exists between the handle and the coil. In other words, you need to SHORTEN the shaft length as measured from handle to coil. The two ways to do that would be first, as Chase noted, adjusting your shaft extension, i.e. SHORTENING your lower rod extension. That makes the shaft (lever) shorter, and thus reduces the nose-heaviness. The other way (if it were an option) would be to move the handle FORWARD -- i.e. TOWARD the coil. That (moving the "fulcrum" closer to the coil end) ALSO shortens the "lever," and thus reduces the leverage advantage that the coil has...i.e. reduces the nose-heaviness.
Hope this helps some; reducing nose-heaviness (i.e. improving balance) requires thinking in physics terms -- of fulcrums, and levers, and such...
Steve -
10 hours ago, jimwasson said:
Couldn’t be happier. This is the best accessory anyone could want.
The quality and workmanship are just fantastic. The balance is perfect and makes it feel weightless.
Jim,
I am SO glad to hear that you are so pleased with the shaft! Thank you kindly!
Steve -
jimwasson and midalake -- THANK YOU for the very kind words! I appreciate it, and am so glad that you both are pleased with the shaft!
Steve -
Phrunt,
Thanks for your reply, and the information. I was of the impression that the hardware would NOT be included. That you for correcting my understanding!
Steve
-
For those of you who have received either an M8 or an M15 coil, can you confirm for me that these coils DO NOT include a coil bolt in the package?
Thanks,
Steve -
What an absolutely stunning coin! GREAT FIND!
Steve -
Airtimesa --
Since it sounds like you don't need the mounting pieces that are installed on the upper section of the 700/900 shaft, then I'm quite sure that I could provide you with a shaft that would work for you, though I'm not familiar with the "SeaGhost" setup you are talking about.
One thing I will say about the sand is that YES, it will wear things down (like sand paper), whether it's your TeleKnox shaft, or the stock Minelab shaft, or mine. BUT -- while your lower rod may "lose diameter" over time due to the sand, you won't have the issue of the lower rod "falling off, " with one of my shafts, as the cam locks I use are ADJUSTABLE, in terms of clamping tension, via a thumb screw on the cam lock (see the attached picture; it's the screw on the right). So, if your lower rod ends up reduced in diameter, such that the cam lock is no longer holding the lower rod securely, you simply tighten up that thumb screw a bit, which tightens the clamping tension. In other words, how tightly the cam lock clamps to secure the lower rod, is FULLY user-adjustable.
I'm happy to help, if you decide you are interested.
Steve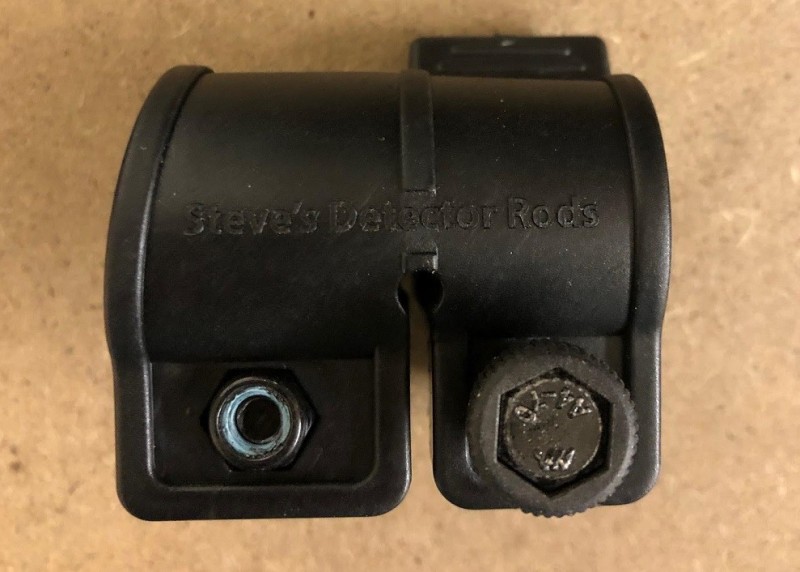
-
Mark,
Thanks for the kind words!
Airtimesa,
I am not sure what exactly you are wanting. The Tele-Knox shaft you showed, that you are using with your 600/800, is a fully telescopic shaft. You said you want a 700/900 collapsible shaft that is similar. However, as you noted, the stock shaft from Minelab, that comes with the 700/900, is a relatively high-quality shaft (as you noted), that is fully collapsible (just like your Tele-Knox shaft). So, it seems that the Minelab shaft meets your needs.Indeed, in a later post, you in fact said specifically that you are wanting the OEM Minelab shaft for the 700/900. Is that correct? I guess my confusion is due to the fact that I assume you already HAVE one -- that came with your 900? Correct? Are you just wanting a "spare?"
If you want a spare, I am near certain that you won't be able to get one from Minelab. They aren't even producing spare LOWER RODS for the 700/900 yet, let alone a whole shaft. So, I think you will be out of luck there, probably for the foreseeable future.
I DO produce spare lower rods for the 700/900, and you will have no issues with the quality. I also produce a combination middle section and lower rod, i.e both of the lower two pieces in one "assembly" -- and again, you'll have no issues with the quality of these. I use high-quality carbon tubes/parts, and top-notch, heavy-duty cam locks of a similar design to the ones Minelab uses on the 700/900. I take pride in producing high-quality shafts. As such, I'd be happy to provide you with two of the three shaft sections (middle and lower) for your 700/900, and could even do so in a few different colored options, if you so desired.The one thing I can't provide is the upper shaft. Reason being, Minelab designed their 700/900 upper shaft such that the mounting piece for the handle/control box assembly, and the mounting "rail" for the arm cuff, are both fixed/epoxied onto the upper shaft's carbon tube. And so, it makes that upper shaft section a bit "proprietary," since those mounting pieces are not able to be removed and installed onto an aftermarket shaft. And since you can't mount the handle/control box, or the arm cuff, onto a shaft WITHOUT those two mounting pieces, it makes producing a compatible upper shaft expensive/difficult -- as one would have to fabricate those two mounting pieces, and then purchase injection molds to produce them, if one wished to build a COMPLETE shaft, for the 700/900.
So -- bottom line, if having just a lower rod, OR a two-piece combination middle/lower shaft assembly would help you with whatever you are wanting to do, I can help. If you need an upper shaft section ALSO, I won't be able to provide that at this time. Meanwhile if it is an OEM Minelab complete three-piece shaft for the 700/900 that you are wanting, I don't think you are going to find one anytime soon as, again, Minelab does not have them for sale.
Let me know if I can be of any assistance.
Thank you!
Steve -
abenson,
Finally had the time to watch your "comparison" video between the original version, and the update, over the three targets. Nicely done. Very informative.
Steve

Quarters Coming In At 2 In All Terrain General.
in Minelab Manticore Forum
Posted
NO, VDI increasing in other modes is not correct, either. You might see a digit or two difference at most, but a nickel going from 27 to 39? No, something is definitely wrong...
Steve