
Steve Herschbach
-
Posts
19,760 -
Joined
Content Type
Forums
Detector Prospector Home
Detector Database
Downloads
Everything posted by Steve Herschbach
-
Me too! U.S. Woman Finds 3.72 Carat Yellow Diamond At Arkansas Park Teen Finds 7.44 Carat Diamond In Arkansas Park Arkansas Diamond Find A Sells For $20,000 Crater Of Diamonds Lovestones
-
Not sure about all that gold stuff, but my wife has several bags of treasure from New Zealand.....

-
 Companies are less enthused these days about spending a lot of money on color print catalogs. It costs a lot, and no way to update when something changes. Cases of them printed at great cost often end up in a dumpster, wasting money and trees. Fisher has not printed anything up in awhile, and the last catalog I had was from 2016. Anyway, I managed to locate a Fisher 2018 metal detector catalog, which appears to be the most up-to-date one done. You can download it at the link, but the only change I see from the 2016 catalog is the addition of the F-Pulse pinpointer. Nice brochure though if you do not already have the 2016 version. Presumably once the new Fisher Impulse models are sorted out, it will be time for a new brochure.
 -
Free Copy Of Prospecting & Mining Journal
Steve Herschbach replied to Steve Herschbach's topic in Detector Prospector Forum
I watched ad counts go up and down with the price of gold for decades. The number of ads in the ICMJ is a rough indication of the strength and vitality of the hobby and industry. -
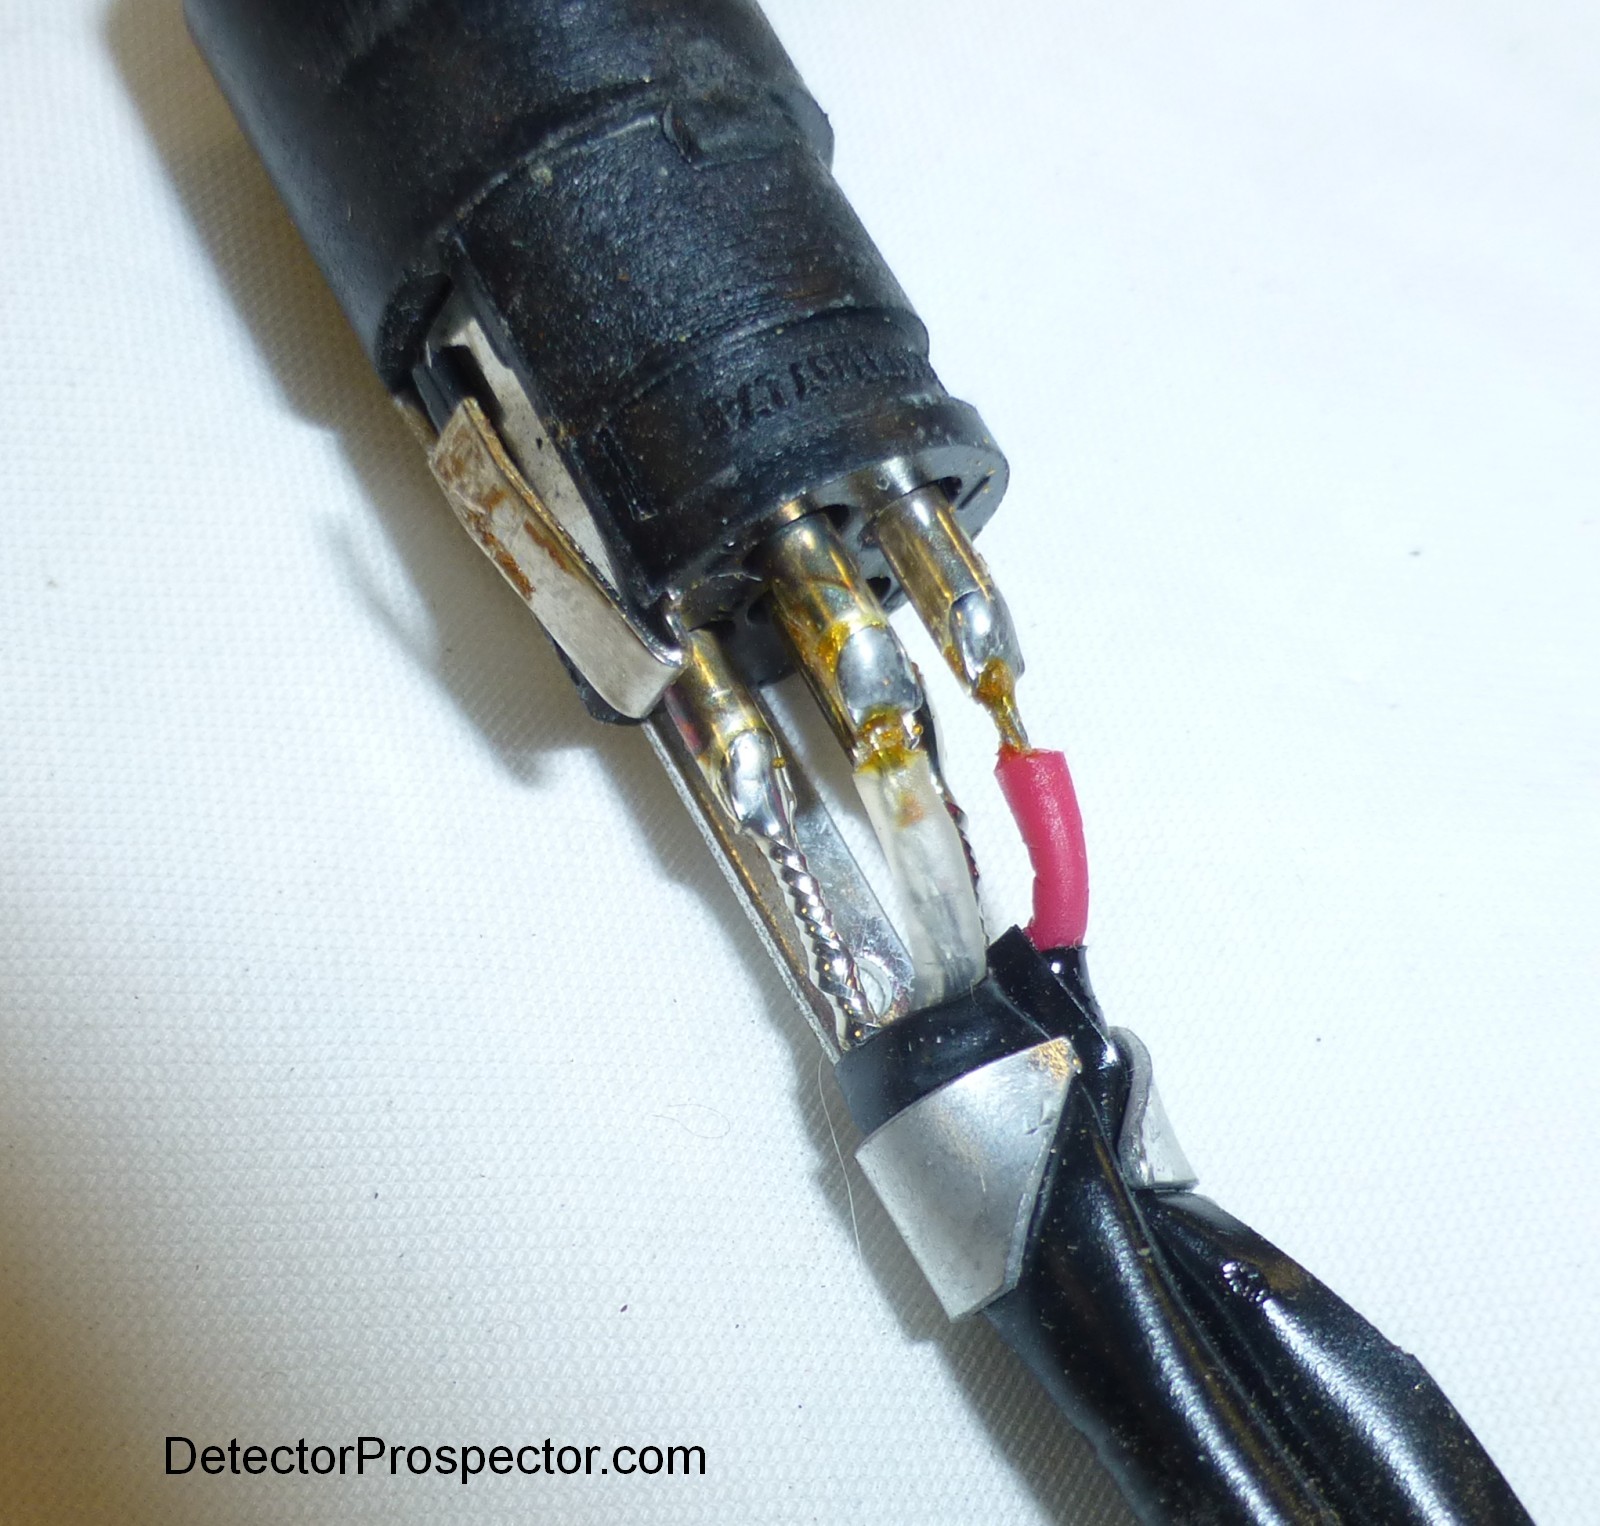
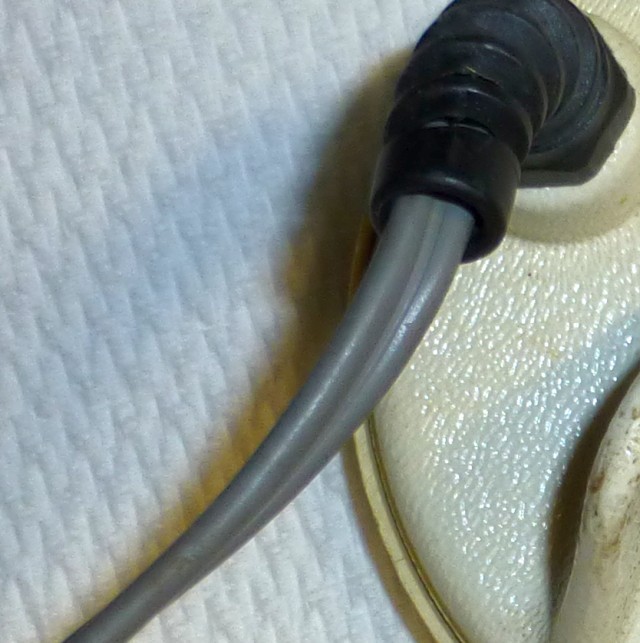
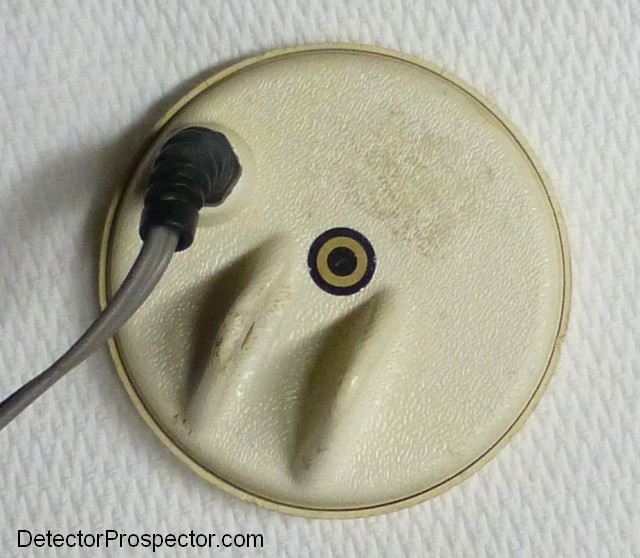
The cable appears to be simple, cheap speaker wire. No markings on it. The connector is five pin but only four used. Two wires, clear and red, and the other two actually use the shielding from those two wires as connections. Close up of coil cable And the connections

-
Once I get the detector back I'll do something up. But I have used this detector and coil combo before and there are limits to what a small coil can do as far as enhancing small gold capability. The machine itself has inherent limits. However, nobody has compared the original Gold Bug to the modern digital version. Since I just happen to have a new 19 kHz model on hand, I will test them both on tiny nuggets to see just what the difference is. I believe it will be instructive as people tend to focus just on frequency, but there is more to it than that.
-

Version 060518 Rev. 5
26 downloads
Fisher 2018 full color catalog, 5.2 MB pdf file, 16 pages First Texas (Fisher) Forum -
Here is a free copy of the July 2020 ICMJ Prospecting & Mining Journal. Some good articles, and the price is right for those who would like to check out what the magazine has to offer. https://www.icmj.com/sample-issue/202007-Jul2020-sample/offline/download.pdf

-
Hodan Prospecting Picks
Steve Herschbach replied to Rick K - First Member's topic in Detector Prospector Forum
Hmmmm... I was a Hodan dealer for a long time, and was told John has passed when the company closed. I was on board early and did a lot to get his product known. That’s been years ago, and I find it hard to believe he hid out and let people like me believe he is gone if it’s not true. I still use his picks to this day when prospecting. Anyway, I could have been misinformed and am happy to hear it may not be true. http://arizonaoutback.ipbhost.com/topic/12311-going-goinggone/?tab=comments#comment-71662 -
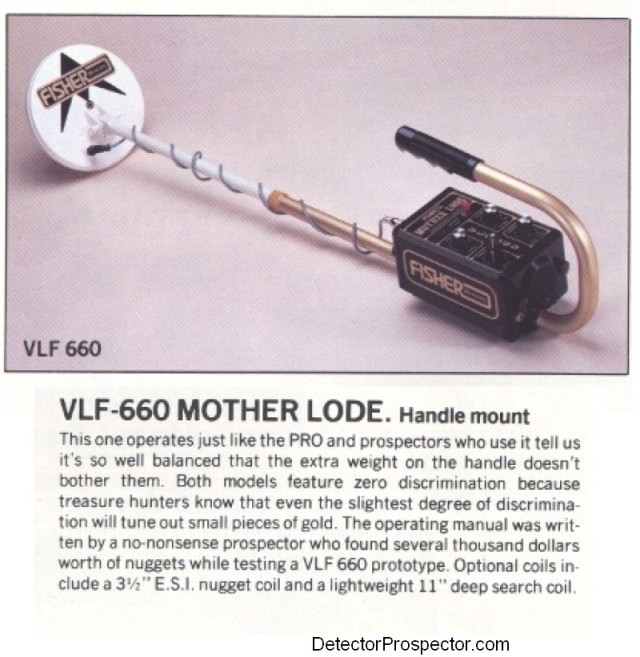
Some interesting early Fisher history from Dave Johnson including some details about the VLF-660 Mother Lode.
-
Faster Recovery Speed For The V3i Anyone??
Steve Herschbach replied to bigtim1973's topic in White's Metal Detectors
Basically you are talking Filters, Recovery Delay, and possibly SAT settings, page 52 of the V3i Owner's Guide. I excerpted a copy below. There is a good post by Mike Hillis at Dankowski's on V3i filtering options and how they affect performance. Older designs often refer to having "two filter" or "four filter" methods. Here is a post by Monte that discusses that subject. See also "Ground Filtering" in the DFX Engineering Report by Mark Rowan. And don't forget - smaller coils separate better. White's V3i Owner's Guide, Page 52-53: FILTER & SPEED – Choose features that match the detector’s circuitry to the conditions and personal preferences. Search – Selections active in the search mode, TRIGGER on grip in center position. Ground Filter - Electronic filtering optimizes penetration / detection depth. Less filtering increase detection depth in low ground mineral areas, however, doesn’t penetrate high ground mineralization well. Greater degrees of filtering increase detection depth in high ground mineralization, however, doesn’t penetrate low ground mineralization well. Spectra V3 offers eight combinations of digital filters. Four different filter frequencies each with a significantly different Band and a High Pass version. Filter speed HZ - defines the speed of the filter process: Lower numbers – 5 Hz and 7.5 Hz allow the filter to process more signals at slower search coil sweep speeds. Higher Numbers – 10.0 Hz and 12.5 Hz, process signals at a faster rate allowing for faster search coil sweep speeds. Filter Types: Band Pass- Typically superior for mild (low mineral) ground types and rejection of external electrical noise / interference. Uses a narrow range of filtration. High Pass – A faster filter with a broader range of acceptance. Most Programs use a 10 Band Pass Filter allowing normal ground rejection at normal sweep speeds. Selecting a filter other than 10 Hz Band Pass allows adaptation to personal search coil sweep speeds and localized ground conditions. 5.0 Hz Band Pass – Better noise rejection, (Very low ground minerals), very slow search coil sweep speeds. 5.0 Hz High Pass - A little more sensitive in areas free of external electrical interference. 7.5 Hz Band Pass - Better noise rejection, (Low ground mineralization), slow sweep speed. 7.5 Hz High Pass – A little more sensitive in areas free of external electrical interference. 10.0 Hz Band Pass – Better noise rejection, (Medium ground mineralization), medium sweep speed. 10.0 Hz High Pass – A little more sensitive in areas free of external electrical interference. 12.5 Hz Band Pass - Better noise rejection, (High Ground Mineralization), fast sweep speeds. 12.5 Hz High Pass – A little more sensitive in areas free of external electrical interference. Recovery Delay - 1 – 200 200 = slowest. Additional and separate (beyond filtration) selection for the signal response time. Short response time benefits performance in high trash by providing better target separation. A longer response time allows a larger window to detect deeper targets. Ideal Recovery Delay is dependent on Ground Filter selection, ground mineralization, trash density, and your average sweep speed (how quickly you move the search coil). SAT (Self Adjusting Threshold) - Off – 40 40 = fastest - Adjusts the speed at which the threshold is automatically maintained during searching. Used to stabilize All Metal modes. Higher numbers are quick to correct threshold variations, however, require quicker search coil sweep speeds to maintain metal detection in the All Metal mode. The ideal setting is one that maintains a steady threshold considering your average search coil sweep speed and ground conditions yet continues to detect metal targets at your slowest search coil sweep. -
Dave started with Fisher in 1981 and the Gold Bug came out around 1990. Any detector is a group effort, but Dave is considered the key player on the Gold Bugs. The Gold Bug 2 came out in 1995, and Dave left at about the same time. See the forward in the book below for details. FREE BOOK - Advanced Nugget Hunting with the Fisher Gold Bug by Pieter Heydelaar & Dave Johnson, Fisher Labs
-
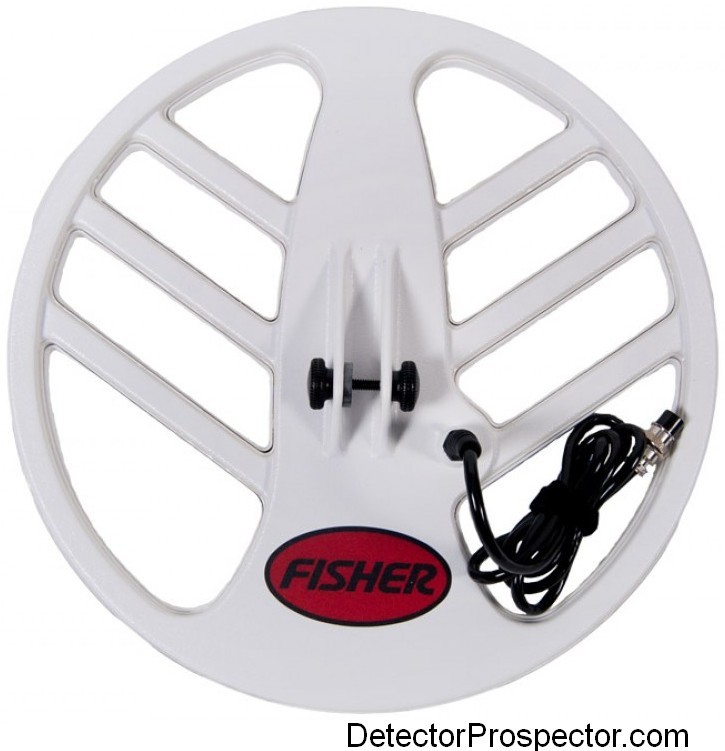
And for more reference, the original 15” coil weighed 908 grams and sold for $249 (MSRP $299) when it was introduced. Ironically this coil was billed as lightweight when it was released at "only two pounds!" Fisher 15” search coil
-
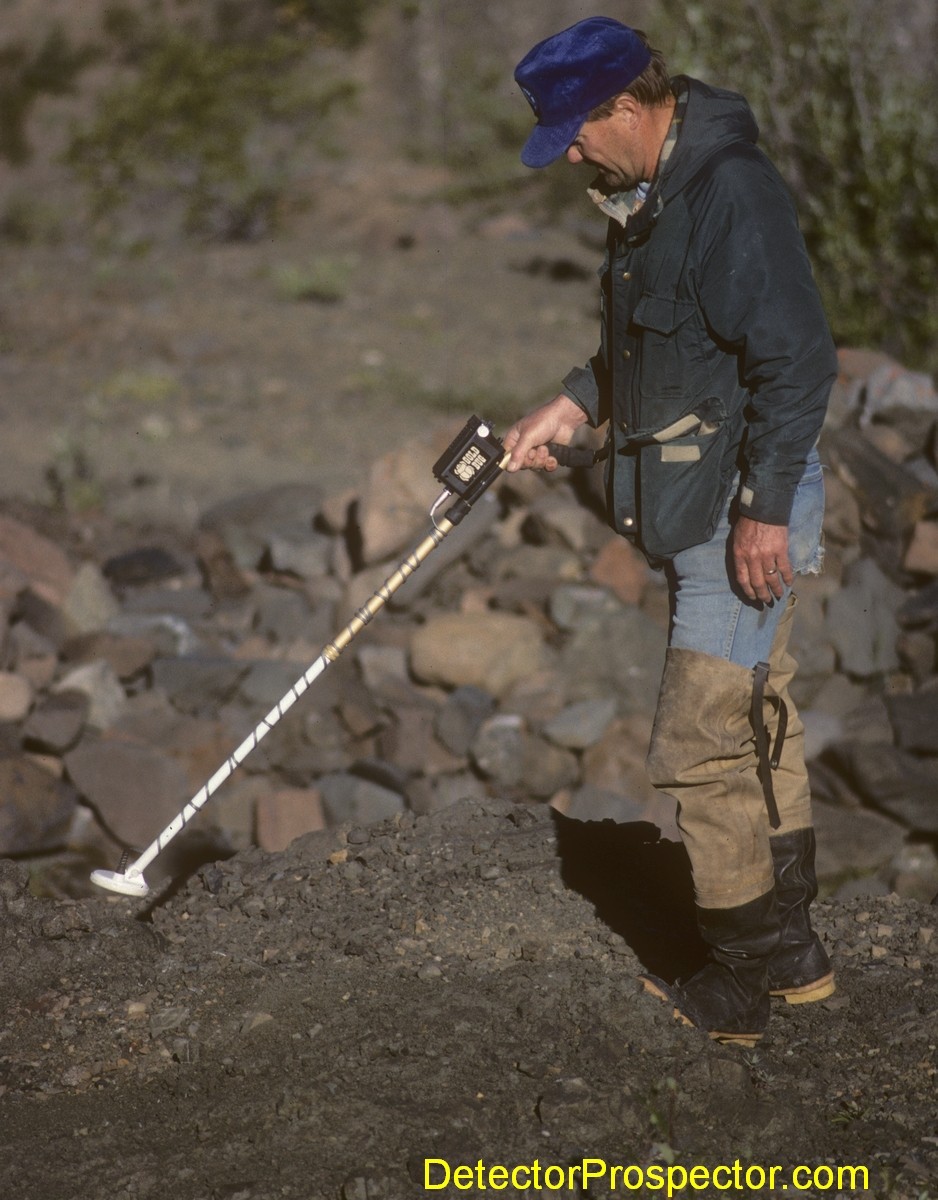
The 19 kHz Gold Bug was kind of the SD2000 of the day. Prior to it, the best thing going was the 15 kHz Garrett Groundhog circuit. Magazines of the time had many stories of people in Australia cleaning up with these old Gold Bugs. That was, as you note, more a function of being first on the ground, not any magical powers the machine had. It is what I call a "low gain" 19 kHz, not as hot on tiny gold as the new 19 kHz digital models, which are running higher gain circuitry. As I noted, however, this allowed the machine to handle really bad ground relatively well for a VLF detector. The coil does look tiny. Here is my father using one back around 1990. The coil is described variously as a 3.5" coil or 3-3/4" coil, but it is 3.5" without scuff cover, closer to 3-3/4" with cover. As you can see it is also very thin, especially compared to other coils of the day or even today. Most similar size coils are over twice as thick. Yes, this is a concentric coil, as are all analog Gold Bug coils. The old coil I am having serviced was used without a scuff cover and is slightly worn through to the epoxy along one edge. The older coil has minimal use and still has the scuff cover on it. Another note on old Gold Bug models. The earliest are like in the photos below, with a white lower rod as part of the two piece shaft. The coil cables are gray or silver, and did not go to black until later. A three piece rod was offered as an option, and it was so popular it eventually became standard. FREE BOOK - Advanced Nugget Hunting with the Fisher Gold Bug Bud Herschbach with original 19 kHz Fisher Gold Bug Bud Herschbach with original 19 kHz Fisher Gold Bug


-
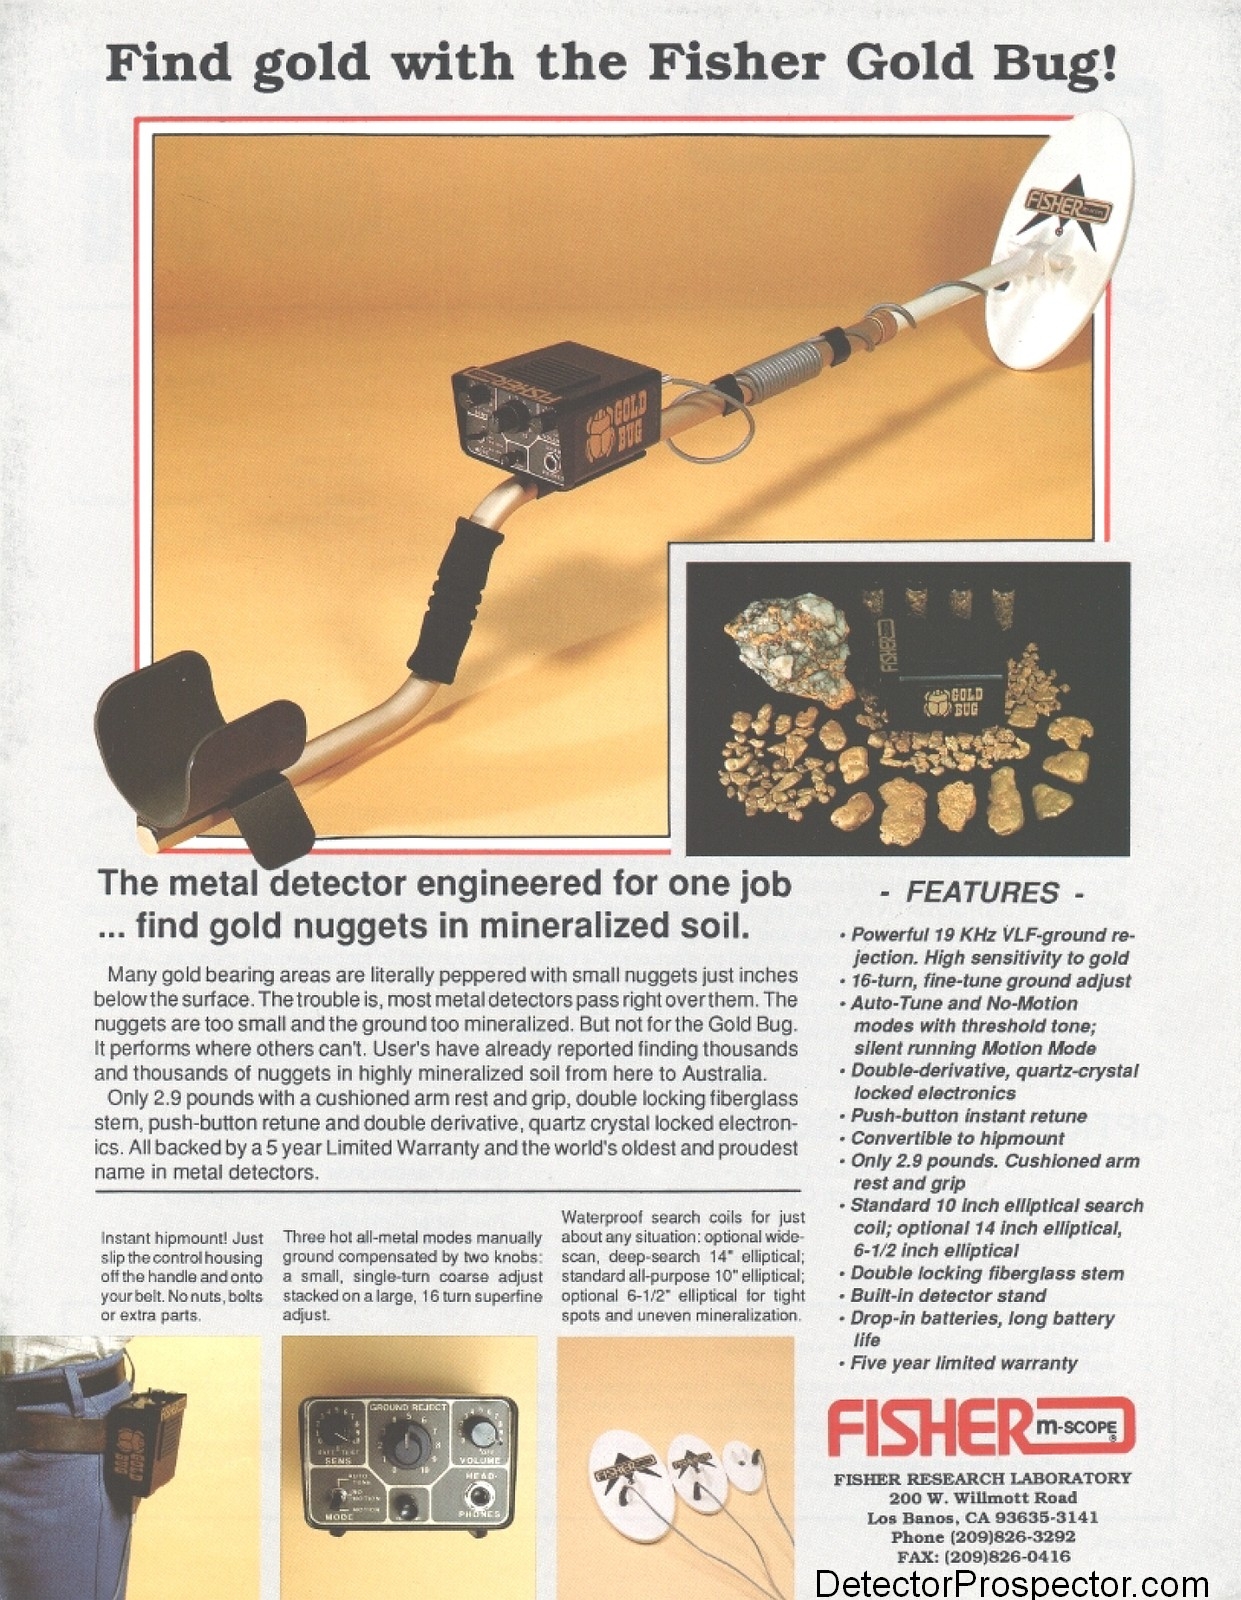
I have a 1990s era Fisher Gold Bug, the original 19 kHz analog version, long since replaced by newer models. The old 19 kHz model was not particularly hot, but it did have an ability to ground balance out some hot rocks that newer and hotter VLF machines struggle with. Original Fisher Gold Bug Data & Reviews The detector came with a 10" elliptical search coil. I have a couple very rare 3.5" round coils that Fisher made for these models before the little 4" x 6" elliptical replaced it. It's the smallest search coil I've ever owned for a commercially sold metal detector, making the unit into more of a probe than a normal detector. The threshold was cutting out if the detector was bumped, something loose, so it's been sitting idle for a very long time. I decided it was doing no good as is, and by chance had an opportunity to call Felix at Fisher recently. Felix is another old-timer in the industry like myself, who I have not talked to since I left my old dealership in Alaska over eight years ago. Anyway, since the detector is still actually functional Felix figured they could give it a good refurbish and fix whatever is loose. The main thing I wanted, however, was to get the detector tuned for the 3.5" coil. Most people do not know it, but analog Gold Bugs are hand tuned for every coil. The coil they ship with is tuned for the detector, or should I say the detector is tuned for the coil. Accessory coils may or may not be a perfect match if the original coil is swapped out for something else. Long story short is I am asking them to match the detector to the 3.5" coil as well as is possible. The original Gold Bug is a genuine classic. Prior to it, detectors were large square boxes with extremely poor ergonomics. The Bug features a very compact control box that is removeable from a S rod, enabling easy chest or hip mounting. The design seems normal now, but you have to have used what came before to see the genius of what Fisher did with the Gold Bug. 19 kHz was also a radically high frequency at the time, as people were just catching on to the idea that higher frequencies are better for small gold nuggets than the lower frequencies that were the norm of the time. The 19 kHz Gold Bug replaced the 4.5 kHz VLF-660 Mother Lode as Fishers top nugget detector. Frankly, Fisher was not seriously in the game prior to this point, with Garrett probably the leader in VLF gold detectors at the time. A new company named Minelab was just starting to sell detectors in Australia, and had yet to really make a name for themselves. Anyway, control box and coil boxed up and on the way to El Paso. I'll let you all know how long it takes and what the result is. Here is a picture of one of the coils. The Gold Bug coils first used a gray dual lead cable, which was replaced very early on with the stouter black cable used to this day. This is the older coil of the two, though it also has less wear. The one I sent in has the heavier cable but is in poor condition. I need to reinforce the coil ears when I get it back since one is cracking. But I decided I wanted to use the coil with the heavier cable, with this older one serving as backup until I sort this all out. And in case anyone is wondering, the old 19 kHz coils do not work on the newer digital versions of the 19 kHz Gold Bug. 3.5" round search coil for original analog Gold Bug To reiterate what a radical design advance the Gold Bug was at the time, here is a picture of the detector it replaced, the 4.5 kHz Mother Lode... Fisher VLF-660 Mother Lode metal detector And the new 19 kHz Gold Bug...

-
Two New Kids Waterproof Detectors
Steve Herschbach replied to Ridge Runner's topic in Nokta / Makro Metal Detectors
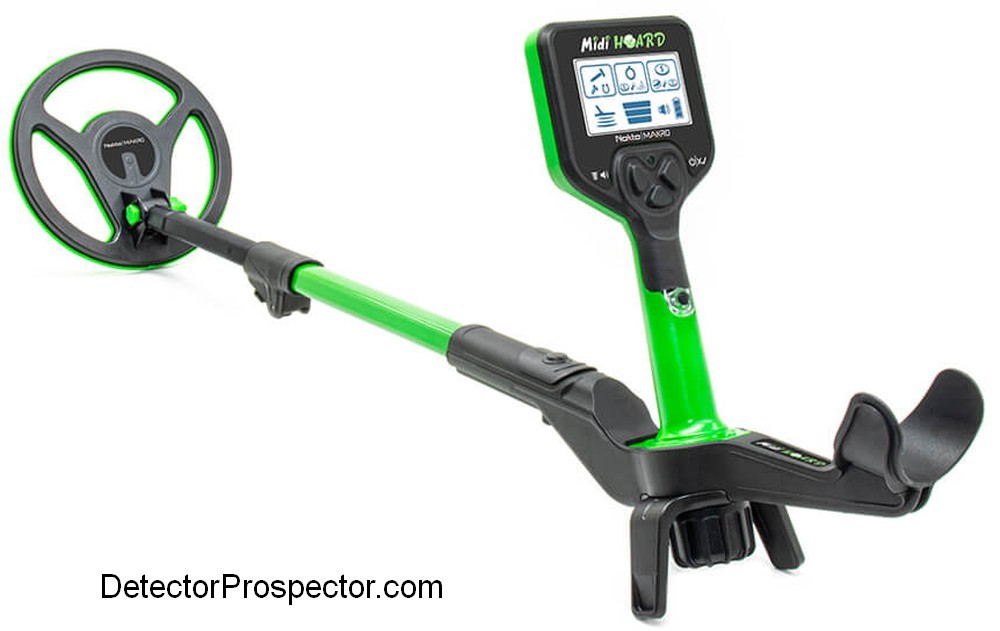
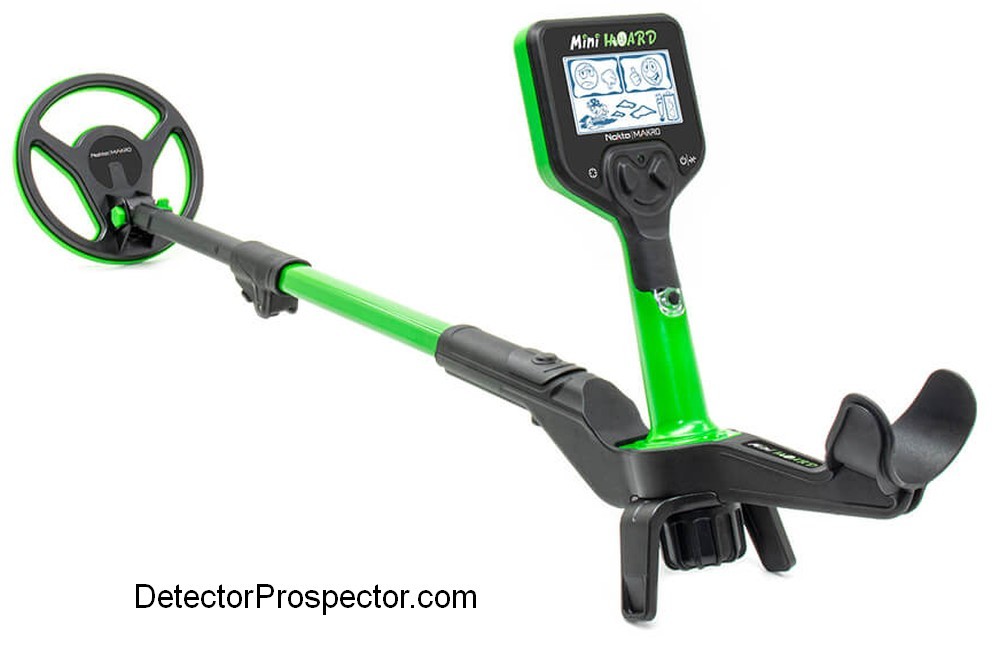
https://www.noktadetectors.com/kids-detectors/ Nokta/Makro Mini Hoard metal detector Nokta/Makro Midi Hoard metal detector

-
First AQ Water Hunt, First AQ Gold
Steve Herschbach replied to cdv's topic in First Texas - Bounty Hunter, Fisher & Teknetics
Wow!! A find like that on a first outing would make it very hard not to like the detector! -
Check out all the great finds with Garrett metal detectors! https://www.garrett.com/sites/default/files/pdf/2020-09/3500089-Searcher-Sept-2020.pdf

-
- They were the first manufacturer to put pulse induction into a hand held pin-pointer I think that was DetectorPro and the Pistol Probe - They were the first manufacturer to have a USB rechargeable pin-pointer Could be, not sure - They were the first manufacturer to put Li-Ion batteries internally into a detector I'm guessing that was XP - They were the first manufacturer to make dedicated wireless systems for detector users White's was first with dedicated high speed wireless headphones, unless you mean generic boxes that work on anything.
-
White's Signagraph Display Explained
Steve Herschbach replied to Steve Herschbach's topic in White's Metal Detectors
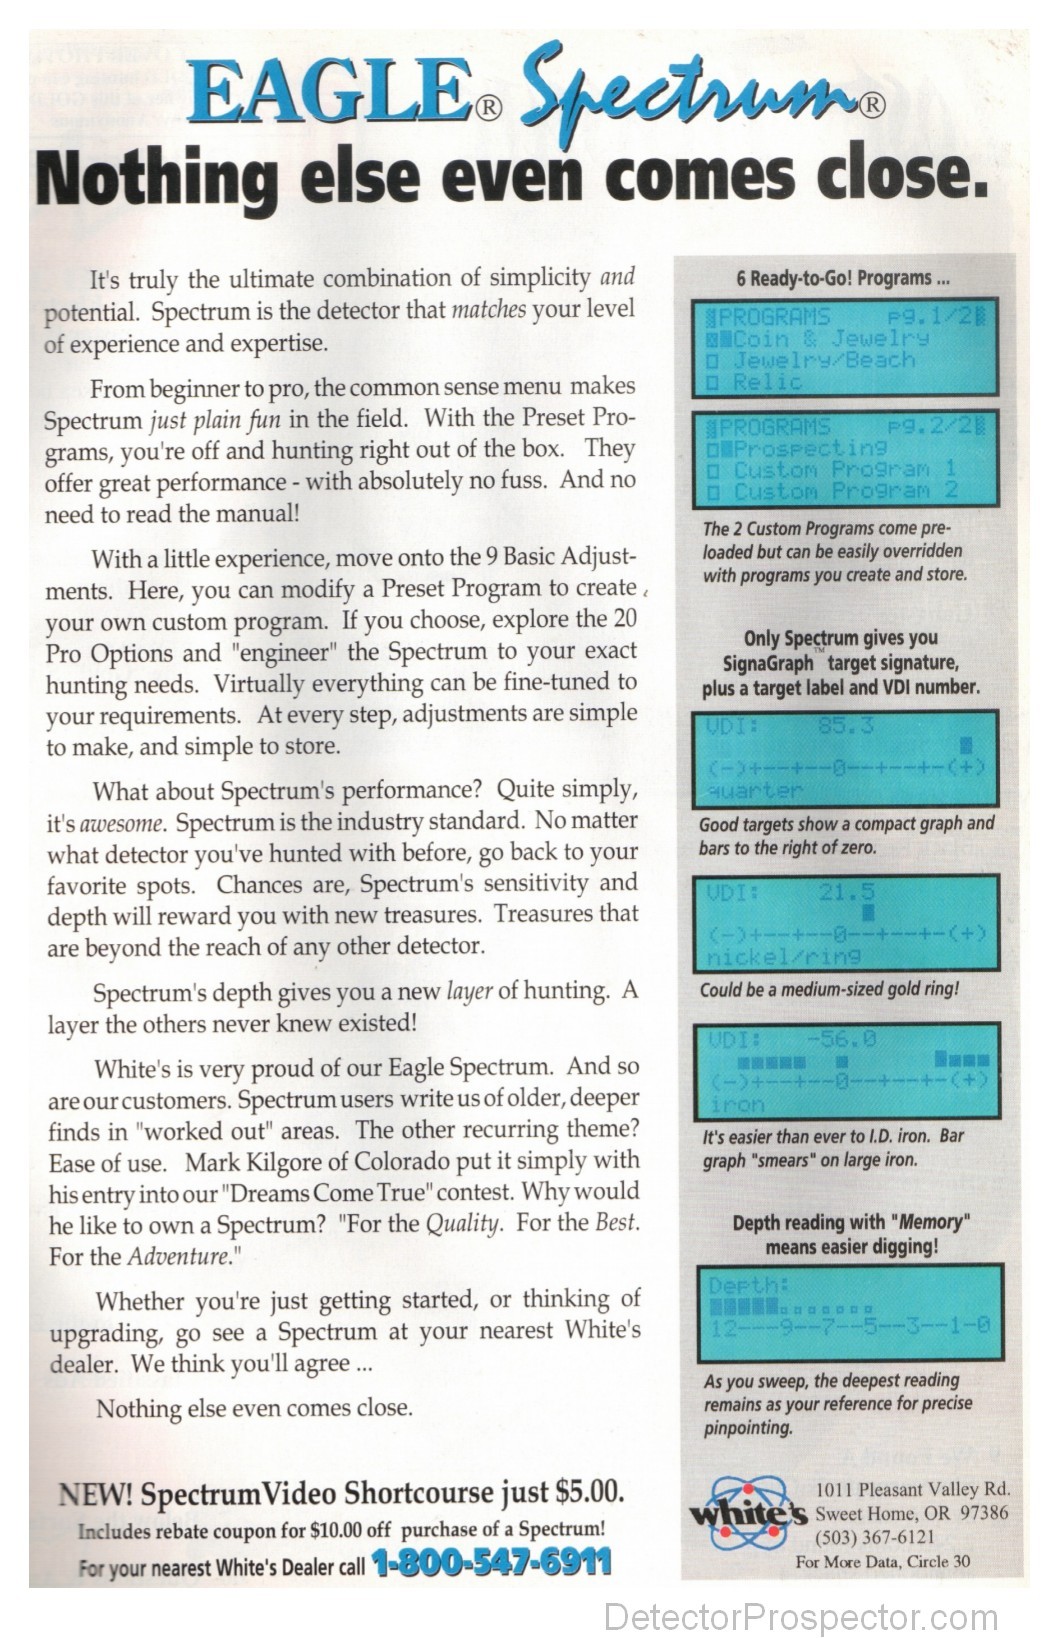
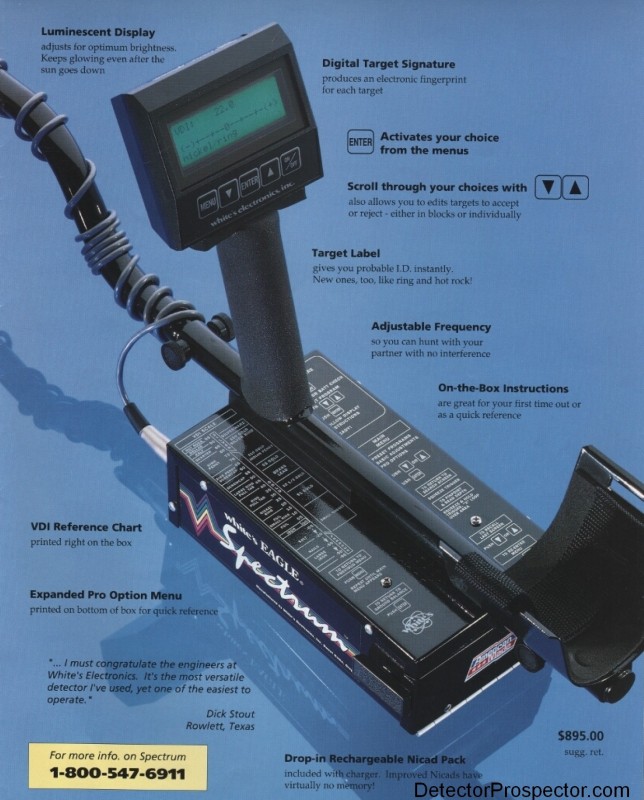
A few updates made to the original post. I indicated that the SignaGraph display was originally developed for the White's XLT. Not quite. White's was a genuine innovator in digital metal detecting, with the first true digital model, the White's Eagle. As shared in Mark's notes, the original Eagle models had a very basic display. The SignaGraph first appeared in the last version of the Eagle, the Eagle Spectrum, the first White's detector to bear the Spectrum moniker. The SignaGraph was thought of as a "Phase Spectrum Analyzer", and that is where the "Spectrum" part of the name derives from. The Eagle Spectrum had the old larger control box powered by four C cells. The Eagle Spectrum was very short lived however, as this is when White's was making the move to smaller control boxes powered by eight AA batteries. This set the stage for most everything else that followed, and the White's XLT was one of the first beneficiaries of the new design. The slimmed down Eagle Spectrum powered by eight AA batteries and with a better LCD display was renamed the Spectrum XLT, and then simply XLT. Here is the ad for the new Eagle Spectrum touting the new SignaGraph display. Click for a larger version. And here is the Eagle Spectrum owner's manual, where one can see the basics of what later became the XLT, then DFX, and the V series.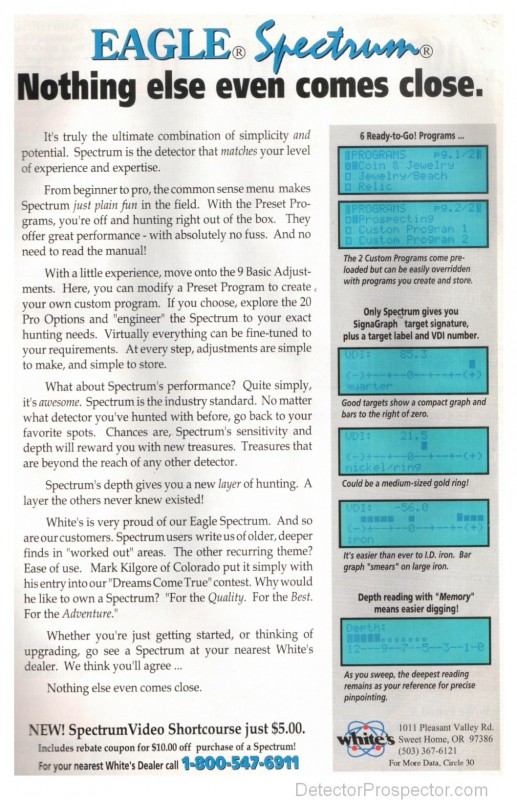
-
White's Signagraph Display Explained
Steve Herschbach replied to Steve Herschbach's topic in White's Metal Detectors
I love these kind of tech notes, and often information detailed in earlier models is sometimes left out in later models as not "new" anymore. I'm pushing it as far as copyright goes reposting some of this stuff I have archived over the years, and which seems to have disappeared as time goes on. This was all on the White's website or in their informational pamphlets once upon a time, but is all long gone now. Anyway, I'm going with the "reposting for historical and informational purposes only" excuse because I hate to see this stuff get lost over time. I just added the notes on Accumulate, Average, and Fade on a separate thread.
-
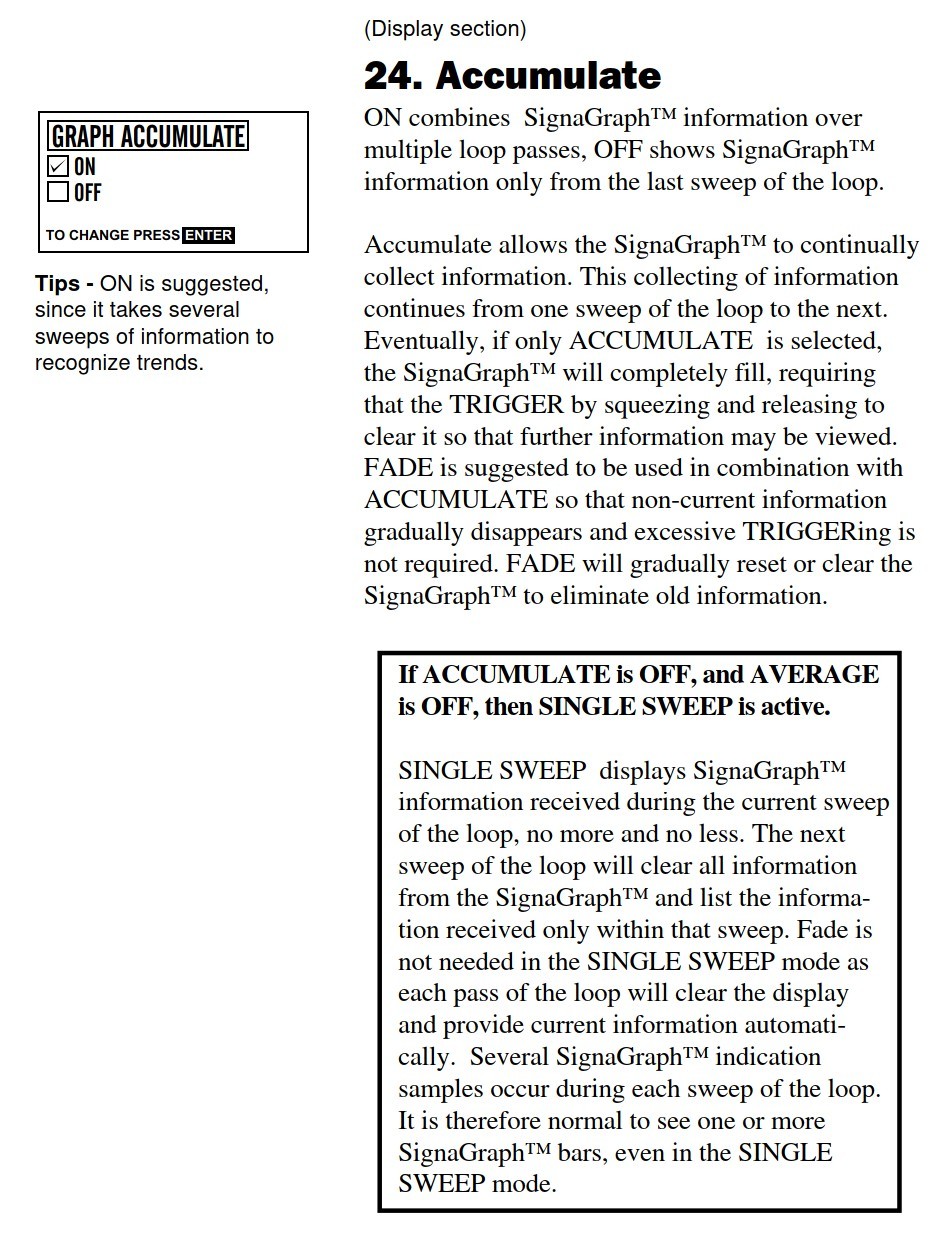
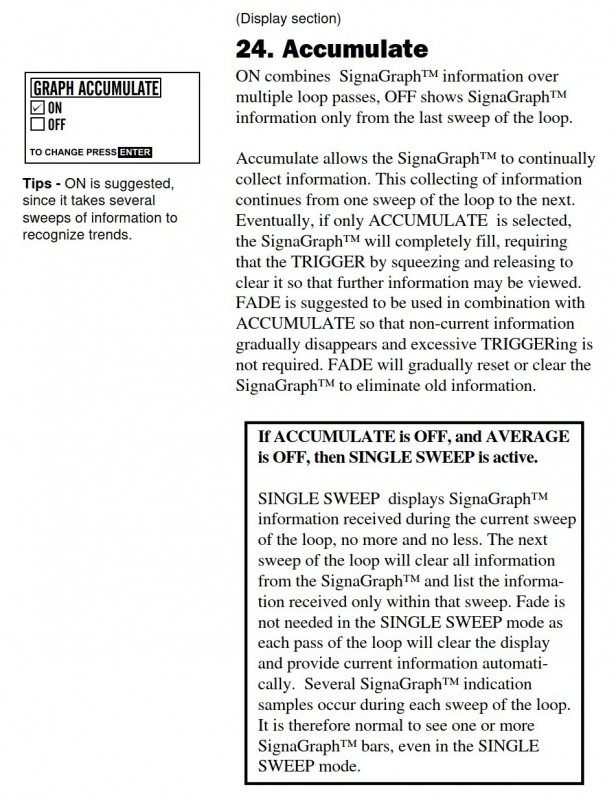
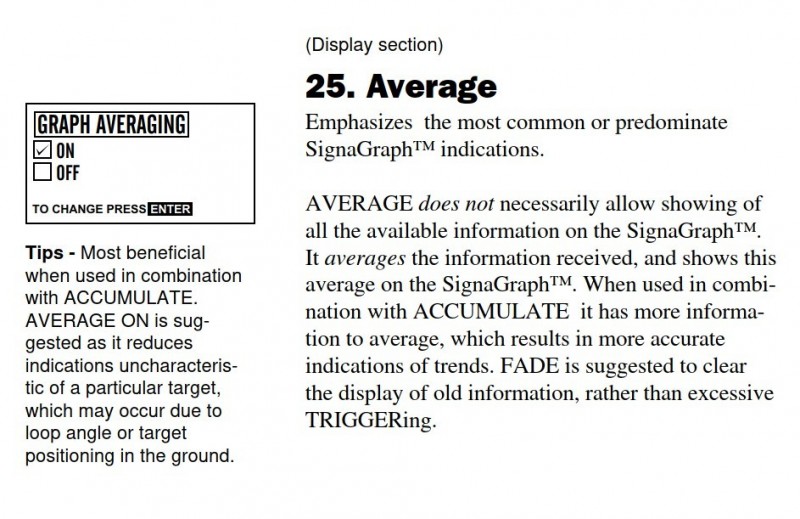
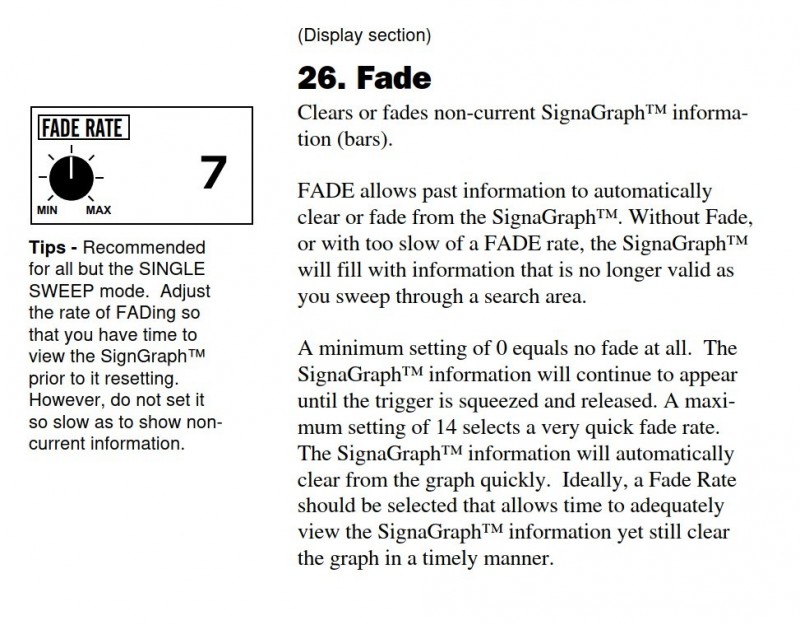
The Accumulate, Average, and Fade controls exist on several White's models, having first been introduced on the White's Eagle Spectrum. The functions govern how the SignaGraph™ and SpectraGraph™ displays show targets and so are unique to White's detectors. These display controls are also used on the DFX and V models. This note appended to the Engineers Guide to the Spectrum XLT offers a basic explanation of what these controls are doing. The display controls are also covered on pages 45-46 of the XLT Users Guide (excerpted below). Spectrum XLT Engineering Note Using Spectrum XLT Modes: Accumulate, Average, and Fade by Mark Rowan Although the SignaGraph™ display format has been well received, there seems to be some confusion regarding the option (average accumulate, and fade) and how to use them. Perhaps a more detailed explanation is called for. The default (preset) condition is Accumulate/Average/Fade, the fade rate being fairly slow. With each sweep over the target, several attempts are made to assign it a V.D.I. number. Each reading (There may be only one or two, or as many as six or eight readings per sweep) is reported to the user as a vertical bar on the SignaGraph™. (NOTE: If all eight readings are the same, the user will only see one bar). In Accumulate mode, these bars are not "cleared out or "blanked" on subsequent sweeps, but continue to "build up" in the display so that the user sees the entire history of multiple passes over the target. Squeezing the trigger will clear the display if it gets too cluttered, or if the user chooses to move to a different target with those of the second one. However, continually having to squeeze the trigger can be a nuisance -- this is where Fade comes in. If a certain period of time elapses with no new target responses, the vertical bars will be shortened by one increment. Eventually, they will disappear from the display. Notice, however, that if a new response comes along quickly enough, the Fade timer is reset (this is necessary to prevent readings from beginning to fade before the user has even had time to see them). Thus, if the Fade rate is slow and the user is sweeping the loop fairly quickly, no fading will occur until he stops swinging the loop or moves away from the target If he is working a trashy area or has his sensitivity cranked up to the noise threshold, the Fade out may be disabled entirely. This is the justification for the Fade Rate control. If the fade rate is increased, the user can find a level at which Fading will reliably occur, but which is not too fast for his personal taste or his style of hunting. If the Accumulate control is turned off the instrument is in the "single sweep" mode. Each sweep of the loop causes the display to be cleared, and only those readings made during the current pass over the target to be shown. The primary advantage of this is that it reduces the chance for readings from two different targets to be confused with each other. If the Fade rate is set to 0, fading is disabled and display bars will remain indefinitely. Average mode is entirely different than either the Accumulate or "single-sweep" mode of operation. When Averaging is turned off (the default in all preset programs have Averaging on) the vertical height of the display bar is an indication of the strength of the signal when that reading was taken. With Averaging, however, the height of the bar represents a running total of the number of readings that have occurred at that point on the display. For example, if you pass the loop several times over a gold ring and get readings of 1, 10, 40, 10, 10, -20, and 10, the display will show a tall bar at the place corresponding to 10 on the display, and very short bars at the positions corresponding to -10, 0, and 40. If the count exceeds the vertical resolution of the display, the bar remains at its maximum height and all other bars in the display are reduced by one increment, eventually disappearing from the display. The usefulness of this is that if the error in the V.D.I. readings is random (such as that caused by electromagnetic interference or irregular loop motion), it will eventually average out and the display will "lock on", showing a single prominent segment at the correct point on the display. Unfortunately, there is a catch. Iron and foil targets which mimic coins will also appear to "lock on"; the smearing one would normally expect will be suppressed somewhat. However, in the hands of a skilled user this should be a very useful feature. Mark Rowan was a Senior Engineer for White's Electronics, Inc. Mark holds degrees in General Science, and Electronics Engineering Technology, and is a graduate of the University of Oregon. His background includes satellite communications and RF test and measurement instrumentation.
-
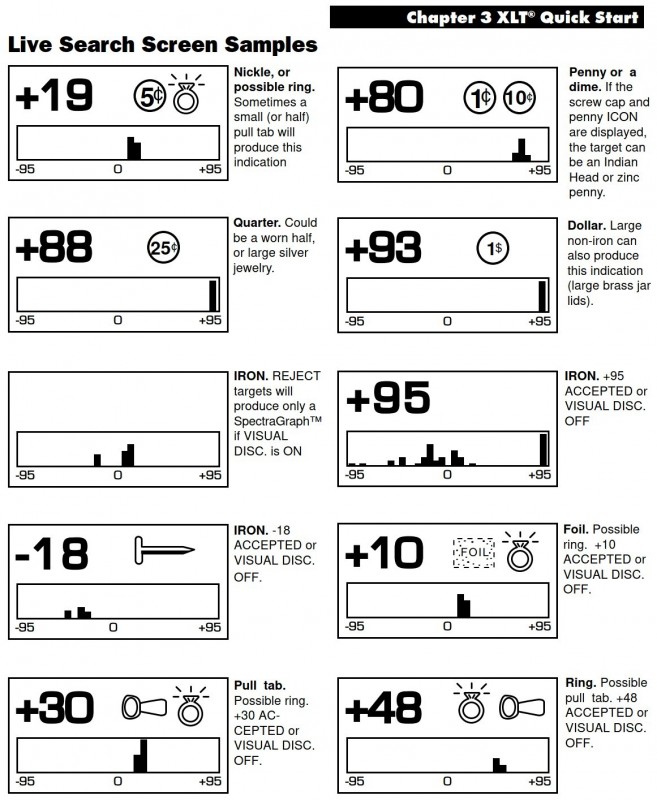
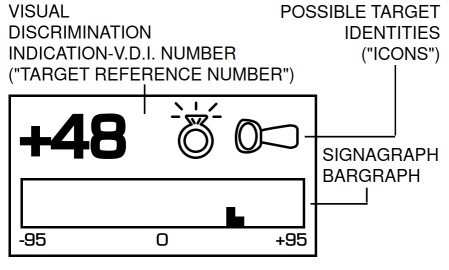
I am a big fan of the White's SignaGraph display. A version 1.0 was originally developed for the Eagle Spectrum. The Eagle Spectrum underwent a complete hardware revamp, and was renamed the Spectrum XLT. A more refined version 1.1 of the software was matched up in the XLT with a much better LCD display. The SignaGraph was also used on the DFX, and was largely the same as on the XLT, with the addition of multifrequency options. The SignaGraph was later greatly enhanced on the V models (Vision, V3, V3i, VX3) and renamed the SpectraGraph. The genius of the SignaGraph/SpectraGraph is the ability to display multiple target id numbers at the same time, and even to choose how the target id number is determined. Here is the SignaGraph explained by its designer, engineer Mark Rowan. More details can be gleaned from the White's XLT User Guide. Spectrum XLT Engineering Note The SignaGraph™ "Phase Spectrum Analyzer" by Mark Rowan Some time ago, I had a conversation with an avid treasure hunter whose instrument of choice was White's Eagle II SL 90. He described to me a technique with which he could discern pull tabs from rings, nickels, and other desirable targets by listening for some subtlety in the audio response. Then he asked me, "If I can do this, why can't you program the Eagle's microprocessor to do it?" My response was, "If you can do it yourself, why would you want the microprocessor to do it for you?" I mention this as a means of illustrating what I consider to be the metal detector designer's fundamental dilemma, which is, as Prince Hamlet might have phrased it, "To beep or not to beep". More specifically, if you're faced with a target at some depth in badly mineralized ground and the detector has a hard time getting a solid reading on it, what do you do? If you design your detector to ignore the target, and then someone comes along with their El Cheapo brand detector and digs the target, which just happens to be a $10 gold piece -- you're in big trouble. If, on the other hand, your customers find that they're spending most of their time chiseling through eight inches of hardpan and finding bent nails and wads of aluminum foil, you're not much better off. The point I was trying to make with the gentleman who had devised the clever pull tab discriminating scheme was, that if you put too much of that kind of "intelligence" into your metal detector, there are always going to be those targets that you miss because the machine got fooled. Which brings me, of course, to the newest White's model, the Spectrum XLT. The Spectrum XLT has all of the features, performance, and flexibility of previous members of the Eagle series, plus a new display which makes the instrument remarkably easy to use. It also makes use of a new way of displaying information about targets -- the "SignaGraph™ or "Phase Spectrum Analyzer" -- which shows the operator everything that we currently know how to display about the characteristics of metallic objects in the ground. In this way, we have gone a long way towards addressing the dilemma I mentioned earlier. The Spectrum XLT is a very "smart" detector, but it is also an "honest" one. Having done the best it can to determine the probable identity of a target, the Spectrum XLT gives you all of the information you need to make your own decision (human beings are, despite what you might have heard, still a whole lot smarter than computers) to dig, or not to dig. Before I begin to describe in some detail what the SignaGraph™ is and how it works, I should emphasize that you don't need to know how it works in order to use it effectively, and that the best way to learn how to use it.... is in the field. In a very short time you will begin to recognize certain display patterns as being characteristic of certain types of targets. I should also point out that even if you ignore the SignaGraph™ altogether, this instrument still has the audio discriminator, V.D.I. number, that its predecessors had, plus the icons, and some significant improvements in terms of weight, physical size, and ease of operation. White's SignaGraph display For many years, White's has built detectors which identify targets based on a V.D.I. number (V.D.I. stands for Visual Discrimination Indicator) which characterizes metallic objects according to their size, shape, and composition. The V.D.I. scale on the Spectrum XLT runs from -95 to +95. Large positive numbers typically indicate objects which are good electrical conductors; for example, silver dollars will come in at 92. Smaller positive numbers usually indicate objects which, because of their size, shape, or composition, are not as conductive; nickels will read about 20 and aluminum foil may come in near 5. Large negative numbers are typical of targets which are readily magnetized, but which conduct electricity poorly or not at all. Some sands or soils which have a high concentration of ferromagnetic minerals may read -93. Metals containing iron have both magnetic and conductive properties, which causes them to spread over a wide area of the scale, although most typically iron objects will fall in the range -30 to -75. The V.D.I. reading is an excellent way to determine the identity of most commonly occurring targets, although I might mention in passing that the only 100% reliable discriminator is called a shovel. However, as a famous metal detector engineer once said, "Life is grossly unfair" (actually, there is no such thing as a famous metal detector engineer, and life really is fair, it just doesn't want anybody to know). For one thing, the signal which a detector receives back from even moderately mineralized ground is typically much stronger than the signal it receives from the targets buried in it. This makes determining an accurate V.D.I. number for a target at any substantial depth a very challenging business indeed. Furthermore, some targets will cause an abrupt change in V.D.I. response during the course of a single pass under the loop; the most notorious of these are the dreaded bottlecap and the dreaded small piece of foil near the surface in bad ground. Enter, as they say, the Spectrum XLT. The SignaGraph™ is very similar in some respects to the familiar analog V.D.I. meter. The display is calibrated from left to right in V.D.I. units, from -95 to +95. When the loop is passed over a target, a V.D.I. determination is made, and a vertical bar is placed at the appropriate place on the scale; near the right end of the scale, say, for a reading of 78. So far, this is just what an analog V.D.I. meter would do. At this point, the similarity ends. An analog meter can indicate only one value at a time; with the SignaGraph™, up to 30 readings can be displayed simultaneously. Also, the vertical height of the bars in the display has significance; the height can either be used to indicate signal strength or a running total of the number of readings at that point on the scale ( the operator may choose which of these two indications is to be used). The advantage of this type of display format becomes evident when the loop is passed over a bottlecap or some other flat, thin iron object. Although the instrument may respond with a loud, clear audio output, and the V.D.I. readout may register a value near the upper end, the SignaGraph™ will tend to "smear out"; numerous segments will appear throughout the display, many or most of them in the negative (typically iron) range. Try the same things with a coin, and you won't see the "smear"; typically you will see 1-3 bars grouped closely together near the top end of the scale. If any smearing does occur, as it might on a deep coin in bad ground, the more accurate readings will stand taller in the display and will tend to persist from sweep to sweep. Another unique advantage of the Spectrum XLT is the ability to make use of information gathered during the course of multiple sweeps of the loop. For years, clever detectorists have realized that by passing the loop over the target repeatedly and mentally keeping track of the range over which readings appear, and the most frequently occurring numbers within that range, they can achieve the highest possible accuracy on really tough targets. The Spectrum XLT performs this operation automatically. The standard mode of operation is the so-called "Graph Averaging" mode, in which a continuous count is kept of the number of readings that fall into a particular slot in the graph. This might also be a good time to mention that more than one V.D.I. determination is made during the course of a sweep; sometimes as many as 6 or 8 readings will be taken during a single pass, so it only takes a couple of sweeps for the effect of averaging to become significant. What you will see in the field will be a single bar on the display which will "grow" until it stands out prominently above the other bars on the display. Although it is not necessary to adjust them, there are a number of controls that allow you to customize the way that the graph is displayed. It can be set up to clear itself on each sweep of the loop, if you find that too much information is persisting in the display for too long. Or, you can configure it to let the vertical bars fade slowly out of view. Even the rate at which this fading takes place is adjustable. If you don't want to be bothered with any of that, then don't be. The factory preset settings should work just fine for almost anyone. For those of you who want to know an explanation of Accumulate, Average, and Fade, one is included in this Guide. If all of this sounds confusing or mysterious to you, allow me to put your mind at ease. The Spectrum XLT is one of the simplest-to-operate detectors you will ever use. I shall describe just how and why it is so easy to use momentarily; but before I finish talking about the SignaGraph™, I want to say it one more time-- you don't need to be a Nobel Prize candidate to figure out what the display is telling you. The usual response from somebody seeing it for the first time is something like: "Okay, I get it now. Now leave me alone and let me hunt!" What is it that makes the Spectrum XLT so easy to use? The key is something that is known in the software business as a "menu-driven interface". To implement that, we have used what is known in the display business as "A True Graphics Display". What all of this means to you, the user, is that all of the controls and options are listed clearly in plain English on the display. A flashing arrow appears on the screen next to one of those options; you can move the arrow up or down with the two "arrow" keys on the 5-key touchpad. When the arrow is next to the control you are interested in, you push the ENTER key. That is everything you need to know to run this machine. If you are like me and you hate reading instruction manuals, I believe I can safely guarantee that you will be able to operate the Spectrum XLT successfully your first time out without ever having to open the cover -- although the manual should be extremely helpful if you want to fine-tune the performance of your detector by adjusting any or all of a rather lengthy list of professional options. Incidentally, another name for this method of running a machine is the "point-and-shoot" method; you point at what you want, then "shoot" with the ENTER key to make it happen. Finally, for those in a hurry, there are a number of "shortcuts" designed to make accessing commonly used features as fast as possible. What makes the Spectrum XLT even easier to use are the factory preset programs (like those in previous Eagles) which you can load with just a few simple keystrokes, following the prompts in the display. These programs configure the machine automatically so that the beginner or casual treasure hunter can expect a great deal of success over a broad range of conditions. Any attempt on my part to detail all of the advanced features and controls which the Spectrum XLT has to offer would probably leave me with blisters on both of my typing fingers. Suffice it to say that all of the features we have had in previous state-of-the-art detectors are here in this one, plus several new ones. Most of the features are there because somebody asked for them -- the moral of the story being, keep those cards and letters coming, and we will continue trying our best to give you the kind of detector you really want. Mark Rowan was a Senior Engineer for White's Electronics, Inc. Mark holds degrees in General Science, and Electronics Engineering Technology, and is a graduate of the University of Oregon. His background includes satellite communications and RF test and measurement instrumentation. White's SignaGraph examples from Spectrum XLT manual
-
Great video, illustrates lots of basic concepts. I pay attention to coil size more than anything. A small coil on a slow machine will pick targets out of trash that a fast machine with a larger coil will miss. The Deus is famous for separation, but many slower detectors can cheat it by running much smaller coils than are available on the Deus. The bottom line is a coil sees everything that is under it at the same time. The detector can either pick one signal as being the strongest and lock on it, or it can average/accumulate things together into a single reading. Dankowski Classics: Beneath The Mask The Painful Truth
-
ACCEPT NO IMITATIONS COMPETITION Minelab are excited to launch our Multi IQ: Accept No Imitations competition, exclusively available to our EQUINOX and VANQUISH users. To enter the contest, simply tell us in 100 words or less why you choose to detect with EQUINOX or VANQUISH, and you'll go into the running to win a Minelab merch prize pack. Competition ends Sunday, October 4, 2020 at 5:00pm ACST. Terms & Conditions apply. ENTER NOW