

Steve Herschbach
-
Posts
19,871 -
Joined
Content Type
Forums
Detector Prospector Home
Detector Database
Downloads
Everything posted by Steve Herschbach
-
 The Nokta AU Gold Finder metal detector was introduced in 2016 and is still in production. The AU Gold Finder is a 56 kHz metal detector in a lightweight, weather resistant package. It fights the trend towards LCD display menu based control systems with a set of control knobs and switches. The Nokta AU Gold Finder is closely related to the Makro Gold Racer in overall function and controls. A lot about how the Nokta AU Gold Finder operates and performs can be discovered by studying the information about the Gold Racer, which has been on the market longer. For all intents and purposes the Nokta AU Gold Finder is basically a Makro Gold Racer in a different housing. Note however that coils are not compatible between the two models. The Nokta AU Gold Finder reminds me of what a Gold Bug 3 might have been if Fisher had ever made one. Hot on tiny gold, variable disc, option to use ground tracking, ground grab, or manual ground balance - and more. There is a dual tone ferrous/non-ferrous mode, and a red LED (ferrous) green LED (non-ferrous) visual id system. The control box contains the batteries and is easily removed from the rod for belt mounting with the integrated belt loops. The Gold Finder runs off four AA batteries. Nokta AU Gold Finder prospecting detector This should really appeal to those who are not fond of all the digital menu nonsense and who prefer to flip a switch and tweak a knob. The Nokta AU Gold Finder with both 10" x 5.5" DD coil and 5" round DD coil (both with scuff covers). Official Nokta AU Gold Finder Page AU Gold Finder Introduction Nokta AU Gold Finder Instruction Manual Nokta Metal Detectors Forum Review by Kevin Hoagland Nokta AU Gold Finder Technical Specifications* Internet Price $679 Technology Induction Balance (IB) Frequency 56 kHz Autotune Mode(s) iSAT Intelligent Self Adjusting Threshold Ground Rejection Grab, Manual, & Tracking Soil Adjust No Discrimination LED Visual ID & Tone ID Volume Control Yes Threshold Control Yes Tone Adjust No Audio Boost Yes Frequency Offset No Pinpoint Mode Yes Audio Output 1/4" Headphone Socket & Speaker Hip Mount Yes Standard Coil(s) 10" x 5.5" DD, 5" round DD Optional Search Coils 5.5" x 10" concentric, 13.25" x 15.5 DD" Battery Four AA Operating Time 25 - 30 hours Weight 3.1 pounds Additional Technology iMask noise suppression technology Notes IP56 water and dust resistant. *Notes on Technical Specifications - Detailed notes about the specifications listed in this chart.
 -
Welcome to the forum! My apologies for the current housekeeping but if you wander around you will indeed find a wealth of information here on gold prospecting and lots of people willing to help.
-
You are not the only late reply - I can’t believe it took me this long to read this. Great report Stephen and congratulations - you are one of only a handful of people who has found a gold nugget with Equinox. And on your first attempt! Beware the blocking of target id number 1 and 2 in some modes by default. If a mode is used while nugget detecting and these are blocked out then almost all gold signals will be either reduced or completely eliminated. I have found Field 2 or Park 2 both to be the next best thing to the Gold Modes but you have to hunt all metal or watch the notches. Click for larger version.
-
 The Minelab Gold Monster 1000 was introduced in 2017 and is still in production. The GM1000 was created as a relatively inexpensive, easy to operate, high performance metal detector. The Gold Monster 1000 is designed specifically for gold prospecting but may have applications such as micro jewelry detecting. At 45 kHz with both automatic ground tracking and automatic sensitivity settings, the Minelab Gold Monster 1000 is not only very sensitive to small gold but it is relatively easy for beginning detectorists to use. I am fortunate to have been involved in the testing of the new Minelab Gold Monster 1000 prior to its release. One benefit is that I have seen the questions that others have posed about the detector, and now I can answer a few of them. When I use new detectors I always have a goal in mind. I am not trying to pick the detector apart for what it cannot do. Instead, I believe most well designed detectors have something they excel at. My goal is to determine how to use a new detector for maximum benefit. The best way to make that happen is to use the detector in the way it was intended to be used, instead of trying to force it to be something it is not. The key is to be realistic. The Gold Monster 1000 is sold as an entry level single frequency metal detector. Expecting it to outperform detectors costing many times its price is unrealistic. Engineers face a very important choice when designing a single frequency metal detector, especially as regards gold prospecting. What frequency should the detector run at? That choice determines nearly everything else about the detector. In general, low frequencies below 20 kHz handle mineralized ground better, and offer good performance on larger gold nuggets. Higher frequencies over 20 kHz enhance the sensitivity to small gold nuggets, but unfortunately ground handling suffers. The number one question I see asked on the internet is how the Gold Monster stacks up as compared to this detector or that detector. Minelab has actually tried to answer that question directly via the following illustration: Minelab Gold Monster Frequency Range Compared The majority of the single frequency nugget detectors on the market today operate at or near 18 kHz. These detectors handle ground relatively well for non-PI detectors, and have good sensitivity on gram size and larger gold nuggets. They can detector smaller gold, but the smallest gold is not where they excel and the chart attempts to illustrate that. Other single frequency detectors running as high as 71 kHz have superb sensitivity to the smallest gold nuggets, but tend to suffer when it comes to depth on larger gold in highly mineralized ground. Again, the chart attempts to illustrate this fact. The Minelab Gold Monster 1000 engineers decided to concentrate on a frequency that offered the best attributes of the lower and higher frequency extremes. The goal was to design a machine that would attempt to acquire in a single pass the bulk of the gold that machines operating at either extreme could recover if operated together – and yet do it with just one detector operating as efficiently as possible. The catch is that the Gold Monster is still a single frequency detector and it cannot possibly capture 100% of the gold that two detectors operating separately at two vastly different frequencies can capture. If you study the illustration carefully, you will see there is still some gold the 18 kHz detector will do better on, and some gold the 71 kHz detector will do better on. Minelab is not claiming to be able to outperform every other detector under all other circumstances. The goal here is to capture as much of the obtainable gold as is possible with a single detector operating in the most efficient manner possible. Minelab Gold Monster 1000 nugget prospecting detector I have mentioned efficiency because there is more that goes into designing a gold prospecting detector than just the operating frequency. This is where Minelab is attempting to not only make a wise choice in the operating frequency, but to extend the efficiency of that frequency by optimizing the other parameters. First, electrical interference is detected and automatically rejected as much as possible when the detector is first turned on. This helps alleviate interference that could result in less than optimum performance. A great deal of effort has been made into designing a sensitivity control that offers the ability not only to manually tune the detector but to deliver excellent results automatically. The automatic operation is important in ground that varies dramatically from place to place in such a fashion that it becomes difficult – inefficient – to constantly be readjusting the machine manually to retain the best overall performance level. Novices in particular tend to set and forget the sensitivity, leading to a situation where the detector could be running better if the control were optimized more often. The crowning glory of the Minelab Gold Monster 1000 however is the automatic ground tracking system. The 45 kHz frequency is considered to be a high operating frequency, and as such it is subject to possible issues from highly mineralized ground and hot rocks. Manual tuning detectors can have great difficulty dealing with these problems… here is that word again… efficiently. The operator must be on top of and constantly adjusting the machine manually. It is very easy for the operator to be out of sync with the ground conditions and operating at less than optimum performance. At high frequencies having the proper ground balance is extremely critical. Manual ground balance versus automatic ground tracking I will admit I have always tended to distrust automatic ground tracking systems. The theory is they can track out good signals resulting in missed targets. The reality however is the risks entailed by not being properly ground balanced are even greater, especially for novices. The illustration below attempts to show what happens when the operator of a manually tuned detector falls out of sync with changing ground conditions, and then “catches up’ by retuning the machine. The automatic tracking or continuous ground balancing detector however maintains optimum conditions at all times. Even given this evidence in the past however I was a skeptic, and always preferred to manually adjust my detector ground balance controls. That is until I obtained first a Minelab SDC 2300 and then a GPZ 7000 detector. The SDC forced me to use automatic ground balance by offering no other option. A surprising thing happened – I liked it! It worked and it worked extremely well, so much so that when I got my GPZ 7000 it also remains in automatic ground balance mode. The fact is that Minelab has always been a leading developer of automatic ground balancing systems, and I do not think it is being unreasonable to state that they may have the very best ground tracking systems available. The company really has had no choice being based in Australia and developing machines for ground conditions considered to be among the worst in the world. Can the Minelab Gold Monster 1000 go up against the hottest high frequency detectors made and hold its own? Yes. I have personally used the Gold Monster with its 5” coil to easily find nuggets (flakes?) weighing under a grain. Not grams, grains - there are 480 grains per Troy ounce. Remember however that even Minelab in that first chart is telling you that a machine tuned specifically at a much higher frequency will have an edge on at least some tiny gold nuggets. Eleven small nuggets 14.9 grains total, largest 4.4 grains - Smallest at bottom 0.6 grain and 0.3 grain The difference and the serious advantage I believe with the Gold Monster 1000 is in the combination of the superior Minelab ground tracking system and the automatic sensitivity system, designed specifically for the GM1000. In all but the mildest ground operators will find that the Gold Monster is a much more efficient detector that allows more ground to be covered while keeping the machine tuned for the best performance possible. My advice to the old pros that get their hands on the GM1000 is that rather than try and force the machine into operating like your favorite manually tuned machine, seek out instead conditions where that machine struggles. Then trust in the Minelab automatic ground balancing system to compensate for and deliver superior performance under those conditions. Use manual more for targeting specific small areas. Case in point, I took the Gold Monster to a location where hot rocks had given my GPZ 7000 some difficulty. Much to my surprise the Monster was able to automatically compensate for and allow me to operate in those hot rocks and find a couple tiny nuggets too small for the GPZ 7000 to find. The machine was far smoother and I was able to cover ground far more efficiently with automatic ground balance. I followed this up with a visit to a location with wet alkali ground where a high frequency machine would normally fail. I struggled with manual sensitivity for a bit, then threw in the towel and went to the highest Auto+ sensitivity setting. The machine quieted right down and I found a nice little nugget shortly thereafter. Nugget embedded in lump of dirt If the ground allows you can certainly use manual ground balancing to get that hot edge on tiny gold nuggets. The Gold Monster 1000 lacks a standard threshold, but it is easy to set up a pseudo threshold by advancing the sensitivity to where the machine produces some light feedback from the ground. Those who like a threshold can run it this way – others may wish to back down just one notch for silent operation. Old timers like me rebel at the thought of running without a threshold but with the GM1000 it works. The normal reason for running a threshold is to be sure the detector does not fall out of proper ground balance. Here however you can put a superb automatic ground balance to work for you, eliminating that concern. For the very worst conditions, the automatic sensitivity system can augment the automatic ground tracking to allow for efficient ground coverage under conditions that will bring other detectors in this class to a crawl, if not a complete stop. Frankly, if you can’t get the Gold Monster to handle the ground, it is time for a Minelab PI detector or a GPZ 7000. To sum up, I do not want to leave you with the impression that the Gold Monster is the be all and end all of single frequency nugget detectors, and that it will under all circumstances get better performance on every single gold nugget than other single frequency detectors. That is not possible given the limitations imposed by having to choose a single operating frequency. I do believe however that the engineers at Minelab have come as close to this as is possible. The real secret to getting good results with the Minelab Gold Monster 1000 versus the competition will be in leveraging its superb ground handling capability to get the best overall gold nugget performance possible from a single frequency detector. ~ Steve Herschbach Copyright © 2017 Herschbach Enterprises Official Minelab Gold Monster 1000 Page Minelab GM1000 Color Product Brochure Gold Monster 1000 Getting Started Guide Forum Threads Tagged "minelab gold monster" Minelab Metal Detectors Forum Jonathan Porter On Mastering The Minelab Gold Monster Understanding The Sensitivity Control On The Gold Monster 1000 Reports Of GM1000 5" Coil Touch Sensitivity My GM1000 Methodology - Manual Versus Auto Sensitivity Minelab Gold Monster 1000 Technical Specifications* Internet Price $849.00 Technology Induction Balance (IB) Transmit Frequency 45 kHz Autotune Mode(s) Pre-Set Slow Motion Ground Rejection Automatic Ground Tracking Soil Adjust No Discrimination Iron Reject Mode plus Visual Indicator Volume Control Yes 1 - 6 Threshold Control No Tone Adjust No Audio Boost Yes (Always On) Frequency Offset Yes - Automatic On Power Up Pinpoint Mode No Audio Output Speaker & 1/8" Headphone Socket - Headphones Included Hip Mount No Standard Coil(s) 10" x 6" elliptical DD & 5" round DD Optional Search Coils N/A Battery Li-Ion Rechargeable Included, 8 AA Optional Operating Time 20 Hours Weight 3.2 lbs. (with rechargeable battery and 10" coil) Additional Technology The GM1000 automatic sensitivity setting is a feature not seen before in prospecting detectors. Notes Unique rod mounting system allows use of broomstick or other items as a rod. *Notes on Technical Specifications - Detailed notes about the specifications listed in this chart.
 -

I Just Did A Coin On Edge Test....
Steve Herschbach replied to Happa54's topic in Minelab Equinox Forum
Matt, you and I are having a communication problem. I am not being defensive. You asked for my opinion directly so I gave it to you. I also am the forum admin who is quite sure that members who have been here longer than you have heard about this quite enough. I have agreed that this is a real issue so commenting that the Equinox is not designed to hit large silver right under the coil is again either not reading or not understanding my post. There is no reason to apologize per se because your concern is valid. The thing is, you only need to bring it up once or maybe twice. Minelab heard about it already, and so repetition gets you nowhere. After a couple times you really are just trolling the forum. I am therefore, just like the "loose rod" issue, telling you and everyone else that if we get new posts on this subject they will be consolidated to this thread. You and anyone else who feels like continuing to discuss this are more than welcome too - as long as it is on this established thread. Nobody is saying you can't post about it all you want, but let's keep it all on this thread. That seems pretty simple to me. I honestly am not concerned about whether anyone likes the Equinox or not. My only real concern is keeping the forums running smoothly. Metal Detectors & Coins On Edge -
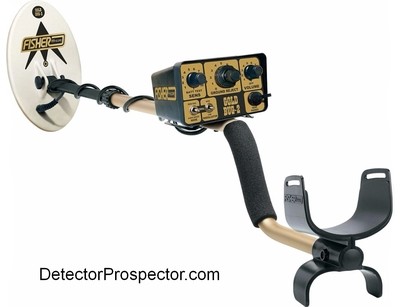 The Fisher Gold Bug 2 was released in 1995 and is still in production over 20 years later. I had the first Gold Bug 2 in Alaska and to this day it is one of my all time favorite detectors - a true classic. Amazingly, nobody has come out with a better detector for hitting tiny gold after all these years. Quite a few models have tried to challenge the Gold Bug 2 on the tiniest gold, and while many can be said to give the "Bug" a run for its money it is debatable if any have really exceeded it. There is a specialized tool called the Falcon Gold Probe that will actually hit smaller gold than a Gold Bug 2, but it would be more properly termed a pinpointer than a normal metal detector. What makes the Gold Bug 2 special is the 71 kHz operating frequency. It was the highest operating frequency in a commonly available ground balancing metal detector for a long time. When paired with the 6" elliptical concentric search coil, the Gold Bug 2 easily detects small pieces of gold weighing less than 1/10th grain. There are 480 grains in an ounce so we are talking less than a 4800th of an ounce! I have a set of digital powder sales that weighs to 1/10th grain, and I regularly found single flakes of gold that will not register on the scale with the Gold Bug 2. Don't think such small gold is found at any depth. I get these tiny bits by literally scrubbing the small epoxy filled coil into the soil. The coil is tough and immune to false signals from being knocked around so the goal is to get that coil right down on the gold. The 6" epoxy filled concentric coil perfectly tuned to the Gold Bug 2 is no doubt part of the magic since other detectors in this class normally run DD coils. The Gold Bug 2 is a perfect detector for "scrape and detect" operations where the surface is carefully scraped away to expose more soil for detecting. It is also ideal for checking quartz for tiny gold, like when hunting around old mine dumps. The Gold Bug 2 will hit specimens with wire or sponge gold that other detectors cannot detect. There are only three coils for the Gold Bug 2, a 6.5" elliptical, 10" elliptical, and 14" elliptical. All three are concentric coils - there has never been a DD coil produced for the Gold Bug 2. I am a little surprised there have never been any aftermarket coils produced for the Gold Bug 2 due to its enduring popularity. I have always wanted a probe for it that would basically turn it into a Falcon Gold Probe type unit, but with more adjustment and iron discrimination. The coils are all waterproof and come with extra long seven foot cables for use when the control box is chest or hip mounted. The coils are among the best I have ever used and are immune to false signals from bumps and knocks. The chart below illustrates a common misperception. People often ask which coil gets the most depth, and it is assumed bigger coils go deeper. That is definitely not true. Coil size has to be matched to probable target size for best depth, and the chart clearly shows how running too large a coil can cause gold nuggets to be missed entirely. The normal 10" coil is a compromise but better depths can be obtained using not only larger coils but smaller coils. Since I normally hunted small gold with my Gold Bug 2 the small coil rarely came off it. Coil Size vs Depth Fisher Gold Bug 2 Source - Field Testing the Gold Bug 2 by Gordon Zahara Despite the high operating frequency the Gold Bug 2 can be made to work in the worst ground conditions. I took one to Australia recently and was surprised how well it did in tough ironstone country. It has a very good iron discrimination setting intended for rejecting man made ferrous trash. This also acts as the setting of last resort for highly iron mineralized soils and hot rocks. When in iron discriminate mode common hot rocks will be ignored or at most pop and click, but they will not sound like gold. Some sensitivity is lost in iron disc mode, but the Gold Bug 2 is so sensitive to small gold it will still hit small nuggets in disc mode that other detectors would miss. The design is very compact and tough, and with what is getting rare these days, a removable control box. The box can be slid off the rod, and slipped on a belt with the integrated belt slots. There is plenty of extra cable, and a chest mount can easily be made with just a belt and a camera strap. This is ideal for working in deep water or heavy rain since the control box is protected and better yet creates a detector so light it can be used for very long hours with no arm strain at all. I usually have the Gold Bug 2 set at full volume and full sensitivity, with the mineralization switch set to low and audio boost engaged. I run this way until I can't due to hot rocks or ground, and then usually go to iron disc mode. However, if you do stay in all metal mode the proper way to deal with mineralization issues like hot rocks is to reduce the sensitivity, mineralization switch settings, or both. Disengaging the audio boost also moderates the responses generated by tough ground. Audio boost does just that - it boosts the audio so that faint signals are louder and more distinct. It also boosts spurious ground signals and so in some cases you may want to run the detector in Normal audio. I have found in practice I very rarely take the Gold Bug 2 out of audio boost mode. Fisher Gold Bug 2 nugget prospecting detector I should note here that the Gold Bug 2 employs VCO (voltage controlled oscillator) audio. Responses not only get louder but they increase in pitch ,producing very distinct "zippy" responses on non-ferrous targets. Large targets literally squeal. Some people think this means the Gold Bug 2 employs some sort of audio discrimination because they can tell a coin response from small trash responses due to this. All that is really happening is that strong signals sound different than weak signals, and so a deep coin will sound just like a shallower, smaller target. The mineralization switch adjusts the threshold auto tune rate, with the low setting being a slow auto tune and high being a very fast auto tune. This is similar to White's Variable Self Adjusting Threshold (V/SAT) control but instead of variable you get three preset selections to choose from. A fast auto tune setting dramatically impacts performance but can be an aid in very uneven ground conditions. Experiment with it to see what I mean but for me in most places it stays set in low. You can find more information on auto tune at Steve's Guide to Threshold Autotune, SAT & V/SAT. Fisher has gone this one better by also adjusting the gain (sensitivity) via these settings at the same time as the auto tune rate is adjusted. The Low Mineral setting not only slows down the auto tune rate but it boosts the gain above and beyond where the sensitivity control is set. The high mineral setting speeds up the auto tune rate and attenuates the gain. Fisher Gold Bug 2 control panel There is an undocumented trick that may or may not work on any particular Gold Bug 2 in iron disc mode. The threshold control usually has no effect when the unit is in iron disc mode. However, some units display a distinct difference in iron disc performance between the threshold being set low or being set high. This ability to "supercharge" a silent search disc mode by turning the threshold up is not unheard of in other detectors and it appears some Gold Bug 2 models have this ability. Several of us used this ability to good effect at Ganes Creek. The detector pops and clicks a lot when supercharged in this fashion but adds considerable depth on large gold nuggets. After awhile the popping and clicking is mentally tuned out as nuggets have a distinctly clearer beep. This ability may have been an accident on some units, as more recent Gold Bug 2 models display no change in the disc mode when the threshold control is manipulated. A simple air test between low and high threshold settings while in iron disc mode will reveal if your Gold Bug 2 has this ability to be supercharged. The iron discrimination on the Gold Bug 2 is unique compared to most detectors in that it is either on or off. There is no direct adjustment of the setting. In theory the Gold Bug 2 in iron discriminate mode rejects signals from ferrous man-made iron and steel targets plus many ferrous based hot rocks. It does this by simply ignoring and producing no signal on items deemed ferrous in nature. The setting is designed to be conservative, and so it does produce a signal on many ferrous items, but the audio response is choppy and more often a "click" than a "beep". Practice with a nugget and various ferrous targets will make the differences clear. ads by Amazon... The more mineralized the ground, the more chance there is of gold nuggets being accidently rejected as ferrous. Borderline targets will often be rejected if swept one way and sound good if swept another way. It is therefore not a good idea to hunt directly in iron discriminate mode, as a bad call on the first sweep will cause you to miss the target and not even know it was there. It is better to hunt in all metal, then flip to iron disc to check the target. This can be an undue burden in thick trash though and sometimes it is simply more efficient to hunt directly in disc mode, but the likelihood of missing nuggets goes up dramatically. As noted above the threshold setting may have an effect on the responses generated in the iron disc mode. The sensitivity setting will also affect the setting, and by enhancing ferrous ground mineralization response it may also lead to more gold nuggets being identified as ferrous. the ground response overwhelms the nugget response leading to a false iron reading. Reducing sensitivity may produce more accurate iron disc readings in bad ground. If you are switching back and forth from all metal to iron disc mode constantly it can prematurely wear out the switch. I have seen several examples of the switch getting so loose as to be inoperable due to the nut on the backside of the control panel becoming loose or even falling off inside the control box. The control panel can be removed and the nut tightened if this is the case. I have found many thousands of gold nuggets with the Gold Bug 2. Granted most were small but not all. The largest I have found with the detector is a 4.95 ounce specimen at Ganes Creek, Alaska. I have numerous stories on Steve's Mining Journal that highlight the Gold Bug 2. See Detecting Small Gold at Crow Creek, Detecting Gold at Ganes Creek, Lode Gold at Hatcher Pass, Memorial Day at Ganes Creek, and Detecting Micro Nuggets at Crow Creek. The Gold Bug 2 is a very specialized detector usually used solely for gold nugget detecting. Recently people have taken note of its extreme sensitivity and have pressed it into service searching for very small jewelry items that others detectors normally miss. Simple post earrings and thin gold chains are difficult if not impossible to detect and the Gold Bug 2 excels at finding these small targets. Thomas Dankowski coined the term "micro-jewelry detecting" to describe this type metal detecting. The Gold Bug 2 does have limitations. The extreme sensitivity that makes it signal on hot rocks that other detectors would ignore. This can be very problematic in some locations, although somewhat offset by using the iron disc control in places where the hot rocks are iron based. More serious is that in highly mineralized ground the Gold Bug 2 has very poor depth on pennyweight and larger gold nuggets compared to most nugget detectors. The high frequency air tests very well but loses that depth quickly on in ground targets. Depth losses of 20-25% are not unusual with the Gold Bug 2 in highly mineralized ground when compared to detectors running in the 12-20 kHz range. The Gold Bug 2 is often best used when paired with another detector for depth on large gold while it serves as the small gold sniper. The Gold Bug 2 also gives a strong response on wet salt sand and so when used for micro-jewelry detecting on salt water beaches wet sand must be avoided. Despite these caveats, I consider the Gold Bug 2 to be a unique and essential detecting tool that even after 20 years is worth consideration by gold prospectors wanting the hottest metal detector possible on tiny gold. ~ Steve Herschbach Copyright © 2008 Herschbach Enterprises Fisher Gold Bug 2 Instruction Manual Control Box Cover for Gold Bug 2 Hip Mount / Chest Mount For Gold Bug 2 Changes To GB2 Rod & Coil Design Forum Threads Tagged "fisher gold bug" First Texas (Fisher) Metal Detectors Forum Fisher Gold Bug 2 Technical Specifications* Internet Price $699.00 Technology Induction Balance (IB) Frequency 71 kHz Autotune Mode(s) Fast, Medium & Slow Autotune Rate Ground Rejection Manual - Course and Fine Tune Knobs Soil Adjust (High/Normal/Low) Three position switch Discrimination Iron Disc setting (On or Off) Volume Control One turn control Threshold Control One turn control Tone Adjust No Audio Boost Yes (On or Off) Frequency Offset No Pinpoint Mode No Audio Output 1/4" headphone socket & speaker Hip Mount Hip, chest, or shaft mount Standard Coil(s) Choice of 10" or 6" elliptical concentric Optional Search Coils 14" concentric accessory coil available Battery Two 9V Operating Time 25 - 35 hours Weight 2.9 pounds with 10" coil Additional Technology Notes Extreme high frequency detector for sensitivity to the smallest gold. *Notes on Technical Specifications - Detailed notes about the specifications listed in this chart.
 -
detectingMO Published on Feb 25, 2017 Quick run through of MI-6 pointer setup and integration with the Deus Metal Detector.
-
Dredge Questions
Steve Herschbach replied to Creekboy's topic in Gold Panning, Sluicing, Dredging, Drywashing, Etc
I will offer a simplistic answer. In general the Proline models are less complicated, fewer parts, and typically a standard basic sluice design. Keene dredges tends to have more parts/pieces and anything larger than a 4" quite complicated sluice boxes. I like simplicity and tend to lean a little towards Proline because of that factor. The Keene 4" mini and smaller do allow for basic sluice box designs and so a bit closer to my liking there. However, for me the real kicker tends to parts availability and prices. Keene units simply cost less, and parts are far more available from a wider range of sources. This may not seem like a big deal until you need something like a pump housing for an older unit. This can be extremely important to more serious operators dealing with small windows of opportunity where every day of downtime can cost in many ways. Add it all up and I lean back towards Keene. That's just me however so I am curious if others have thoughts on the matter. Here is my last dredge and it was a Keene 4" mini. I don't know that I will own another dredge since my dredging days appear to be past. This is a good little unit though and on target for your question.... -
 The White's GMT was released in 2000 and is still in production. The GMT has been the best-selling dedicated nugget detector in Alaska for many years. The combination of small gold finding ability, excellent depth on larger gold, and ease of use at a bargain price make it a hard unit to beat. I have used the GMT and its predecessor Goldmaster models to find thousands of gold nuggets in Alaska. See Thirty Years with White's Metal Detectors, White's Goldmaster GMT Rebuild and First Gold Nuggets Found with White's GMT for more information on my use of the GMT. See also Steve's Guide to White's Electronics GMT versus MXT. The GMT is one of only a few detectors available operating at more than 40 kHz (the GMT runs at 48 kHz), making it exceptionally sensitive to small gold nuggets. The GMT is the latest in the new Goldmaster line of detectors that White's introduced in the early 1990's. The Goldmaster name is an old one, and White's produced many old BFO and IB/TR versions of the Goldmaster in the 60's and 70's. The early Goldmasters were old technology and did not ground balance, a key breakthrough in detector technology. These old models usually had large blue control boxes. If you see one of these for sale cheap do not confuse them with newer Goldmasters, all of which come in black boxes. Note that in late 2018 White's introduced the 48 khz Goldmaster 24K. The GMT also remains in the lineup for now, but it is possible that the 24K will eventually replace the GMT. The Goldmaster II was a serious breakthrough detector when it was introduced, operating at 50 kHz, far in excess of other ground balancing nugget detectors at the time, which commonly ran at 15-20 kHz. The Goldmaster II was quickly followed by the Goldmaster V/SAT, and these two models I credit with igniting a metal detector "gold rush" in Alaska. I got the ball rolling by finding thousands of gold nuggets at Crow Creek Mine south of Anchorage, and widely publicizing my discoveries. Crow Creek had produced few nuggets with detectors prior to the Goldmaster release, but the new 50 kHz design crossed a threshold where all of the sudden thousands of nuggets were large enough to be detected that were too small for previous detectors. White's simply could not build the new Goldmasters fast enough. The Goldmaster V/SAT was followed by the Goldmaster 3 and raised the price from $499.95 to $599.95. White's then shifted gears and with the Goldmaster 4/B switched to using the control box design used by its coin machines. They also raised the price again to $699.95. This was not well received, and when Fisher introduced the Gold Bug 2 at about the same time for $775.00 Goldmaster sales plummeted. White's GMT 48 kHz gold nugget prospecting detector The Goldmasters were all analog designs but a shift to digital began with the Goldmaster 4/B. White's started a project for a brand new detector design by hiring Dave Johnson, a well known engineer specializing in gold nugget designs, the ended up as the White's MXT. The GMT was as early spinoff of that project released a couple years before the MXT hit the market. The MXT Engineering guide linked to below tells the story in detail. A key design goal was to have automatic ground tracking, and so the Gold Master Tracker (GMT) was born. The new model also sported a new retail price of $799.95. The GMT is a totally new design from the prior Goldmasters but seems very similar due to the goal of wanting it to be compatible with existing Goldmaster coils. In order to prevent "crosstalk" interference with existing Goldmaster models a 48 kHz operating frequency was chosen, which was still close enough to 50 kHz for old coils to work. However, the GMT was designed with DD coils in mind. Older Goldmasters all used concentric coils but the GMT shipped with a new 6" x 10" elliptical DD coil. One thing all the Goldmasters seriously lacked was a small coil option, and finally after the GMT was released White's came out with a small 4" x 6" coil, commonly referred to as the "Shooter". Much later yet, the concentric 8" x 14" Jimmy Sierra Gold Max coils were converted from concentric to DD. The concentric 8" x 14" coils were white and the newer DD versions are black. White's is currently shipping only the new DD 4" x 6" Shooter, 6" x 10", and 8" x 14" Gold Max coils but until recently the only concentric coils available were the 6" x 10" and 8" x 14" coils on the used marketplace. White's in 2017 introduced a new round concentric coil for the GMT. The old concentric Gold Max coils are easy to identify - they have a white plastic housing whereas the new DD version is black. Concentric 6" x 10" coils are white plastic just like the new DD version, what differs is the decal. Any 6" x 10" Goldmaster coil not sporting the "Twin D" label is a concentric. The early decals came in red and black and later gold and variously were called the Long Scan, Gold Master II, Gold Master, and GM 3 coil. Beware of any round coils marked for use for the Goldmaster series. The only round coil ever produced that is compatible with the newer Goldmaster series is the 12" round Hot Shot coil pictured below. Any other round coils would be for the old "blue box" Goldmasters and will not work on the 48-50 kHz series. 4"x6" Shooter DD coil, 6" round concentric, stock 6" x 10" DD coil for GMT, and 8" x 14" Sierra Gold Max DD coil Old version 6" x 10" concentric and 8" x 14" concentric coils The GMT currently has no aftermarket coils available. Jimmy Sierra used to market a couple coils that may be found on the used market. The Hot Shot was a round 12" concentric coil that in mild ground may have been the deepest coil made for the GMT but it suffered in mineralized ground due to the concentric design. Jimmy Sierra also marketed the 2.5" x 9" Hot Foot coil, a unique rectangular DD design. These coils were made by Jim Karbowski of Applied Creativity and marketed by Jimmy Sierra. Unfortunately Jim has passed away in 2007 and the manufacture of his coils with him. Applied Creativity Hot Shot and Hot Foot coils for GMT As always, when designs shift from analog based to digital, there are always some who regard the analog designs as better in some way. A lot of people nostalgically remember the Goldmaster 3 as the best Goldmaster made. I do myself miss the old control box that could be converted to a hip or chest mount. However, the benefits of the GMT far outweigh any perceived faults. It was for a long time the only VLF nugget detector that allowed the operator to choose between automatic ground tracking and manual ground balance. The "Grab" button was an innovation only now being seen in other detector models over ten years later. The "follow the black sand" feature was also a unique though underutilized feature. The innovative "iron probability" ferrous identification system was unique for many years but has recently been copied by a couple other manufacturers. GMT meter pod and typical meter readings The ground balancing options on the GMT are as good as they get. The unit can automatically track ground conditions and keep the machine as near optimum settings as possible. The GMT has what is regarded as one of the best ground tracking systems available. It has superior resolution, tracks faster, "jumps" into new ground more quickly, has greater resistance to tracking into targets, and tracks over a wider range of soil conditions. This is an obvious advantage for beginners who often have difficulty with manual ground balancing systems. It also benefits experts in locations where the ground varies constantly. This requires constant monitoring and adjustment on a manual system. It can place an undue burden on the operator and if ignored leads to the detector not being optimally tuned for the ground conditions. Simply set the ground balance toggle switch to "Fast AutoTrac®" and let the GMT handle the ground balancing chores. The GMT will automatically track and display the ground balance setting under the "Ground Balance (Mineral Type)" heading on the meter. Ground balance tracking systems can "track into" a faint signal produced by a very small or very deep gold nugget and cause it to fade out as if it is a ground signal. This is especially likely if the operator hovers over the target after it is heard on the initial pass. For this reason the GMT trigger switch has a dual function. It engages the iron discrimination system but more importantly it temporarily locks out the ground tracking system. Whenever a faint target is encountered, squeeze and hold the trigger switch while working the target to insure the tracking system does not cause it to fade away. While automatic ground tracking offers many benefits it can impede finding the very faintest targets. In extreme ground conditions the fact that the machine is constantly adjusting for ground conditions can actually impede a savvy operators ability to discern ground and target signals. Professional operators like having the option of using manual ground balance and the GMT accommodates this is a couple ways. There is the standard ability to toggle the ground balance switch to manual ground balance and then adjust the setting up or down via the plus and minus touch pads. One major benefit of manual ground balance is the ability to purposefully set the ground balance slightly off of the supposed perfect neutral ground balance setting. Many prospectors will set the ground balance slightly positive, or in other words such that the detector signals very slightly when the coil approaches the ground. This tends to prime the system to react more quickly to the faintest targets. The GMT goes one step farther with the introduction of the ground "Grab" button. This unique GMT feature was long overlooked but is now being added as a feature on many other detectors. While in manual ground balance mode the tracking system continues to work in the background. Simply touching the Grab button on the meter touchpad instantly updates the ground balance to what the tracking software thinks is the best setting at that point in time. Pressing and holding the button engages the tracking system momentarily. This offers the best of both worlds in that a prospector can hunt in manual ground balance yet take advantage of the software to instantly update the setting instead of manipulating the plus and minus pads. The Grab button acts like an instant "Coarse Tune" control, which can then be tweaked slightly with the manual touch pad if desired. This is how I prefer to run my GMT most of the time. Run in manual, update with Grab when needed, and tweak if desired. ads by Amazon... The ferrous discrimination on the GMT is far more nuanced than on most detectors, with the meter giving an "iron probability" reading. A LCD bar graph reading starts on the left and builds to the right hand side of the readout and indicates the relative probability that the target is ferrous. A real plus on this system is it always reminds the operator that the ferrous indication is never 100% - there is always a chance that ferrous reading is a gold nugget. The system will never give a reading of higher than 90% or less than 10% ferrous probability. Most systems tend to lull the operator into thinking they are more accurate than they really are, causing gold nuggets to be erroneously identified as ferrous. The GMT forces the operator to analyze the target more thoroughly and when there is any doubt, to dig it. The meter also helps identify iron based "hot rocks". In other words, most ferrous target systems are audio based, with a setting that may or may not be adjustable. Targets deemed ferrous on a single pass are ignored and the operator does not even know the target existed. The GMT alerts the operator to every target to make sure it is thoroughly checked out as a detector is often wrong about a target on a single off-center pass. The downside is that where targets are thick this constant analysis can place more of a burden on the operator than a system that can be set to silently ignore most trash targets. Running the GMT with the trigger switch in the locked forward position engages an audio discrimination circuit that gives an audio "grunt" whenever the iron probability exceeds 85%. This can quickly identify likely iron target without having to refer to the meter. This is a momentary indication that resets on each sweep of the target. It is normal for an operator to approach the target with a slightly different angle and speed on each sweep and so the iron probability indication will vary on each pass. The operator works the target and takes note of the reading on each pass to make a dig or no dig decision. Squeezing the trigger activates a target analysis mode that automates this task for the operator. Each target response is accumulated and averaged building a more consistent response than that generated by the trigger forward setting. Targets will tend to consolidate and build either higher or lower probabilities with multiple passes. This does not mean the final reading is any more accurate however. A small nugget in highly mineralized soil will tend to read as ferrous, and relying on the analyze feature will give a false sense that the GMT is more confident in that erroneous ferrous response by accumulating and averaging many of them. The fact is all ferrous identification systems suffer from the reality that some gold nuggets will read as ferrous if small enough or deep enough. High gain levels also increase the possibilities of inaccurate results. Some gold is actually in magnetite instead of quartz and can be picked up with a magnet! Nuggets of this type have a strong possibility of being identified as ferrous. Whenever possible a prospector should dig all targets. However, with practice a skilled operator of the GMT has a far more informative ferrous identification system at their disposal that if used properly will result if fewer gold nuggets being left behind as trash targets. Even if the GMT says the target is 90% probable ferrous it is still telling you it is a 10% chance it is gold. How lucky are you feeling? 1.89 Oz nugget found with White's GMT chest mount conversion The meter itself opens up many features lacking in detectors without a meter. The battery check reads out on the probability meter indicating the percent battery strength when the momentary toggle switch is activated. If the batteries are not fresh, audio loudness on big targets will not be as great, but there will be no loss of sensitivity or performance because the GMT is voltage regulated to run properly at less that peak battery voltage. You can rest assured the detector is working properly until the meter reads out "SORRY, LOW BATT". Be sure to have backup batteries ready to change out when this occurs. From the MXT Engineering Report referenced below "The GMT's circuitry broke a lot of new ground. It uses a reactive impedance transformation network to boost transmitter voltage for higher sensitivity. It uses an active transmitter regulator to keep transmitter voltage constant even when the search coil is moved over black sand that would blow an unregulated machine off the air." What this means is many detectors can actually go completely non-functional when operated over extremely mineralized ground and the operator will not even be aware of it. The GMT is very resistant to this occurring, but if it does the detector will give a loud audio "squawk" and the meter will read "BAD GROUND REDUCE GAIN". The GMT literally tells you your gain is set too high for the ground condition. Set the control lower until this message goes away for optimum performance. The GMT can also overload on shallow oversize targets in which case the meter will display "METAL TOO CLOSE LIFT SEARCH COIL". The overload condition will correct itself when the coil is moved away from direct proximity to the large metal item. There actually are gold nuggets large enough to overload a GMT so find out what the item is! The GMT constantly displays the ground balance setting, typically in the 70-80 range. This number is telling you what type of mineralization is affecting the GMT and is very much akin to the target VDI number displayed on coin detectors except that here it is a ground reading. The GMT goes one step father and also displays the amount of the mineral being detected. This is called the "Follow Black Sand" reading because it can be used to trace shallow black sand deposits that in turn can be used to locate gold deposits. A reference number in the upper right portion of the display shows this value. The number grows as the coil is pumped up and down over concentrations of black sand. The readings are relative so the idea is to take readings at various locations across a dry wash for example, and then to focus on the highest readings as being the probable location of a black sand deposit. White's GMT control panel When White's introduced the Goldmaster V/SAT it featured "Variable Self Adjusting Threshold" or V/SAT. The Goldmasters were the only nugget detectors for many years that allowed you to vary the rate at which the threshold readjusts itself via a variable control - anything from very fast to very slow. This allows for more control in varying situations. In general, use the lowest SAT setting that allows for smooth operation. As ground variations increase, setting a higher self adjusting threshold can be beneficial. At low settings, the coil can be swept slower without responses being overly smoothed out. High settings demand a faster sweep rate as the detector adjusts rapidly to bring the threshold back to the level set by the threshold control knob. See Steve's Guide to Threshold Autotune, SAT & V/SAT for more details. Finally, the GMT offers an optional Audio Boost setting that amplifies the audio by up to four times. This makes faint signals louder but in bad ground can also amplify ground noise. Still, this is an extremely useful function for eking faint targets out of the ground. All these features added up to the GMT being vastly more popular than the Goldmaster 4/B that preceded it. The GMT remains a best seller to this day. The bottom line is the GMT bears serious consideration for anyone wanting a detector solely for gold nugget detecting. Although the GMT is intended solely as a prospecting unit, it is very popular with meteorite hunters, and it is also one of the best micro-jewelry detectors on the market. Official White's GMT Page White's GMT Instruction Manual GMT Videos and Tuning Tricks Forum Threads Tagged "whites goldmasters-gmt" White's Metal Detector Forum Read the MXT Engineering Report - Features some important notes on GMT design White's GMT Technical Specifications* Internet Price $729 Technology Induction Balance (IB) Frequency 48 kHz Autotune Mode(s) Variable Self Adjusting Threshold (V/SAT) Ground Rejection Tracking, Fixed & Manual w/Grab function Soil Adjust No Discrimination Visual & Audio Ferrous ID Volume Control No Threshold Control Single turn control Tone Adjust No Audio Boost Yes Frequency Offset No Pinpoint Mode No Audio Output 1/4" headphone socket & speaker Hip Mount Shaft Mount Only Standard Coil(s) 6" x 10" DD Coil Optional Search Coils Three accessory coils available Battery Eight AA Operating Time 30 - 40 hours Weight 3.9 pounds Additional Technology One of the first detectors to measure mineralization "amount" instead of "type" Notes *Notes on Technical Specifications - Detailed notes about the specifications listed in this chart.
 -
Best Detecting And Prospecting Forum On The Internet
Steve Herschbach replied to Norm S's topic in Meet & Greet
I should be out detecting right now but with this underway it's full speed ahead until it gets done. Really should have been on this sooner and thought I was two months ago when I started the whole thing. I can't complain in the slightest however because I have some really great detecting coming up this year! -
I Just Did A Coin On Edge Test....
Steve Herschbach replied to Happa54's topic in Minelab Equinox Forum
Hi Matt, Whether it is an issue or not is up to you. I prefer to look at it as a fact. It will either stay the way it is or it might change. If you are asking me if this bothers me, well no, it does not. It clearly does bother you. That said, I personally reported this to Minelab about 4 months ago when steveg first discovered it and reported it. So while it does not bother me, I obviously thought it something that deserved reporting. I do differ with people trying to make it out like other detectors do not have “issues” with on edge targets. Any knowledgeable detectorist knows otherwise and trying to present Equinox as being unique in this regard is not factual. I am too busy making finds with my Equinox that other machines can’t find. If I find something with my Equinox that the X-Terra can’t find, I am betting that would bother the X-Terra owner. Why won’t the X-Terra find it? Because they are all flawed? How about the stuff my Equinox finds that an E-Trac misses? Is the E-trac defective? Should not more expensive detectors be able to find stuff that a less expensive detector does find? All detector’s miss stuff. All I am saying is that this particular problem has long since been noted and discussed. It is a fact. Minelab may or may not change anything regarding it. Great, we all on the same page. You know how many silver dollars I have found in over 40 years of metal detecting? One. Half dollars? A handful, most over 30 years ago, with the one I found last year with my Equinox the first in a long time. If any were on edge I did not know about it. The fact is these are rare large targets, the odds they are on edge even lower. From my perspective the risk odds here are statistically nil. But that’s just me. You may feel very concerned about this and I am not belittling your concern. The question is what to do about it? As I said, maybe it will change with an update in the future, maybe it won’t. Your only decision left to make at this point? Keep your Equinox or not. That is your decision to make one way or the other. If this makes you not like the Equinox, I get it. Ditch it and use something else. Not so worried about it, think a fix may be coming.... then keep it. The only decision that is in my court that is relevant is that all further discussion of this topic will be limited to this thread. Any posts about it elsewhere will get moved here. This forum is for people who like, enjoy, and want to have fun with the Equinox. Beating a dead horse for months is not fun - it’s beating a dead horse. If you are still an Equinox fan despite this, then hang around. If your only reason for being on this forum is to reintroduce this now old subject over and over on unrelated threads.... there are other forums that kind of stuff. -
 The Makro Gold Racer metal detector was introduced in 2016 and is still in production. I very much anticipated the Gold Racer as something unique on the market at the time - a 56 kHz high frequency gold prospecting detector with all the extra discrimination and other features to make it versatile enough for other uses. What follows is a basic description with a very detailed review starting below the specifications chart. Note that Makro has introduced the 61 kHz Makro Gold Kruzer in 2018 and there is a possibility the Gold Racer will be discontinued soon in favor of this new model. The Makro Gold Racer comes standard with an 10" x 5.5" DD coil and has optional 5" round DD, 10" x 5.5" concentric, and 15.5" x 13.25" DD coils. The Gold Racer has been changed slightly from the original Racer design to make the handle grip more comfortable based on customer feedback. The original Bluetooth dongle and wireless headphones have been replaced by a proprietary 2.4 Ghz design to help reduce the audio lag that was occurring with the regular Bluetooth design. The main item of note however is the very high 56 kHz operating frequency, making this one of the hottest machines available on tiny non-ferrous targets. The Makro Gold Racer shares many features with the original Racer plus has added many more. The new iSAT control from the Nokta FORS Gold+ is visible as is another new feature called iMask. The Gold Racer adds a Tone Break feature often requested by Racer and FORS owners and the Gold Racer has the ability to save its settings when shut off, unlike the Racer. The layout of the control panel has also been simplified making what features are available in what modes much more obvious. Makro Gold Racer metal detector Makro is fast gaining attention as a company that listens to its customers. The new Gold Racer model is the perfect example of that, creating a unique machine based almost solely on feedback provided by customers in the prior year. Official Makro Gold Racer Page Gold Racer Color Brochure Makro Gold Racer Instruction Manual Ray Mills (TrinityAU) Makro Gold Racer Review Makro Gold Racer vs Racer 2 Forum Threads Tagged "makro gold racer" Makro Metal Detectors Forum Makro Gold Racer Technical Specifications* Internet Price $509 Technology Induction Balance (IB) Frequency 56 kHz Autotune Mode(s) iSAT Intelligent Self Adjusting Threshold Ground Rejection Grab, Manual, & Tracking Soil Adjust No Discrimination Visual ID & Tone ID, Tone Break Adjustment Volume Control Yes Threshold Control Yes Tone Adjust Yes Audio Boost Yes Frequency Offset Yes Pinpoint Mode Yes Audio Output 1/4" Headphone Socket & Speaker Hip Mount Shaft Mount Only Standard Coil(s) 10" x 5.5" DD Optional Search Coils 5" round DD, 5.5" x 10" concentric, 13.25" x 15.5 DD" Battery Four AA Operating Time 25 - 30 hours Weight 3 pounds Additional Technology iMask noise suppression technology, built in LED flashlight, backlit screen, save settings Notes Optional 2.4 Ghz wireless headphones *Notes on Technical Specifications - Detailed notes about the specifications listed in this chart. Detailed Review Of Makro Gold Racer by Steve Herschbach Makro Gold Racer finds small Nevada gold The Makro Gold Racer has been one of my most anticipated new VLF metal detectors in years. This completely new model represents something I have wanted for a very long time – a high frequency VLF metal detector that does not skimp for features, in particular as regards discrimination options. A little background. First, I have been testing prototypes of the Makro Gold Racer, and this review is based on those prototypes. The final version due soon has a completely new LCD display layout, audio boost, refinements to other settings, and physical refinements like a change in the handle angle, etc. That being the case this review should be considered preliminary and final specifications are subject to change, as well as details you may see in my photos regarding the physical design of the detector. Second, what is the intended market for the Makro Gold Racer? The machine looks deceptively like many other detectors aimed at general purpose metal detecting. I want to emphasize that first and foremost this is a gold prospecting detector. There are only a few other detectors that directly compare to the Gold Racer which is running at a very high frequency of 56 kHz. Comparable detectors would be the White’s GMT at 48 kHz, the Minelab Eureka Gold running in its 60 kHz setting, and the Fisher Gold Bug 2 at 71 kHz. The intent with very high frequency detectors is to sharpen the response on extremely small metal targets. High frequency detectors are in a niche all their own when it comes to finding the tiniest of gold nuggets. This sensitivity does come at a cost however, in that the detectors are also responsive to ground mineralization and hot rocks that less sensitive, lower frequency detectors might ignore completely. There is no free lunch in detecting, and I want to caution anyone thinking that the Makro Gold Racer is going to be a magical solution to all their detecting desires to be realistic about things. Inevitably when new detectors come out people fall victim to wishful thinking, and I would like to try and avoid that here. When it comes to reviewing detectors I do the best I can to describe detectors to help people decide if they might be interested in them or not. Do realize again however that this review is based on preliminary information. Also, I honestly do not want people buying new metal detectors based solely on my reviews. There will be some of who want the latest and greatest right now, and I appreciate that, but being a first adopter does have its risks. My normal advice to people is to never buy anything based on a single review, but to wait for more of a consensus opinion to emerge. I have used the Gold Racer in the field, and I have found gold with it. Right now though if it is just a matter of you wanting to know if the Makro Gold Racer can find gold then I refer you to the excellent field review with photos posted by Ray Mills at the Detector Prospector Forum. In outward appearance the Makro Gold Racer resembles its immediate predecessor, the Makro Racer, but this really is a new detector, not just a Racer running at a higher frequency. Feedback on the original Racer has been incorporated as well as extensive testing and commentary from prospectors around the world. Besides the obvious color difference, major physical changes include completely redesigning the layout of the LCD display to better differentiate what are all metal functions and what are discrimination functions. All metal functions are on the left, and discrimination functions are on the right. I think the new display is more intuitive and better accommodates the extra functions implemented on the Gold Racer. The angle of the bend in the S rod handle grip has been relaxed based on feedback from Racer owners. The vibration mode was eliminated, shaving a tiny amount of weight and freeing up room on the display menu. The Gold Racer with stock 10” x 5.5” DD coil and NiMH batteries installed weighs in on my postal scales at exactly three pounds. Coils available at launch are the 10” x 5.5” DD that is stock on the detector. Optional coils include a 10” x 5.5” concentric coil, 5” round DD coil, and a lightweight 15.5” x 13” DD coil. Makro Gold Racer with 5" round DD coil Let’s take a look at the functions. Under All Metal on the left side of the meter are the functions that apply only to the All Metal mode. On the right are the functions for the two Discrimination modes. The settings are independent in each mode, and once set can be saved when the detector is powered down. This simple and intuitive setup is also part of the power of the Makro Gold Racer. It is incredibly easy once each mode has been customized to flip quickly between the three modes, cross checking target responses to make a dig/no-dig decision. All Metal is the heart and soul of nugget detecting, and the Makro Gold Racer has an extremely powerful, smooth, and sensitive threshold based all metal mode. The Sensitivity setting is familiar to anyone who has used a metal detector, except that there are three base levels of sensitivity or gain. Significant boosts occur between 39 - 40 and again between 69 - 70. Most detectors max out at what is a setting of 69 on the Gold Racer. Settings of 70 and above are a type of hyper gain setting that takes the machine above and beyond, but in extreme ground overload signals may occur. Overload signals are indicated by a “warning siren” audio and the machine is telling you that there is either a large metal object under the coil, or that you are encountering extreme mineralization. In the case of mineralization, either raise the coil slightly while scanning, lower the sensitivity setting, or both. Overloads occurring at 70 will almost always be eliminated by dropping to 69. Rest assured very little is lost by lowering sensitivity to 69 or below, again, because many detectors cannot be set as hot as the Gold Racer even at their maximum setting. Do you ever run detectors and have the distinct feeling some performance has been left on the table, because the detector can always be run at maximum settings? Makro has given you that extra power for where it can be used, but in doing so they expect you will lower settings in places where that extra power works against you. Luckily, the audio alert makes it easy to know when this is. Most people do not know it but many detectors simply shut down and quit working under similar conditions with no indication at all to the operator, a situation referred to as “silent masking”. ads by Amazon... The threshold setting is the normal control that sets the volume of the slight audio tone that is key to any experienced nugget hunter finding the tiniest or deepest gold nuggets. The most minute variations in the threshold tone can indicate a gold nugget, and the ability to read the threshold is what sets most really good nugget hunters apart from everyone else. Makro has added a feature to the Gold Racer called iSAT, for “Intelligent Self Adjusting Threshold”. This setting consists of several levels of adjustment that vary the rate at which the threshold tone steadies itself. Higher levels of iSAT smooth the threshold more aggressively which aids in maintaining a smooth threshold in rapidly varying ground. Lower levels allow for faint variations to be heard more clearly in milder ground for extra depth and sensitivity. The Gold Racer can be ground balanced three ways. Holding the trigger switch under the control pod in the forward position activates an instant automatic ground balance. Just pump the coil over the ground a couple times, release the trigger, and you are done. There is a short delay when you release the trigger, and during this delay you may manually adjust the ground balance setting. The instant ground balance is neutral to slightly negative. Those that like a slightly positive ground balance need only perform the instant balance, then tap the right hand control button three of four times. The Tracking function on the control panel engages and disengages automatic ground tracking. This is most useful where the ground conditions vary wildly, a perfect example being mixed cobble piles or river bars. The tracking is very quick yet resists tracking out genuine gold signals as much as possible. This can also be an aid to anyone new to ground balancing detectors as it makes the process entirely automatic. The Backlight setting adjusts the illumination level of the backlit screen. The FD/Save setting allows adjustments to be saved when the detector is powered off, while the FD function resets Factory Defaults. There is also a Frequency Shift setting to help eliminate outside electrical interference from power lines, or another Gold Racer being operated nearby. This is set through a combination of control buttons but not visible on the menu. Finally, although this is a true threshold based all metal mode, the meter acts independently in discrimination mode at all times and indicates target id information when the signal strength is sufficient to do so. Easy to read well designed screen Under the Discrimination menu are settings that are completely separate from the All Metal settings and also saved or reset separately. Disc 1 is a standard two tone mode with low tone ferrous and higher tone non-ferrous. Disc 2 is a similar but deeper, more powerful mode. Quick switching between these two modes, each with fully independent settings, creates a many layered and subtle approach to target discrimination. Both discrimination modes are silent search, no threshold based systems. However, new to Makro models is the ability to set the point at which low tones flip, or “break” over into being higher tones. Typically 39 and lower target id will cause a low tone, and 40 and above a higher tone. This ability somewhat replaces the three tone mode on the original Racer because by increasing the Tone Break setting it is possible to create various coin detecting scenarios. For instance, all targets with an id number below copper penny could register low tone, and therefore copper pennies, dimes, quarters, and dollar coins a higher tone. Conversely, lowering the Tone Break setting would create a more conservative approach for nugget detecting by accepting a little more ferrous digging in return for possibly finding another nugget or two. The Sensitivity control on the Disc menu is the same as but independent of the All Metal setting of the same name. ID Filter is a variable discrimination control, with higher settings eliminating or blanking out id numbers lower than the current setting. This setting is independent for each Disc mode, and again flipping back and forth can create some interesting scenarios for comparing targets at completely different sensitivity and ID Filter levels. This quick mode switching between All Metal, Disc1, and Disc2, all with independent settings, is a very powerful tool once you get used to it. Also new with the Gold Racer is the iMask setting. I noted at the start of this review that all metal detector designs involve making trades of some sort. Extreme high frequency sensitivity to small metal targets does increase chatty false responses in extreme ground when in the discrimination modes. iMask attenuates or suppresses weaker target responses in the discrimination modes and provides a secondary level of adjustment separate from and in addition to the Sensitivity and ID Filter settings. If the detector is producing lots of quick, spurious signals in the discrimination modes, reducing sensitivity or increasing ID Filter settings or both is the first line of attack. If this does not work, go back to the original settings on those functions, and try increasing the iMask setting. If this does not work, again lower sensitivity or increase the ID Filter or both on top of the current iMask setting. iMask acts as a pre-filter giving an extra level of control to help deal with extremely bad ground conditions. Finally, Disc1 is a less aggressive mode than Disc2, so using Disc1 offers even another level of possible options when dealing with bad ground in the discrimination modes. The Backlight setting is independent for the discrimination modes, as is the Factory Default/Save Settings function. I think it goes without saying that there has never been a high frequency metal detector ever produced with this level of options and control. There are a lot of variables to play with here, and I would not be truthful at all if I said I have this machine all figured out. In fact, I think part of the fun with the Makro Gold Racer is we are entering uncharted territory. Until the final version of the machine is released, and until quite a few people get their hands on it and experiment, it is very difficult to say just what applications creative detectorists may find for the Gold Racer. It is a very powerful VLF gold prospecting detector, I can vouch for that. Applications also may be found for jewelry detecting and relic hunting in particular, and even coin detecting, due to the unique combination of features the Makro Gold Racer offers. OK, finally – some notes on real world use! Again, this is all based on prototype models and so I can only speak in generalities for this report. However, there is no doubt in my mind that even the prototype detectors rival anything currently available in a VLF detector for finding tiny gold nuggets. I can easily locate flakes of gold weighing under one tenth grain with the Gold Racer and the stock 10” x 5.5” DD coil. In fact, the machine is so hot with the stock coil I thought using a smaller coil offered minimal if any benefit, mostly because of lost ground coverage and possibly lost depth on larger nuggets. I would only use the smaller coil myself for nooks and crannies where the stock coil can’t fit, but otherwise the stock coil really is the way to go in my opinion. Keep in mind I did say grain not gram. There are 480 grains per Troy ounce and in my opinion I can find flakes all day long with the Gold Racer that weigh less than 1/10th grain, or less than 1/4800th ounce. Smallest nugget unweighable, largest 2.4 grams In trashy locations I generally preferred running in all metal and just checking the meter for ferrous targets, which tend to lock in hard at 21 or 22 on the numbers. In theory anything under 40 is ferrous, but to be safe I might investigate items as low as 35 or even 30 depending on the situation and amount of trash. However, as I noted most ferrous locks in hard around 20 leaving no doubt what the target is. In All Metal mode very tiny or very deep targets beyond discrimination range give no target id at all, automatically meaning they need investigation. The main reason I prefer to always hunt in All metal is the extra depth and sensitivity it affords, and checking targets visually is very quick and more efficient than toggling back and forth to a Disc mode under normal circumstances. For areas with too much trash where meter watching might get to be a bit too much, I normally use one of the disc modes set for two tone ferrous/non-ferrous. Iron targets just burp away, while non-ferrous target pop out with a beep. If even that got to be too much for some people, increasing the ID Filter to eliminate most ferrous responses completely can make for a quieter experience in really trashy locations. As always, I must include the warning that the more discrimination applied, the more risk of missing a good target. Use no more discrimination than needed to preserve your sanity! I used the Gold Racer to hunt a couple trashy areas where I just could not go with my big dollar all metal machine, and easily located nuggets in the midst of trash. For me personally the Makro Gold Racer fills in two areas where the high price big gun detectors come up short. The ability to find the tiniest, most dispersed gold possible, both in flake form or enclosed in specimen rock. And the ability to deal with really trashy areas where good discrimination is needed. Perhaps the biggest surprise for me was when I decided to give the 15.5” x 13” DD coil a try. Honestly, I did not expect much from it. You normally do not see a coil this large for high frequency machines because the ground feedback usually overwhelms them, negating any gains that can be had regarding depth. Instead, the Gold Racer seemed to be even better behaved with the larger coil than with the smaller coils. I hunted some cobble piles with it and it ran smooth as can be at higher sensitivity levels. I then wandered into some moderately hot ground with it, still with no problems, and was actually surprised when I came up with a couple small gold nuggets with it. The first was only 0.8 grams which I thought was pretty fantastic. So I put a little more effort into it, and found a 0.3 gram nugget. With a 15.5” x 13” DD coil on a VLF? That is really kind of unheard of, and I was thoroughly impressed. I am not sure what is going on there but I do know the Makro detectors can sense what coil is on the detector. Something different going on with that big coil? I don’t know, but the results and performance surprised me. Also surprising was that for such a large coil it actually was not bad swinging it for half a day. That could be from my using large, heavy detectors all summer however. Still, it was an eye opener all around and changed how I think my Gold Racer might get used in the future. It looks to have more use for covering very large areas blue sky prospecting than I would have imagined. The 15" x 13" DD coil is unique for detectors running in this frequency range I would be remiss if I did not include at least a note on the versatility possible with the Gold Racer. I recently took it to a local park. Now, my ground in Reno is screaming hot, full of magnetite. The mineral percentage graph on the Gold Racer and similar machines all come up one bar short of maxed, and ground balance numbers run around 88-90. A magnet dropped in this stuff comes up with a lump of magnetite. As a result getting accurate target id numbers with even the best coin detectors past 5” is a chore. I know that sounds crazy but it is the truth. I ran the 5” DD coil and even then had to back the sensitivity down to 69 to prevent overloads in the worst areas. One thing about the Racer detectors that I have heard people complain about, and that is that they tend to up average target numbers in bad soil. For me this is a good thing. Many detectors will see target id number average lower in bad ground, and so fringe targets are more likely to get identified as ferrous when they are in reality non-ferrous. This is obviously not a good thing for nugget detecting. The Racer and the Gold Racer both tend to up average, and so targets like lead sinkers or aluminum that you would expect to give lower numbers often give coin like responses with the Racers. It is odd to see in practice. I got a good high signal reading near 80 at about 5” that when dug up turned out to be a common round lead fishing sinker. Out of the hole the target id promptly dropped to about 45. This effect whether by design or by accident is common with European detectors. I think it is by design because first and foremost these machines are made to pull non-ferrous targets out of ferrous trash. Improperly identifying a non-ferrous item as ferrous is the worst possible result, and so up averaging helps insure that non-ferrous items will not be missed. However, it also means these types of detectors are not as efficient at cherry picking coins as common coin detectors are. You get the coins for sure, but you dig more trash doing it. Still, I experimented a few hours and if you are content to live with the limitation I just described you can actually make some good finds with the Gold Racer under almost any conditions. The ID Filter works very well, and by just running it all the way to 79 it was easy for me to cherry pick a few coins though larger aluminum items like screw caps or big pull tabs often came up in the 80s also. I do think this is a result dependent on ground conditions to some degree, but really the Gold Racer is best suited for people like me who want to recover all non-ferrous targets. I prefer to hunt jewelry rather than coins myself, as one gold ring makes up for a pile of coins. And to hunt jewelry you have to dig aluminum, no two ways about that. The Gold Racer will suit me well hunting jewelry, especially micro jewelry like ear rings and fine chains. This report is very long, and yet I really am just skimming over the features and possibilities inherent in the Makro Gold Racer. I will close by once again noting that while everything regarding the Gold Racer is pretty much set in stone at this point, last second changes are possible. Look for more soon when the factory production models hit the street. I also get frustrated when people want information on new units, but then turn right around and characterize reports trying to provide that information as hype or a sales pitch. I have tried my best here to just present what facts I can without leading anyone to think that the Gold Racer is anything other than what it is. And that, in my opinion, is a very interesting, unique, and capable metal detector. I look forward to hearing for myself in the future what people think about it and the applications and tricks they come up with, because you pretty much need to toss anything you think you know out the door when approaching this machine. Many thanks to the folks at Makro and in particular Dilek Gonulay for providing me with the opportunity to be one of the first to use the Gold Racer. I admit that VLF detectors were beginning to bore me, and the Gold Racer has reignited my interest in seeing what they can do for me. ~ Steve Herschbach Copyright © 2015 Herschbach Enterprises
 -
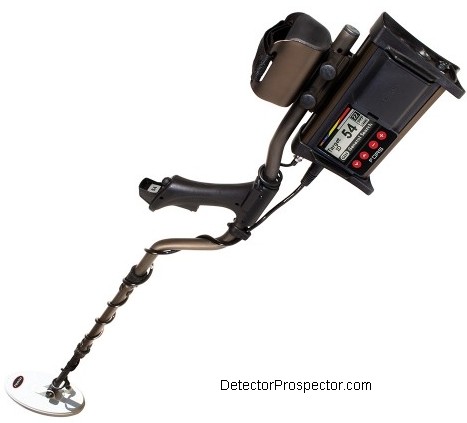 Nokta Detectors is a new name to most people in the United States. Nokta Engineering is a company based in Istanbul, Turkey since 2001. The FORS Gold+ is an update of the earlier FORS Gold and is aimed at the prospecting market. The Nokta FORS Gold+ was introduced in 2015 and was discontinued in late 2018. The Nokta FORS Gold+ has been replaced by the Nokta Anfibio 19, new for 2018. The main changes in the FORS Gold+ include boosting the frequency from 15 kHz to 19 kHz which should enhance the sensitivity to small gold. The stock coil has been changed to the 10" x 5.5" DD coil popular with gold prospectors and a 5" round DD coil is also included. The smaller coil is good for working nooks and crannies and will provide the best sensitivity on the smaller gold nuggets. Optional coils include a 10" x 5.5" concentric and 13.3" x 15.5" DD. The concentric is new for Nokta and offers extra performance in mild ground combined with more accurate ferrous identification properties for trashy locations. A very new feature is what Nokta is calling the iSAT control. This allows a person to customize the threshold retune rate for ground conditions. A fast threshold retune smooth's ground responses but can also smooth faint gold signals. A slow retune rate can enhance faint signals but also enhance false ground responses. The amount needed varies with ground conditions and the type of gold being found. This setting is preset in most detectors and so by including it Nokta is offering a degree of control not possible on many prospecting detectors. Finally, the three tone "coin mode" on the original FORS Gold has been replaced by a Fast retune two tone discrimination mode suited for hunting bad ground. This is in addition to the already existing Boost discrimination mode for work in milder ground. The Nokta FORS Gold+ comes with two coils - 5.5" x 10" DD and 5" round DD Here are some details in the three modes offered on the FORS Gold+. There is a true threshold based all metal mode that has no discrimination control. There is no variable discrimination in this mode but the on screen target id does kick in for targets in discrimination range. Because all metal reaches deeper than discrimination modes the deeper targets will give an audio signal but no on screen target id number. This is how you locate deep targets beyond what a discrimination mode can detect. Then you have preset two tone discrimination modes. In two tone mode it is low tone ferrous and high tone non-ferrous. These discrimination modes are "silent search" with no threshold sound. In both the disc modes you have a variable control called ID Mask. It is just like the control on a single knob disc machine, up and down with anything below the setting rejected. This is on top of and in addition to the tones. However, ID Mask is not like on most detectors where it starts at iron and goes up from there. The control starts all the way down in the ground range and goes up from there. This is important because many detectors cannot be set for a true "zero disc" mode but always have a little iron discrimination built in even at minimal settings. The FORS are like other Euro machines that let you fine tune the ferrous responses for extracting targets out of thick ferrous trash. This combined with the small coil makes it deadly in ferrous trash. Nokta FORS Gold+ 19 kHz gold nugget detector ALL modes always have an active on screen visual VDI number. If you want you can run ID Mask very high to eliminate foil or aluminum or whatever on the high end, but like other machines you will lose nickels if you go too high. There is no notch function. Run ID Mask up to just below nickel range. Now you get no signal on targets that fall below nickel, nickel on up will produce a high tone. My FORS reads 56 on a nickel. If I turn the ID Mask up to 56 it still accepts the nickel. If I turn it to 57 nickel breaks up badly. At 58 nickel is gone. There is no threshold in the disc modes so no threshold nulling. The rejected targets are simply gone, and nothing pops up on screen for VDI. So on screen VDI is not 100% independent of settings. If you turn the ID Mask up to 99 nothing goes beep so the control operates over the entire discrimination range unlike many detectors that do not allow the control to run into the coin range. The ID Mask control has exceptional range all the way from ground on one end up to silver coins and above on the other end. I like the out-of-box thinking Nokta is displaying in the design of their detectors. The FORS Gold+ has a small LED flashlight built into the handle to illuminate the work area in low light conditions or to just use as a flashlight when you get back to your vehicle in the dark. The two coils, both manual and automatic ground tracking, 19 khz, new iSAT control, dual discriminate modes, and more all add up to a metal detector worth very serious consideration. The new discounted price of $578 with two coils makes this a real bang-for-the-buck option for those wanting a full featured nugget detector at a great price. Nokta FORS Gold+ Color Brochure Nokta FORS Gold+ Instruction Manual Nokta FORS Gold+ Photo Tour Forum Threads Tagged "nokta fors" Nokta Metal Detectors Forum Nokta FORS Gold+ Technical Specifications* Internet Price $578.00 Technology Induction Balance (IB) Frequency 19 kHz Autotune Mode(s) iSAT Intelligent Self Adjusting Threshold Ground Rejection Grab, Manual, & Tracking Soil Adjust No Discrimination Variable with Visual ID & Tone ID Volume Control Yes Threshold Control Yes Tone Adjust Yes Audio Boost No Frequency Offset Yes Pinpoint Mode Yes Audio Output 1/4" headphone socket & speaker Hip Mount Shaft Mount Only Standard Coil(s) 10" x 5.5" DD and 5" round DD Optional Search Coils 5.5" x 10" concentric, 5" x 9.5" DD, or 13.3" x 15.5" DD Battery Four AA Operating Time 25 - 30 hours Weight 4.3 pounds Additional Technology Handle Mounted LED Flashlight Notes *Notes on Technical Specifications - Detailed notes about the specifications listed in this chart.
 -
 The Tesoro Lobo SuperTRAQ detector was released in 1997 and was discontinued in 2019. It is also referred to as the Lobo ST. I have had some experience with the Lobo over the years and have seen a lot of gold found with it. See Detecting for Gold with the Tesoro Lobo and Metal Detecting for Gold at Ganes Creek, Alaska at Steve's Mining Journal. The Tesoro Lobo SuperTRAQ replaced the earlier Tesoro Lobo, which was produced from 1989 - 1997. The main difference between the two units is that the earlier model lacked automatic ground balancing, the SuperTRAQ signature feature. Be aware that coils for the earlier Lobo do not work on the newer model. The The old coils had a female coil connection and the new coils have a male pin connector. The original Lobo is listed at running "at approx. 20 kHz" while the Lobo ST runs at 17.8 kHz. Note: The Lobo ST is also quoted widely as running at 17.5 kHz. The latest spec posted on the Tesoro website is 17.8 kHz. Another change in the old Lobo versus the new SuperTRAQ is that when the old model was manually ground balanced, the ground balance carried over in both all metal and discriminate modes. The new SuperTRAQ automatically tracks ground conditions while in all metal mode. When switched into discriminate mode, the automatic ground tracking is disabled and the unit uses a factory pre-set ground rejection. This is a less than desirable situation. In all metal nugget hunting mode it is impossible to disengage the automatic ground balancing system. Very small or very deep nuggets that generate a minimal signal are at great risk of being tracked out. Conversely, in discriminate mode there is no ground balance at all except what the factory has chosen for you. Tesoro Lobo SuperTRAQ metal detector Despite the lack of flexibility in ground balancing there is no doubt about one thing - the Lobo is one of the easiest detectors for a novice nugget hunter to learn. The lack of manual ground balance contributes greatly to the machine being very easy to operate, and this is a important feature in itself. The Lobo is a very forgiving metal detector. My main experience with the SuperTRAQ came with my involvement with Moore Creek Mine in Interior Alaska. The mine produced a lot of large gold nuggets but also had hot rocks in the form of highly magnetic basalt cobbles. After trying just about every VLF detector made we decided the Lobo SuperTRAQ handled the ground as well or better than any other VLFs available at the time. The automatic ground balance smoothed the hot rock responses and in a worst case scenario the unit could be put in discrimination mode. Dialing in a discrimination setting of 1.5 eliminated the hot rocks and nearly all ferrous trash responses while still responding well to larger gold. The SuperTRAQ produced a lot of gold at Moore Creek over the years we operated the mine. The Tesoro Lobo SuperTRAQ is getting somewhat dated in that most of the competition offers target id meters but it is still a very versatile detector. It is very easy to operate. It also is one of the few nugget detectors still produced that allow the control box to be hip or chest mounted, a very desirable feature for those working in and around water. It also has a very good coil selection, including the rare ability to run a 3" x 18" sweeper coil (Tesoro Clean Sweep). Official Tesoro Lobo SuperTRAQ Page Tesoro Lobo SuperTRAQ Instruction Manual Forum Threads Tagged "tesoro detector" Tesoro Metal Detector Forum Tesoro Lobo SuperTRAQ Technical Specifications* Internet Price Discontinued - was $679.00 Technology Induction Balance (IB) Frequency 17.8 kHz (also widely quoted at 17.5 kHz) Autotune Mode(s) Pre-Set Slow Motion Ground Rejection Tracking (All Metal) and Pre-Set (Disc Mode) Soil Adjust (Normal/Blk Sand/Alkali) Three position switch Discrimination One turn control Volume Control No Threshold Control One turn control Tone Adjust No Audio Boost No Frequency Offset No Pinpoint Mode Yes Audio Output 1/4" headphone socket & speaker Hip Mount Hip, chest, or shaft mount Standard Coil(s) 10" x 5" elliptical Widescan (DD) Optional Search Coils Seven accessory coils available Battery Eight AA Operating Time 20 - 30 hours Weight 3.5 pounds Additional Technology Notes *Notes on Technical Specifications - Detailed notes about the specifications listed in this chart.
 -
 The Garrett AT Gold was released in 2011 and is still in production. It is a variation of the excellent Garrett AT Pro metal detector, but modified slightly to make it a better detector for prospecting. Garrett really raised the bar in the detecting world with the AT models. These detectors are waterproof to ten feet yet give up none of the features one would normally expect in an above water detector. They even have an external speaker for use above water which can be submerged without harm. Best of all you pay no penalty in either weight or price. The Garrett AT models provide exceptional value in metal detecting. The AT Pro is a 15 kHz detector that features full notch discrimination. The lower frequency means that it can be used in salt water. It also allows for custom discrimination, such as tuning out coins to concentrate on likely jewelry targets. The AT Pro lacks a true threshold based all metal mode and so is less suitable for nugget detecting, although it can and will find gold nuggets. The AT Gold runs at a slightly hotter 18 kHz and has a true threshold based all metal mode. This makes it a better nugget detector than the AT Pro. However, it is too hot to run on wet salt sand or in salt water. It also has only a couple preset discrimination patterns and so lacks the custom discrimination ability the the AT Pro has. The AT Pro and AT Gold both have three search modes. The first is a discrimination mode preset to accept all items with an audio beep in different tones and a visual target id. Pretty much everything goes beep, but you can adjust the level at which iron/steel is rejected completely, and this is saved when the detector shuts off. The mode is preset and only the iron rejection level may be modified. Garrett AT Gold metal detector for gold prospecting and more The second mode is a preset discrimination mode with light foil and pull tabs set to audibly ignored. A so-called coin pattern that eliminates common trash but beep on common coins. Again, only the iron rejection level may be set and saved. The rest of the pattern is preset and cannot be adjusted. The AT Pro has a third discrimination mode, a fully adjustable notch mode. Notch refers to the ability to set certain non-ferrous items to be accepted or rejected in ranges or "bins". The non-ferrous discrimination range is split up into sections or "notches". For example, all foil items may fall into a range of 0-20 on a scale of 0-99 and so would be said to fall in the 0-20 section/range/notch/bin. That 0-99 range can be split up into several notches and this varies by model. On the AT units you get 12 non-ferrous notches. Garrett AT Gold with 5" "sniper coil" An independent adjustable notch system lets you decide what sections get accepted and what get rejected. For instance, you could decide you are looking for something that reads like a nickel and set only the nickel range to beep, all other ranges get ignored. All nickels and items that read like nickels would go beep, and that is it. Or, you can set all non-ferrous items EXCEPT the nickel range to go beep, and ignore the nickel range. The AT Pro in the third search mode allows you to create a custom notch program and save it. Again, both units treat ferrous items the same. You can adjust how the ferrous targets respond and save the setting. It is only in how non-ferrous targets are treated that the units differ. The third search mode on the AT Gold is a pure unfiltered all metal mode. All items are detected, with significantly more depth. The all metal mode has an adjustable "iron audio" feature that will identify strong ferrous targets with a low or broken tone. The all metal mode also features a unique ground balance "window" that can expand beyond the normal area spanned by a ground balance control in order to eliminate some types of hot rocks. Gold nuggets found with Garrett AT Gold So on the AT Pro the third mode is an adjustable notch discrimination mode, on the AT Gold it is an unfiltered all metal mode. Finally, the AT Pro comes with an 8.5" x 11" DD coil whereas the AT Gold comes with a smaller 5" x 8" DD coil. I think the Garrett AT Gold is an exceptional detector and for anyone wanting to use a VLF detector in and around water it is an obvious choice. Do note that while the detector itself is submersible the headphones that come with it are not. To actually use the unit face in water with mask and snorkel requires optional fully submersible headphones. The depth of detection, sensitivity, and ground handling are on par with other 18 kHz nugget detectors. However, if the waterproof feature is never going to be needed (desert detecting?) then the special lubricated O-ring connectors for the headphones and coils add service issues that can be avoided with a normal dry land model. Therefore I think the decision to get a Garrett AT Gold depends in large part on whether the waterproof design is actually needed or not. Official Garrett AT Gold Page Garrett AT Gold Instruction Manual Forum Threads Tagged "garrett at" Garrett Metal Detectors Forum Garrett AT Gold Technical Specifications* Internet Price $637.45 Technology Induction Balance (IB) Transmit Frequency 18 kHz Autotune Mode(s) Pre-Set Slow Motion Ground Rejection Ground Grab, Manual Soil Adjust No Discrimination Adjustable Plus Presets, Visual ID, Tone ID Volume Control Yes Threshold Control Yes Tone Adjust No Audio Boost No Frequency Offset Yes Pinpoint Mode Yes Audio Output Speaker & Supplied Headphones* Hip Mount No Standard Coil(s) 5" x 8" DD Optional Search Coils Four accessory coils available Battery Four AA Operating Time 20 - 40 hours Weight 3.03 pounds Additional Technology Ground Balance Window Notes *Uses special waterproof connection for headphones, adapter needed to use other brand headphones *Notes on Technical Specifications - Detailed notes about the specifications listed in this chart.
 -
 The Fisher Gold Bug Pro was released in 2010 and is still in production. It is the final version of a series of new digital Gold Bug releases intended to replace the older analog Gold Bug models. The easiest way to tell the new Gold Bugs from the old Gold Bugs is that the new models sport a prominent digital readout. The model is also marketed separately by First Texas, Fisher's parent company, as the Teknetics G2. The G2 has a different rod and handle assembly and comes standard with the 11" elliptical DD coil for slightly more money. The Gold Bug Pro comes standard in three versions - with a 5" round DD coil (actually 4.7" diameter), or with the 7" x 11" elliptical DD in which case it is called the Fisher Gold Bug Pro DP. Finally, there is a dual coil package the includes both the 5" round DD coil and the 5" x 10" DD coil. In addition to the three coils mentioned here DeTech markets the 13" Ultimate DD coil for the G2 that will work on the Gold Bug Pro. For more information see the Guide to Different Versions of the Fisher Gold Bug. I have come to rely on the Gold Bug Pro as my general purpose prospecting detector for when I want a unit that can handle trashy areas. I appreciate its light weight and simplicity in getting the job done. I prefer to run the detector in all metal mode for the best depth and sensitivity. The nice thing is that the meter always displays possible target ID information to help make digging decisions without having to switch or toggle to another mode. This is far more efficient in the field not to mention wear and tear on switches. I prefer the 5" x 10" DD coil for general use - it is too bad Fisher does not sell the Gold Bug Pro with that as the stock coil. The only way you can get it is as a package deal or as a separate accessory item. The only thing I wish was that instead of displaying the ground phase as a large number while in all metal mode the Gold Bug Pro instead displayed the possible target ID number. The target ID is displayed on a small "racetrack" display above the ground phase number. I rarely if ever need to know what the ground phase is but I constantly refer to the target ID. Hopefully this will be addressed in future versions. Fisher Gold Bug Pro - Gold Bug DP variant (7" x 11" DD coil) I normally hunt in all metal. The detector hits all targets with the same audio signal except the stronger the target, the stronger the signal. There is a little "speedometer" target id readout in all metal above the big ground phase reading and so after hearing target I work it and eyeball the reading. If you get no target id it is target deeper than disc can hit (all metal prospect mode goes deeper than discriminate mode) so dig until you get target id or target. You need to decide on what target id to dig and what to pass. In theory all 40 and above is non-ferrous so in theory just dig all 40 and higher. Reality is small gold or very deep gold can read iron. I usually opt for digging some iron, and so depending on types of ferrous trash and ground mineralization the actual number I choose may be 35-39, usually 38. Then, and this is key, work the target. If the number bounces even once to or above your chosen break point, dig. The numbers bounce around, and if they consistently read at or below your chosen reject number, for example 38, if the number is always 38 or lower pass it up. If it bounces even once to 39 or higher dig it. Again, number picked depends on actual ground conditions. Start lower, maybe 35, then adjust upwards after digging targets. As long as you are not digging too much ferrous stay put but is too much digging adjust higher. VLF discrimination can and will lie on small or deep gold so better conservative and digging at least some ferrous than leaving gold. Fisher Gold Bug Pro with 5" x 10" elliptical DD coil Ok, let's assume too much trash, to many signals to analyze each one. Go to disc mode. Immediate depth loss! But now we can set target id audio break point. The unique tone disc system has three tones, mid tone, low tone, and no tone (target rejected). You can move range but it is not totally adjustable. The low tone area compresses as the disc is set higher. If you set low tone cutoff at 30 all target below 30 make no sound at all and all passed up. You never know they are there. 30 to about 55 will be low tone, meaning most gold and small ferrous, 56 and above will be mid tone, usually brass but maybe big nuggets. There is no high tone on the GBP. You can adjust this potential gold tone range to a certain extent. Set at 35 and nothing below 35 reports, 35 to maybe 60 (doing this from memory so may be off a bit on the numbers) will be low tone, above 60 mid tone. Or if trash really is bugging you set at 39 so only 40 and above beeps. But because some targets read mostly ferrous but bounce non-ferrous at times it is a fuzzy choice. If you set for 40 and above and small nugget reads 38 on first pass, you miss it and never know it was there. At the end of the day it depends on trash level and how much target analyzing you want to do in the fuzzy zone. Most small nuggets actually read around 50 but again all depends on gold size, shape, purity, ground mineralization and other factors. ads by Amazon... Lots of nuance in what is a deceptively simple detector. The more I use it the more I appreciate it. In all metal with 11" x 7" DD it approaches PI depths on most average size gold in moderate to mild ground. I very much like having the dual ability of hunting in all metal while having visual target id. No toggling back and forth. I not only use the Gold Bug Pro for prospecting but for jewelry detecting. It is a not the best coin detector in the world but does well, especially in trashy areas with the little 5" coil. All in all a great little machine, one I can swing high and low all day long with little fear of arm strain. I highly recommend the Gold Bug Pro for anyone looking for their first nugget detector or for old pros like myself wanting something light, simple, and effective. Official Fisher Gold Bug Pro Page Download the Fisher Gold Bug Pro Instruction Manual Here Guide to Different Versions of the Fisher Gold Bug Forum Threads Tagged "fisher gold bug" First Texas (Fisher) Metal Detectors Forum Fisher Gold Bug Pro Technical Specifications* Internet Price Basic Gold Bug $499 / Pro $549.00 (5" coil) or $599.00 (7" x 11" coil) Technology Induction Balance (IB) Transmit Frequency 19 kHz Autotune Mode(s) Pre-Set Slow Motion Ground Rejection Manual Touch Pads with Grab Function Soil Adjust No Discrimination One turn control, Visual ID, Tone ID Volume Control No Threshold Control One turn control Tone Adjust No Audio Boost No Frequency Offset No Pinpoint Mode Yes Audio Output 1/4" headphone socket & speaker Hip Mount No Standard Coil(s) Choice of 5" round DD or 7" x 11" DD Optional Search Coils Many accessory coils available from Fisher and aftermarket Battery One 9V Operating Time 15 hours Weight 2.5 pounds with 5" coil Additional Technology Continuous ground phase readout Notes Also available as 5" plus 10"x5.5" DD two coil package for $749 *Notes on Technical Specifications - Detailed notes about the specifications listed in this chart.
 -
*Notes on specifications: This page is a footnote link in all "Steve's Reviews" - metal detector and gold prospecting equipment reviews by Steve Herschbach. Two basic technologies are described here; Induction Balance (IB) and Pulse Induction (PI). Induction balance is often referred to as VLF, or very low frequency. This is a misnomer, as some gold nugget detectors and some coin detectors are not very low frequency units as normally defined. VF = Voice Frequency = 300 Hz - 3 kHz, VLF = Very Low Frequency = 3 - 30 kHz, LF = Low Frequency = 30 - 300 kHz. Most IB gold detectors operate in the Low Frequency Range and quite a few coin detectors operate as low as the Voice Frequency range. Pulse Induction (PI) detectors operate over hundreds of frequencies employing a totally different technology than IB detectors but can be best imagined from an operational standpoint as Low Frequency detectors Internet Price - Manufacturer's often publish manufacturer suggested retail prices (MSRP) intended to set the full value of an item. In the United States they also will often set a minimum advertised price (MAP) that determines the lowest price that can be used for advertising purposes. Note that this is not the lowest price an item can be sold for but instead is what you will normally see in print ads or online as the lowest advertised (sale) prices. The Internet Price in the chart is the normal advertised sale price as commonly found on the internet as of the date listed. Dealers will often try and sweeten the deal by including "free" items in the advertised prices. You can often negotiate a lower price by contacting the dealer requesting a lowest price for the item without all the "free" package items. Technology - The basic operating technology a detector uses has a huge impact on how it behaves. Early consumer 1960's model detectors commonly employed a method referred to as Beat Frequency Oscillator (BFO). This simple design can be built by a school child with a handful of components. The search coil or loop was literally a coil or loop of wire. They are noted for making a distinctive "putt-putt-putt" continuous beat. The beat increases as a target is detected and the BFO responds to both conductive metals and magnetic minerals. The early 1970's saw the appearance of the Induction Balance (IB) detector. The IB detector employs two coils, a transmit and a receive coil, that are kept in electronic balance. They were therefore also commonly referred to as Transmitter/Receiver (TR) and that term saw more popular use. The TR produces a steady tone that increases in volume and the early TR models, like the BFO, responded to both conductive metals and magnetic minerals. The BFO and TR were both very limited because their ability to detect magnetic minerals interfered with their ability to detect conductive metals. An IB or TR variant was developed that allowed the detectors to not only eliminate the signal from ground minerals but to discriminate between various metals. These detectors ran at lower frequencies than the TR models and referred to as Very Low Frequency (VLF) detectors. Dual mode models existed, the VLF/TR, but the TR modes were so limited they were eventually dropped in favor of pure VLF operating modes. Almost all such detectors are referred to as VLF detectors today, but VLF is actually a misnomer. In electronics, VLF refers to the 3 kHz - 30 kHz frequency spectrum. There are detectors operating at under 3 kHz, and so technically they are Voice Frequency (VF) detectors. There are also many models operating over 30 kHz which are technically Low Frequency (LF) detectors, although because they are operating at higher than VLF frequencies many people refer to the as "high frequency" detectors. Therefore on this website the more technically correct term Induction Balance (IB) will be used. This is important because IB detectors are dramatically different than the other major technology employed at this time, the Pulse Induction, or PI detector. The IB detector requires two coils or loops that continuously transmit and receive in electronic balance. The PI detector requires only one coil but may use two. Rather than transmit and receive continuously, the PI detector transmits, pauses, then receives, which can be done with a single coil. The PI detector is able to ignore salt water and mineralized ground that an IB has difficulty with. This makes PI detectors particularly well suited for salt water diving applications, and that is where most consumer models have been aimed over the years. Simple PI detectors are often advertised as having "automatic ground rejection" but that is not strictly true. A normal PI will ignore common ground conditions, but they still are affected by highly mineralized ground and hot rocks, and so are not suitable for most prospecting applications. A company in Australia recognized the potential however, and developed PI detectors aimed specifically at the prospecting market. These detectors do actually ground balance, or tune out the effects of highly mineralized ground and hot rocks, and so along with other models now on the market represent a subset of the PI detectors, the Ground Balancing Pulse Induction (GBPI) detector. Frequency - Induction Balance (IB) detectors as radio devices normally operate on one of more frequencies that govern certain operating characteristics. The transmit frequencies are often quoted but what is most important is the frequencies the detector receives and actually processes. Most detectors receive and process a single frequency but a few detectors receive and compare the results of two or more frequencies. The focus on frequency has lead some marketing people to advertise multiple transmit frequencies in ways that are a bit misleading because people assume more is better. The reality is single frequency detectors excel at some tasks and multi-frequency detectors at others. Single frequency detectors can be better honed for specific tasks, such as nugget detecting. Multiple frequency detectors are better able to handle salt water environments and generally excel at target discrimination. In general, the higher the frequency, the more sensitive the unit is to small gold, but also more affected by mineralized ground and rocks. Lower frequencies penetrate mineralized ground better but are less sensitive to small nuggets. Multiple frequency detectors have historically acted like lower frequency detectors but newer models are so sensitive as to be practical for gold nugget detecting. Frequency article Pulse Induction (PI) detectors are sometimes advertised as using huge numbers of frequencies, which is technically true, but again is the marketing people going to work. Operating frequencies on IB detectors do not really equate with PI detectors which operate on a different principle. The closest specification in a PI detector that has some bearing on the operating characteristics is the Pulse Frequency which is the number of times the transmitter pulse is repeated every second. It is usually quoted at Pulses Per Second (PPS). The pulse frequency affects the response time (slower PPS call for slower sweep speed), power consumption (higher PPS uses more power) and interference rejection (adjustable PPS helps adjust out electromagnetic interference). Pulse Induction (PI) detectors again are a special case, and the sensitivity to small items and ground minerals is more affected by the Pulse Delay than the Pulse Frequency. The Pulse Delay is the wait time between the transmit mode and receive mode. The shorter the delay, the more sensitive the detector is to small items and hot rocks. In theory a PI can be just as sensitive as an IB detector by operating at extremely short delay times, but then it would suffer the same problems as an IB detector. PI detectors designed to hunt gold often have a pulse delay of about 10uS (microseconds). Salt water however signals at 10uS so salt water PI detectors often run about 15uS. Some PI detectors can have an adjustable pulse delay that commonly runs from 10uS to 25uS. Autotune Modes - Almost all modern detectors require the search coil to be in motion over the target to get a response. Nugget detectors employ automatic threshold tuning, which acts to help keep the threshold tone even in variable ground. The circuit seeks to return the threshold to a level preset by the threshold control. The retune rate can vary from slow to fast and in some cases can be adjusted by the operator. Holding the coil stationary over the target causes the target to disappear as the autotune circuitry brings the threshold back to the preset level. Detailed article Ground Rejection - Ground rejection or ground balance can be set at the factory (Pre-Set), manually set by the user (Manual) or automatically track ground conditions (Tracking). Fixed refers to units that lock in whatever setting the automatic system has at any moment but which cannot be manually adjusted. Manual adjustment allows a unit to be purposefully adjusted to specific conditions that cannot normally be attained through manual or fixed settings. The preferred option is to have both tracking and manual ground balance systems. A compromise between manual ground balance and ground tracking is an automatic "Grab" function. This allows the unit to be ground balanced by pressing a button. The ground balance setting is obtained instantly or with a few pumps of the coil over the ground. Soil Adjust - This refers to a control that allows the operator to adjust the unit for basic ground conditions. Common settings are Normal, High Mineral, Low Mineral (Sensitive), Salt (for salt water beaches or salt flats) or a variable setting. The technology employed may vary. The unit will compensate for difficult conditions by basically lowering the overall sensitivity of the detector in various ways so as to not detect the item or items causing problems. The sensitivity to desired items almost always suffers as a result. Discrimination (Disc) - Most detectors offer all metal detection, all metal with ferrous (man made iron or steel) rejection, possibly adjustable, and fully adjustable discrimination that can actually identify different non-ferrous targets one form the other. The method may be audio only, via a visual display, or both. A control that allows for only ferrous items to be rejected to a varying degree is commonly referred to as "Iron Mask". Volume Control - Detectors with volume controls usually have a built in speaker and this way you can adjust the speaker output. Detectors without volume controls operate at full volume at all times. Be sure and purchase headphones that have an adjustable volume for these detectors or the headphones will be too loud to use. Tone Adjust - This allows for a change of tone in the speaker output, to the sound that best suits the user's ears. Some people hear high tones better and some people better hear low tones. Audio Boost - Boosts the audio volume on small, faint targets, making them easier to hear. It may also boost ground and hot rock signals in some areas and so is usually offered as an option. Frequency Offset - Two detectors operating on the same frequency close together will "cross-talk" or cause some kind of false signals in both nearby detectors. A frequency offset or adjust allows for a small change in frequency so detectors are less prone to interfere with each other. The control may also alleviate interference from outside sources like power lines or cell phone towers, referred to as EMI (Electro-Magnetic Interference). Pinpoint Mode - Common in coin detectors, rare in gold nugget detectors. The pinpoint mode is usually a variation on the all metal non-motion mode (see Search Modes above) that allows the detector to be held steady over a target as an aid to locating the exact position of the target. This may be of some benefit in some "silent search" that lack a threshold tone and which only make a sound when passing over a target. The mode is usually activated via a momentary push button or trigger switch. Audio Output - Nearly all detectors have a built in speaker and a 1/4" headphone jack. Others vary from the norm and are so noted. Also, be aware that some detectors have a mono output and some have stereo output. This is noted when known but it is best always to have headphones that can operate in either mode. Headphone notes Hip Mount - Some models allow the control box to be put on a belt or chest harness. A very desirable feature, as even a lighter detector can cause arm soreness, or even injury, if used for long periods of time. New detectors are so light this is now a rare feature more often seen on older models. An exception are the Minelab SD/GP detectors in that they are heavy, but through the use of an ingenious harness and bungee system they actually impose less arm strain in level ground than most detectors. Similar harness/bungee systems can be obtained for use on most detectors from aftermarket sources. Chest mounts however are still a valuable option for those thinking of using their detector in deep water. Standard Search Coil(s) - The search coil or coils that come that come with the detector. Also referred to as loops. IB detectors have concentric or double D (DD) options. PI detectors have mono or double D (DD) options. Concentric or mono coils are usually more sensitive but more affected by ground mineralization. Double D coils handle ground mineralization better but at some loss of maximum depth in low mineral conditions. Concentric or mono coils have an inverted cone detection pattern with maximum depth dead center that fades off in all directions. DD coils have an elongated inverted canoe pattern that covers the ground more thoroughly but lacks the maximum depth dead center that concentric or mono coils offer. Large coils get more depth and cover more ground than small coils, but lack sensitivity to small targets. Small coils lack overall depth but enhance sensitivity to small targets and have better target separation by not "seeing" two targets under the coil at once. Large coils are more affected by the overall ground mineralization, small coils are more affected by hot rocks. Suffice it to say that the more coil options one has, the better. Coil compatibility Optional Search Coils - See the note above. The more, the better. Battery - Options are usually disposable batteries, rechargeable systems, or both. Common battery types are AA batteries and 9V batteries. Disposable batteries tend to fade away slowly as they lose power. Rechargeable batteries maintain a more even power output then go dead very rapidly. Rechargeable are preferred by heavy users and a backup battery is a necessity. Operating Time - Normal battery life in operation with standard battery. Note that the use of headphones will significantly extend operating times. Weight - Weight of unit on arm with a few noted exceptions. Additional Technology - Features offered by this detector not normally seen on other models. Notes - Anything else of interest about the model in question.
-
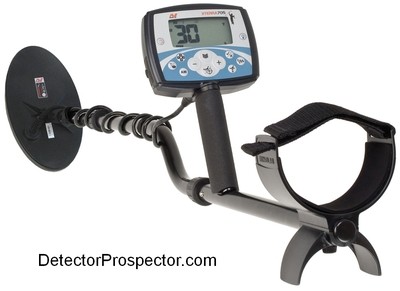 The Minelab X-Terra 705 was released in 2009 and is still in production. It is a feature packed detector available for under $500 and weighing less than 3 pounds. Quite a remarkable detector for the price, the X-Terra 705 can run at any one of three separate frequencies by changing to various custom tuned "smart" coils. Unlike some detectors that select between frequencies while using a single coil, the X-Terra 705 insures optimum performance by using coils specifically tuned for each operating frequency. The coils contain a chip that tells the detector what frequency it is designed to run at, and the detector automatically switches to match the coil. You can choose between 3 kHz, 7.5 kHz, and 18.75 kHz. The original X-Terra 705 comes stock with the 9" round concentric coil, which is great for general purpose detecting. The X-Terra 705 Gold comes with the 10" x 5" 18.75 kHz DD coil deemed best as an all around prospecting coil. The X-Terra 705 has a full complement of ground balancing options - a simple "Ground Grab" automatic push button option, full adjustable manual ground balance, and automatic ground tracking, making it one of the few prospecting detectors that offer all three methods. There are several tone id options to choose from, all the way from a simple mono tone to a full multi tone mode. The X-Terra 705 features full programmable notch discrimination with memory to save all your settings when turned off. Minelab X-Terra 705 Gold multipurpose metal detector Most importantly, the X-Terra 705 Gold has a very powerful threshold based all metal mode, one of the best available. The all metal mode "Prospect Mode" has an adjustable "iron mask" which allows shallow ferrous trash to be identified and rejected even while in the all metal Prospect Mode. The Beach setting along with the optional alternate frequency coils makes the Minelab X-Terra 705 a worthy contender for those seeking a single powerful "do-it-all" detector in an affordable and lightweight package. At one time this was a $700 detector and it was a good value then - at $499 it is a true bargain. Official Minelab X-Terra Gold Page Minelab X-Terra 705 Instruction Manual Minelab X-Terra 705 Gold Start Guide Understanding Your X-Terra by Randy Horton Minelab X-Terra Coil Brochure X-Terra 70 & 705 On Gold Nuggets Forum Threads Tagged "minelab x-terra" Minelab Metal Detectors Forum Minelab X-Terra 705 Gold Technical Specifications* Internet Price $499.00 Technology Induction Balance (IB) Frequency 18.75 kHz (X-Terra Gold model) Autotune Mode(s) Preset Slow Autotune Ground Rejection Ground Grab, Manual, Tracking Soil Adjust Normal and Salt (Beach) Modes Discrimination Variable with Visual ID, Tone ID, Notch ID Volume Control Yes Threshold Control Yes Tone Adjust No Audio Boost No Frequency Offset Yes Pinpoint Mode Yes Audio Output 1/4" headphone socket & speaker Hip Mount Shaft Mount Only Standard Coil(s) 10" x 5" DD (X-Terra Gold model) Optional Search Coils Nine or more accessory coils available Battery Four AA Operating Time 20 - 30 hours Weight 2.9 pounds Additional Technology Can change frequency by changing coils to 3 kHz or 7.5 kHz from 18.75 kHz, has ground tracking offset feature Notes The 10" x 5" coil is not rated as waterproof *Notes on Technical Specifications - Detailed notes about the specifications listed in this chart.
 -
Best Detecting And Prospecting Forum On The Internet
Steve Herschbach replied to Norm S's topic in Meet & Greet
You are too kind Norm - thank you. Not the best but in a few years who knows. The website lets me combine several interests under one roof and is a passion project for sure. You guys are not seeing but 1% of what has been going on behind the scenes the last couple months. For those with an interest in such things here is what’s going on. This started as your basic html website with the forum tacked on in a subfolder. No worries but then Invision started dramatically adding to the forum software capability, with the intent that it drive an entire website. The problem was my installing the forum software in a subfolder. That was common at the time just to run a forum, but for it to drive the whole website efficiently I needed to move it to the root or home folder. That turned into a huge undertaking due to the sheer size and number of files involved. After one aborted attempt I finally got that part accomplished. The last few weeks I have been copying all those old html files into the forum side of things. I am about half done with that part of the project, should get wrapped over the next week or two. Why all this effort? If you look at this page you are on, it is driven by the forum software. It automatically adjusts to any device and any screen size - it’s “mobile friendly”. Now here is an old html page. It does ok but when you go to a phone screen all that happens is everything gets really small. Not mobile friendly, and any change I make tends to break it. Right now the mobile renditions are not “locking on” properly due to a change I made some time ago. I started trying to fix it, then realized I was wasting effort better put to eliminating the html pages entirely. Once I get all the old pages copied over, the whole website will be mobile friendly, and that will boost the Google results. The next step is the whole site will be upgraded and converted to https secure communications protocol. It’s not really needed per se but Google now insists any site that has log in and password structure run off https or get downgraded search results. Since everything will eventually be in the forum database, the search function will be more efficient at finding things. Currently I was jumping through hoops trying to get the html pages to appear in searches done using the forum search function. With those steps in place, I can then do a couple things to boost website performance for faster page and image delivery, snappier performance overall. Then, once all that gets done, I can actually forge ahead adding more information and capabilities to the website! Right now it’s more about shuffling everything around to get more efficiency going forward. Suffice it to say I would not be going to all this effort if I did not have plans for the future. Not the best site now perhaps but if I get my way someday that will be an undisputed fact. Thank you everyone for your interest and participation! New Steve's Reviews Index (work in progress) New Website Home Page New Meet & Greet Forum New Updated Steve's Mining Journal Index New Updated Steve's Guides Index -
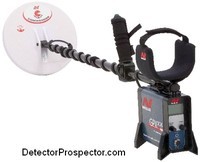 The secret to the Minelab GPX series is thoroughly understanding the timings and when to use each one. Timings are variations of the basic pulse induction technology at work in the GPX series that gives you far more flexibility than exists in other pulse induction detectors. Unfortunately this extra flexibility also adds complexity, and so it is not unusual that some people may not be using the optimum settings in many cases. It is very important when investing in a Minelab GPX detector to take the time to read the manuals and study until you fully understand what the settings do and how to adjust the detector for the best performance. Otherwise you will not be getting all the potential out of your investment. The chart below shows the timings and what GPX models they are available on along with a general description. The descriptions are from the owners manuals that are available by download at the bottom of the page. In general you should always use timings as near the top of the chart as possible, with the exception of the Salt settings. Those are for alkali flat and salt water beach areas only. Using timings designed for more mineralization than is actually required may result in less depth on desired targets. Imagine the timings as another sort of ground balance setting. Low mineral settings are more powerful than high mineral settings and should be used whenever possible. Some confusion is the result of the timing names. Some people assume the Fine Gold timing is best for fine gold. This does make a sort of sense, but the fact is Fine Gold is just better than other high mineralization timings on smaller gold. In milder ground Sensitive Extra will obtain better results on small shallow gold. It is also very important to know that some timings work better with one coil type or the other. Minelab GPX Timings Chart Little or No Mineralization Coin/Relic (GPX 4800, 5000 ONLY) Coin/Relic is for use in lightly mineralized soils including many beaches and loamy soils. It offers maximum detection depth on a range of target sizes, significantly greater than any other timings. However, if the ground is any more than lightly mineralized, the detector may not ground balance properly. On ocean beaches containing significant quantities of black sand, better results may be had by using Normal or Salt settings. Mild Mineralization Sharp (GPX 4500, 4800, 5000) Sharp is similar to Normal but creates a more powerful detection field. It is capable of an improvement in depth, but is more susceptible to interference and will increase the severity of false signals in difficult grounds. This timing is best used in quiet conditions and can work well in combination with Deep Search Mode with a reduced Rx Gain setting. Sharp is an excellent tool for pinpointing faint signals due to the very "sharp" signal response. Sharp will work best with DD coils in most gold field locations. Medium Low Mineralization Sensitive Extra (GPX 4000, 4500, 4800, 5000) This timing may increase the signal from certain hot rocks near the surface, but can actually help smooth out the Threshold in certain ground types, particularly with Double-D coils. In mild ground conditions Sensitive Extra will provide the best signal response on a small, deep target. Medium Mineralization Normal (GPX 4000, 4500, 4800, 5000) Normal gives you the best performance on a wide range of soil conditions, and it will provide the best depth on a wide variety of target sizes. It works particularly well with the supplied 11" DD search coil for general detecting. You should always use Normal in new areas where you are unsure of the soil mineralization and the depth of targets. Medium High Mineralization Salt Coarse (GPX 4000, 4500, 4800) The effect of alkaline salt mineralization is vastly different to the effect of ironstone and mineralized clays. Normal should be tried first in these areas, but if the Threshold is too unstable then better performance will be obtained in Salt-Coarse. Using the Salt-Coarse timing may result in a loss in signal response to smaller targets. However, the response on larger items remains relatively unaffected and ground noise is usually minimized. Medium High Mineralization Salt/Gold (GPX 5000 ONLY) Provides the best signal response on small to large gold in salt saturated and mineralized ground conditions. It should work well on dry inland salt lakes, high salt concentrated goldfields, and mineralized saltwater beaches. Extremely salt saturated soils may still need to be searched with the coil switch in Cancel (using a Double D coil). High Mineralization Fine Gold (GPX 5000 ONLY) Fine Gold is sensitive to smaller targets in highly mineralized ground. It provides a sharper signal on small gold compared to Enhance, and improves the detectability of rough/flaky gold and specimens, while ignoring most hot rock signals and false ground noises. Shallow, highly mineralized ground where gold has been found previously should be re-examined with Fine Gold, and best results will be had by using the optional 8” and 11” Commander Monoloop coils. Note: Sensitive Extra will provide superior results on small gold in milder ground. Very High Mineralization Enhance (GPX 4500, 4800, Improved in GPX 5000) Runs quietly in most heavily mineralized, variable and "hot rock" infested grounds using a monoloop coil. It is more sensitive and detects deeper than Sensitive Smooth but can be slightly more affected by severe ground mineralization. Severe Mineralization Sensitive Smooth (GPX 4000, 4500, 5000) Sensitive Smooth is optimized for an improved response on smaller, shallow nuggets in severe soils. There is a loss of depth on bigger targets; so you should not use this setting when seeking out large, deep nuggets. Sensitive Smooth is best suited for use with monoloop coils in difficult soils. It eliminates most false signals from hot rocks, and ground mineralization, whilst retaining excellent sensitivity to small targets. The example below shows three common timings and where they should be used. It also highlights why using the wrong timing for the conditions can result in missed targets. Minelab Mineralization and Timing Example The following chart illustrates the procedure for finding the correct timing for each situation. In general, always start with the Normal timing. If the detector is stable and quiet, try timings on the left - Sensitive Extra, Sharp, or in rare cases, Coin/Relic. If ground noise or hot rocks present problems in Normal, then try timings on the right - Fine Gold, Enhance, or Sensitive Smooth. Salt settings should generally only be used on alkali ground (salt flats) or salt water beaches, but may have applications in other ground. The goal is always to find the most powerful setting that allows for stable operation. Each timing can be adjusted within certain parameters, primarily through the use of the Gain and Stabilizer settings. Adjusting for a lower Gain, for example, may be preferable to going to a less powerful timing. Minelab GPX Timing Selection Chart - Click on image for larger version Finally, each timing may work best with a certain type of coil (DD or Mono) and the timings have varying level of resistance to Electro Magnetic Interference (EMI). The matrix below attempts to show which timings offers which benefits and strengths/weaknesses. Minelab Timing Coil EMI Matrix - Click on image for larger version The simple chart below can be printed out and taped or glued on your detector shaft as a reminder in the field as to which timing may be best. Click on the image to download a large version. Minelab Timing Decal - Click on image for larger version Minelab GPX 4800/5000 Instruction Manual Download Here Minelab GPX Series Quick Start Guide Download Here Beginner's Guide to Tuning the Minelab GPX 5000 Minelab GPX 4800/5000 Product Brochure Download Here Minelab Commander Coil Brochure Download Here Minelab GPX 4500 Instruction Manual Download Here Minelab GPX 4000 Instruction Manual Download Here ~ Steve Herschbach Copyright © 2011 Herschbach Enterprises
 -
Waterproof Headphones Ukraine
Steve Herschbach replied to Treasure_Adventure's topic in Minelab Equinox Forum
Check out tsnamiscotts post just a few posts before yours. -
 I've been a longtime fan of the White's Goldmaster series, but I was really annoyed when White's put the machine into the XLT packaging. I like to keep weight off my arm, but more importantly I work some very steep hills where putting a machine down can be a problem. The unit will simply roll to the bottom of the hill. I also work in muddy conditions a lot and so I do not want to set my detector down in the soup. A little history. Prior to 1990 the White's Goldmaster was a simple T/R detector housed in a blue aluminum box. Those old obsolete models should be avoided by all but collectors because they could not ground balance. Around 1990 White's introduced the Goldmaster II, which featured a new black paint scheme. These black box models since 1990 are all quite capable 50 kHz nugget hunting detectors. The Goldmaster II used a S rod design that allowed the control box to be mounted in several locations on the rod, plus removed completely and either chest or hip mounted. This design was popular with prospectors. I still remember clearly the huge fuss when White's introduced the Goldmaster 4/B around 1998 and put it in the same one piece control box as was used in White's coin detecting models. This was no doubt partly a cost saving measure but also to accommodate a much larger circuit board as the Goldmaster series made the move from analog to digital. The Goldmaster 4/B was an hybrid analog/digital design that preceded the microprocessor based White's Goldmaster GMT. The dealer network raised a fuss and Jimmy Sierra in particular was incensed by the design change. He prevailed on White's to make a run of "chest mount only" models that basically took the handle and pod assembly and stuck it in the middle of the control box. A cumbersome design if there ever was one. It was also basically kept secret from anyone but Jimmy's dealers and so the chest mount only model is a rare Goldmaster indeed. This move coincided with Fisher introducing the Gold Bug 2, which at 71 kHz was hotter than the 50 kHz Goldmasters, plus had the hip and chest mount options with an even more compact design than the Goldmasters. Goldmaster sales plummeted and the Gold Bug 2 took over. The very unpopular Goldmaster 4/B was replaced by the 48 kHz GMT, a totally new microprocessor design. White's Goldmaster 3 (GM3) - last analog model, last with removeable control box Starting about 1990 the sequence was: White's Goldmaster II (1990) - new 50 kHz model, on S rod with removeable control box. White's Goldmaster V/SAT (1994) - added Variable Self Adjusting Threshold (V/SAT) control, on S rod with removeable control box. White's Goldmaster 3 (1996) - Added frequency offset, boost options, three piece rod standard (optional in previous two piece models), on S rod with removeable control box. New DD coil replaces concentric coil used on previous models. Widely considered the best analog Goldmaster. White's Goldmaster 4/B (1998) - Added meter on a pod for iron discrimination, non-removable coin detecting type box design. White's GMT (2000) - Completely new 48 kHz microprocessor model, non-removable coin detecting type box design. White's Goldmaster 4/B with the new "coin detecting" control box design I really wanted a new White's GMT. The automatic ground balance and LCD iron readout are very good. So I thought about what I might do to get what I wanted. A GMT to chest or hip mount. White's makes a chest mount version, but it has the darn handle/pod sticking out the front where it blocks vision and is prone to getting hit while digging. And for hip mounting it bumps into things. White's Jimmy Sierra GMT chest mount I went ahead and bought the chest mount version, but the following conversion can be applied to the standard model as well. I went with the Jimmy Sierra special chest mount model as a starting place since the rod assembly is already a separate item. 2011 Update: White's does not make their chest mount version any longer. First step... take it apart! Here is the unit in parts, with a close up of the main board: White's GMT components disassembled White's GMT circuit board White's GMT pod contents The main board is clearly marked with what plugs where. Nice for reassembly. I took the pod apart, and ground the touchpad mounting down to just the pad itself as it was glued on too well to pry off. The LCD plugs into a mini circuit board in the pod, along with the trigger switch. Then a long cable runs through the handle and to a plug in the center of the main board. I wanted to chest mount the unit with the coil cable and headphones running out the right side. This meant the LCD would have to be mounted on one side. That particular side does not have enough room to flush mount the LCD into the case, so I decided to cut a hole in that side and mount the LCD on the outside of the case. This meant the mini circuit board would have to be mounted inside the case lid where the speaker resides. I am a headphones guy anyway, so out came the speaker. You could flush mount the LCD on the other side and retain the speaker, but then the coil cable will exit on the left. Good for lefties, however! You might even be able to do it the way I did and keep the speaker, but my fingers are not the most adept, and I figured I could use the extra work room. Mounting the pod circuit board The picture above shows the positioning of the mini circuit board inside the lid. The white ribbon cable runs out to the LCD. The green ribbon cable runs out through a hole I cut in the lid to the touchpad. I glued the touchpad on the outside of the case. More on that in a minute. The wires run to the new trigger switch location. I mounted the board on short spacer posts. Mounting the touchpad and LCD display The picture above shows you where we are heading. The LCD is mounted outside the case. The LCD was mounted using the hardware that originally mounted it to the mini circuit board. A D-Ring has been repositioned to the left. The touchpad is glued down partially covering the speaker holes. The rectangular hole in the case was left after removing the handle. You can see the new trigger switch location. I'm going to replace this switch with one of the rubber capped types. The touchpad covered the battery check/audio boost switch, so it was relocated to a position below the trigger switch. I had to lengthen the wires to do this, the only soldering involved. As I look down at the LCD, I can easily operate the switches and pad with my left hand. The switches are set so I can push down on them to activate the battery check or iron id accumulate mode. Relocated touchpad I cut an aluminum faceplate to cover all the leftover holes and glued it in place. Painted it all black so it would look halfway ok. If I had it to do over again, I would make the faceplate at the same time as I was mounting the touchpad. It was hard to make the faceplate after the fact, and I had to dismount and remount the mini circuit board to drill the bolts mounting it through the faceplate. Better to glue down the faceplate and pad as a unit, THEN drill the holes for mounting the mini circuit board. Relocated LCD display This turned out to be the hardest part. I originally figured I would be able to find some kind of clear plastic box to glue over the LCD to protect it. I cruised aisles in Lowes, Kmart, and Fred Meyer for hours looking for any kind of little box I could cut down and use. Finally I decided to make one. I got a piece of oak trim about 3/8" thick and made a bezel. I found a piece of thin plastic and made a window for it, and glued the window onto the bezel. I cut the original LCD stick-on window (the one that says "% probability of iron") down and glued it in place over my window. Finally, I glued the whole assembly over the LCD. Imagine my surprise when I tested it out after the glue had set up and the LCD was missing half its pixels! I was bummed. I took the case apart and wiggled everything. The unit was working fine, just the LCD was acting funny. Finally I pried my carefully placed cover off and looked the LCD over. No obvious problems. It was still just barely readable, however, so I figured the heck with it, and glued the cover back on. After it set up, I tried it again, and now the LCD was almost totally blank! I was using a glue called E6000 that bonds most anything. I decided that somehow the fumes from the glue had somehow "poisoned" the LCD. So I put a lamp on the unit and blew air in it periodically. And behold, the LCD slowly came back to life! Whew!! I cruised the net looking for info on this weird problem, but never did find anything. GMT conversion chest or hip mount So here is the final product. Actually, as you can see, I took these before I did the trim work. The chest mount is just for show. I need to rig up a full harness. But I'll tell you what... I really liked it. Everything right there where I need it, but well out of harms way. The alternative hip mount setup is better than the original by far, but I liked the chest mount so much I will only use it like this where there is no trash to deal with. I'm still looking for that spot! So there you go. This is not for the faint of heart. It was the first time I had done a mod this extensive, and it was a somewhat scary feeling to be tearing a brand new detector apart. Kiss that warranty goodbye! But now I have a unit I really like that will work well on steep slopes and other odd spots. Not to mention give my arm a break. The GMT is very well balanced, but every ounce counts when you are at it for 10 or 12 hours at a time. A final note. You could leave the pod on the handle and route a longer cable from it up the coil cable and to the control box. But I wanted the pod off the handle entirely, and adding more cables seems like a way to ask for more problems down the road. I know another guy that has now done this mod after seeing mine, and a third is at work on his. Maybe some people going to all this effort will tell White's that their old box design was better. Postscript: After the above post was made I took my new White's GMT chest mount to Ganes Creek, Alaska for a real world nugget hunt. The unit worked as I hoped and then some. Here is a picture of it and the 1.89 ounce gold nugget it found for me! 1.89 Oz nugget found with White's GMT chest mount conversion ~ Steve Herschbach Copyright © 2002 Herschbach Enterprises
 -
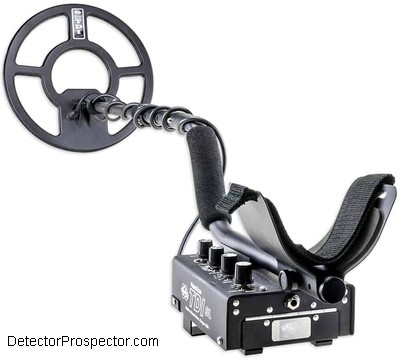 From original forum post 5/27/2008 updated 2/14/2010, 1/13/2013 and 1/3/2014 The White’s PulseScan TDI is a ground balancing pulse induction (GBPI) metal detector and as a rule these detectors are considered “dig-it-all” type detectors. The TDI, however, has a number of manual controls that can be adjusted to allow for a degree of discrimination not normally found in PI units. Most normal pulse induction (PI) detectors have a monotone audio response on targets. In other words, the soft threshold tone simply increases in volume in relation to the target strength. All target sound more or less the same, the only difference being a stringer or weaker audio response. This makes things real simple - you just dig everything. Ground balancing pulse induction, or GBPI detectors, employ a method of ground rejection that in current models has an audio side effect. Tones are produced in relation to the current ground balance setting. In the case of the Garrett and Minelab models, a dual tone is produced by a single target. Either a high-low tone or a low-high tone, depending on the target and how it relates to the current ground balance setting. The White's TDI has a simpler response on a single target, either a high tone, or a low tone. The targets and the tones they produce fall into two broad categories. In general one category has low conductive items, like aluminum, US nickels, most gold, and small ferrous trash. On the TDI these items produce a high tone. The other category has highly conductive items including clad, copper, and silver coins, silver rings, some large gold rings and very large gold nuggets, and large ferrous items. The ground balance varies depending on the ground itself but usually is around the same as zinc pennies, and therefore these may read in either category. Other settings, such as the pulse delay on the TDI, can also cause items to vary. The following photo shows how the two target categories break down digging around school yard playground equipment. Coins found with GBPI detector Left side high tone targets, right side low tone targets As you can see in the photo the vast majority of targets produce a high tone response. What is lacking at this location is large nails. Large nails will give a low tone response and so would end up with the coins on the right. Still, by digging low tones only, the vast majority of trash targets can be passed up and excellent results had on deep copper and silver coins. The following photo shows what might result digging low tones only in a park setting. Coins and nails detected with PI Low tone only targets The icing on the cake with the TDI is the Target Conductivity switch. Normally you would have to listen to all the tones the detector produces, the vast majority of them being high tone, to pick out the much rarer low tones that would possibly indicate a deep coin. The Target Conductivity switch allows one response or the other to be suppressed, and by selecting for high conductive low tones only, the TDI operates very quietly in very trashy environments. This value of this feature cannot be overstated, and it makes the TDI a secret weapon for pulling coins out of extremely mineralized ground where VLF detectors would fail. The TDI can go even farther, because unlike the Garrett and Minelab models it features a manual ground balance. This means that in milder ground conditions the ground balance control can be purposefully misadjusted to directly affect target tone responses. This method was passed on to through comment from Reg Sniff and George Kinsey so credit goes to them for turning me on to this. The method involves purposefully misadjusting certain controls to get results and I’m not saying these are the best settings per se. I would encourage more experimentation to see what you can coax from the Whites TDI as I have not seen a detector so prone to experimentation and yet with relatively few controls. This is not a VLF detector and so lessons learned with VLF detectors often do not apply, and in fact could get in the way of understanding the TDI. Have an open mind and experiment. I highly recommend the use of a PI pinpointer with the Whites TDI. You need some serious pinpointing power. The DetectorPro Uniprobe units are very good, but you may need to switch the TDI off when employing the Uniprobe pinpointer if the TDI interferes with the Uniprobe. Coiltek makes a 1” probe with switch box that can use the TDI itself as the pinpointer as another option, along with the more common self-contained pinpointers like the Garrett Pro-Pointer. With the unit powered off, set the TDI Gain at 12, Pulse Delay at 10uS, Ground Balance knob at 1.5, GEB switch On, Target Conductivity On, and then turn the unit Power On. Set for a faint Threshold. If you are getting any interference (uneven threshold, warbles, and funny noises) slowly run the Frequency knob through its range seeking the quietest setting. Then flip the Target Conductivity switch to High. The threshold should go extremely smooth. If you get spikes or noises breaking through the normally rock solid threshold you may need to reduce the Gain. But usually at this point the threshold will be so smooth and solid you will find you can reduce it so low as to be barely heard. Now try waving various steel items and coins a few inches under the coil and note the responses. You will see that most steel and iron, aluminum, and bottle caps will not signal. Beyond that, there are three basic responses. First, hold a coin 6-8 inches from the coil. Note the soft, sweet tone, woo, woo. Listen to it over and over, as this is your deep coin signal. Now run a coin or larger steel item within 1 inch of the coil. You will get an overload signal, a strong baaaaawo, baaaaawo. This is the shallow item overload signal. If you are trying a steel or iron item, increase the distance from the coil. Note that at a certain distance it abruptly cuts off. Now try a coin and slowly increase the distance from the coil. It will gradually turn into that sweet coin tone. The way you tell shallow coins from shallow junk is to slowly raise the coil. If the target just cuts off – junk. If it slowly mellows out – dig! OK, let’s go detecting. What follows is the results of an outing using these settings. Listen for that sweet, deep coin sound. Those are the oldies and you main goal. In some hunted out parks this may be about the only signal you get as there are no shallow targets to generate to overload tone. Just go dig coins. Walk around each target and insure it gives a good, clean response from all angles. Be sure and use proper digging practices to leave the ground undamaged. Please protect our hobby. In other places you will get lots of overload signals. If all you care about is deep coins, ignore them. If you want, however, just raise the coil while sweeping, and if the signal cuts off, skip it. If it fades to the deep coin tone, use your pinpointer and there should be a coin within an inch or two of the surface you can just pop out. The Target Conductivity switch can be set too All to investigate questionable targets and to size targets. A pipe buried horizontally will have a high tone its entire length but a low tone at each end. When you walk around these in the High setting you will only hear the low tone and think it is a coin, but they tend to fade in one direction as you walk around them. If the target seems iffy, switch to All and see if you are picking up the end of an elongated iron or steel item. This false positive can occur well off the end of the pipe and so if you dig and nothing is there you may be off the end of a pipe or rebar. This is where a top notch pinpointer comes in handy. The Pulse Delay seems to be most critical, and if you set in much higher than 10uS the ability to ignore iron is lost. But when it is working right the iron rejection is amazing. Try walking up to a garbage can or other large steel item. You will get no signal until you get close enough to overload the unit. Not only does the unit ignore iron, but nearly all aluminum and bottle caps. The only ferrous target I found was a very rusted bottle opener buried vertically in the ground. If flat it is rejected but the TDI does pick it up if held vertically. I never did dig a bottle cap. I did get two aluminum screw tops that gave the shallow overload and that then sounded like shallow coin when the coil was raised. I got one older aluminum screw cap that was not deep or shallow so I checked it out. I also got positives on two copper wires, two chunks of broken heavy aluminum, an aluminum grommet, and a copper screw cap. Coins found with White's TDI Oh yeah, I found 39 coins. Including three silver dimes and three wheaties so they were not all recent drops. That is 39 coins to 10 trash targets using a PI detector in a turf setting. That is a four to one ratio, and when hunting the deepest targets no worse than a VLF. Better yet, the targets that fooled me were not exactly bad targets by deep detecting standards. There was a time I would have said this was impossible with a pulse induction metal detector. I really did feel most of the junk was iffy but I wanted to check as I am learning. Coins sound oh so sweet and when I’m 100% sure it is a coin it almost always is. What else to say? The GB control is in effect the discrimination control. It is all about setting the Pulse Delay, the GB control, and the Target Conductivity switch to get the best balance of depth and iron rejection. The iron rejection tends to be best at low GB settings, and in high mineral settings best depth is at high GB control settings. If you have no clue what I’m trying to say, you are not ready for the Whites Pulsescan TDI. In high mineral conditions you are trading max depth for max iron rejection. You have to set the unit for the best balance for your conditions. But if you get it right, hold on. This detector is like no PI you've ever used. I have been able to run the Gain very high. I’m sure not everyone can based on where they are. So experiment, experiment, experiment! What about coils? Things might change depending on the coil you use. To summarize the TDI can find coins using two different methods. The simplest is to just run the detector tuned for best depth and dig low tones only. In high mineral ground this will produce coins VLF detectors have been unable to reach while passing on most common trash. The second method makes the TDI into a very effective coin detector, but the misadjustment of the ground balance ends up giving up the extra depth attained with the first method. Still, it does something no PI has ever been able to do before, and that is to find coins with nearly as much efficiency as a VLF detector. I do not want to give the impression I am pushing the TDI as a coin detector. If you want a detector strictly for coin detecting I suggest you get one to do just that. The real point of this article is to highlight that the TDI is a unique detector prone to experimentation. It is a machine for more serious detectorists willing to think outside the box. For those willing to dig some junk and having locations that favor the method, digging low tone targets will find deep coins missed by the best VLF detectors. The main use for the TDI is still nugget, beach, and relic detecting, make no mistake about that. But if you have a TDI , it can pay to experiment with it as there is really nothing else quite like it on the market. Thanks to Eric Foster and White's Electronics. White's TDI Information Page ~ Steve Herschbach Copyright © 2008 Herschbach Enterprises
 -
Equinox Waterproof Headphones From Hungary
Steve Herschbach replied to Cabo Chris's topic in Minelab Equinox Forum
Well, I am sorry to hear that. The Minelab set is the safe bet but it also sets a benchmark to beat, and when push comes to shove it seems it's hard to find third parties doing any better. -
 Polishing gives rocks a permanent "wet" look. Choose material that looks good when wetted. Rocks that are unimpressive when previewed wet will not look any better once polished. As they say in the computer world, "garbage-in, garbage-out". Beach or gravel bar stones are good beginners material. These stones are already rounded and usually represent relatively hard rocks. Try to avoid rocks with deep pits or crevices. Rocks with very deep pits and crevices should normally be split along the depression. Extremely rough material can also be pre-shaped on a grinding wheel. Avoid mixing hard and soft stones together. This is very important when tumbling gemstones. Some stones, like obsidian, should be tumbled only with other obsidian. Obsidian also is prone to chipping, and so may need to be cushioned with a filler like plastic pellets or walnut shells. A tumbler should be 2/3 to 3/4 full to get proper tumbling action. Buy a tumbler that will match the amount of material you are likely to have available to tumble, or use filler rock to get to the proper volume. The initial tumbling stage with coarse grit is where the rock is smoothed to its final form. Subsequent steps simply polish the surface of the stone. Keep tumbling stones with coarse grit until they reach the desired degree of smoothness. This may add extra weeks to the tumbling process, particularly when starting with rough, broken material. Harder material will also take extra time. The tumbler should be cleaned of ground waste periodically. Extra coarse grit should be added as it is wore out. Continue this process until the rocks are in the final form you desire. I like to run my stones until they are perfectly smooth. Then proceed to the fine grit and polish stages. Small rock tumbler with accessory items I use two tumblers; a 12 lb. and a 3 lb. unit. The 12-pound tumbler runs exclusively with coarse grit. I periodically clean the barrel and remove stones that have reached my desired goal. I am looking for perfect smoothness with absolutely no pitting. I remove stones that have reached this state and put them in the 3 pound barrel. I add extra rock to the 12-pound unit to make us for loss, and add extra grit as needed. I usually buy my coarse grit in 5 pound containers, and use much more of it than the fine grit or polish. When I get enough perfect stones to fill the 3-pound tumbler 2/3 to 3/4 full, I proceed to the fine grit and polish stages with these stones separately. When proceeding to the polish stage, it is extremely important that every single particle of grit be removed from the material. This is relatively easy with perfectly smoothed stones, but material that has pitting or crevices should be run through repeated short tumble and rinse cycles to dislodge any remaining grit. Clean the barrel carefully for the same reason. Even a few particles of grit making it into your tumbler during the polish stage will prevent a good polish. My 12-pound tumbler will run for many weeks, sometimes months, with stones only removed when they reach the desired state of "perfection". Starting with hammer broken, hard material such as agate can cause this process to be a long one, requiring much patience. Pre-rounding with a grinder can speed the process considerably. The final run with the 3-pound tumbler, however, only takes 1-2 weeks. My final product consists of beautifully polished stones with a glass smooth finish. Have fun! Cleaning Coins With A Rock Tumbler ~ Steve Herschbach Copyright © 2000 Herschbach Enterprises