
Steve Herschbach
-
Posts
19,773 -
Joined
Content Type
Forums
Detector Prospector Home
Detector Database
Downloads
Everything posted by Steve Herschbach
-
 The Minelab SDC 2300 metal detector was released in 2014 and is still in production. The SDC 2300 is making news due to the compact folding design waterproof to ten feet, and its extreme sensitivity to small gold in very mineralized ground. The SDC 2300 is also quite simple to operate for such a powerful detector, making it a good choice for those not wanting to invest lots of time into becoming proficient with harder to learn detectors. The animation below best illustrates the standout feature of the Minelab SDC 2300 - its ability to quickly fold into a compact package. The Minelab SDC 2300 is extremely compact, folding down to only 15.7 inches (40.0 cm) by 8.5 inches (21.6 cm) for stowing or packing. It is waterproof to 10 feet (3 meters) and is very rugged, the housing being originally designed to military standards. It is assembly free, needing only to be folded out to full operating length from the compact, stowed position. The Minelab SDC 2300 uses high performance Multi Period Fast (MPF) technology designed to optimize the performance on small gold nuggets and specimen gold. It offers both and audio and visual target response via waterproof speaker, headphones (included), and LED indicator. The SDC 2300 is designed to be easy to use, with an intuitive icon user interface. It operates on only four easily obtained C cell batteries (both alkaline and NiMH rechargeables included) that have no issues with shipping or air travel. The SDC 2300 weighs 5.1 pounds excluding batteries and approximately 5.7 lbs with four NiMH rechargeable C cell batteries. Minelab SDC 2300 folding and unfolding animation The Minelab SDC 2300 is fully waterproof and submersible to ten feet but the included headphones must be kept dry, only the cord can be submerged. To get the full use out of the ability to submerge the detector optional waterproof headphones are available. The four C cell batteries are inserted into the end of the SDC 2300 via a waterproof cap. The handle mounted LED control panel on the Minelab SDC 2300 is one of the more intriguing features. It is quite small, measuring only about 2" x 3" in size. The LED Indicators show target signal strength, threshold level and battery status. The Audio Control touchpad adjusts the threshold level and low/high audio tone to suit user preference. The Noise Cancel touchpad automatically reduces external electrical interference. Nine LEDs indicate detection signal strength, battery status and threshold level. There is also one Low Battery warning LED. Just behind the control panel is a thumb operated button on top of the handle that engages a quick automatic ground balance sequence. When released the SDC 2300 goes into a continuous slow automatic ground tracking mode. Minelab SDC 2300 waterproof pulse induction metal detector A recessed control panel on the left side of the SDC 2300 has two rotary switches - the on/off Power Switch, and a Detecting Mode/Sensitivity Control. Both these twist knobs must be lifted and twisted to adjust, making it near impossible for them to be accidently knocked out of position during normal operation. There are two operating modes, Normal Mode, and Salt Mode. The Normal Mode has five sensitivity settings and the Salt Mode has three sensitivity settings. Normal Mode is for most gold prospecting situations and the default recommended sensitivity setting of 2 is highlighted in green. Areas with low mineralization may allow higher sensitivity settings. Extreme mineralization or electrical interference may require lowering the sensitivity setting. Salt Mode is for salt flats of salt water beaches. Three sensitivity settings are offered. Only use Salt Mode when Normal Mode will not suffice as it has lower sensitivity to the smallest gold targets. The Salt Mode may also be a setting of last resort in mineralized areas where the lowest Normal Mode setting still does not provide stable operation. The Minelab SDC 2300 employs a round 8" mono coil that is hardwired to the unit. This allows the coil to be optimized for the best performance possible and eliminates a possible leakage point in the system. Ground balancing is almost a non-issue with the SDC 2300. In many areas the SDC 2300 simply ignores the ground right out of the box and there is no ground balance procedure. In more mineralized ground, holding the ground balance button causes a quick ground balance to occur. The SDC 2300 is always automatically ground tracking at a medium-slow rate to maintain the best possible balance, so it is impossible for a novice operator to mess it up. I had no issues with it tracking out targets. I did encounter hot rocks the SDC would not balance out, the very same types my GPX 5000 would not balance out. Overall the SDC handles ground as well if not better than the GPX because it is running a variation of the fine gold timing and the small coil "sees" less ground than the stock coil on the GPX 5000 therefore there is less ground for it to balance out. ads by Amazon... I can get my GPX 5000 to make a threshold that is perfect with no waver. The SDC 2300 has a less stable threshold more reminiscent of other SD series detectors at higher sensitivity settings. It is pretty stable at the stock "2" sensitivity setting but still not as solid as my GPX. The SDC 2300 is quite a bit more EMI resistant than the GPX 5000 and plays well with other detectors as long as reasonable spacing is kept. When my brother fired up the SD2200v2 I could get within about 50 feet of him unless he ran a larger coil, then I needed a bit more space. The bottom line is the SDC 2300 is perhaps the most user friendly nugget detector you can buy. Anyone can run it. It really is normally a turn on and go detector. The only option normally to consider is the sensitivity setting, which gives a balance between a bit more depth but more threshold noise. We were in mild ground and I could run it maxed out but that did make for a less stable threshold. Once you find the sensitivity setting you like in an area you just leave it alone; the ground balance setting is retained when the detector is turned off. So for me operating the SDC 2300 boiled down to turning it on or turning it off. Batteries lasted a good seven hours plus. It seemed just right for most days, never quite running dead by the end if the day except for rare occasions. If I have to complain about the unit I could complain about the armrest folding up every time I pull my arm out and the lack of volume control. The headphones I received were wired on the left and the cord runs across your chest. You either wear the headphones backwards, or in my case run the cord behind my back. I need a headphone adapter to run optional phones with volume controls. But these really are minor niggles. The waterproof, compact folding design is extremely compelling and easily offsets these minor complaints. The SDC 2300 except for the cost is a perfect detector for many more casual nugget hunters who would never, ever learn what all the settings on a GPX 5000 do. It is far easier to operate in bad ground than a VLF. I can hand one to anybody, tell them to turn it on, keep the coil on the ground, and dig everything that goes beep. If it were not for the high price I would flat out just tell everyone to go buy one. It is practically impossible to be unhappy with the SDC 2300. ~ Steve Herschbach Copyright © 2015 Herschbach Enterprises 5 Grams gold found with SDC 2300 - smallest nugget in lower right only 0.045 grams! Official Minelab SDC 2300 Page Minelab SDC 2300 Instruction Manual Minelab SDC 2300 Quick Start Guide Minelab SDC 2300 Color Brochure SDC 2300 & MPF Technology Explained Forum Threads Tagged "minelab sdc 2300" Minelab Metal Detectors Forum Minelab SDC 2300 Technical Specifications* Internet Price $3299 Transmit Frequency Multi-Period Pulse Induction Autotune Mode(s) Slow Motion Ground Rejection Automatic Ground Tracking Soil Adjust Normal and Salt Modes Discrimination No Volume Control No Threshold Control Yes Tone Adjust Yes, High or Low Tone Options Audio Boost No Frequency Offset Automatic Pinpoint Mode No Audio Output Waterproof Speaker or Headphones Hip Mount Shaft Mount Only Standard Coil(s) 8" round Mono Optional Search Coils No Battery 4 C-Cells (Alkaline and NiMH Supplied) Operating Time Approx. 7 Hours with NiMH Batteries Weight 5.7 lbs. with NiMH Batteries Installed Additional Technology MPF (Multi Period Fast) Waterproof to 10 feet (3 meters) Notes Ultra compact folding design derived from Minelab F3 Compact Demining Detector *Notes on Technical Specifications - Detailed notes about the specifications listed in this chart.
 -

Makro Gold Kruzer Review
Steve Herschbach replied to Steve Herschbach's topic in Nokta / Makro Metal Detectors
Link to a pdf of my review above posted on the Makro website.... https://www.makrodedektor.com/dosyalar/makro-gold-kruzer-review-herschbach.pdf -
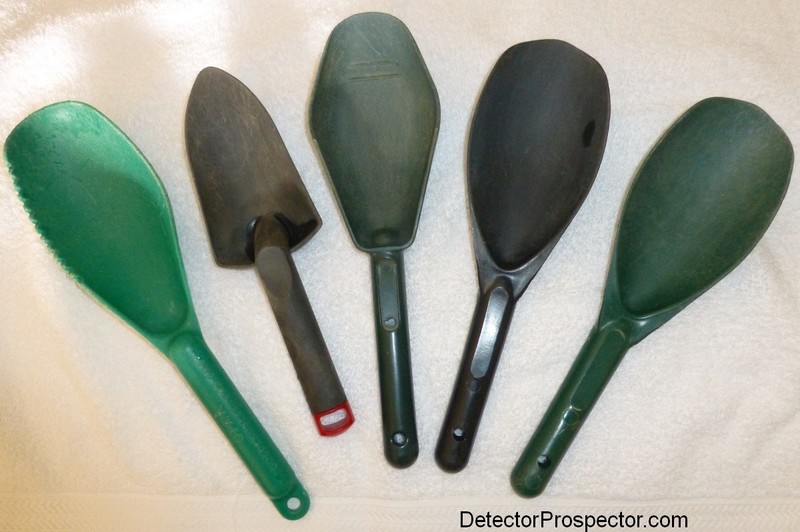
Do you use a plastic scoop or cup to separate gold nuggets from that pile of dirt while metal detecting? Good use of a plastic scoop is critical as these tiny nuggets can be very hard to find. I use the "divide and conquer" method. Scoop up the material that has the nugget in it. Give the scoop a good shake to get the nugget into the bottom of the scoop. If you have a couple inches of dirt in the scoop and the nugget is on top, you may not be able to detect it when you run the scoop over the coil. I prefer to do this with the bottom of the coil turned upright so I can get the scoop right over that hot spot in the middle of the coil. If I confirm the nugget is in the scoop, I dump half in my hand and check again. If it is still in the scoop, I place the material in my hand on the ground where I can check it again later. If the scoop no longer beeps, the nugget is in my hand, in which case I discard the material in the scoop. I just split and check until I'm down to a bit of material, which in the case of these little mud covered nuggets sometimes is just a few little pieces of dirt which have to be check one at a time to find which one has gold in it. Once you get good at this it goes real fast, but care must be taken to not get a nugget in the scoop only to discard it. That is why you put all the dirt in a place where you can check it again when you are done. Sometimes you can get more than one nugget in the scoop at once. Another option is to simply put all targets in a pan and pan it all later. But since I'm following the gold I want to know just where each nugget came from so I prefer to locate them as I find them.
-
Makro Gold Kruzer: The Experience
Steve Herschbach replied to californiagold's topic in Nokta / Makro Metal Detectors
The scoop thing did not come about due to PI detectors. It is a direct result of the use of hot VLF detectors in the U.S. The early guys were using little plastic cups. Jimmy Sierra and the Goldmasters is when it seems it really got going. Virtually everyone I know uses a scoop and it is a best selling item at metal detector shops. Time for a poll! -
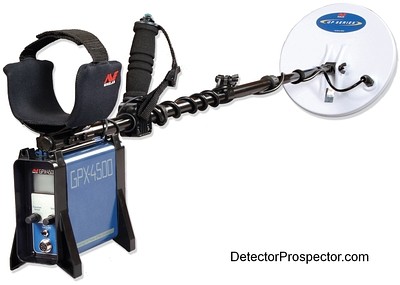 The Minelab GPX 4500 detector was released in the spring of 2008, and discontinued in 2020. The Minelab series of pulse induction (PI) metal detectors starting with the SD 2000 are widely acknowledged as being some of the most powerful gold nugget prospecting detectors currently available. The GPX 5000 is the latest and most refined in the series but the GPX 4500 is only just a step behind it in features and performance. See Steve's Guide to Differences of Minelab SD, GP, & GPX for details. The GPX 4500 created a page in gold rush history by being singled out as the detector of choice in Africa for some time. Many large nugget finds were made there with the new GPX 4500 and starting around 2009 demand far exceeded supply as African prospectors were willing to pay any price to get what they believed was the only detector capable of possibly making them rich. Buyers in the U.S. drove prices far over retail due to extreme demand and these units were resold in Africa for prices well exceeding $10,000 per machine. This amazing demand was almost single-handedly responsible for driving Minelab sales and stock prices to all time highs. When the GPX 4800 and GPX 5000 were introduced Minelab stopped selling the GPX 4500 in the U.S. and Australia but demand was such that it continued to be sold in Africa. Finally, in 2015 the GPX 4500 was reintroduced for sale again in those countries as an entry level pulse induction model (for Minelab) priced at less than half what the GPX 5000 sells for. This makes the GPX 4500 an exceptional value at this time. Minelab GPX 4500 Pulse Induction (PI) metal detector for gold prospecting and more I got my own GPX 4500 in 2008 and saw many others in use at my old mine at Moore Creek, Alaska. The GPX 4500 made the ground light up like it had never been hunted with many nuggets found in already detected locations. Here is my report at the time about what I observed at Moore Creek: "I have run a little pay-to-mine operation at Moore Creek for four years now. We have old tailing piles that have nuggets in them. Some piles produced quite a few nuggets, and so everyone and their brother has been over them hoping for just one more. For instance, Dean's Hill. Dean found a 6.54 oz nugget a mile below camp on a pile. Rich Lampright found I think about 6 more ounces of smaller specimens on the same pile. Anyway, well over a pound came off this one pile. Now, these piles are small hills. You might be talking 300 feet long by 100 feet wide by 40 feet tall. Big but not something a person can't cover every square inch of. There have been probably 50 people hunt Dean's Hill using everything from the SD2200 on up to the GP3500 and probably a GPX-4000 or two last summer. There are other hills with similar reputations, including Bud's Island right near camp. Over 100 people have hunted it since it is so near camp. So the guys show up this year with the GPX-4500. A determination was made almost immediately that all ground should be treated as virgin again, and sure enough nuggets started coming out of Dean's Hill and Bud's Island and other places that were well and truly "hunted out". It was simply way too many nuggets to chalk up to anything other than the GPX-4500 being able to hear nuggets previous units could not hear at Moore Creek. ads by Amazon... I attribute this to two things. Previous SD/GP units had a tendency to sound very faintly on hot rocks at Moore Creek. So you got to where you usually ignored those sounds as they were almost always rocks and listened for something just enough different to indicate a real target. It is possible with the GPX to completely and absolutely tune out those faint hot rocks, allowing whisper faint nuggets to be detected. They might not actually be deeper per se, it is just that you could not discern them before. Same difference as far as I'm concerned. Plus, with the Gain and extra timings you can crank the GPX up for some insane performance. Steve F got his biggy by running the GPX up to the point where the ground was super noisy. You'd not normally hunt that way but he was focused on one spot, and it did allow him to get an exceptionally deep target. The bottom line is I am absolutely convinced the GPX is doing stuff that could not be done before. It was too many people getting too many nuggets out of too many hard hit spots to be anything else. There is no doubt in my mind that money spent on a GPX-4500 is money well spent. Remember, though, it can't make the gold. We had a couple GPX users who simply could not seem to get over nuggets. Anyway, hopefully Rob and Glenn and Steve and other Moore Creek visitors will chime in here with some of the settings they were using at Moore Creek to help little old me out. I am headed back up to Moore Creek August 8th to prep ground for next season but plan on firing my new GPX up for the first time finally. I gave away everything I found in June so it would be nice to have at least one nugget to call my own this summer!! Any tips would be most welcome. Steve Herschbach Moore Creek Mining LLC July 25, 2008" Gold found with Minelab GPX 4500 at Moore Creek, Alaska in 2008 - largest nugget 3.5 ounces The was a period of time after the GPX 4500 was discontinued in the United States that the GPX 4800 and GPX 5000 were the only two PI models available from Minelab. Garrett introduced their new Garrett ATX at less than half the price of those detectors. It was a bargain at $2120 compared to almost $6000 for the GPX 5000. I do not know this for a fact but I believe that Garrett had something to do with the GPX 4500 being reintroduced for sale. The GPX 4500 at $2699 with two coils was close enough to the $2120 ATX with one coil, that it pretty much stopped the ATX dead in its tracks as a prospecting detector. Up until that point I had been recommending the Garrett ATX as a bang-for-the-buck alternative to the much higher priced GPX uits. Given the extra power and versatility of the GPX 4500 at the new lower price, and the GPX 4500 is now my recommendation for anyone wanting a "bang-for-the-buck" new full warranty high power PI for gold prospecting and possibly even beach or relic detecting. Official Minelab GPX 4500 Page Minelab GPX 4500 Instruction Manual Minelab GPX 4500 Product Brochure Minelab GPX 4000-5000 Timings Charts Difference Between Minelab SD, GP, and GPX Models Forum Threads Tagged "minelab gpx" Minelab Metal Detectors Forum Minelab GPX 4500 Technical Specifications* Internet Price $2699.00 Technology Ground Balancing Pulse Induction (GBPI) Frequency 1100-4500 PPS? Autotune (Motion) Mode(s) Very Slow, Slow, Medium and Fast Ground Rejection Slow, Medium, Fast Tracking, Fixed, and Off Soil Adjust Six settings (timings) - see chart below Discrimination Variable 1-10 and Off in Menu Volume Control Variable 1-20 in Menu Threshold Control One turn control Tone Adjust Variable 1-100 in Menu Audio Boost Quiet, Normal, Deep, Boost in Menu Frequency Offset Automatic Tune plus Manual 0-255 in Menu Pinpoint Mode No Audio Output 1/4" headphone socket (No speaker) Headphones supplied Hip Mount Shaft Mount Only Standard Coil 11" round DD and 11" round Mono Optional Search Coils Over 100 accessory coils available Battery Rechargeable 7.4VDC 9.2A/hr Lithium Ion Operating Time 14 - 15 hours Weight 5.3 lbs (w/11" coil, excluding battery (1.7 lbs) Additional Technology Multi Period Sensing (MPS) Dual Voltage Technology (DVT) Smart Electronic Timing Alignment (SETA) Numerous Audio Adjustments via menu Coil (Double D/Mono/Cancel) - 3 pos. switch Notes The GPX 4500 employs an external battery carried on a backpack harness and connected to the control box via a power cord. The detector is normally suspended from the harness with a bungee cord, allowing for nearly weightless operation in level ground. *Notes on Technical Specifications - Detailed notes about the specifications listed in this chart.
 -
Aftermarket Coils For Gm1000??
Steve Herschbach replied to Desert Dawg's topic in Minelab Metal Detectors
I heard a rumor of an aftermarket coil in the works a year ago, but nothing has come of it so far. -
Recorded 6/18/18 - Join George and Mike as they talk Makro Gold Kruzer and other Makro/Nokta metal detectors Listen to "George Kinsey & Makro Kruzer" on Spreaker. More information on Makro Gold Kruzer
-
Anyplace in a National Forest that has gold has a very high chance of mining claims also.
-
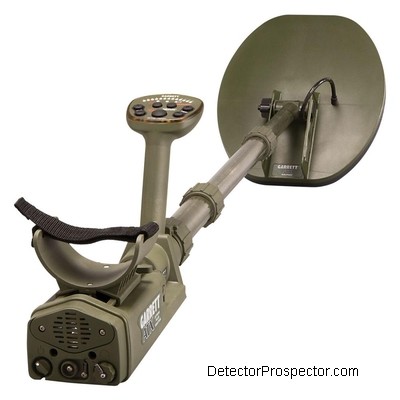 The Garrett ATX was introduced by Garrett Electronics in 2013 and is still in production. It is a pulse induction metal detector waterproof to ten feet. It is unique in that it is one of the few metal detectors retailed to the general public in a housing developed for military applications. Garrett makes a military land mine detector called the Recon Pro AML-1000. It was developed and marketed after the Garrett Infinium, the only underwater ground balancing pulse induction (GBPI) metal detector made by a major manufacturer at the time. The Recon is notable for the waterproof telescoping compact design with hidden coil cables. The new ATX is a highly refined detector combining the best of the Garrett Infinium and Garrett Recon AML-1000 into a single package. The actual housing is almost identical to that used by the AML-1000. The electronics has attributes from both detectors. It is a considerable improvement over the much older Infinium electronically and folds into a remarkably small package without disassembly. I was one of the first individuals to obtain a Garrett ATX when they came out as I had been waiting for a new waterproof ground balancing pulse induction metal detector ever since the Infinium came out over ten years ago. I honestly was a bit surprised Garrett came out with a second generation waterproof GBPI before the competition has released any at all. Ground balancing PI detectors have the ability to work in a combination of salt water and black sand/hot rock environments in unique ways. VLF and even standard non-ground balancing PI detectors suffer under these extreme conditions. The Infinium showed me what might be possible in Hawaii but it suffered from issues common in first generation detectors. There was room for improvement, and I am hoping the ATX addresses the electromagnetic interference (EMI) and salt water instability problems that plagued the Infinium. My first impressions were positive, with my first detailed report at Gold and Silver with the New Garrett ATX. I have a separate article on prospecting with the ATX at Gold Nugget Detecting with the Garrett ATX. The ATX is a versatile detector and will see use prospecting, relic hunting, jewelry detecting (above water and under) and even coin detecting. I have two beach detecting articles on the ATX - Beach Detecting in Hawaii With The ATX and Garrett ATX Return To Hawaii. Garrett ATX waterproof pulse induction (PI) metal detector with 10" x 12" coil The Garrett ATX is uniquely versatile in its physical aspects. It can be extended longer than most people need yet can collapse into a very short diver configuration due to the three piece lower rod design. Garrett ATX collapsed for diving use For storage or backpacking the ATX folds even shorter yet to only 20" in length due to the rotating/folding coil design. The ATX coils are rather unique in that they are integrated with the lower rod with the wires running through the rod and a rear mounted hinge on the coil. This allows the coil to fold back completely over the rod and/or detector body. The rod/coil assembly can be rotated 90 degrees for hunting walls and to enable a more compact stowed configuration. Garrett ATX folded for storage or backpacking All the ATX functions are accessed through a top mounted control panel with rubber topped touchpad buttons and LED indicators. A shift button allows each button to have at least two functions allowing for a full feature set in a simplified layout. Garrett ATX Control Panel Quick Guide to Garrett ATX controls from Owner's Guide - Click image for larger version The Garrett ATX comes standard with a 10" x 12" DD search coil. Optional 8" round and 15" x 20" mono coils with integrated lower rods are also available. New for 2017 are 11" x 13" enclosed coil options in both mono and DD designs. The ATX does have a built in waterproof speaker and so does not require headphones. It does come with land headphones that use a waterproof connector, the same connector that Garrett uses on the Infinium and AT Pro/AT Gold models. The same waterproof headphones available for those models work on the ATX and are required if it is desired to put the headphones underwater. The included headphones have a waterproof cable that can be submerged but the headphones themselves must be kept dry. A short adapter dongle is also available to convert the ATX waterproof headphone connector to the standard 1/4" female receptacle so standard metal detector headphones may be used. See the Garrett ATX Accessory Page for details on headphones, search coils, and other accessory items available for the Garrett ATX. There is information there on using Garrett Infinium coils on the ATX, and notes on how to chest mount or even backpack mount the ATX control box. Finally, the ATX runs off eight standard AA batteries, eliminating any shipping or airline issues that can be a problem with some PI detectors. The detector comes complete with both alkaline and NiMH rechargeable batteries plus a 110V and 12V charger system. The detector runs approximately 10-12 hours on a charge when using headphones, less if running off the speaker. The best method is to use the rechargeable batteries and carry the alkaline set as backup. Garrett ATX search coil options I have had the Garrett ATX now since the fall of 2013 and so have had a solid year with the detector. It really does take about a year for me to settle down my thoughts about a detector. I tend to be all giddy with the new toy at first, having fun, and discovering new things. The strong points and weak points are revealed with use over time, and now I think I can offer up a fair summary of the detector. The ATX is a bit difficult in that Garrett started with the premise of using an existing housing designed to military specifications, and then decided to put a detector in it for consumer retail sales. On one hand this is really great as we get this very unique detector design that would never have been developed just for consumer sales. On the other hand it means for some uses the ATX is just not a very good fit. For other uses it works pretty well. It just so happens I am an avid prospector and an avid beach hunter. I do not beach hunt as much as I like but when I do it I really go after it. Because of this the ATX hits a particular sweet spot for me personally. I really do need a good pulse induction metal detector that can be submerged in saltwater. I would keep the ATX for that purpose alone. I am very happy with its performance as a beach detector especially on beaches where there is black sand mineralization or volcanic rock to deal with. The fact it also does very well as a prospecting PI is almost a bonus for me. From a straight up prospecting perspective Garrett also scores though nobody needs a seven pound detector waterproof to 10 feet while desert prospecting. However, if all I had was a couple thousand dollars to invest in a brand new, full warranty PI for gold prospecting it would be a Garrett ATX. I believe the ATX is superior to the White's alternatives in overall performance and it is far less money than a new Minelab PI detector. I will not speak for the Australians but in the U.S. the ATX holds its own for PI performance and I feel quite comfortable using it gold prospecting. I could wish for a lighter package but the fact is it works and a person who puts in the effort should do just fine with the ATX. I know I can. The ATX does well for relic hunting applications and I have even found I can cherry pick coins halfway well with it. I have always been partial to pulse induction detectors and Garrett has won me over with the ATX. I enjoy using the detector and I can make good finds with it, and that is all I can ask of any detector. Some of Steve's finds with the Garrett ATX in the first year of use In retrospect I have actually done remarkably well with the ATX since I got it, considering it is only one of several detectors I have been using and not the one with the most hours on it. I have found about 3 ounces of gold and platinum jewelry with the Garrett ATX plus about two ounces of gold nuggets with it. I have found gold nuggets in Alaska, Arizona, California, and Nevada with the ATX under sunny skies and in pouring rain. My ATX has spent a couple weeks of days underwater in rough surf and is none the worse for wear. Many thanks and a hat's off to Garrett for producing my all time favorite Garrett detector. ~ Steve Herschbach Copyright © 2015 Herschbach Enterprises Official Garrett ATX Page Garrett ATX Instruction Manual Garrett ATX Color Brochure How To Disassemble and Clean the ATX Coil Shaft & Camlocks Garrett ATX Accessory Page Report on new 11" x 13" Search Coils Forum Threads Tagged "garrett atx" Garrett Metal Detectors Forum Garrett ATX vs Minelab GPX 5000 Garrett ATX Technical Specifications* Internet Price $2120.00 Technology Ground Balancing Pulse Induction (GBPI) Frequency 730 pps Autotune Mode(s) Slow Motion and Non-Motion Ground Rejection Four Tracking Speeds and Fixed Soil Adjust Can ground balance into salt soils Discrimination Dual Tones, Iron Check & Reverse Disc Volume Control Volume Limiter plus headphone controls Threshold Control 25 level push button setting Tone Adjust No Audio Boost No Frequency Offset Automatic Pinpoint Mode Yes Audio Output Proprietary headphone socket, Headphones supplied plus Waterproof Speaker Hip Mount No Standard Coil(s) 12" x 10" Open Spoke DD (Or Optional 11" x 13" Coils) Optional Search Coils 8" Round Mono, 20" x 15" Mono, 11" x 13" Enclosed DD, 11" x 13" Enclosed Mono Battery 8 AA rechargeable and disposables supplied Operating Time 10 - 12 hours Weight 6.9 pounds Additional Technology 13 level adjustable gain control Notes Waterproof to 10 feet (requires optional submersible headphones) *Notes on Technical Specifications - Detailed notes about the specifications listed in this chart.
 -
Ah, Scotland. My mom is of Cameron descent and I would like to visit someday. Welcome to the forum!
-
Dredging's Up's & Downs
Steve Herschbach replied to Dig It's topic in Gold Panning, Sluicing, Dredging, Drywashing, Etc
It looks familiar in the way all Kenai Peninsula creeks look familiar but no, I can't place the location. -
http://www.mylandmatters.org/Tutorials/LandStatus/ This article also might be useful Where To Prospect For Gold Nuggets
-
Equinox 800 Gold Nugget Detecting Tips
Steve Herschbach replied to Steve Herschbach's topic in Minelab Equinox Forum
The photo is from JPs linked article and are his nuggets and detector. He really does not cover settings in his article so I have no idea if he was using Field 1 to actually find the nuggets or not. Field 1 is a “milder” mode than Field 2 and maybe his soil called for it. You have to use what works, and as I noted I tested in Nevada and California. JP may be doing something entirely different in Australia. I liked the photo but I suppose I should replace it with one of my own. -
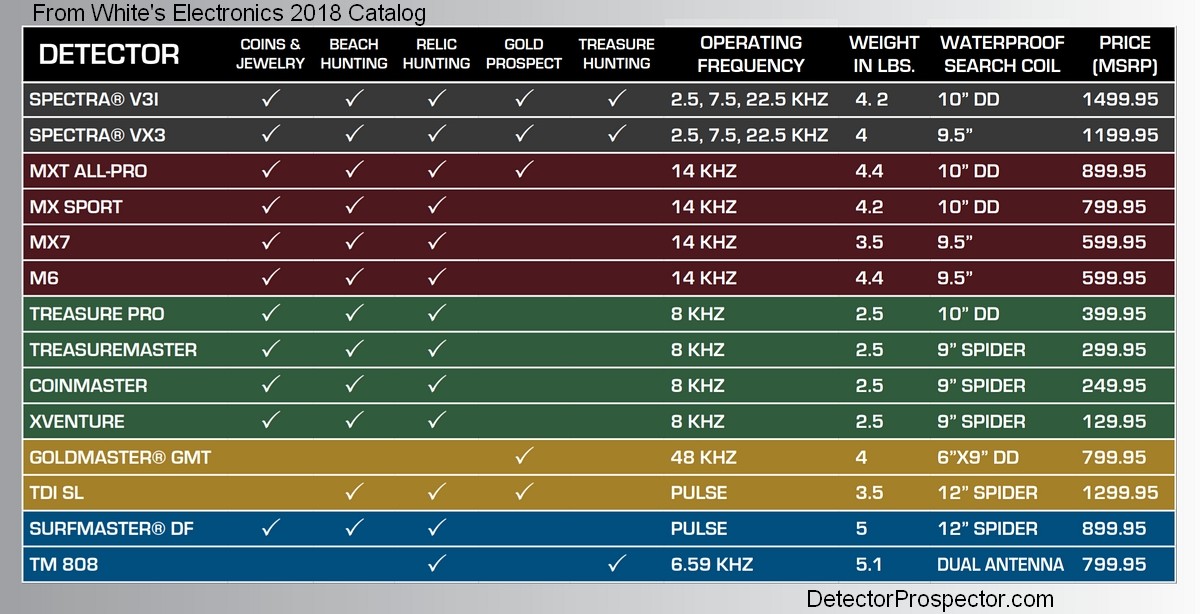
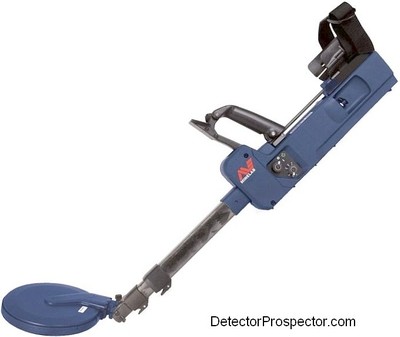
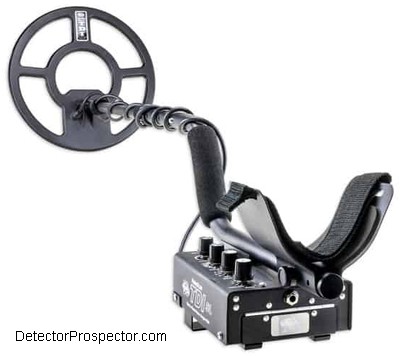 The White's PulseScan TDI was released in 2008 and is still in production as the TDI SL. Prior versions have been discontinued. I was one of the original users of the TDI and still dabble with them to this day. See my story White's TDI at Moore Creek, Alaska for pictures of lots of TDI gold nugget finds. I also have extensive notes on using the TDI for coin detecting at Steve's Guide to White's TDI Coin Settings. The TDI is a unique detector and is seeing use in many applications unforeseen when it first came out. The TDI has been available in several versions but all are basically the same detector as far as how they work. October 2019 Note: White's has a model called the TDI Hi-Q, which is a TDI SL with straight rod, new coil, and tan or camo paint job. See the details here. I am a big fan of competition as I always want more and better detectors from the manufacturers personally, and I think competition is the best way to get better detectors. After Garrett got into the ground balancing pulse induction (GBPI) game with the Infinium people including myself were really after White's to make an entry into the field. I went so far as to visit White's Electronics personally to lobby for such a detector with suggestions on how to get there. Alan Holcomb, the CEO at that time, flew me down at White's expense for discussions on how to proceed with such a project. In particular, I advised that rather than developing something from scratch, it might make more sense to license the existing Goldscan technology from Eric Foster, widely known as "the father of pulse technology" for his early work in the field. Eventually White's did decide to pursue the matter, and I was therefore aware early on that White's was working on a new detector, In 2007 I was sent a prototype unit to evaluate while I was on vacation in Hawaii. I was very impressed not only with the power of the detector but more importantly for me in Hawaii I was very impressed with how stable the detector was in salt water. It was also virtually immune to electromagnetic interference (EMI) issues that had dogged my use of other detectors in Hawaii. White's TDI SL with closeup of control panel (compare to original TDI controls below) My use of previous GBPI detectors, the Minelab models and the Garrett Infinium, made me familiar with how they respond to targets with various tones. Each target generates a dual tone that varies depending on whether the target is above or below the ground balance point that has been set. You will hear either a high tone followed immediately by a low tone (hi-lo), or a low tone followed immediately by a high tone (lo-hi). This dual tone system is effective for most uses but if you get into a target rich location it in effect doubles the number of audio signals coming from the detector. I also had an opportunity in Alaska to visit with Brent Weaver, the main engineer at Garrett responsible for the development of the Infinium. While testing a prototype Infinium I asked him about the dual tones (Garrett now refers to them as "echos") and whether they could be suppressed. He told me the dual tones were integral in how the Infinium worked and that it was not practical to produce a single tone result on the circuit they were working with. White's did end up working with Eric Foster on the development of the TDI. His method is one I like because instead of the dual tone responses generated by the Minelab and Garrett models (hi-lo or lo-hi) the TDI generates one of two tones, either a low tone, or a high tone. The tone depends on whether the target is above or below the current ground balance setting, and therefore there is only a tone difference when the ground balance system is engaged. The ground balance off, straight PI mode has monotone responses. Also, because the ground balance can be set manually on the TDI, this tone "breakpoint" can be shifted by the operator. This allows targets to be separated broadly into two distinct groups. On one hand there are high conductor type targets, like most coins and large steel items, that on the TDI produce a low tone response. The other group is comprised of low conductor type targets, and includes most gold items, US nickels, aluminum, and small ferrous trash. These all produce a high tone response on the TDI. There are far more high tone targets than low tone targets in most locations. I really liked the prototype TDI that I used in Hawaii, in particular the fact that it generated half the audio responses compared to a Garrett or a Minelab. Once again I wondered if one tone or the other could be suppressed. I sent an email to Eric Foster, and was surprised when he told me that not only could it be done, but it would be a very simple thing to implement with a basic toggle switch arrangement. This came about very late in the TDI development, and I lobbied hard for just such a feature to be added. A last second vote was taken by those involved, and probably the last major change on the TDI before it went into production was the Target Conductivity switch. There was no such switch on the tan prototype models. Prototype White's TDI Used by Steve Herschbach in Hawaii Now, I do not want to give the impression I was some kind of major player in the development of the TDI. I was just one of many voices pushing at White's for years to develop a ground balancing pulse induction (GBPI) detector. I am pretty sure though my last second inquiry and little push was what made the tipping point to getting the Target Conductivity switch included, and I think to this day it is one of the most useful and intriguing features on the TDI. It allows for a vast reduction in the number of audio responses in certain situations and in conjunction with the manual ground balance and pulse delay offers a degree of discrimination on the TDI not seen on any other pulse induction detector made today. This makes the TDI a pulse induction machine that can be used effectively for coin detecting, if the operator knows what they are doing and employs some smarts in site selection. I wrote an article entitled Steve's Guide to White's TDI Coin Settings on this very subject. I will not repeat the information here in the interest of keeping this page from getting too long so check out the link. Suffice it to say the TDI has the ability to play tricks and discern targets far beyond what most PI detectors can achieve. Another major feature on the TDI is the ability for the ground balance system to be shut off. The method used to ground balance the TDI in effect subtracts the ground reading from the total readings returned by the detector. This subtractive method does actually steal some depth, which is easily shown in air tests on targets with the ground balance turned on and the ground balance turned off. The closer the target is in relation to the ground balance setting, the more depth is lost. People find this very confusing, as the whole point of ground balancing a PI is to get better depth, right? Original White's TDI Control Panel The way it works is this. In low mineral ground a PI gets maximum depth without using any ground balancing. However, as mineralization increases, depth is affected. The more mineralization, the more depth is lost. Also, ground effects increase. In low mineral ground, the coil may be raised off the ground with little response. In highly mineralized ground, raising the coil even slightly off the ground produces a false signal. Nearly all PI detectors have an audio retune circuit that slowly retunes the audio response to keep it at the set threshold level. Otherwise circuit drift and minor ground variances would require constant retuning. In high mineral ground, the ground produces a response, but the detector compensates as long as the coil is kept at an exact height over or on the ground. If the coil is raised quickly, the audio overshoots when the ground signal is removed and a false signal occurs. This can be a real problem in even ground or in the water where it is difficult to maintain a steady distance above the ground or sea bottom. Hot rocks or wildly varying ground mineralization present an even greater issue. Again, the detector does well as long as the conditions are constant, but when a hot rock or mineralized ground condition like a clay seam enter the picture, a false signal is heard. In areas with lots of hot rocks PI detectors that cannot ground balance are almost useless due to the overwhelming number of false signals. So imagine a PI with no ground balance in low mineral soil. All is well, maximum depth is achieved. Pretend we have the ability via a magic dial to turn up the ground minerals and/or hot rocks in the ground. A point is reached where performance and efficiency is greatly impacted. It becomes impossible to discern good targets from ground signals and false hot rock signals. At such a point, engaging the ground balance circuit gains back the lost performance and efficiency. It does this by eliminating the ground signal and hot rock signals. White's search coils for TDI (from 2018 product catalog) This leads to situations occurring where people use a GBPI detector in low mineral ground and decide they are no better than a VLF. That actually often is true, in that a good VLF in all metal mode will do about as well as a Ground Balancing PI in low mineral ground, if both have similar coil sizes. A GBPI does not come into its own until the ground conditions or hot rocks are such that a VLF operator wants to toss the detector in a gully in frustration. This has been a very long lead explanation to the TDI secret weapon. In low mineral ground, turn the ground balance off! The detector will become extremely stable with a very smooth threshold and become more resistant to electrical interference. Gain may be boosted and a great deal of extra depth achieved in situations that allow for this type of operation, and they are actually very common. This would be the preferred beach mode on most beaches, the exception being beaches with a lot of black sands. The White's TDI in pure PI mode is one of the most powerful straight PI detectors available. The tone differences between targets disappear, and sometimes the ability to differentiate targets is more important than the depth gained by shutting the ground balance system off. But do not overlook this ability to run without ground balance in situations that warrant doing just that as it can really pay dividends to the knowledgeable operator. In 2018 White's responded to long standing demand from customers and released a version of the TDI that is waterproof to 25 feet - the TDI Beachhunter. This is basically a TDI SL in a Beachhunter ID control box. The model weighs more at 5.2 lbs for obvious reasons. The TDI Beachhunter has all the same controls as the TDI SL with the exception of the conductivity switch. This means the TDI Beachhunter signals on all targets, but the dual tone scheme remains to allow the operator to differentiate targets by the sounds. In order to help insure waterproof integrity the coil on the TDI Beachhunter (12" Dual Field coil) has been hardwired into the control box. Forum thread with more information on TDI Beachhunter. White's Electronics TDI Beachhunter - new for 2018 ~ Steve Herschbach Copyright © 2010 Herschbach Enterprises Official White's TDI SL Page White's TDI SL Data & Reviews White's TDI SL Instruction Manual White's TDI SL Special Edition Data & Reviews White's TDI BeachHunter Data & Reviews White's TDI Pro Instruction Manual White's Original TDI Instruction Manual White's TDI Field Manual Forum Threads Tagged "whites tdi" White's Metal Detector Forum Great Post on Batteries For the TDI SL White's TDI Coin Settings Some Commentary On TDI Tuning & Discrimination White's TDI Technical Specifications* Internet Price TDI SL $1189 (Special Edition $1049) (Beachhunter $1199) Technology Ground Balancing Pulse Induction (GBPI) Frequency 3250 - 3370 Pulses Per Second Autotune Mode(s) Slow Motion Ground Rejection Manual, one turn control Soil Adjust Ground Balance On or Off (two position switch) Discrimination Conductivity switch*, 10 - 25 Pulse Delay Volume Control No Threshold Control One turn control Tone Adjust No Audio Boost No Frequency Offset One turn control Pinpoint Mode No Audio Output Speaker, 1/4" headphone socket Hip Mount No (TDI Beachhunter - Yes) Standard Coil(s) 12" Round Dual Field Optional Search Coils Over 100 accessory coils available (TDI Beachhunter has hardwired coil) Battery Rechargeable NiMH & AA Operating Time Up to 6 hours Weight TDI SL 3.5 pounds ( TDI Beachhunter 5.2 lbs) Additional Technology The TDI was designed specifically to be able to use Minelab SD/GP compatible coils. However, performance can vary and the pulse delay may have to be advanced to compensate for coil differences that result in overload readings. TDI Beachhunter is waterproof to 25 feet. Notes *The TDI is unique in that it can suppress audio responses into two different classes. Targets have a high tone or low tone audio depending on how the target relates to the ground balance setting. In general high conductive targets give a low tone and low conductive targets a high tone. The TDI can be set to allow for one response or the other. See White's TDI Coin Settings for more details on this control. *Notes on Technical Specifications - Detailed notes about the specifications listed in this chart. White's TDI SL High-Q Tan metal detector
 -
This is the latest version of the 1997 Gold Panning: A Guide to Recreational Gold Panning on the Kenai Peninsula, Chugach National Forest, Alaska The guide has been newly updated for 2018 and can be downloaded here for free

-
Well, with two different outfits advertising in the forum Classifieds that they have Equinox 800 units on the shelf ready to ship, it appears that supply is finally catching up with demand. Anyone being told they still have to wait a month or more should explore other options.
-
White's 2018 Full Color Brochure
Steve Herschbach replied to Steve Herschbach's topic in White's Metal Detectors
I think this is the best White's catalog I have ever seen and one of the best ever from anyone. I say that mainly because of the great coverage given accessory items like coils, scuff covers, batteries, etc. Kudos to the people who put it together! I also like charts like this.....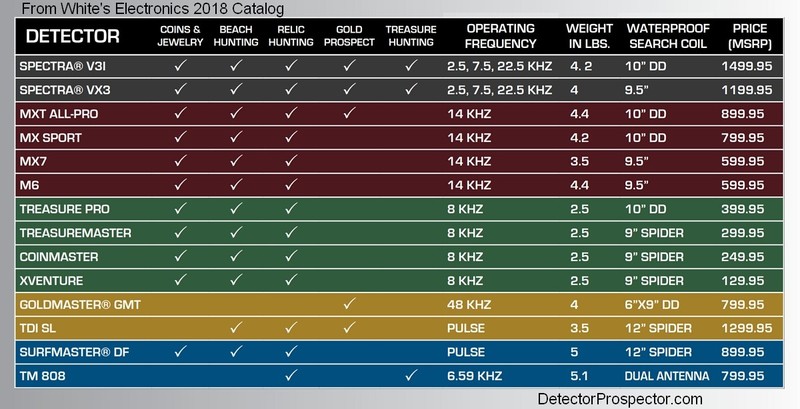
-
Nice - it’s always good to see gold peeking out of the mud and grime!
-
Best Detecting And Prospecting Forum On The Internet
Steve Herschbach replied to Norm S's topic in Meet & Greet
Thanks Jim..... the years are kind of sneaking by us all. I hope all is well in your world! -
These tips are based on my personal use of the Minelab Equinox 800 at a few locations in Nevada and California. That means you have to take this with a grain of salt for other locations as far as exact settings but the basic process is the same. I will probably update this in the future as I learn more, including hopefully any observations and tips people may provide on this thread. The Gold Mode is only available on the Equinox 800 and features a VCO boosted audio that is quite different than the other Equinox modes. It is very powerful, especially in Multi frequency, and will detect very tiny pieces of gold. The downside is that in highly mineralized ground you will encounter hot rocks and even the ground itself that wants to react and create signals. The basic secret of nugget detecting with a VLF detector is in tuning the detector for the best performance possible, while accepting that air test type results are not possible in bad ground. A balance must be obtained between sheer power (sensitivity) and the false signals generated in difficult ground. The key default settings for Gold Mode 1 are: Frequency: Multi Ground Balance: Tracking Sensitivity: 20 Recovery Speed: 6 Iron Bias: 6 Accept/Reject: -9 through 0 rejected, 1 through 40 accepted When I hit new ground when nugget detecting I want my detector to be running with manual adjustments. Initially knowing how the ground responds is very important and I want to make any settings that affect anything myself. Therefore, the first thing I do is turn off the ground tracking and use the Auto (pump coil over ground) method of ground balancing instead. Ground tracking can also track out faint nugget signals, so my preference is to run with it off if possible. Frankly, I have not experimented with Iron Bias much. In theory at least reducing this setting will reduce the possibility of tiny gold being misidentified as ferrous. Since I am mistrustful of filters I have been running the Iron Bias at 0. Starting out however people may want to leave it alone since adjusting too many things at once may not be productive for beginners. Recovery Speed is highly misunderstood. People latch onto one out of context statement "lower recovery speed equals more depth" and too many people therefore are immediately going to lower settings. Higher recovery speeds allow the detector to better separate trash targets from good and minimises any masking effects. "Masking" is where bad targets overwhelm and hide good targets. Mineralized "hot rocks" are really nothing more than a large target that can mask (hide) nuggets not just under but next to them. Reducing the recovery speed will often add no depth due to ground conditions, and mask nuggets next to hot rocks. Higher recovery speeds will reveal those nuggets, and so you are often getting more "relative depth" with higher recovery speed settings. I basically stick with the default setting of 6 and will not go lower unless the ground is relatively low mineral and free of hot rocks. Most importantly, in some ground you will find that the coil will tend to give false signals when bumped. This is directly affected by Recovery Speed. Going to lower recovery speeds will generate more false signals due to bumping on rocks. With all that said however, reducing the Recovery Speed can add extra sensitivity to very deep or very small targets. A setting of 4 is easily manageable in low mineral ground and can work for the Equinox in higher mineral ground with a skilled operator. It is possible to go even lower though the detector will typically become less stable at the slower recovery speed settings. Sensitivity is one of those “set it as high as you can without making the detector too unstable” type settings. My settings normally range from 18 to 25 but could go lower in bad ground. Now, the extremely important Accept/Reject settings. Weak gold signals in highly mineralized ground will definitely run into the ferrous range. Starting out, I am going to toggle the Horseshoe button to remove all rejected settings so that the detector reacts to everything. My starting point for Gold Mode 1: Frequency: Multi Ground Balance: Auto (pump method) Sensitivity: 20 Recovery Speed: 6 Iron Bias: 0 Accept/Reject: -9 through 40 accepted The first thing I want to do is see how the ground responds with these settings. Find a place hopefully free of trash, and run the coil over the ground and observe what happens. In most gold locations you should see lots of target responses at -9 and -8 plus possibly -7. These are ground responses and are giving you direct feedback on your settings. The first thing I want to try and do is reduce those ground responses as much as possible by employing a mix of ground balance, sensitivity, and recovery speed. Simply ground balancing should cause those signals to alleviate somewhat. You will want to note hot rock readings especially. The ground will balance out (ground noise reduce) at one ground balance setting, but it may make some hot rocks worse. Sometimes you can manually tweak the ground balance to also reduce the hot rock response while not really making the ground itself worse by trying intermediate settings. You can only do this when not in tracking since tracking decides for you where the settings will be. I always will stay in manual until forced to use tracking for this reason alone. Reducing sensitivity is also a good thing to do in many cases, yet people are very resistant to doing so for fear of losing depth. The thing is, unless you can get the detector to settle down and run relatively smoothly you will struggle with hot rocks and false signals. Reducing sensitivity will reduce hot rock signals faster than it will reduce metal signals in most cases, so back it down as needed to get stable performance. If the ground is mild enough you should be able to find settings that reduce or eliminate the readings in the -9, -8, and -7 ground range, plus hopefully alleviating any hot rocks that are present. However, in very bad ground you may still have a lot of signals in that region. If so, try a couple things. First, go ahead and try out the tracking. Tracking has an advantage in that it will typically tune out a hot rock in a single swing or two, while being extremely resistant to tuning out metal objects. If you can get smoother performance over the ground than with any reasonable manual settings, it may be the way to go. In the worst ground and hot rocks the magic ability to switch frequencies can be a serious aid. I have found that Multi is very powerful... more powerful than any single frequency. That does mean that by simply going to 20 khz a lot of ground and hot rocks that are noisy in Multi settle down and become manageable. One of these options may allow you to go detecting without rejecting any target id numbers. That would be ideal. However, do not be surprised if residual signals remain in the -9, -8, and -7 region. If they are still too prevalent, then hit the Horseshoe button again to engage the Accept/Reject function, but go in and open up everything except the offending signals. That for me commonly means blocking -9, -8, and -7 but accepting -6 and higher. Or maybe you need to block -6 also. You have to listen to what the detector is telling you and adjust accordingly. If you do end up blocking out some low negative numbers you may find you can also bump the sensitivity back up a point or two as long as everything stays quiet. Again, the goal is to try and shut down ground and hot rock responses to the greatest degree possible while retaining as much detecting power as possible. It's a balancing act. Tiny nuggets will often read as solid hits at target id 1 and 2. The larger the gold, the higher the target id reading. Gold can appear anywhere on the meter all the way up into the 30's if the nugget is large enough. I have not had it happen yet but be very suspicious of 0 and -1 readings as also being possible gold readings.* This is just an example of where I end up at on my ground a lot so far: Gold Mode 1 Frequency: Multi Ground Balance: Auto (Ground pump method) Sensitivity: 18 - 23 Recovery Speed: 4 - 6 Iron Bias: 0 Accept/Reject: -9 through -7 rejected, -6 through 40 accepted Note: the following works as well on both Equinox 600 and Equinox 800. Since Gold Mode lacks target tones, going to Park 2 and using the solutions above plus the additional possibility of tones is another alternative. Instead of using Gold Mode and blocking the lowest target id numbers they can be left open to signal as ferrous or mixed ferrous targets. And you now have 5, 10, and 15 kHz options that Gold Mode lacks. Park 2 set up properly is quite close to Gold Mode performance and a perfectly acceptable nugget detecting alternative, and actually superior for some situations. You may also use Field 2 as a starting point. Be very careful however because the default rejection pattern for Field 2 rejects target id 1 and 2. This will reject most small gold nugget readings and reduce signal strength on larger gold by blocking part of the signal. I therefore recommend Park 2 to avoid this possibly fatal error. For Park Mode 2: Frequency: Multi Ground Balance: Auto (Ground pump method with manual tweaking) Sensitivity: 16 – 25 Recovery Speed 800: 4 - 6 (default is 6) Recovery Speed 600: 2 - 3 (default is 3) Iron Bias: 0 Accept/Reject: Everything accepted, rely on tones (alternative reject -9, -8, and -7 if too much ground feedback) In closing, I want to say that gold nugget detecting demands far more expertise from the operator than most detecting. People who rely on canned settings provided by others will never be expert unless they really understand what the settings are doing. It is imperative that you be able to observe ground responses as I have noted above, and know how to best alleviate them while losing as little depth on gold as possible. It is a very fine balancing point done correctly and can only be done properly by a person who genuinely understands how the detector operates. The only way I know to become proficient is lots of experimenting in the field with different settings on test targets and hot rocks. The settings above are less important than the methodology, and if you want to truly become a proficient nugget hunter you do need to work at it. I hope that helps somebody out - best of luck to you! Updated Nugget Detecting Tips 9/2018 *This article recommends keeping as many negative numbers set to accept as is possible. It has been confirmed that as I suspected that nuggets range well into the negative numbers. First gold nuggets found with Minelab Equinox from Jonathan Porter report...

-
Garrett has released a new set of headphones with built in proprietary wireless capability, the Garrett MS-3 headphone. These headphones can interface directly with new Garrett models with built in wireless, like the new Garrett AT Max. They will not work with anything other than Garrett Z-Lynk compatible detectors and accessories. Garrett MS-3 Z-Lynk™ Wireless Headphones PN: 1627710 MSRP $119.95 Built-in Z-Lynk receiver. High-fidelity audio. Volume control. Adjust signal levels to suit individual hearing requirements and to enhance weak signals. Comfortable headband and ear cushions. Folds down for easy storage. USB charging cable included. Speaker impedance: 8 ohms Frequency response: 30-18,000 Hz. The new headphones can be purchased alone or as part of a system with a transmitter box that can work with any detector. Garrett MS-3 Z-Lynk™ Wireless Kit PN: 1627720 MSRP $189.95 Includes: Garrett MS-3 Z-Lynk Wireless Headphones WT-1 wireless transmitter 2-pin AT connector to Micro USB cable—connects AT detector to transmitter ¼" Jack to Micro USB cable—connects detector with ¼" jack to transmitter USB charging cable Mounting band For any style metal detector with 2-pin AT connector or ¼" headphone jack
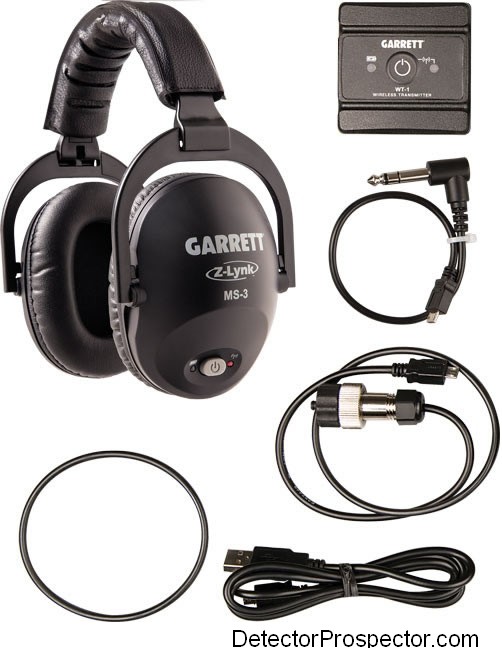
-
Welcome to the forums! The Minelab Equinox Essential Information thread will be a great place to start.
-
Equinox, Gold Monster, & Arizona Gold
Steve Herschbach replied to Steve Herschbach's topic in Minelab Equinox Forum
If that’s you Bill... welcome to the forum! -
All I can tell you is I knew none of this throughout the testing phase, and grabbed just any old USB charger I had around, and had no problems with any of them. Chargers do not force a charge - the device draws the charge, so a higher rated charger will not blow the detector up. Lower rated chargers typically just take longer to charge. I have not heard a single person yet complain of having issues with chargers, so I think Equinox is pretty forgiving here. Still, Minelab had to cover their posterior legally (the fine print) and so the stuff they recommend is to make sure you have no problems, In other words, having the symbols is a good thing, but them lacking does not mean the charger will not work. If you read the stuff I posted again, you will see they are warning you more about damaging the chargers than the detector.
-
I assume we are talking saltwater? Was the sand wet a foot down? Dry has got to mean DRY when running Gold Mode on a saltwater beach. If conductive wet sand is within reach of the detector it will signal in Gold Mode. If I was there with my Equinox running in Gold Mode Multi, I would start at sensitivity 1 and work my way up or if you wish, start higher and work your way down. There should be a point where the sensitivity is low enough you can get the machine to behave. You could also try 20 kHz to mellow the machine out because Multi is turbocharged in Gold Mode. The only reason I would ever run Gold Mode on a saltwater beach would be to hunt micro jewelry. I would want to be high up the beach, and even then I would back it down until the machine behaved. Nobody detects micro jewelry a foot deep, so all you are really trying to do is hunt the top few inches for that tiny stuff. If the targets you are hunting have any size at all, most any mode will be more applicable on the beach than Gold Mode.