Search the Community
Showing results for tags 'rods shafts hardware'.
-
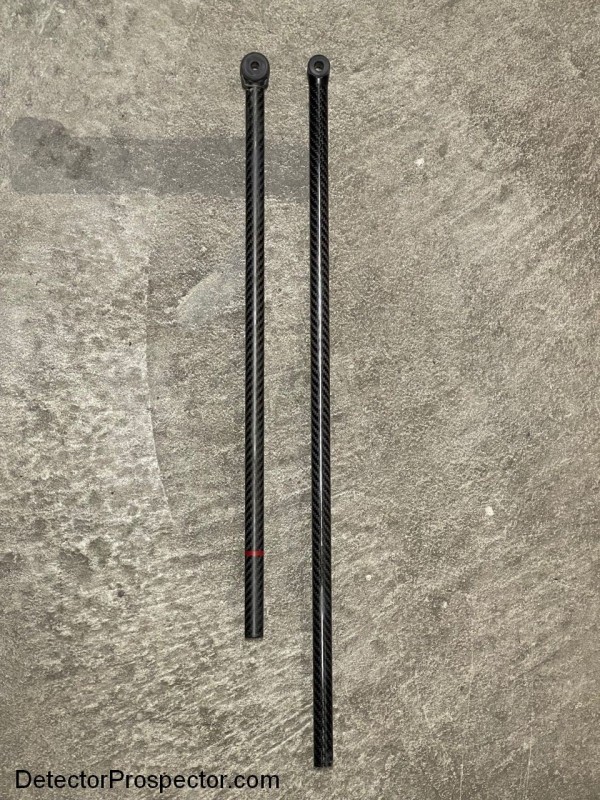
 Hi all. I wanted to offer the first update regarding the Kevlar and/or fiberglass lower rods, that I plan to offer through Steve's Detector Rods (www.stevesdetectorrods.com). Some here are familiar with the back story, with respect to my decision to produce/offer a non-conductive lower rod option, for those whose specific detecting needs may warrant consideration for such a lower rod. In time, I hope to offer these new lowers for many of the shafts I offer, including: Minelab Manticore Minelab Equinox series (600, 700, 800, 900) Minelab Gold Monster 1000 Minelab GPX 4500/4800/5000 Minelab GPX 6000 XP Deus II Initially, I am prototyping lower rods for the Manticore, and wanted to offer an update as to where the project stands. I received the first samples from one of my two suppliers through whom I've requested them. This order included two Kevlar tubes, and two glass-fiber tubes. From preliminary testing, at the wall thicknesses that are required, the Kevlar tubes appear to have too much "flex" to be a reasonable option. A thicker-walled tube would likely mitigate this to a large degree, but given that all of my cam locks, lower rod yokes, etc., are designed for certain tube sizes, I need to find a material that "works" at the same sizes as my carbon-fiber tubes. At this point -- at least from this supplier -- the Kevlar tubes are too "low modulus" to be optimal. However, the glass-fiber tubes appear to be a very good option at this point. The negative is that, as expected, they are heavier than both carbon-fiber tubes, and Kevlar tubes. However, they are a much higher-modulus tube than the Kevlar tubes. Compared to a carbon-fiber tube of the same length and wall thickness, the flex/stiffness of the glass fiber tube is SLIGHTLY greater, but I believe the difference is small enough so as not to be a negative in that regard. Overall, I am actually very pleased with the glass tubes. I received one in a black, slightly "ribbed" surface -- nearly identical to a stock Minelab Equinox 600/800 lower rod, and one in a silver "twill" pattern, that looks similiar to my silver carbon-fiber tubes (see the attached picture). I plan to make two prototypes, from these two tubes, and send them out for testing. I am pretty confident that they will prove to be a very good option. I will wait for the samples from the second supplier, which should arrive in the next 7 to 10 days, and will report back. Meanwhile, if anyone has any thoughts or questions, I'll be happy to answer. Specs (17.65mm x 16mm x 535mm tube -- standard Manticore size/length) carbon fiber -- 1.13 oz. (32g) kevlar -- .95 oz. (27g) glass fiber -- 1.55 oz. (44g) Thanks! Steve
-
 I was fortunate to have Steve’s Detector Rods send me a sample lower rod to test on my Manticore. I hope it’s because he values my honest opinion as a detector user more than just being a detector dealer? Also, since I reached out to him about an option of a non CF lower shaft before all this blew up, that probably had some play into it as well. The rods address the issues discussed here. To me, part of metal detecting is a way to unwind and walk away from todays worldwide issues, politics and pressures we all allow to build up in our bodies and minds. Swinging a detector is my Therapy. One thing about my detector preference, is the ability to tweak and fine turn it to get most depth on bigger gold, best sensitivity to smaller gold or specimens and smooth operation when swinging the detector in my desired locations. When I do swing a detector, I also want to have peace of mind knowing I’m getting best results. Now with the factory setup of Equinox 900 and Manticore, I no longer have the confidence that I’m getting best performance. I no longer feel I’m hearing all targets and or especially potential targets (iffy’ s) when I’m hearing the signal response of my detector as it beeps on the carbon fiber shaft. Side note - One of the reasons I don’t use Minelabs advertised VLF gold detector, the old technology Gold Monster 1000? The Equinox 800, 900 and Manticore are more capable detectors, with added features and better performance. Those 3 models of detectors are not advertised by Minelab as Gold Prospecting capable detectors and to this day I have no clue? I guess the Marketing Team working behind a desk, knows better than real genuine gold prospector detectorists? Anyway, the 800/900/Manticore all are better VLF gold detectors than GM-1000. So, I’m going to take advantage of my knowledge and put them to use. When doing so, I prefer to set up my detector to run best results and smoothest operation. The EQ-800 was great and new improved EQ-900/Manticore models should have been even better and for many reasons are. But that Carbon Fiber shaft is a mistake and a thorn in my buttocks (both of them). Here’s my 1st impression of in the field use. I ran my Manticore in Eastern, OR at an old Prospect site that’s produced good gold in years past with VLF detectors. This area recently burned and so I desired to swing where it’s now more open and not thick with brush. Here’s my findings and some other info of importance to me. Detector is more quiet when bumping into rocks and stumps, which is the majority of my Gold Prospecting VLF detecting style. I turned Gain/Sens up to 25 on detector and it ran ok with more False Chatter but not as much as I expected. So I turned it down to 21 and it really smoothed out. 20 seemed to be a little better. Interestingly, my go to on GAIN for dredge tailing piles is 19. So, yes I was happy with added Gain of 20/21 but at the same time, this was not dredge tailing piles and so maybe at that location, I’ll be back at 19? Reall hard to say until I get there. Noise during target Recovery - When laying detector down and lifting it up off the ground during target recover. This was the biggest difference I noticed. Detector was much more quiet and reminded me of using the Equinox 800 with hardly any issues. The reason? Each time a person lays detector down and picks it up, the stock CF shaft is seen and makes the Manticore scream. This new non CB shaft takes care of that issue. Just having a more quiet detector during operation is worth the value spent on a non CF shaft, in my opinion. Realize, my hunting in ore dumps, side banks in placer digs and tailing piles are all steeper terrain and so the detector can easily move, slide, rock back and forth…which used to drive me nuts. The non CF shaft alleviates most of that. Quality - built of the non CF shaft. Certainly ranks high and I even like the silver color as it separates my unit from those around me. The diameter of the shaft is just as great as the stock shaft from Minelab and maybe even a hair thicker when I put it in the clevis, hardly any need to adjust the back screw. It feels a little more snug, which I prefer. Texture of the shaft, is on par with the factory shaft provided. To me, that’s important because when I hunt in saltwater, some materials will easily wear and mar up from the find sand (early CTX 3030 shaft for example). Weight of Steve's non CB lower shaft is 2.2 oz Weight of stock lower rob by Minelab that makes all the extra noise, is 1.8 oz The difference of .4 oz. Length = Steve’s rod is 23 ½” vs stock lower rod from Minelab at 22 ¼”. Now, I myself prefer the smaller 22” and in fact hope Steve cuts them down to 22” as an option. I take trips all the time and get n planes and fly with my Manticore. The airlines carry on size dimensions are 22” x 14” x 9”. This is a big thing to me since I fly with detector at least 6 times a year. Also realize, the Manticore has a lithium Ion Battery, so it’s illegal to have in normal luggage under the plane. Cool Factor = Tops. Why be the same and have your detector looking like everyone else you hunt with. Overall, I’m quit sure the majority of guys who use the Equinox 900 and Manticore detectors for Gold Prospecting, will in fact enjoy the benefits of the non CF shaft. I also feel just like I do with a new detectors as I’ll start getting more time on it in a variety of detecting situations and see other benefits as well. Minelab, are you listening? You dropped the ball this time. Having some Engineer guy tell Simon all the excuses why you used a CF shaft is a bunch of BS. The better option would have been to reach out to those who originally mentioned the issue and provide us an option of fix of the error made. Telling us the EQ-900 and Manticore are not advertised as gold detectors is weak and the rest of the excuses made, I’m not even going to waste my breath/time with rebuttal. At least we have other metal detector manufactures and accessory businesses out there that provide a more responsive approach to helping get it right and keeping the end user (customer) happy with the product they purchased. Thank you Steve’s Detectors Rods for doing what should have already been done by Minelab. You my friend, understand the importance of Customer Satisfaction. Steve, you'll need to update your business card with the new and hot selling non CF rods as well.


-
Well, this s#it it is a good reminder of how many times I burnt money on weird experiments for gold hunting... Under here, the brand new flexible clevis for the fiberglass lower end... Wait.. Flexible...😑 Something went wrong with the hardener after 72 hours in the mold, of course 🫢

-
I’m trying to find an XP replacement CF marked lower rod to replace the plastic one on my original d2. I have a newer d2 that has the CF marked lower rod and would like to buy one of the newer ones that are carbon fiber for my old d2 that I use for water hunting. I contacted Colonial Metal detectors and he emailed me back saying that his distributor said this: So, has anyone bought just the CF lower shaft and if so, where did you get it? thanks BTW, I had been using the nokta carbon fiber lower rod on my original d2 for water hunting, but I noticed that the lower radius of the bolt hole section is larger than the corresponding oem lower shaft part and sand has gotten in the space between that rounded part and the coil and is starting to wear away at the coil. The stock shaft is smaller and would let sand particles pass through that area. That’s why I’m wanting to get the oem carbon shaft.

-
Whatever the reason, shaft issues, hypersensitive electronics, wrong wiring, I have no idea. But the Manticore sucks in bump senitivity in gold mode. Even when you don't touch anything just strong wind can cause the chatter. I am actually really suprised that the testers did not pic that up. Or, they just had relic hunters test it who never used the gold mode. However, no wind, no touching anything, no fly landing on the coil, and the Manti is brilliant for shallow gold in trashy sites. GC
-
I got a very rare metal detecting surprise recently when I was informed of something I automatically never considered. Every detector I have with a cross hatch carbon fiber lower rod, screams with a Garrett pinpointer and even more so if I check that lower rod with my 24K. They told us back in the day metal coil bolts were ok because they did not move in relation to the coil. True perhaps but now we do not use them. They told us metal rods were ok if they do not move in relation to the coil, but all the manufacturers got away from that and went non-conductive. I just assumed that's the way it was and always would be. Now it appears conductive lower rods are back in the form of cross hatch carbon fiber. Is the issue a problem or not? Probably not for most uses, but I’ll bet most nugget hunters ears are really perking up on this news. It's definitely a problem for the Manticore used in Gold Mode. I am looking for alternatives for my Manticore lower rod while nugget detecting as it does have some observed issues regarding false signals when jacked to the max for nugget detecting. Credit for this observation goes to Gerry McMullen and his class members and team. It also is shown by Bill Southern in his video below (Jeff McClendon's post) so I don't know who observed it first. Jeff has experienced it, as have others. Apparently the conductivity of carbon fiber varies greatly depending on how it is made and what additives are used. All I know is my pinpointer goes nuts on the stuff and if it does, that’s a target as far as a detector is concerned. From https://europlas.com.vn/en-US/blog-1/does-carbon-fiber-conduct-electricity ”So, does carbon fiber conduct electricity? Yes, carbon fibers do conduct electricity. The electrical conductivity of carbon fiber is typically improved by incorporating reinforcing materials. Additionally, they can also generate electricity when subjected to magnetic fields.”
-
There was a big blow up over the discovery that the conductive lower rods now shipping with the Equinox 700, 900, and Manticore can be problematic for gold prospectors and maybe others. The lower rods are surprisingly conductive, and can fire off when the detectors are set in gold mode or high single frequency modes. It is not really a problem for people using modes less sensitive to tiny targets. Most coin, relic, and beach hunters are just fine. However, to make it easy I have a simple test for you. If your detector passes this test, I’m not swearing a conductive rod is not an issue. The test is very conservative in that only the hottest detectors will fail. In the case of the detectors mentioned it is dependent on your settings. What I am swearing therefore is if your detector can’t pass this test, is that you really should not be using a conductive lower rod. steveg is now working on and will have a non-conductive rod option available soon for the three detector models mentioned. I will link directly to it here when he has it for sale. I want to note that this is not really a rod problem. It’s a hot detector problem. The conductive carbon fiber rods are excellent in most applications, and it’s only when you pass a certain sensitivity threshold that they might present issues. This test applies to all detectors, PI or VLF. Official Steve H Conductive Rod Test Set your detector up with your desired settings. Be sure you are not wearing a ring or a watch, cufflinks etc on your test hand. Move your open palm directly around on the bottom of the coil. If the coil signals at all to your bare palm, then I strongly recommend you do not use a conductive lower rod with the settings you are running.
-
Beach hunters might’ve heard the mighty uproar over at the prospecting side of the forum.. They’ve got their undies all knotted up over their high frequency VLF detectors reacting to carbon rods.. As if they’re the only ones.. Whilst Geotech’s excellent video shows that carbon rods don’t react when the detector is in multi-frequency beach mode (where the rod’s signal is filtered out just like a salt signal), not all beach detectorists hunt exclusively in beach mode.. Nor do they just hunt on beaches.. I for one also hunt gold, silver coins and the occasional bit of ‘old junk’ (relics).. I don’t buy any manufacture’s claim that reactive carbon rods only effects a small, easily disgruntled, part of the metal detecting community.. Prospectors are not the only ones who demand the best performance from their tools.. When I read about this ‘problem’ I straight away started to think about ways to fix it.. Even if there's only a slight chance that a carbon rod is gonna make me miss a gold ring (or anything else!), then to hell with it.. To this end, I’ve put the original lower plastic rod back on my Nox 800 (with a carbon fibre upper rod) to serve as my general purpose detector, whilst the fully carbon fibre Nox 600 stays in beach mode as a beach detector until I can get another plastic lower rod for it.. Just like every other detectorist, I don’t want anything to screw up my chances of finding my favourite bit of metal..
-
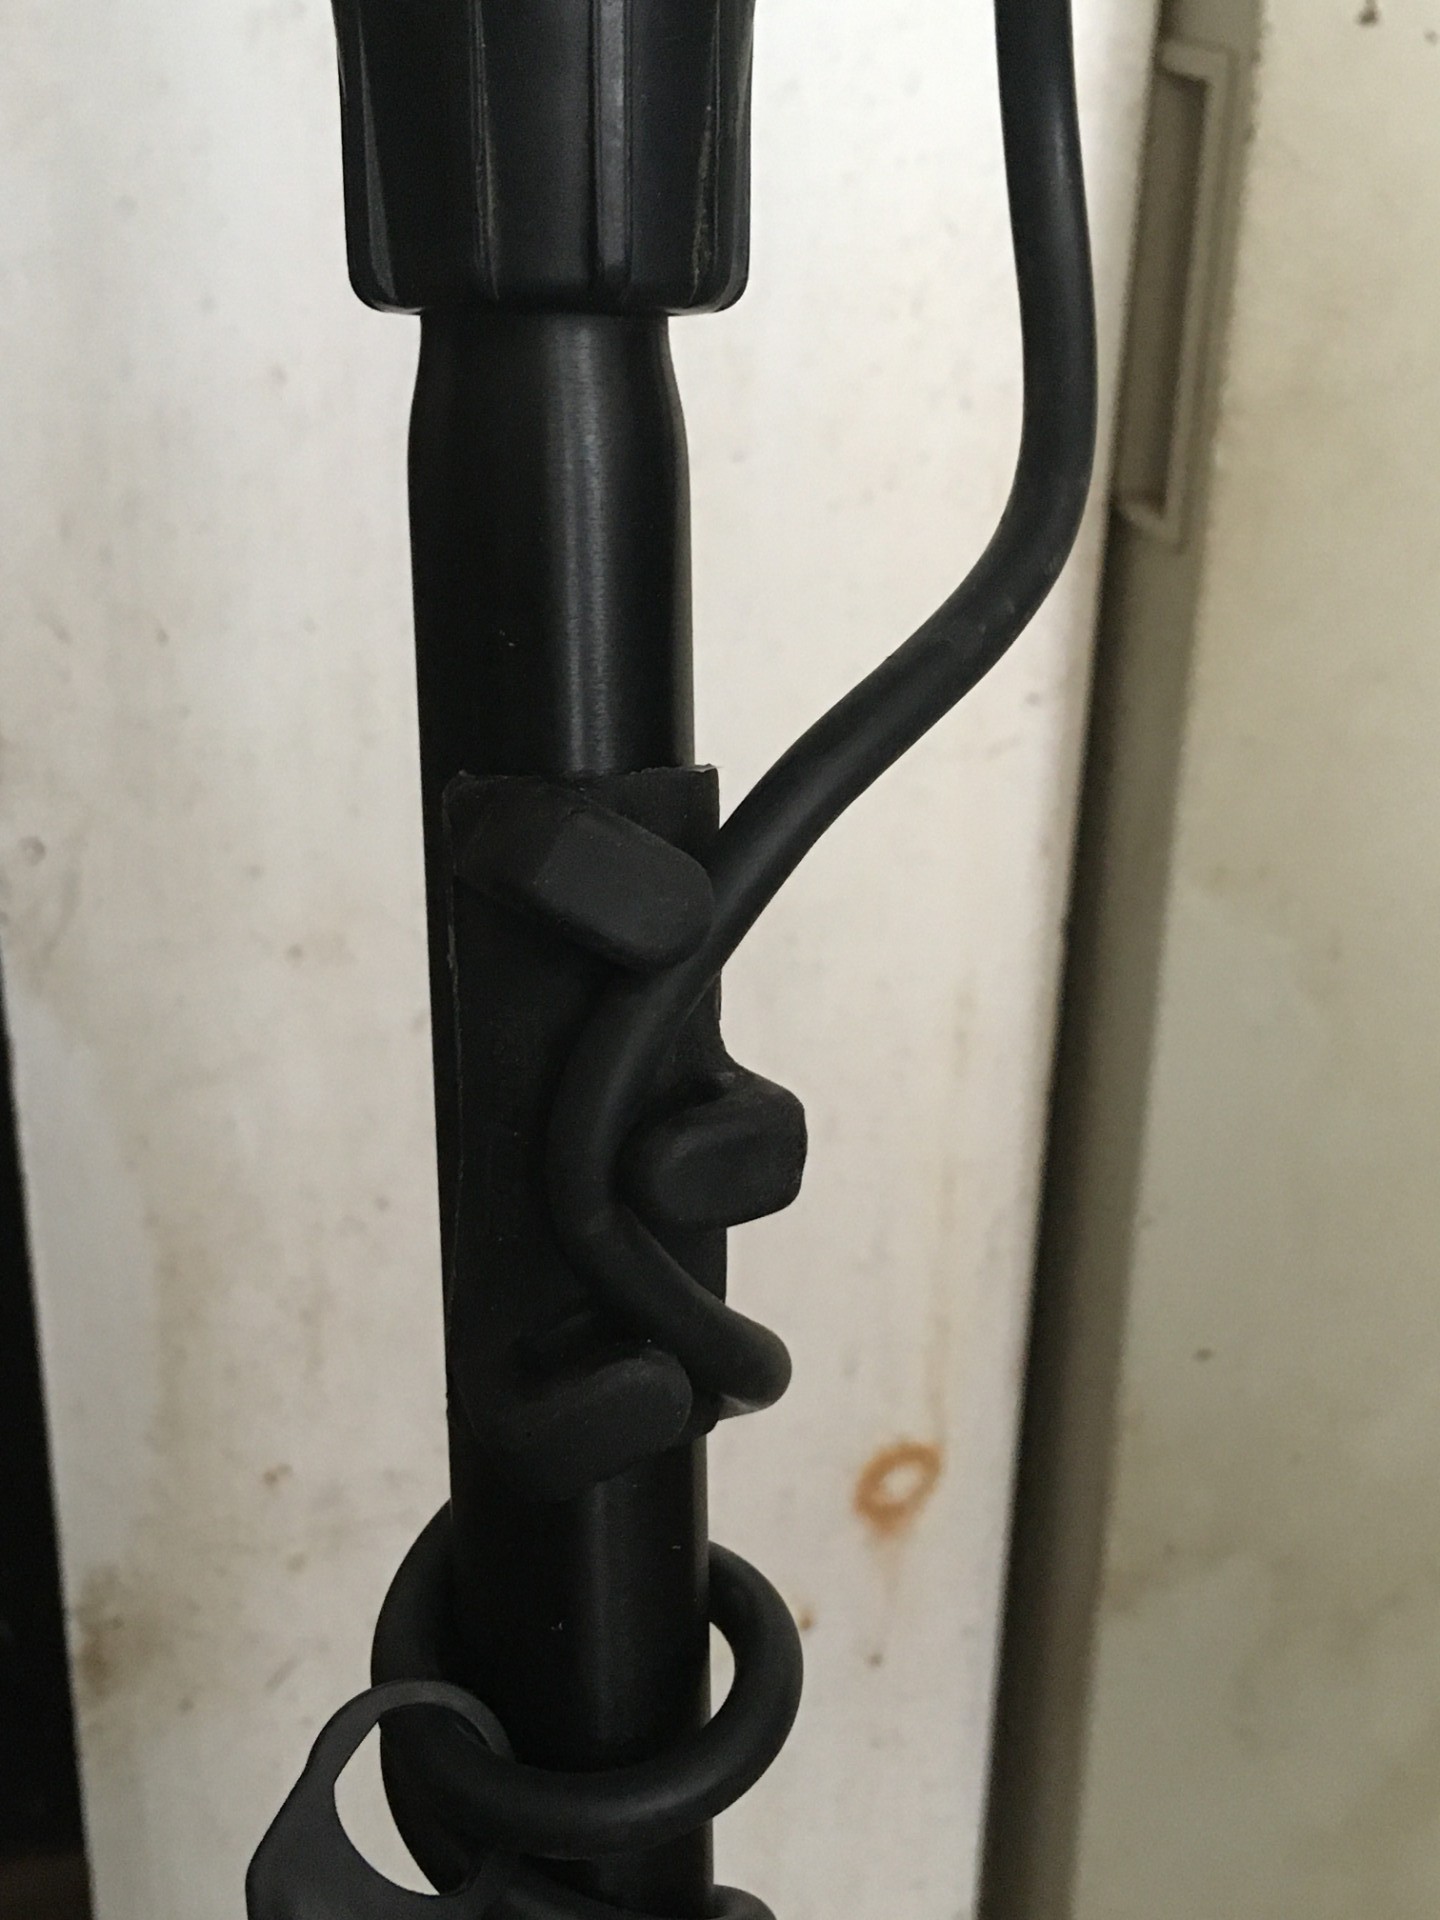
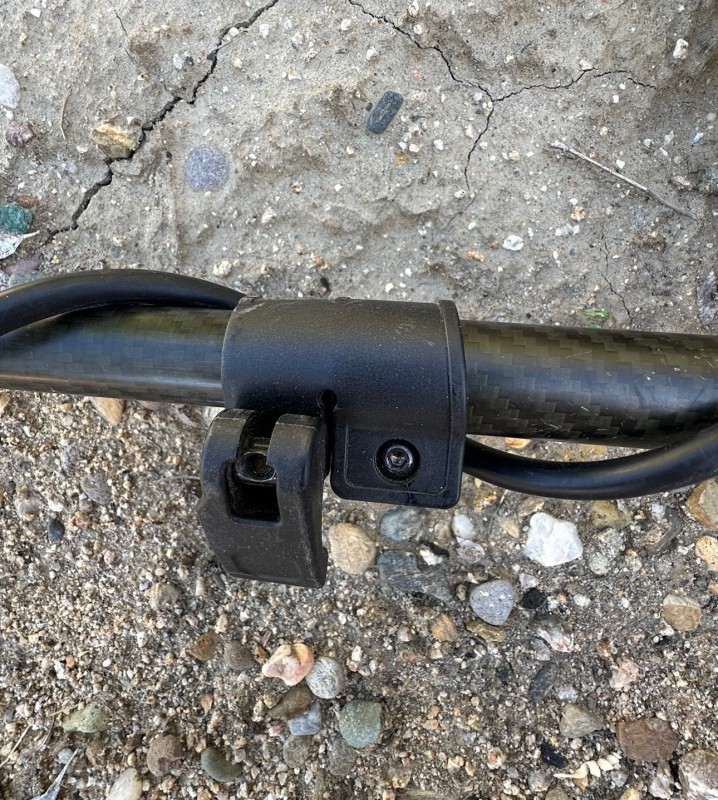
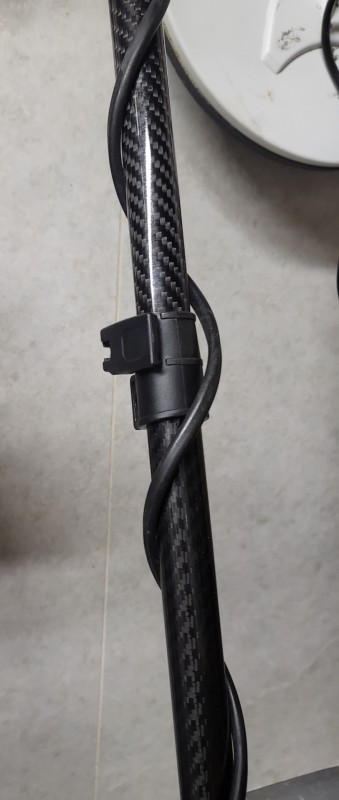
My quest for securing coil cables is over.....I have tried; 1. Electrical tape.....sand sticks and it leaves a gummy residue behind. I am always applying it and taking it off 2. Cable ties......can bite into the cable if too tight and cause damage. Cutting them off is a pain and expense. 3. Cable clips.......can also bite into the cable and sand grinds where it contacts. 4. Velcro.......seriously....too loose and sand plugs the hook and loop constantly. We all pretend the love velcro but we are liars ! Found these at the hardware store the other day by accident........have I been living under a rock all these years. Have my fellow DP members not shared this with me before? Adjustable / easily removable / reusable silicon rubber ties !! Tough and very gentle on the cable.....secure perfectly and tightly. I snipped off a few inches after cinching them down on the cable and shaft. Cheap to buy and if pink is your color then my friend you are covered ! I am in coil cable management utopia........if my wife hadn't asked for kitty litter (for the cat and not her) then this might never have happened. Vegan friendly and NON-CONDUCTIVE !!!! Behold......😍

-
Phrunt posted a pretty neat Clip he got from China. It works perfect for your Swing Arm. Especially if you have a Minelab Swing Arm that has no convenient way to store the Swing Arm if you don't want to use it. I ordered a sample and it has my approval. So I ordered 550 of them. Price $3.50 plus shipping in the U.S. Unfortunately depending on where you live shipping will probably be more than the clip. Doc
-
 I have a carbon fiber Anderson Over/Under shaft for my Excalibur 2. I typically hunt in water depths varying from knee deep all the way out to chest deep. I am noticing some slight falsing as I am transitioning from the shallower to the deeper waters and vice versa, and I can only attribute it to the water that is retained in the shaft sloshing around next to the detector. When I leave the water and point my coil to the sky, a large amount of water drains out from the back of the over/under shafts. I remember on one of the shafts I had for my Equinox, there was a drainage hole in the lower shaft. My current Anderson lower shaft does not have a drainage hole, and I was wondering if this would help prevent the slight falsing I am getting transitioning from different depths? I guess its easy enough to try and plug if it doesn't work, but I was curious if any other Excalibur users have noticed this?
 -
 O-rings work pretty well for locking down the twist locks on the GPX 6000 shaft, but they don’t work perfectly and get really hard to unlock. So in trying to figure out a better way to go, I decided to try something much different. I don’t remember who first mentioned this, but using Detecting Innovations’ Glueless Clamps designed for Tele-Knox Shafts are a really great modification! High Plains Prospectors sells a set containing 2 clamps for $20, and they fit GPX 6000 shaft sections perfectly. For this modification, you have to cut off the two twist locks right up next to each one, and the best way I know to cut carbon fiber shaft tubes is with a basic diamond bladed tile saw so you don’t mess up the fibers. You don’t need water for it either. The shaft clamps work perfectly, and fit very well. You do not need to use glue or anything like that, they simply tighten up with a hex screw that is included with the kit. My 6000 is much more compact and I’ve only lost about 2 inches total from the shaft length by cutting off the twist locks. o
-
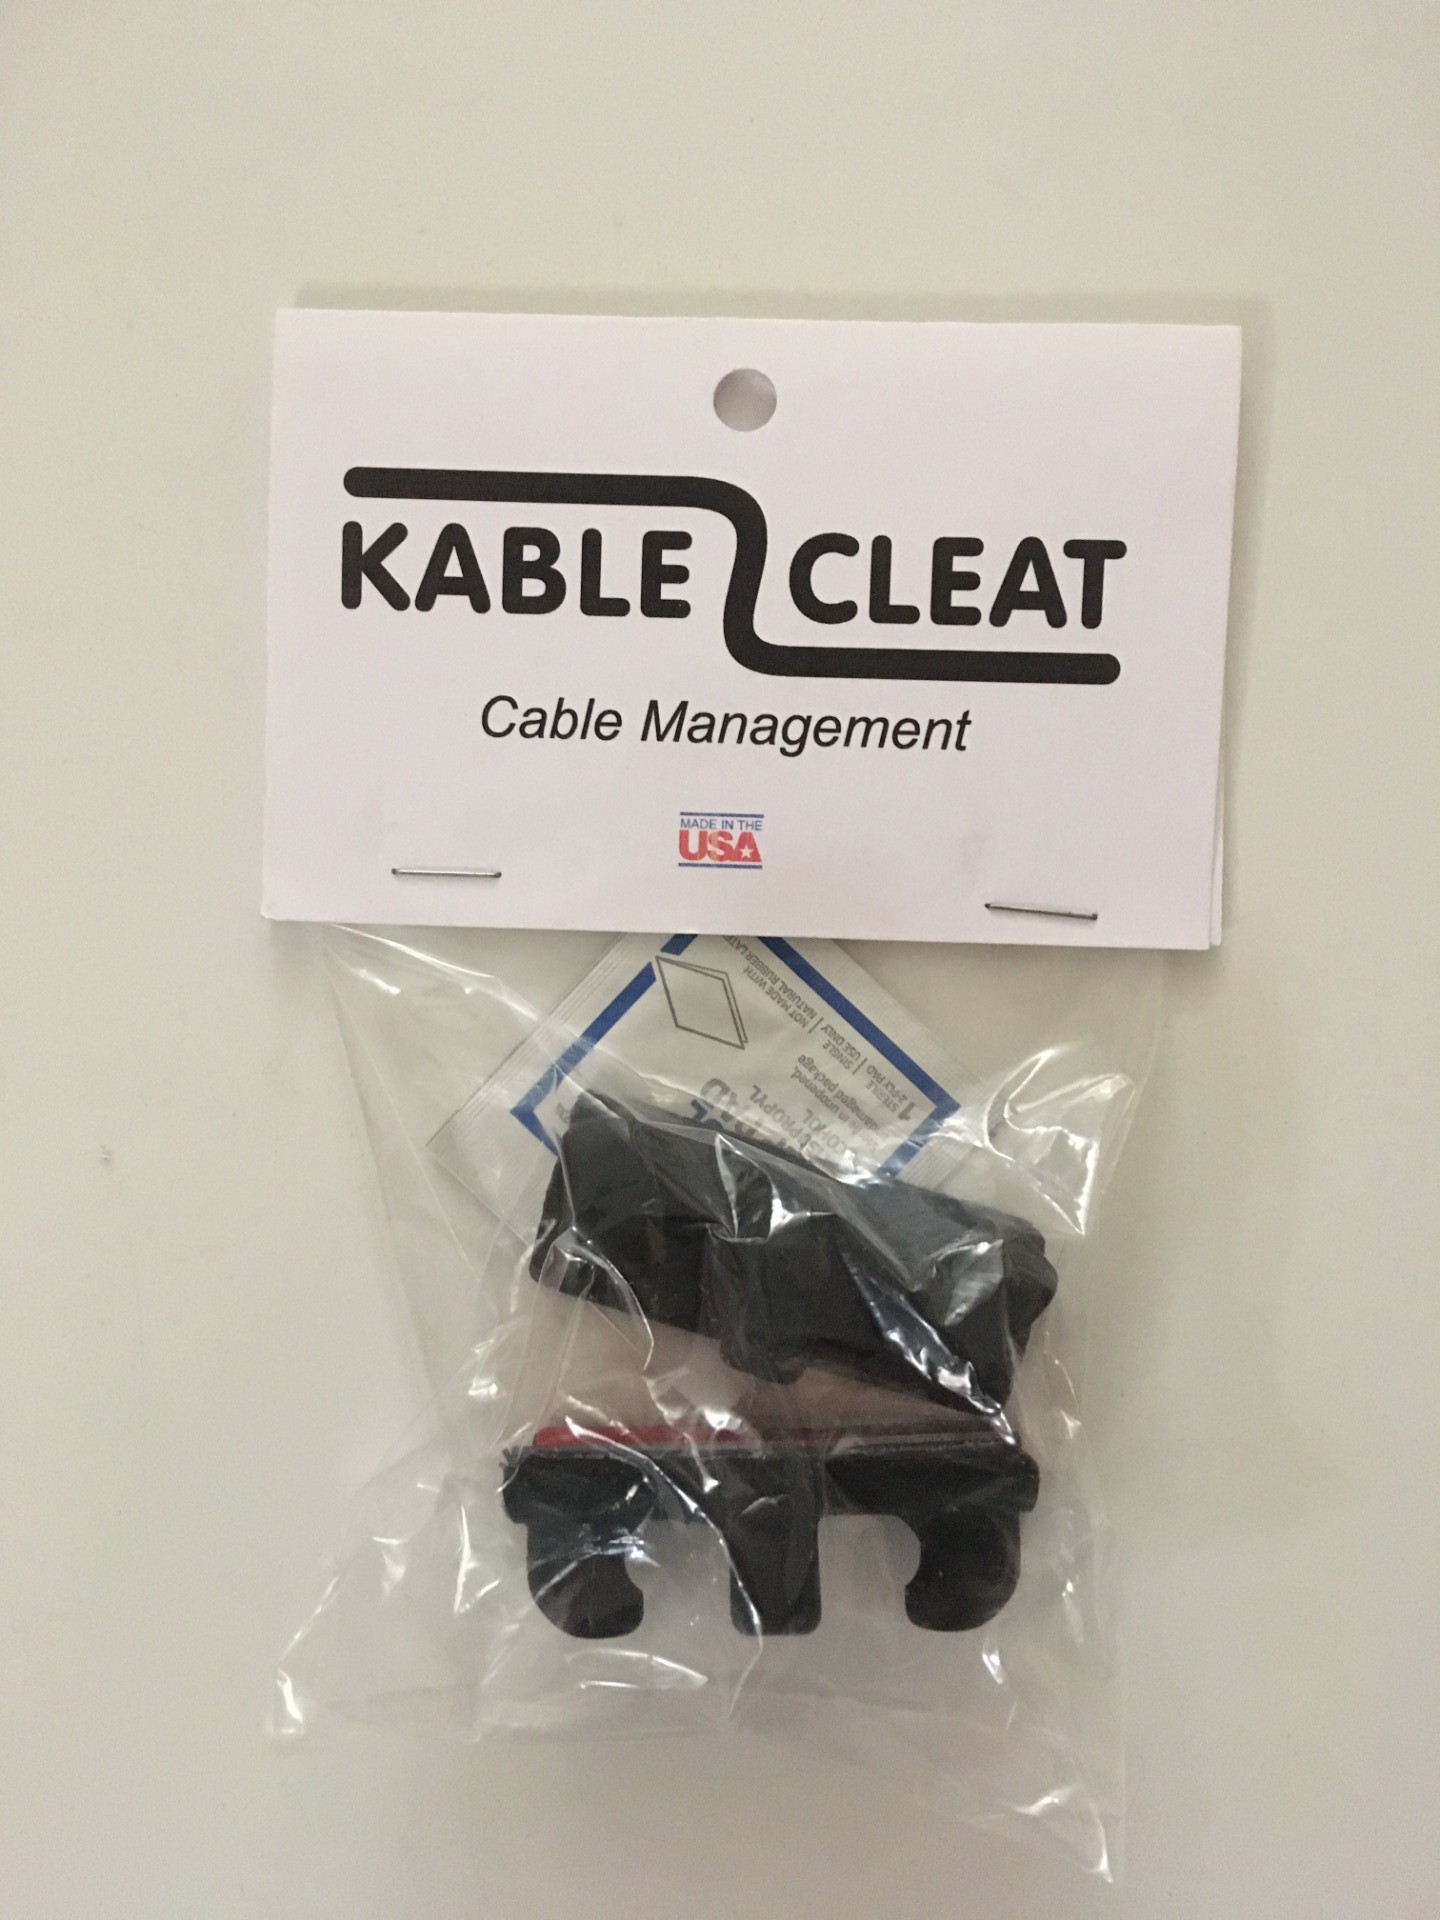
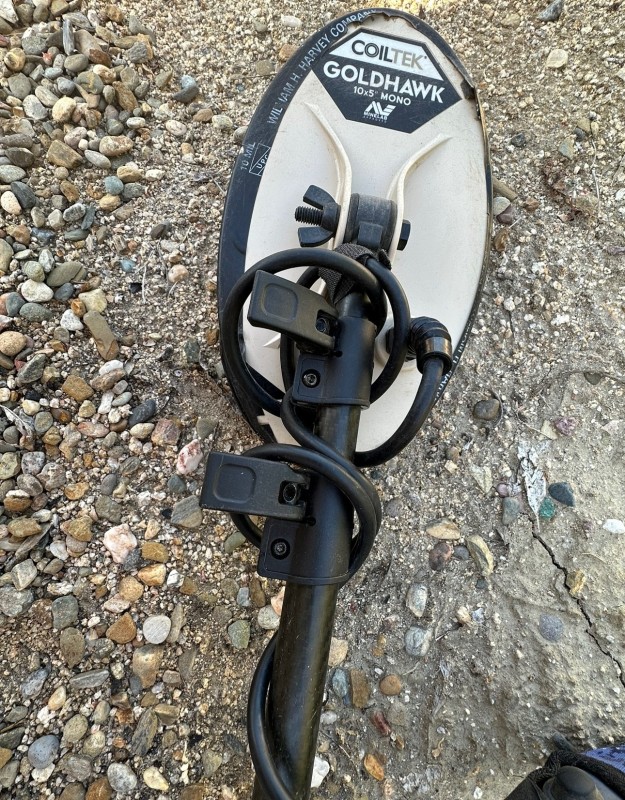
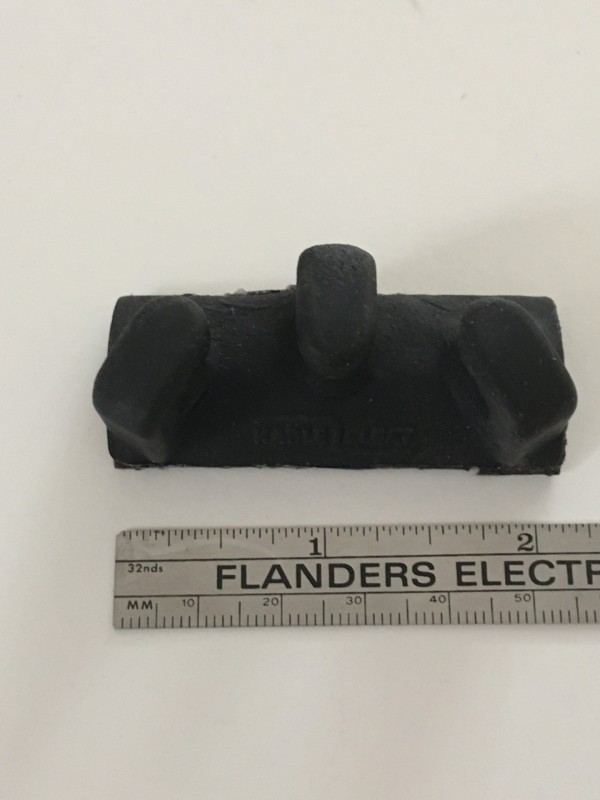
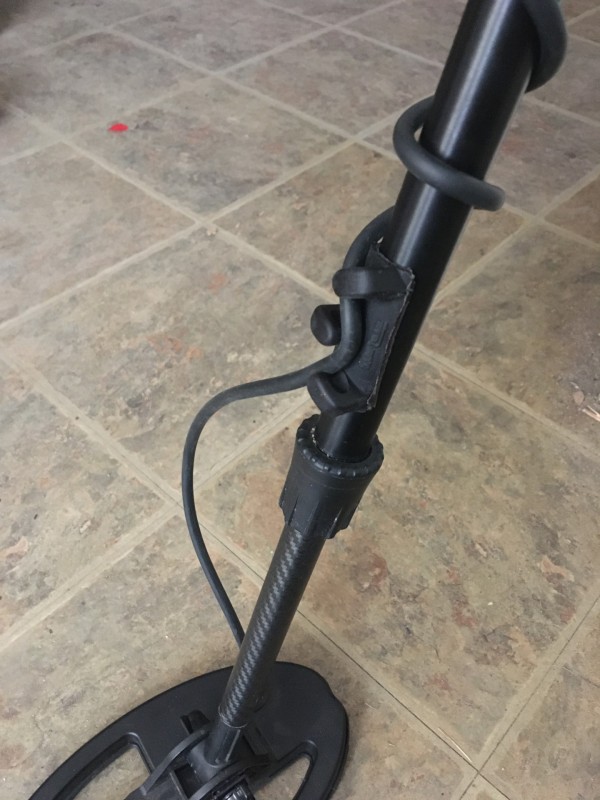
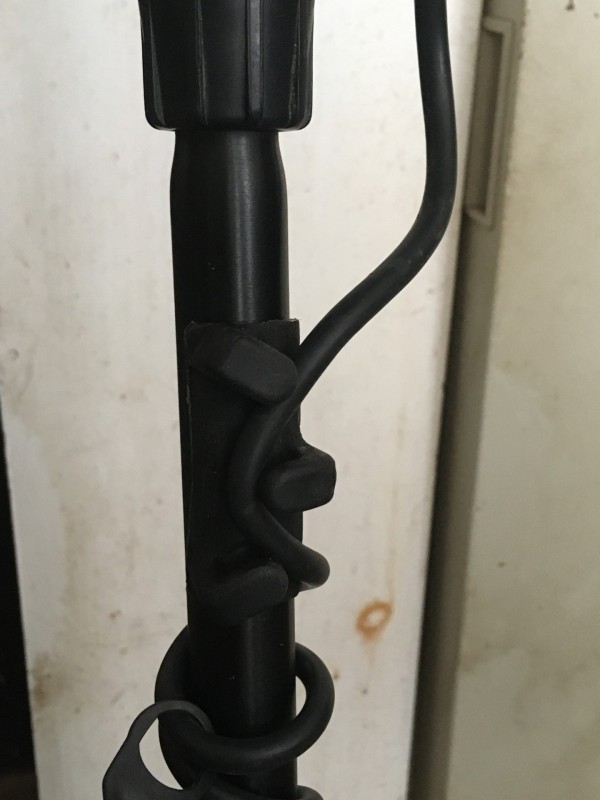
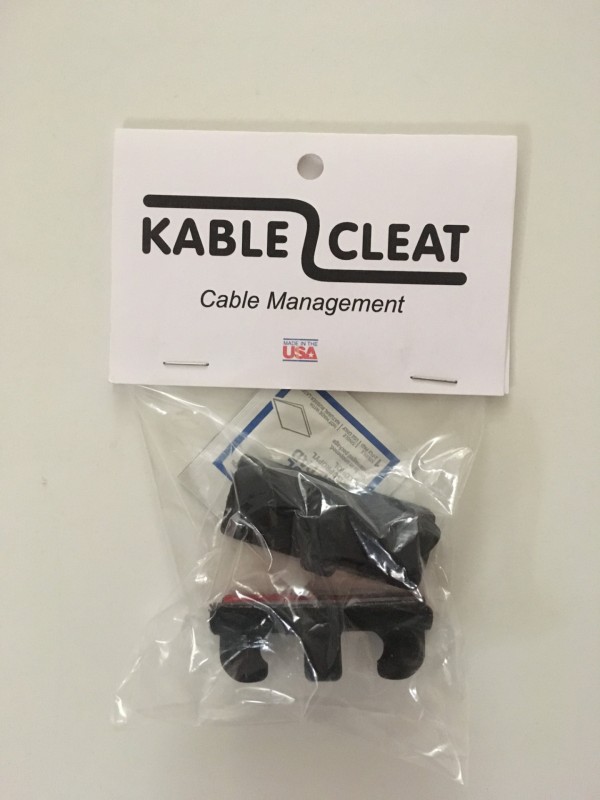
I change coils on my machines quite a bit, always hated the way velcro twists around. I also lost a couple of coils from Nel and Mars as their connectors aren't all that sturdy and the heavy cable wire likes to bunch up which eventually breaks the connections inside the strain reliefs. Something for you guys to think about when winding the cables on the shafts. I came up with a cleat and cast a bunch out of urethane so they are gentle on the wires. So far cleats are working really well for me. I will be shipping a batch out on monday but figured I would post what they look like for those that may want something better. Not sure how well they will work on 3 section shaft systems like the 900 and Manticore have. I have to check that out. Used my initials for the name to add that touch of cheesiness ? Questions, comments etc all welcome. Thanks Ken

-
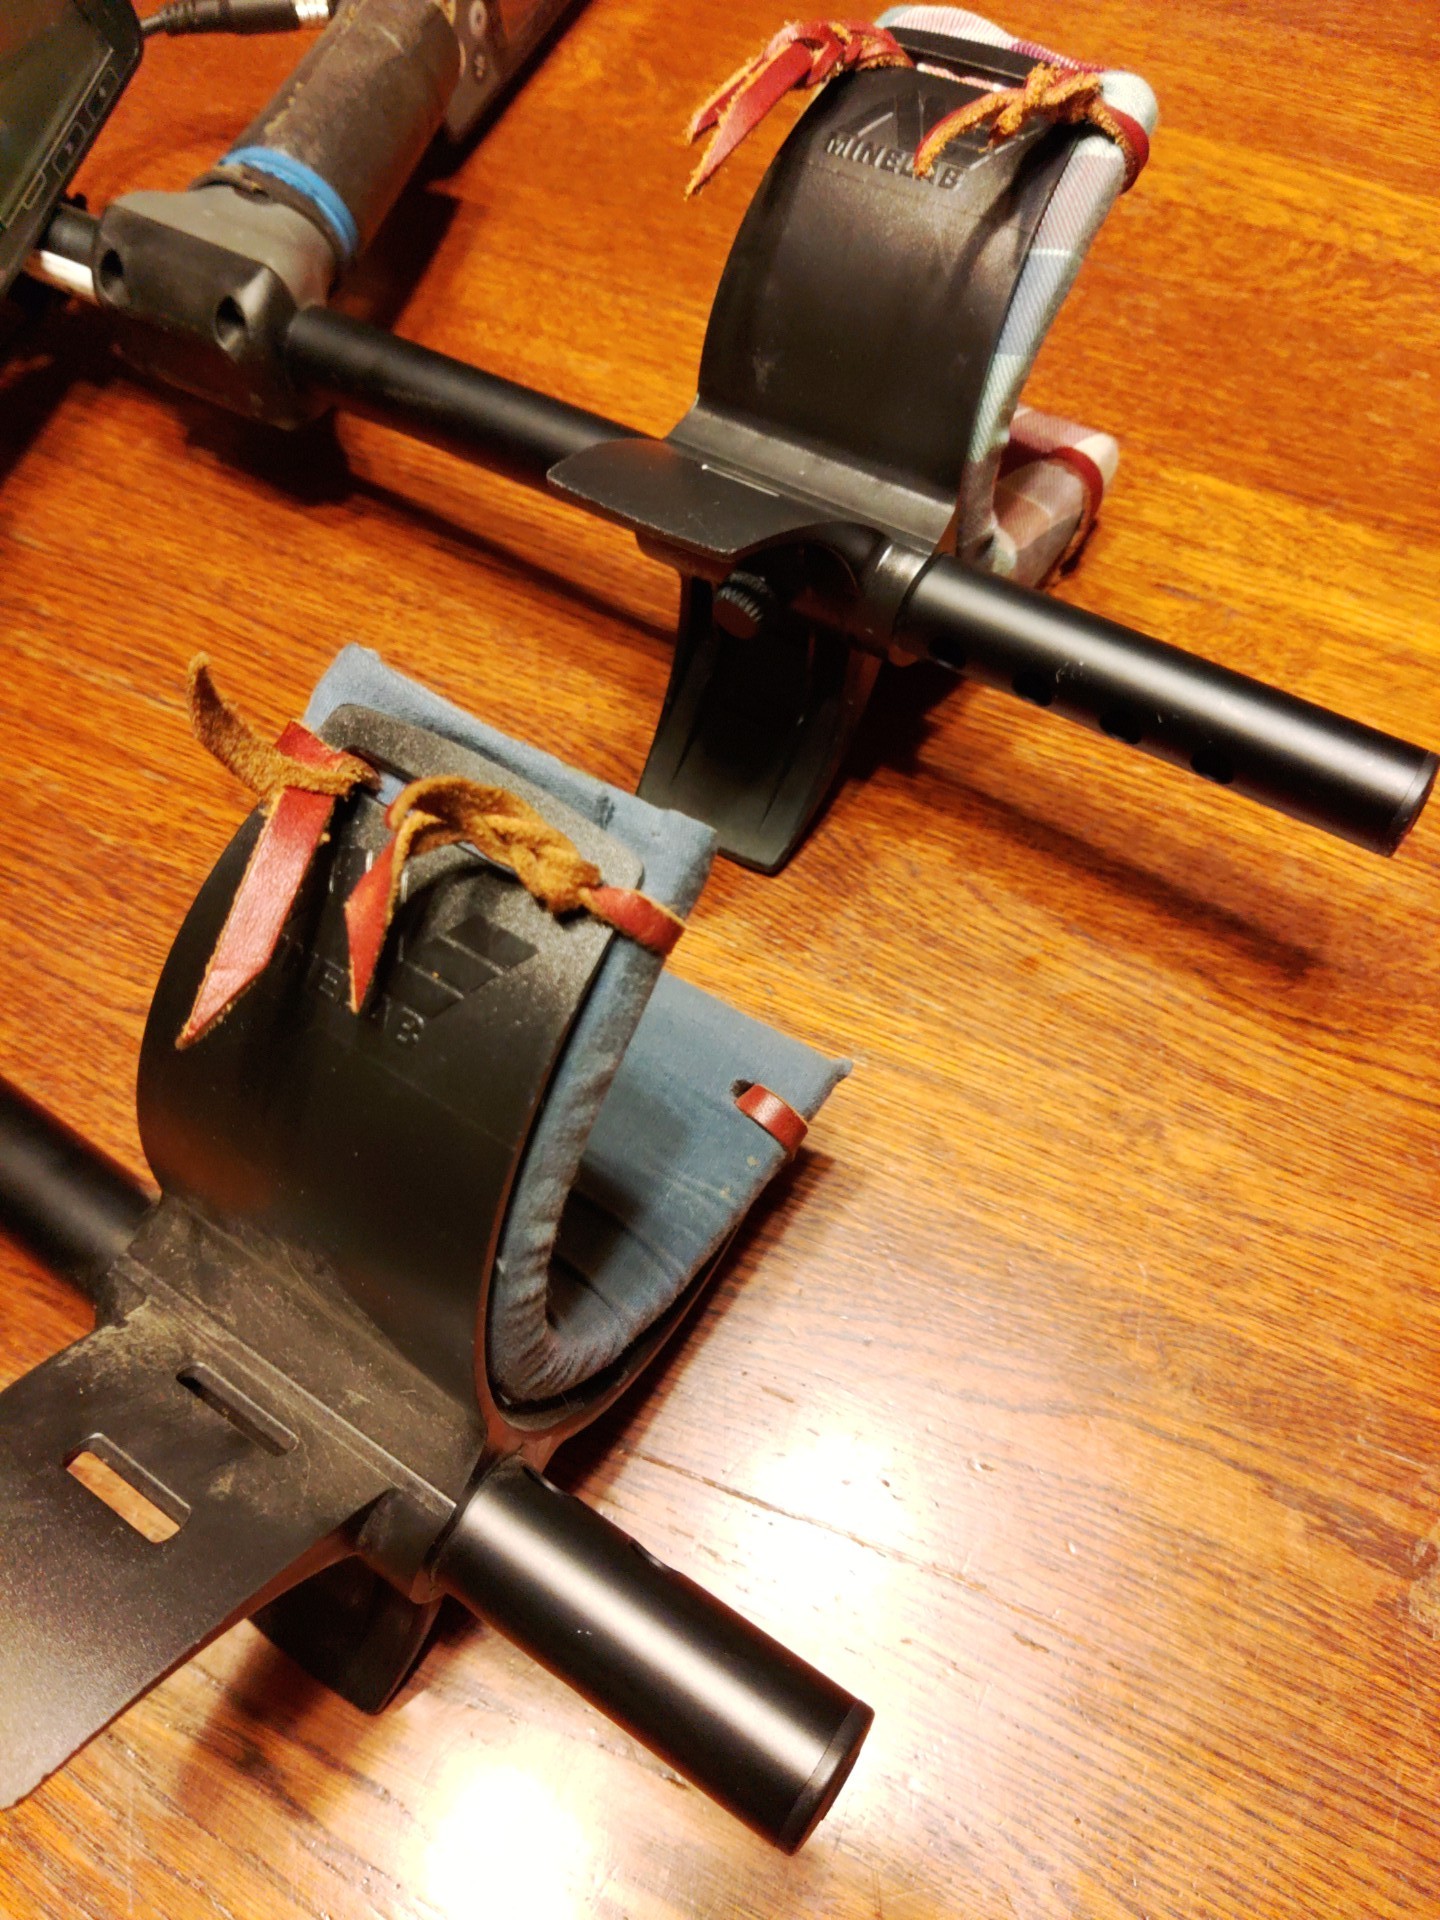
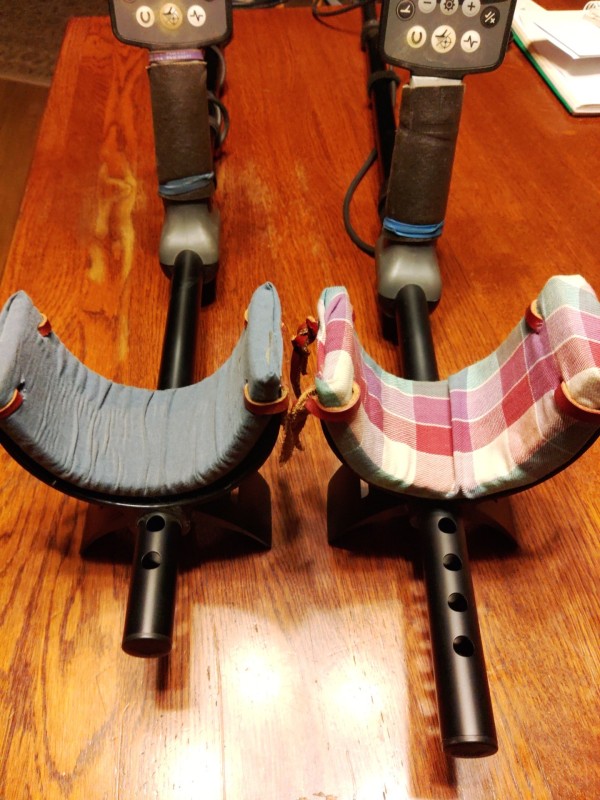
Love the box 800 but...the arm cuff is lacking. To big for both my wife and I. It allowed for to much side wobble while swinging. My fix on one is 3/8" felt with cloth glued on. Leather ties keep it in place and can be removed for other users if needed. I needed just a little more room so a 1/4" piece was used. MUCH better. Because of her short arms I also drilled a new hole to move the cuff closer to the handle. Basic ergonomics. Now she is comfortable and will detect for hours.

-
I just stopped dithering and bought the EQUINOX 900…. now I just hafta learn how to use it…. I’m looking for 2 lower carbon fiber shafts ( the shaft that the coil attaches to )…changing coils on this 900 is a chore…the shafts for the 600-800 will NOT work as they are a different diameter….I’ve contacted several dealers with NO results and have left several messages on Minelabs voice mail, but have had no reply from them….any ideas will be most appreciated….
-
 I finally got around to putting on a carbon fiber shaft that steveg designed for my GPX 5000. Sorry for the long delay Steve ?. I put it on the backup GPX and finally tried it out. The shaft breaks down in the center for easier travel. The 3rd section is a short shaft around 8" that connects to the coil. I wanted to have short shafts on various coils so they would backpack easier when traveling deeper into the woods. We were worried about a clamp that would have to be located right next to the coil, and if that would interfere with the coil. It does not and it still pulled silver at 15+" at a beach site it was tried at. So no worries there. Design and weight of the shaft is top notch. Those of you considering this for a GPX, just remember the main 2 pieces have to be designed for your height, as there is no way to adjust them. The adjustment comes from the 8" coil shaft. So you will only have about 4-5" of usable adjustment. This is necessary to keep the shaft assembly strong. The stock Minelab handle moved slightly for me since, I'm chicken little with it due to breakage. I've cracked too many of them, and I was over cautious of tightening it fully. I will do so in the future. Even though I under tightened the handle it did not move much for the whole hunt. I'm pretty confident the handle fits on it when tightened. Thanks Steve for the great job!
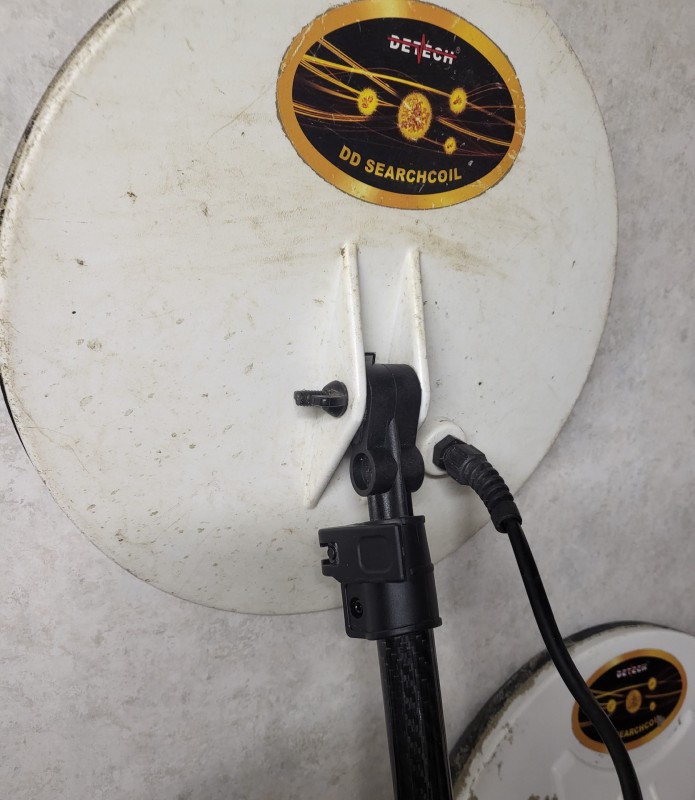
-
Dropped the detector and the shaft snapped just above the bolt. What are the options? JB Weld? Someone make a new, stronger shaft?
-
 Hi all. I'm looking to build an upgraded shaft suited to some very specific needs. I have all parts EXCEPT the coil mount piece. Does anyone know where I can grab a couple of them cheap? I'm thinking like most Minelab gear, they're probably under some random miscellanies camping equipment spare part name. Obviously Garrett, Nokta, Minelab, Tesoro, Detect-Ed, XP etc have them for their own shafts so they must be readily available somewhere? I've even seen some knockoff cheap shafts coming from China which have them but I can't find the individual part anywhere. Ideas?
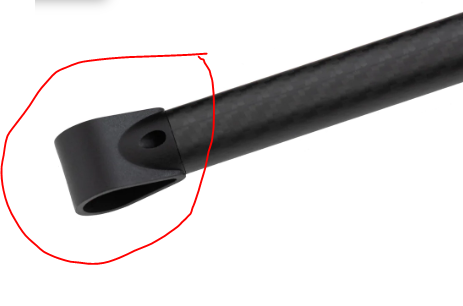
-
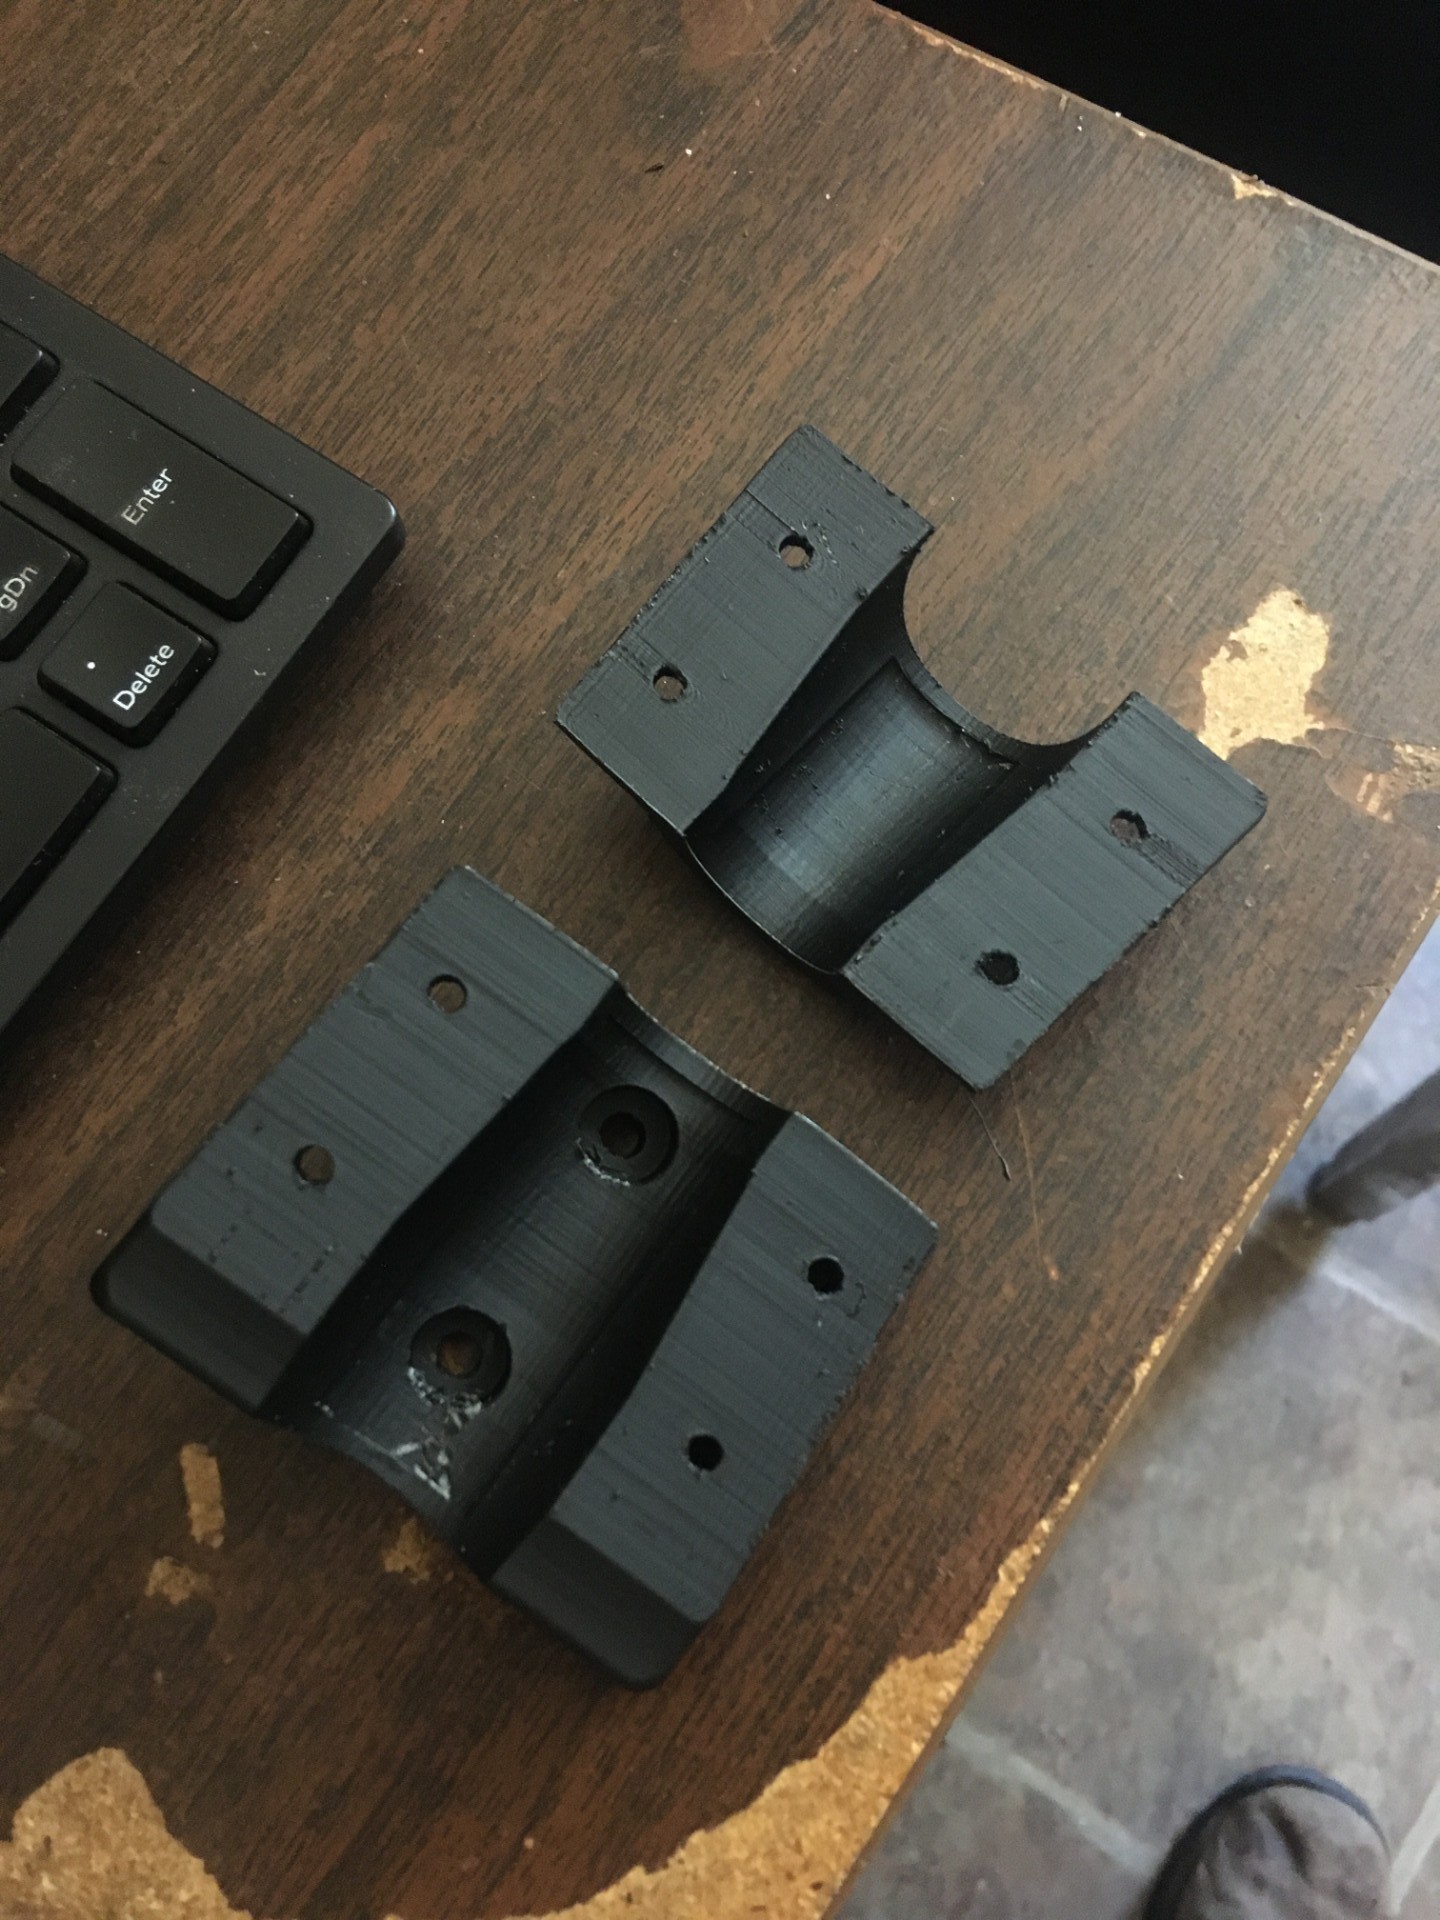
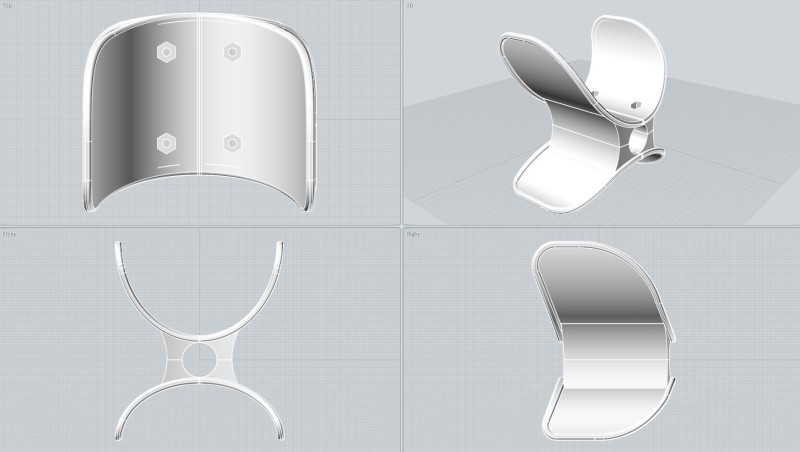
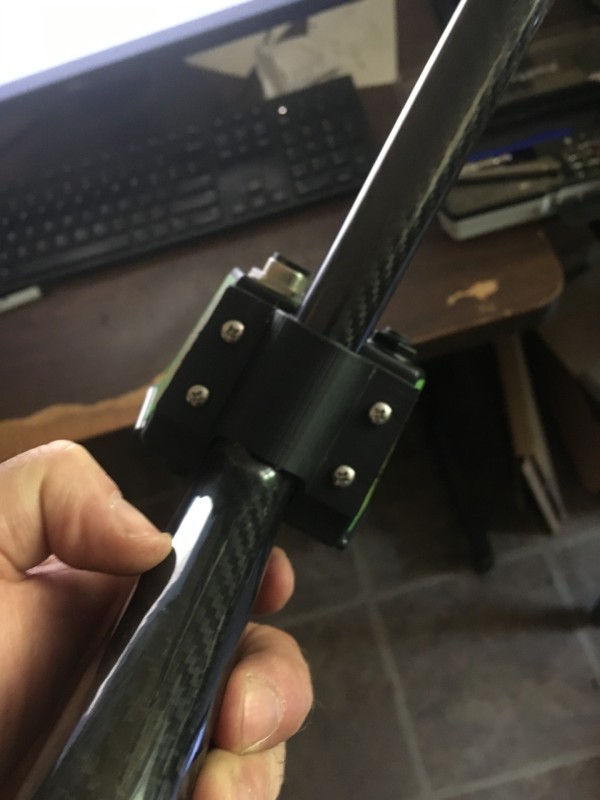
I made this for a carbon shaft conversion I did for my Cibola. Requires 4 8-32 x 7/8 screws and nuts and some double face mounting tape ie Gorilla tape or 3m. There is no holes needed to mount on shaft so it is non destructive. I did this because I did not want to drill holes through a carbon shaft because that causes a weak spot. So far the cuff is holing up really well and is very durable. When printing you can use a 10% infill to keep it light. 2 mm wall max is needed. Cuff 22-3mm shaft.zip

-
This is likely a stupid question, but I'll ask. While I'm not interested in landmines, it seems that some mine detectors fold into those nice-looking and portable packages. Why all(?) civilian detectors that I know of have this standard, less-portable, and more awkward form factor: a coil on a (collapsible) stick with a control box attached?
-
On June 21 I ordered a locking shoe for my Deus 2 and I paid extra for 2 day shipping. It has now been 2 weeks and I still have not received the item. I have sent them 2 messages and haven’t received any response. Has anyone else had a problem receiving their order from detecting doodads? At this point I am going to contact them through PayPal and request a refund. I don’t know what is going on with them, but their customer service stinks.
-
steveg has outdone himself again, and produced a "tall man rod" for the GPX 6000, that adds 5" length to the length of the stock rod. At 5'11" I find the stock lower rod to be just long enough, so this will be great for the taller people out there. See The Classifieds If This Link Does Not Work For Latest Ad
-
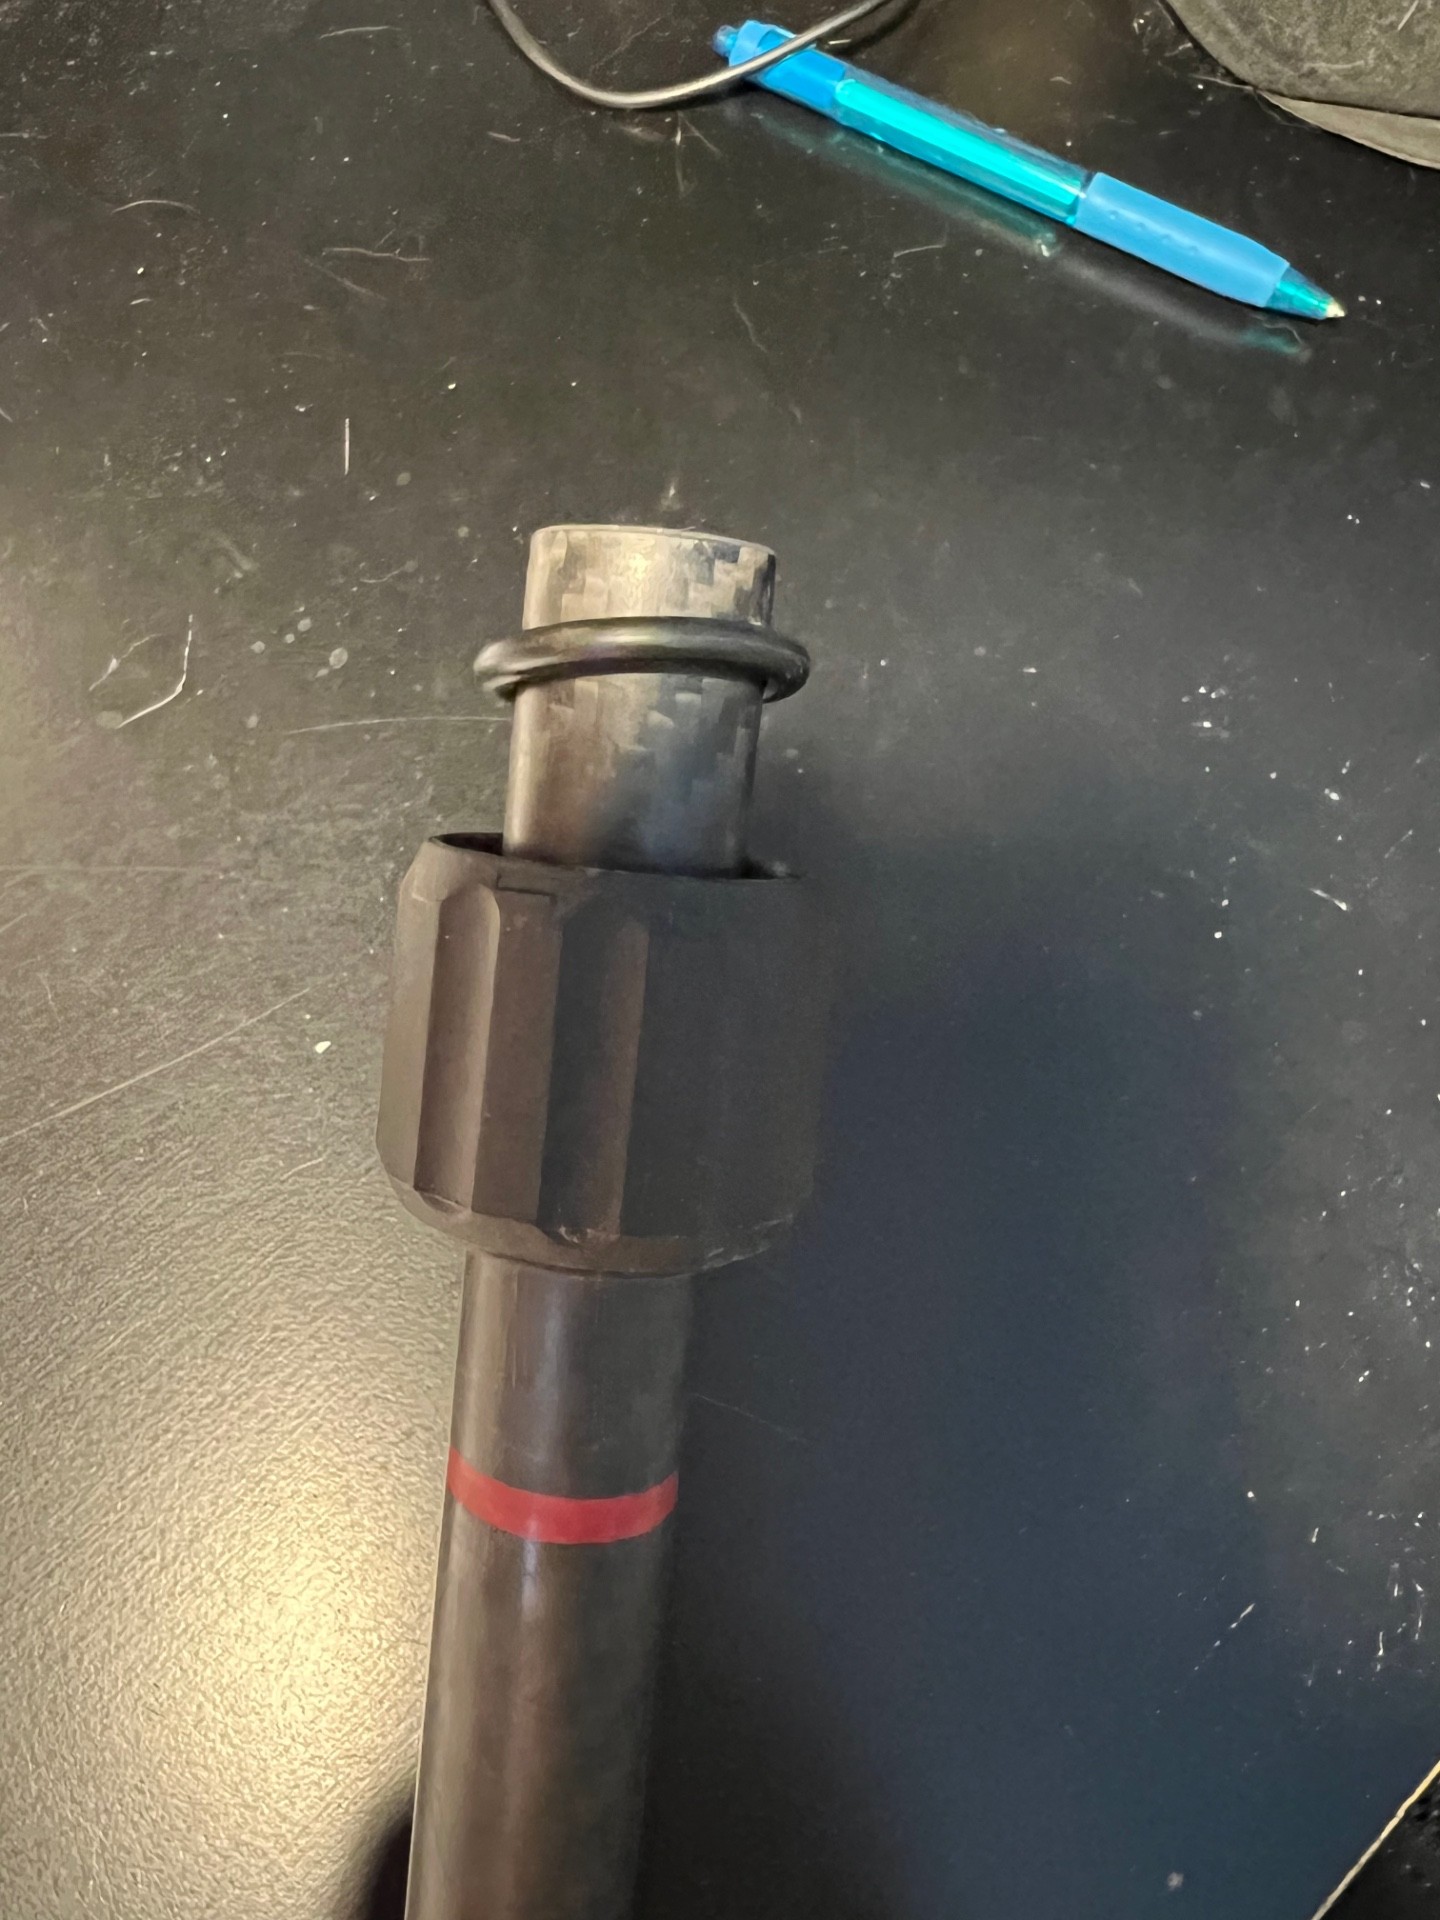
Here’s a simple fix for the 6000 twisting shaft issue- just put a 1/8th inch thick dry O-Ring inside each of the locking rings. When you twist the locking rings, the o-rings compresses and tightens up between the shaft locking ring and collet keeping the shaft sections from spinning as easily. I used these two sized o-rings (in inches): 13/16 x 1-1/16 x 1/8 3/4 x 1 x 1/8 Fully unscrew each plastic locking ring and separate each rod, leaving the plastic locking rings in place on them and put the o-rings on. Be sure the o-rings fit snuggly but not too tight around each rod as shown below. Then insert the rods back in place and reconnect the threaded locking rings with the o-rings between the two parts. The o-rings will slip between the plastic collets and the ring wall as you screw on the locking ring. When the locking ring gets hand-tight, the o-rings will provide more locking force between the rod sections so they can’t spin as easily.

- 3 replies
-
- 7
-

-
- rods shafts hardware
- advice and tips
- (and 1 more)
-
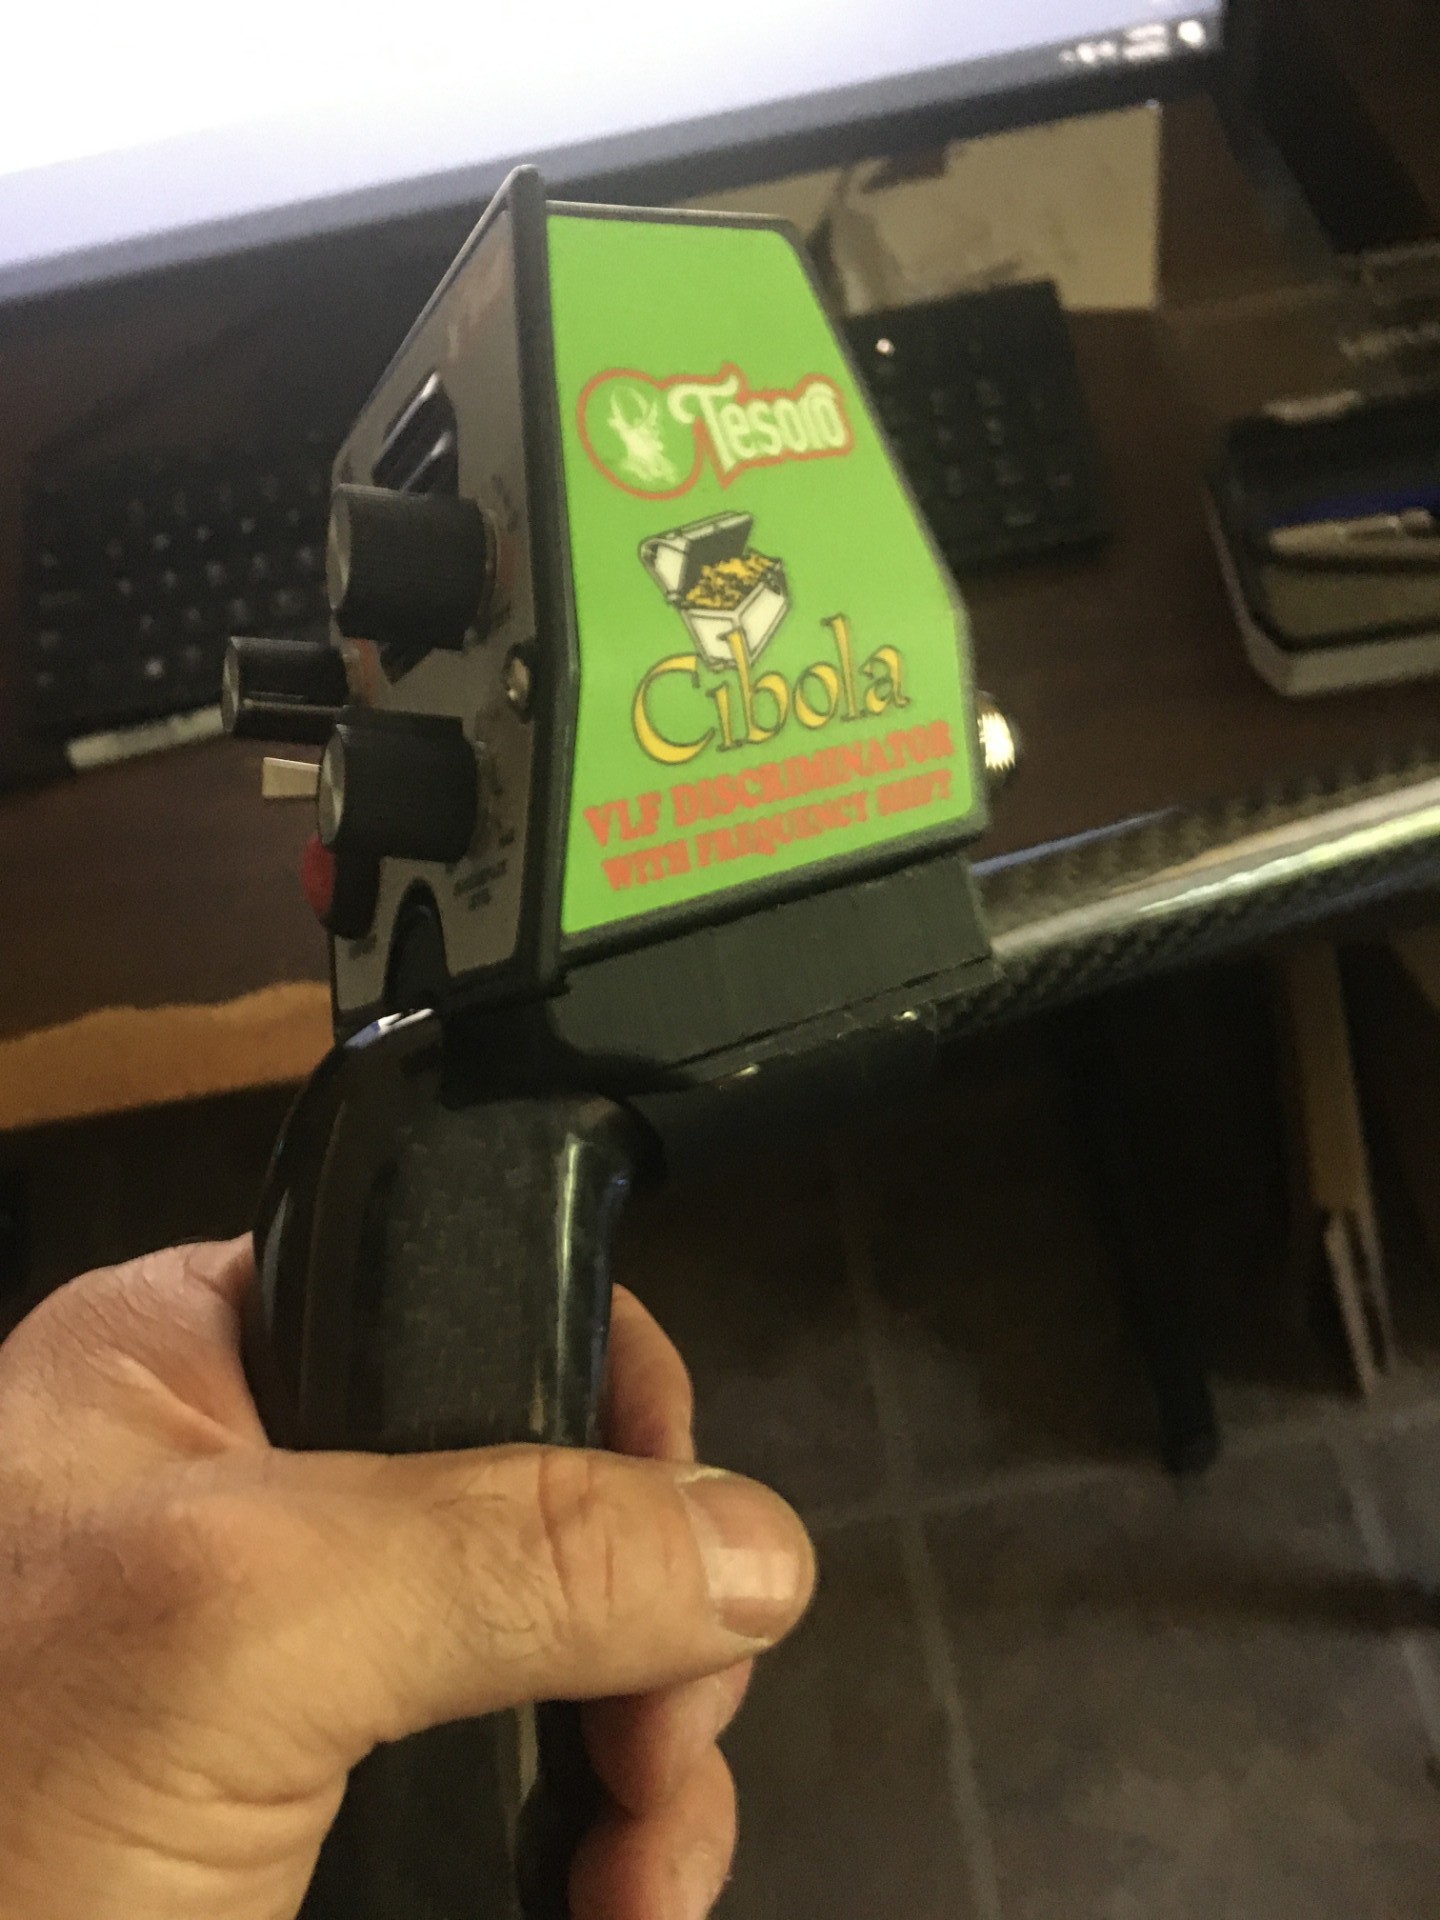
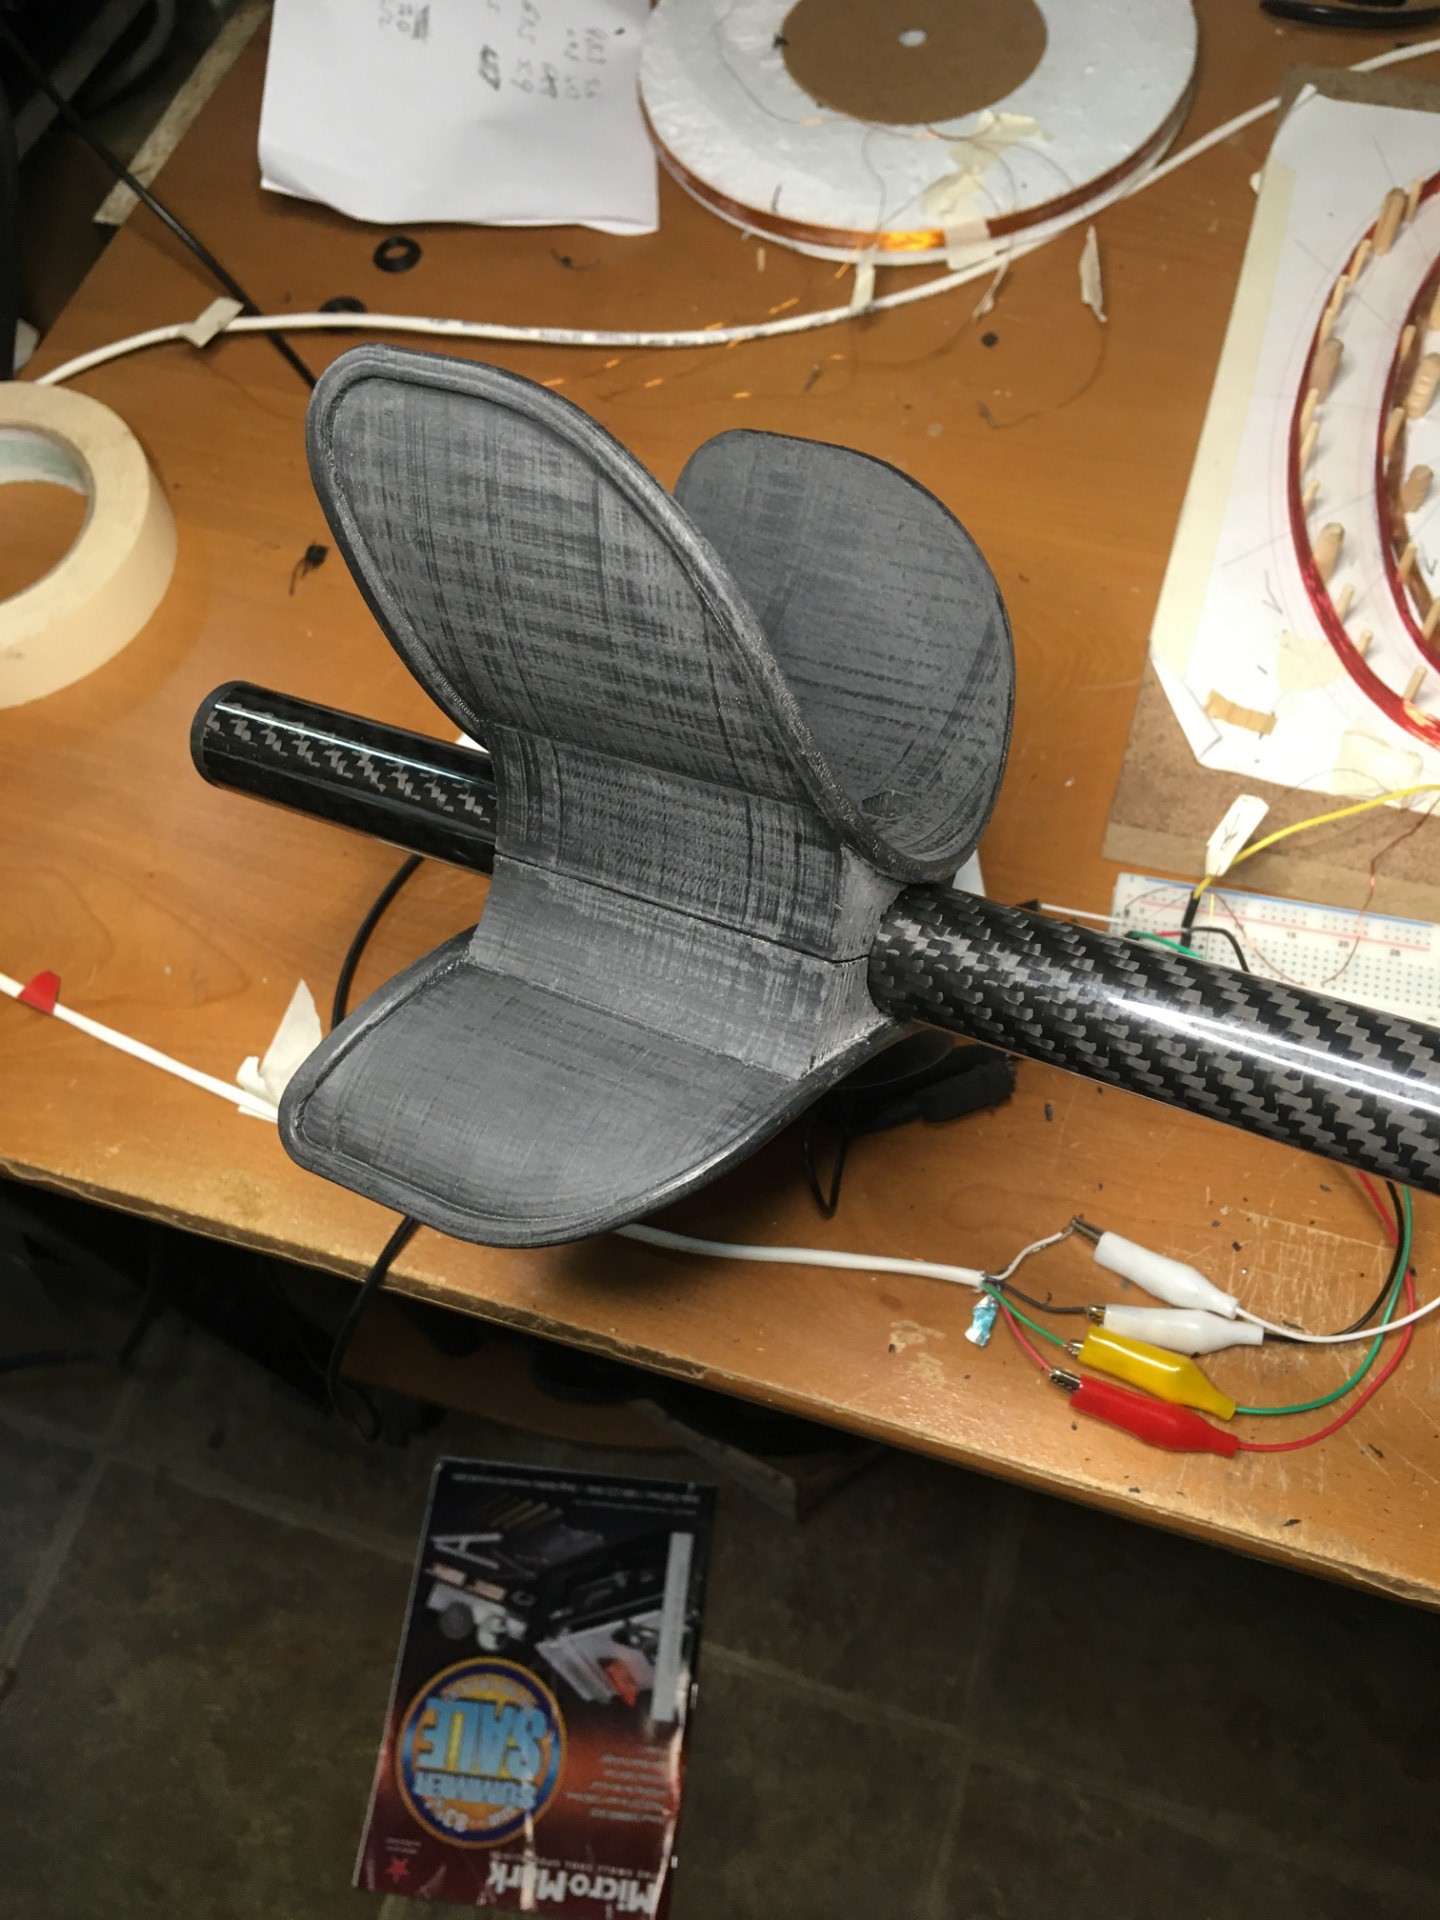
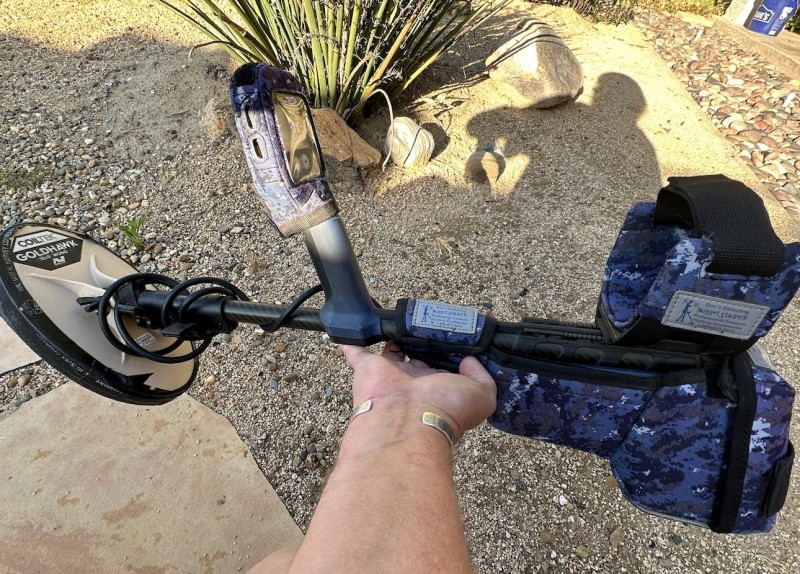
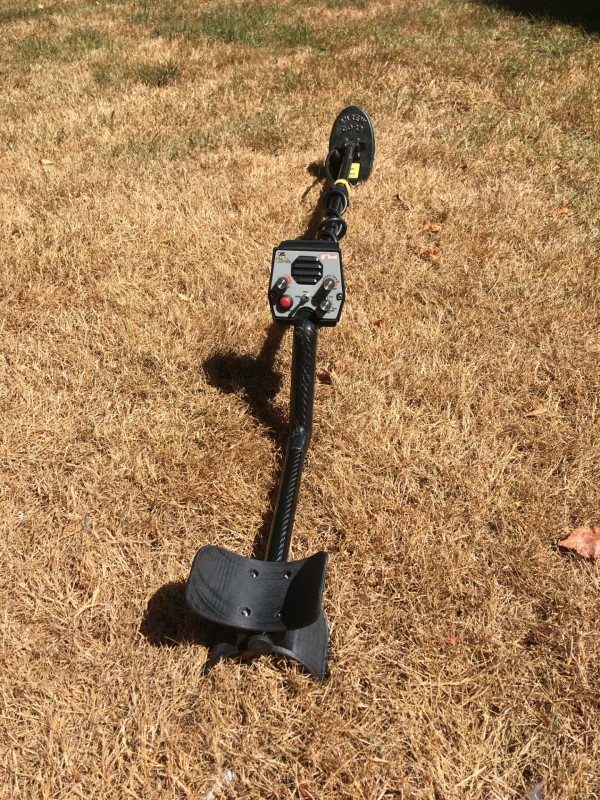
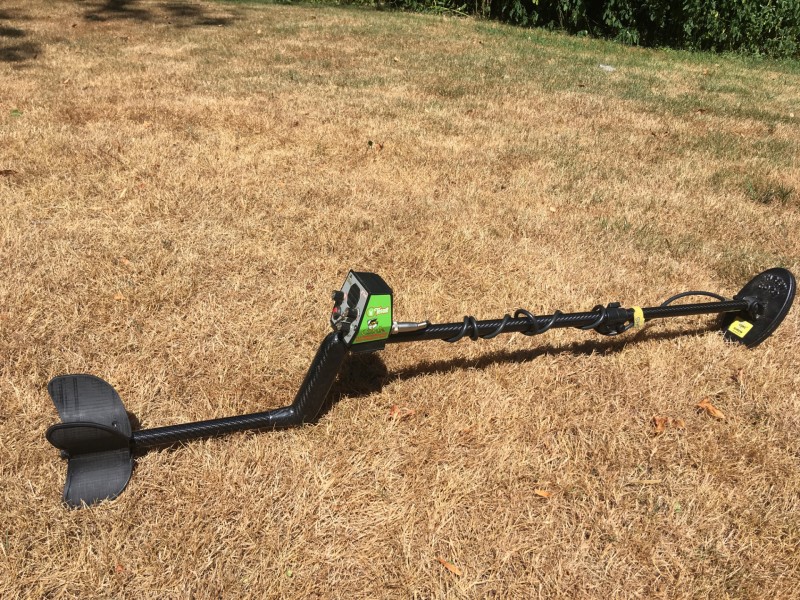
 Hot weather kept me in most the summer so I got bored. Wasn't happy with the frankenshaft I had put together for my Cibola so I snagged the all carbon S-Shaft from Steve G. Carbon shaft alone is only 8.6oz!! You can see the taper on it that I needed to make an adapter plate; Plate I may redo and refine it later and make it bit lighter as I over built it as usual. Next I made the cuff: Finally because I ordered the shaft with the back too long I had to trim a couple inches off. Final pics of complete machine: Total weight including the 10.5 oz Shrew is 2.1lbs. If I remake the adapter I can get it to the 2lb mark. The adapter plate and cuff use pocketed screws and bolts and internally there is a recess for industrial adhesive tape. I did not want to glue or put screws through the carbon in case I needed to remove a part so nothing is permenant.
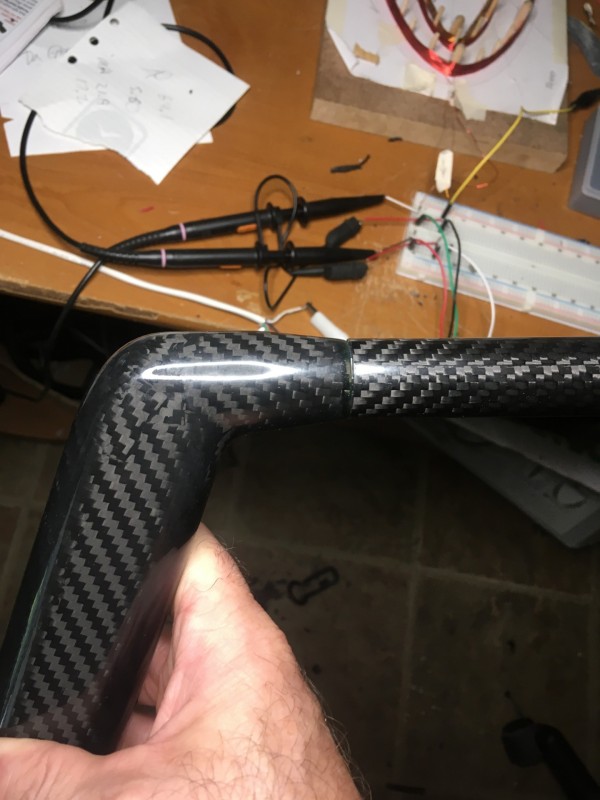


-
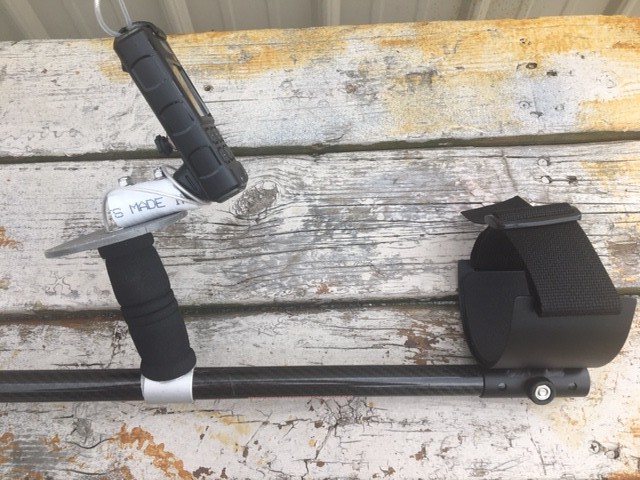
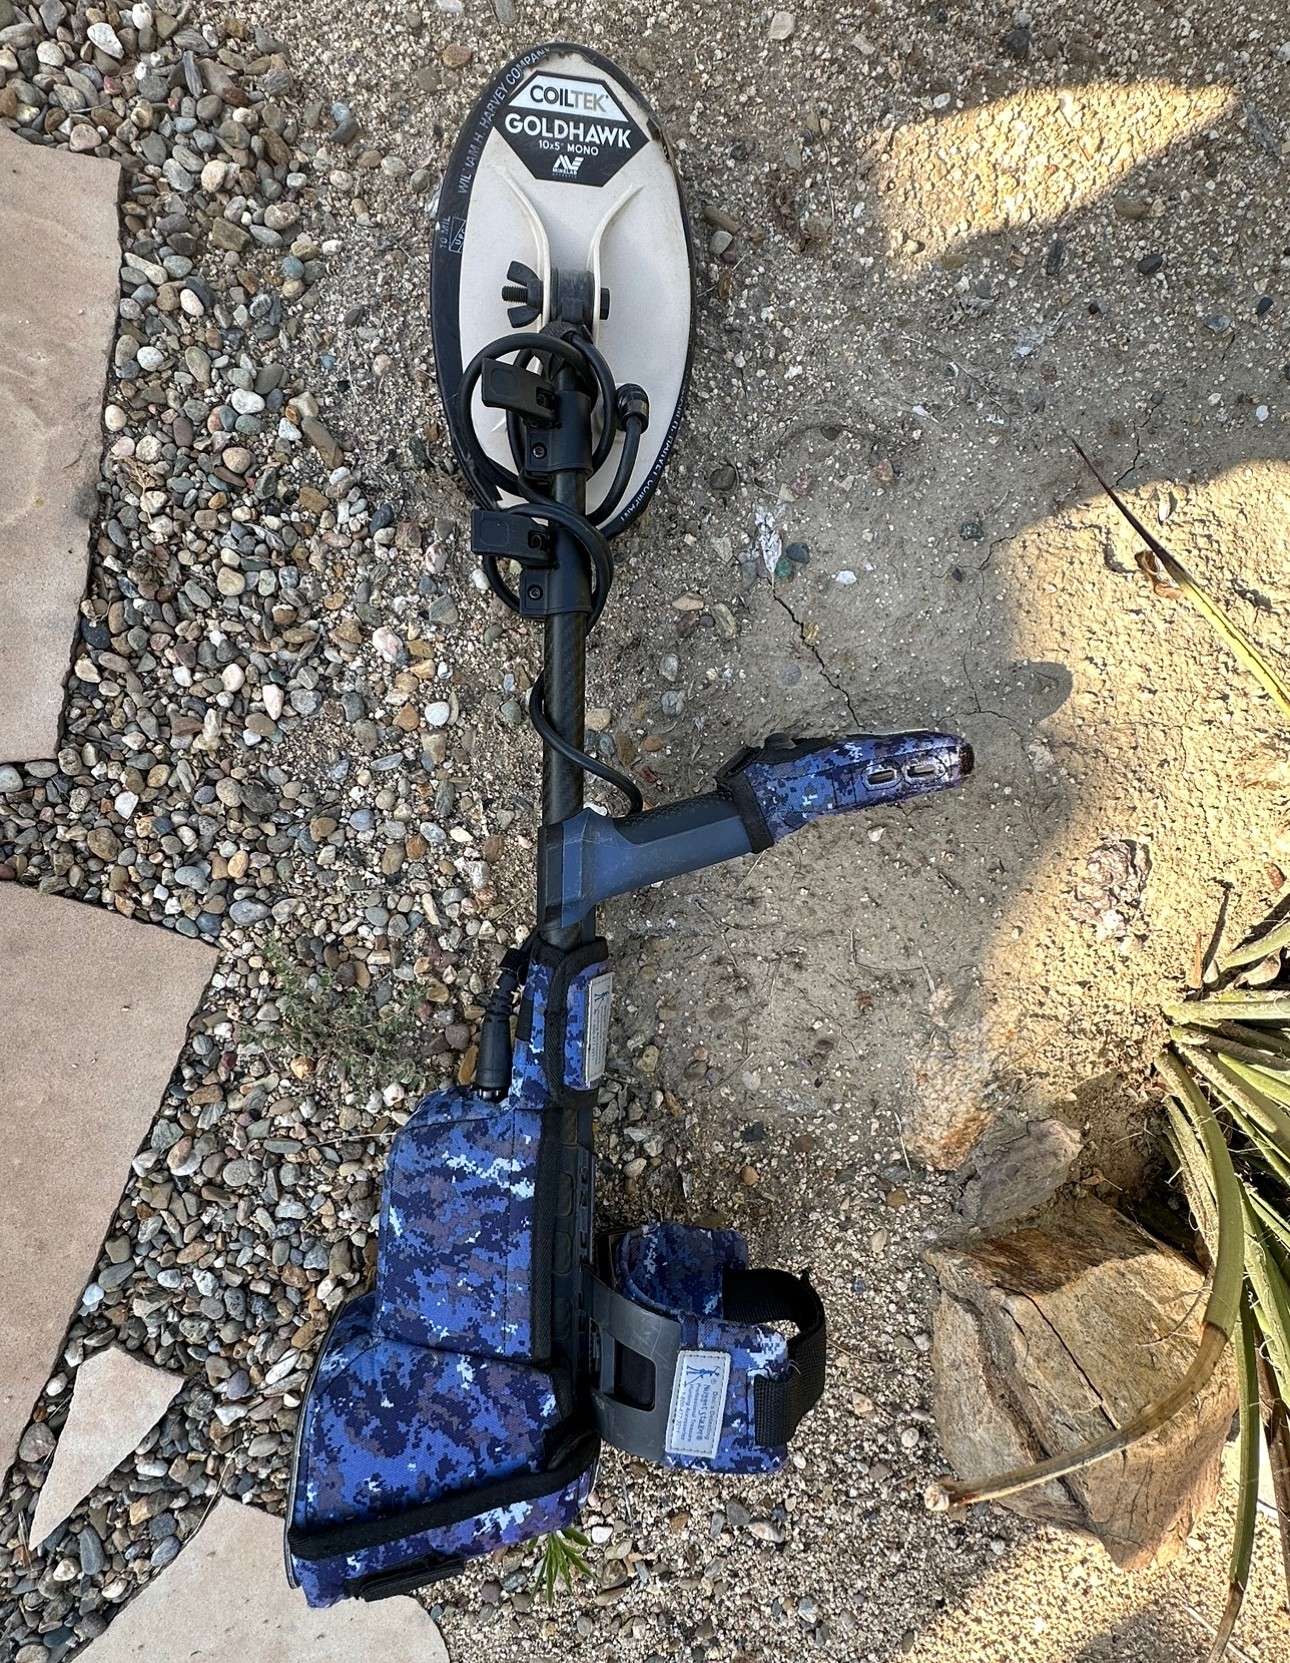
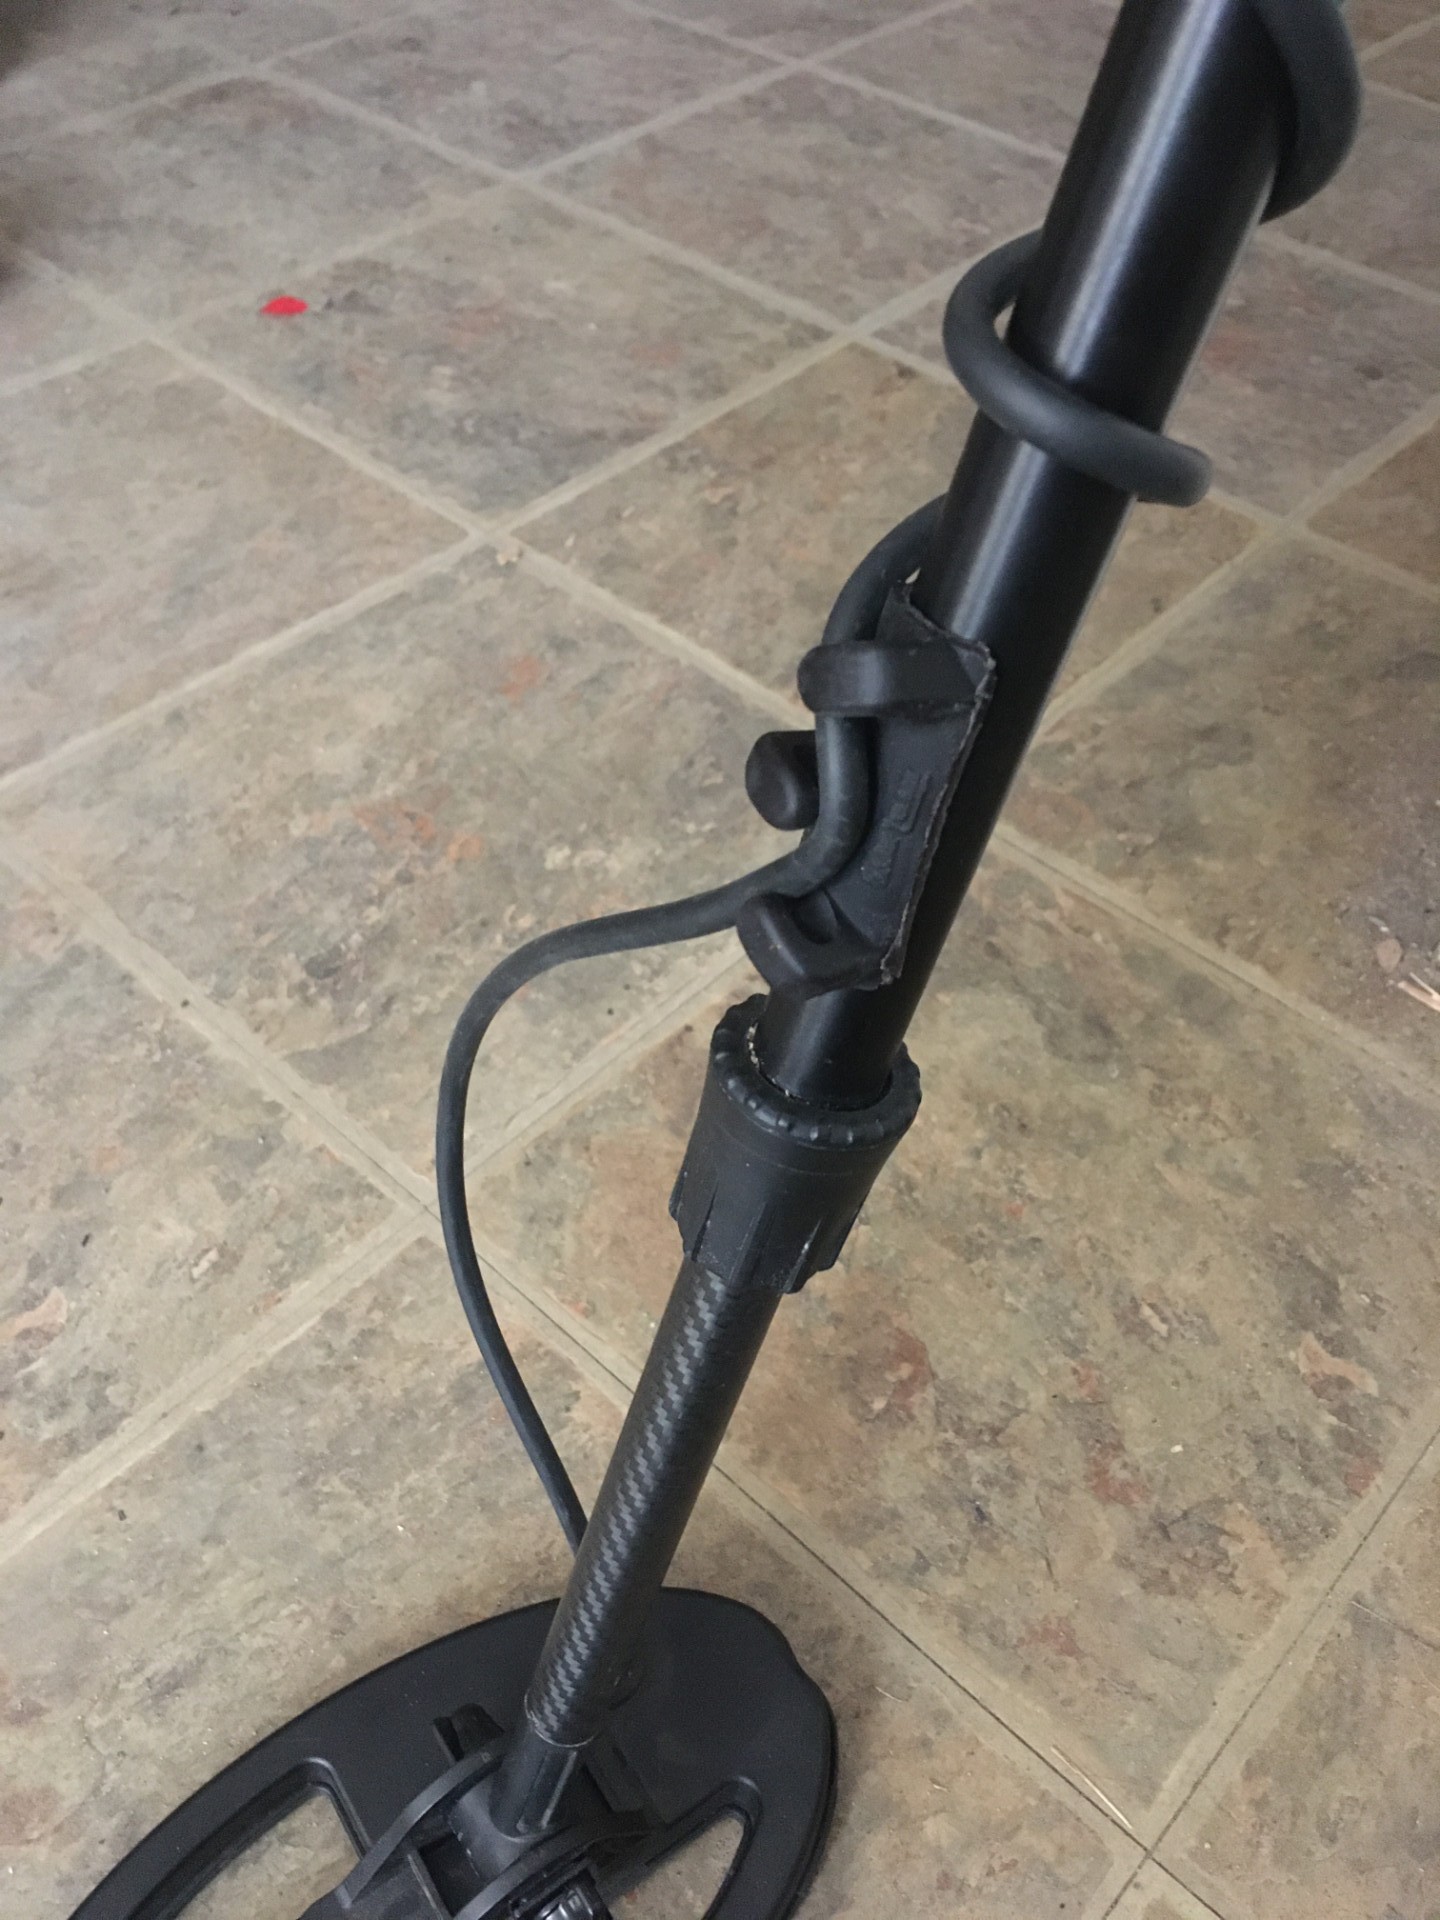
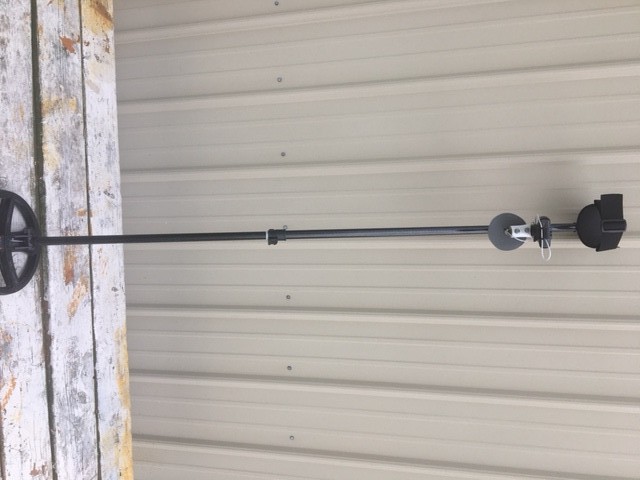
Got my very durable beach rod set for the Deus 2. This has great features. *Antenna run through the center of the shaft [Steves yoke mount has a hole in the center] . *Original coil bolts are used with washers on both sides. *Hand grip with stress washer on top. *The pod can be turned slightly from left to right depending on which hand you want to use. Added Anderson arm cuff. *Cam locking clamp. *Also, no holes in the shafts except for where the antenna comes out. I will be using the Gig's modification for attaching the antenna to the coil with adhesive and keeping water out of the antenna wire. This has already been tested by me. Both on land with and without antenna connection and in the water without any performance loss. I would like to thank Steve from Steve's rods for helping me make a great strong Deus 2 beach set-up.
.JPG.1fdc2b8c5c9dcdb4d9f35febc8a149ff.JPG)
.JPG.4a94b528e321754fc183a2ed3c08cd61.JPG)
.JPG.f31fe586e707181443bd7aaad00cf0d8.JPG)