Search the Community
Showing results for tags 'batteries and chargers'.
-
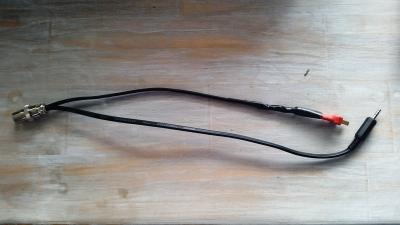
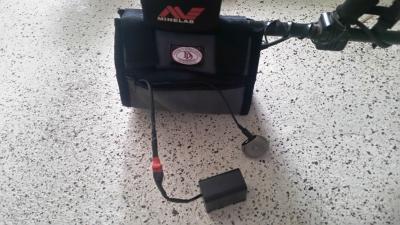
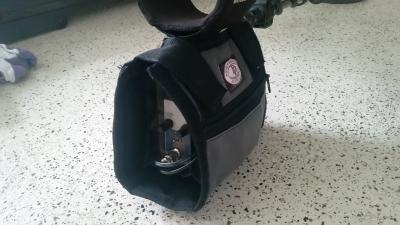
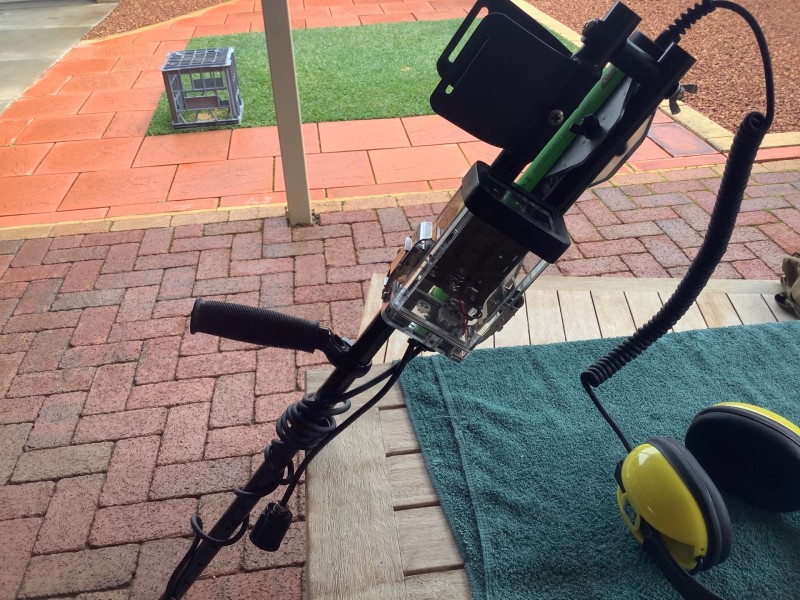
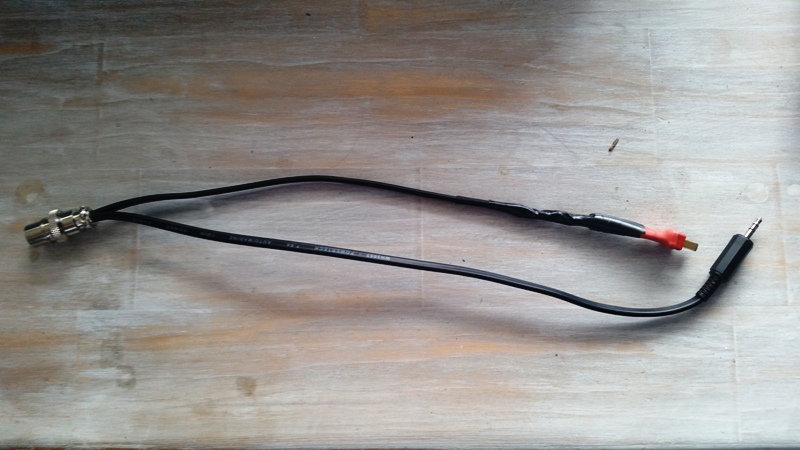
Just thought I would share my wireless setup for anyone thinking of trying this. I have used Avantree Saturn Pro (Low Latency) bluetooth Transmitter/receiver and some Camcorder batteries. I have also got a couple of Lipo batteries from my RC which run the 5000 really well as they keep their voltage for longer. The leads I made myself with genuine power plugs and a deans RC battery plug and a 1/8 audio jack so as to go straight into bluetooth wireless module. These little module are very good and are lasting well over the 8 hour mark on a charge, and their size and weight make them very versatile. The 7200mah pack and wireless module come in at 325 grams with leads included this lasts about 5-6hours I have made up a couple of 3400mah packs with 18650 cells and these weight 180 grams with module and leads and lasts about 3 hours. I have a 5000mah Lipo hardcase which weight 200 grams with both wires and module, this goes for 7 hours before the low voltage alarm comes. Lipo batteries aren't for everyone as they can be a little volatile, but I am yet to have one explode and treat them with care when charging with a good lipo charger.

- 29 replies
-
- 4
-

-
- batteries and chargers
- headphones and audio
- (and 1 more)
-
 I was thinking today about all the newer detectors that have built in batteries. Most manufacturers say they are good for 5 to 10 years and thousands of charges. Well, what happens if or when they go bad? I haven't seen any mention from any manufacturer about replacements being available. I guess I'm old school and like the battery separate and not built in. I suppose a few of us could replace the built-ins ourselves. Just ranting! Best wishes to all! snakejim
 -
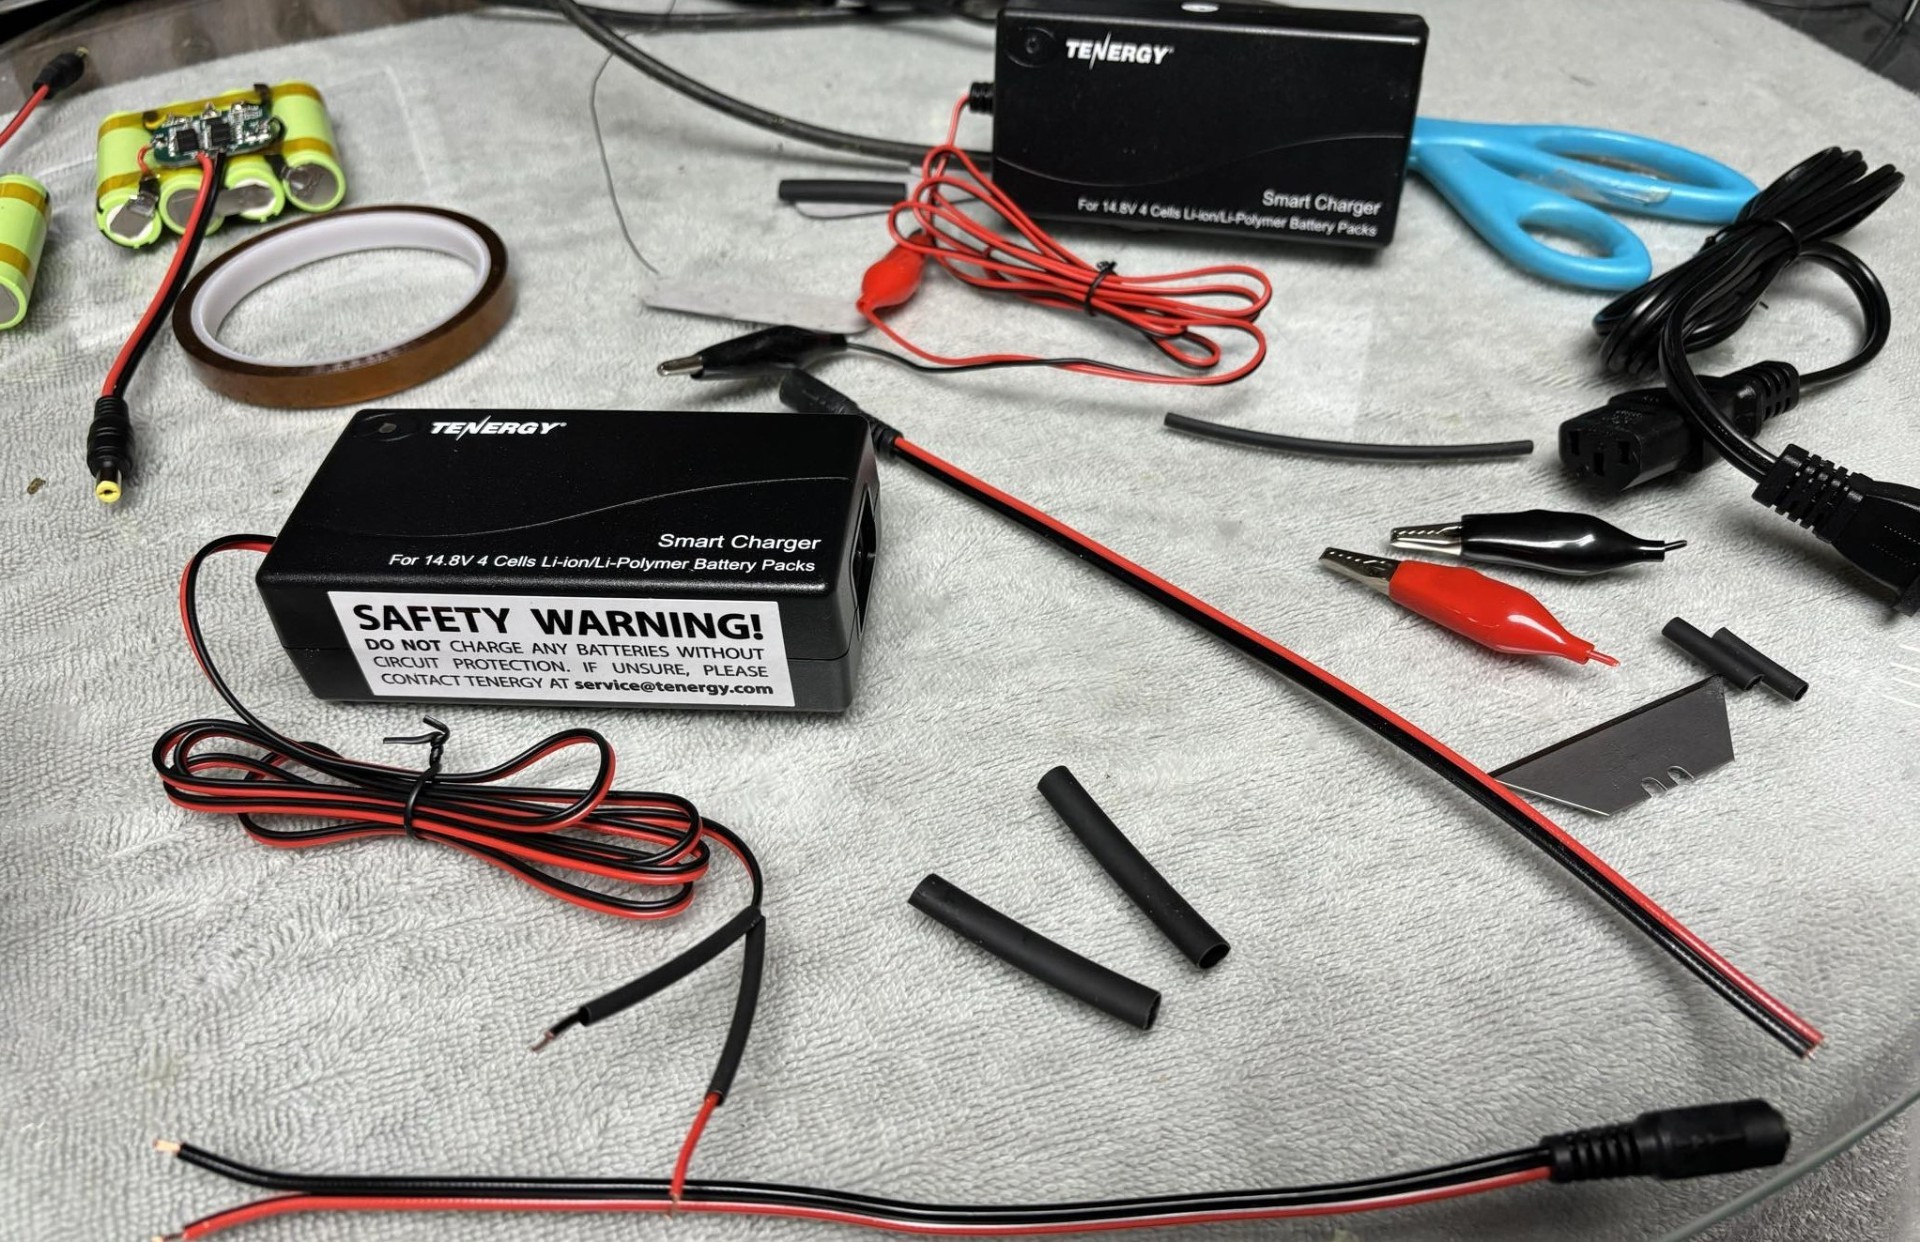
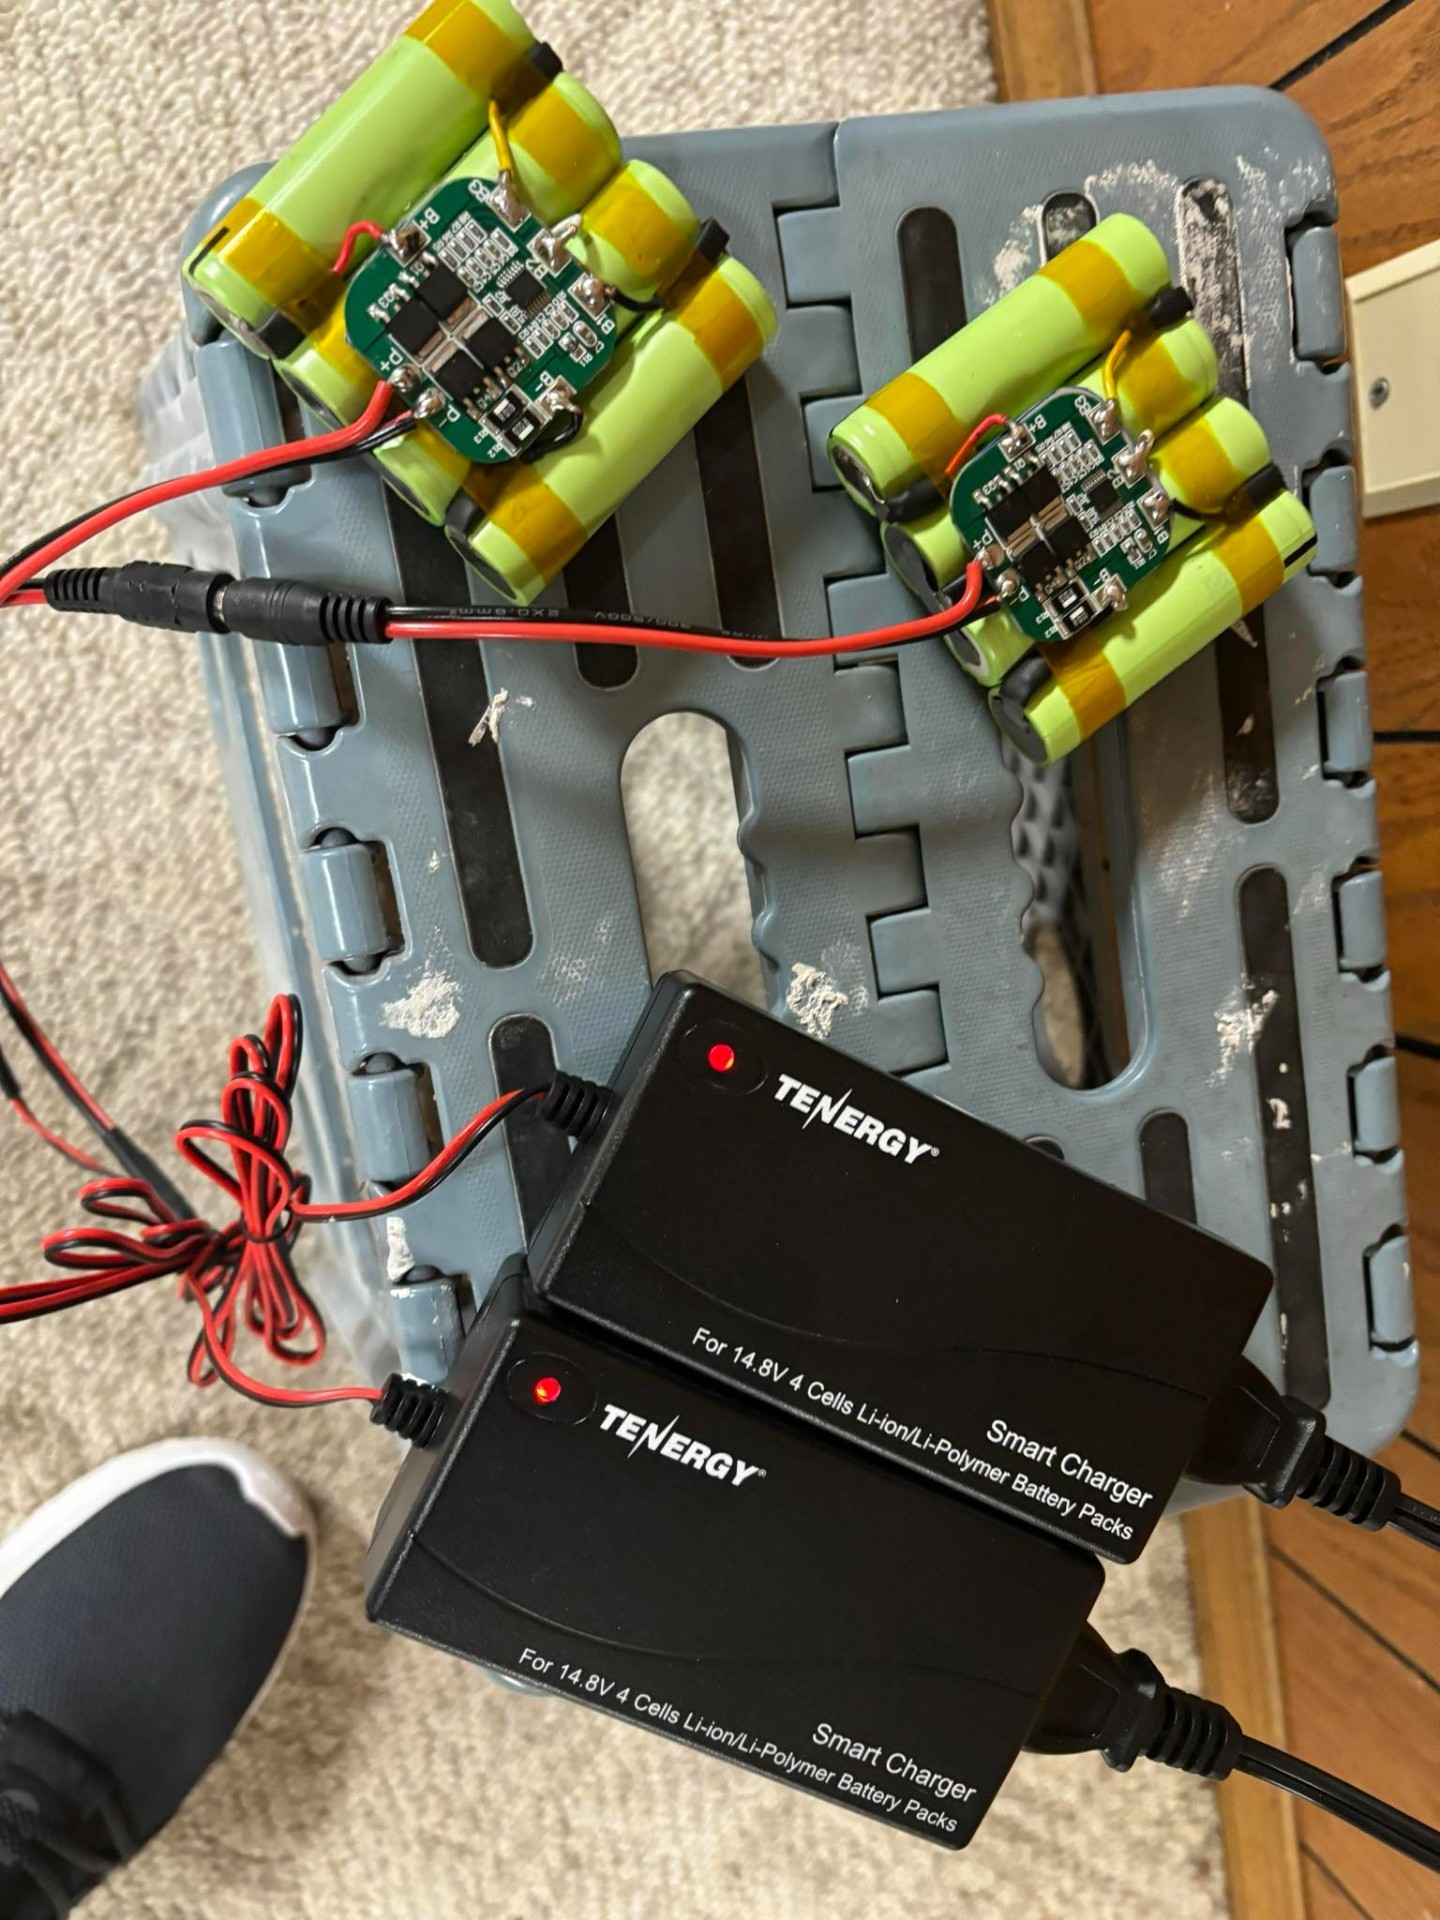
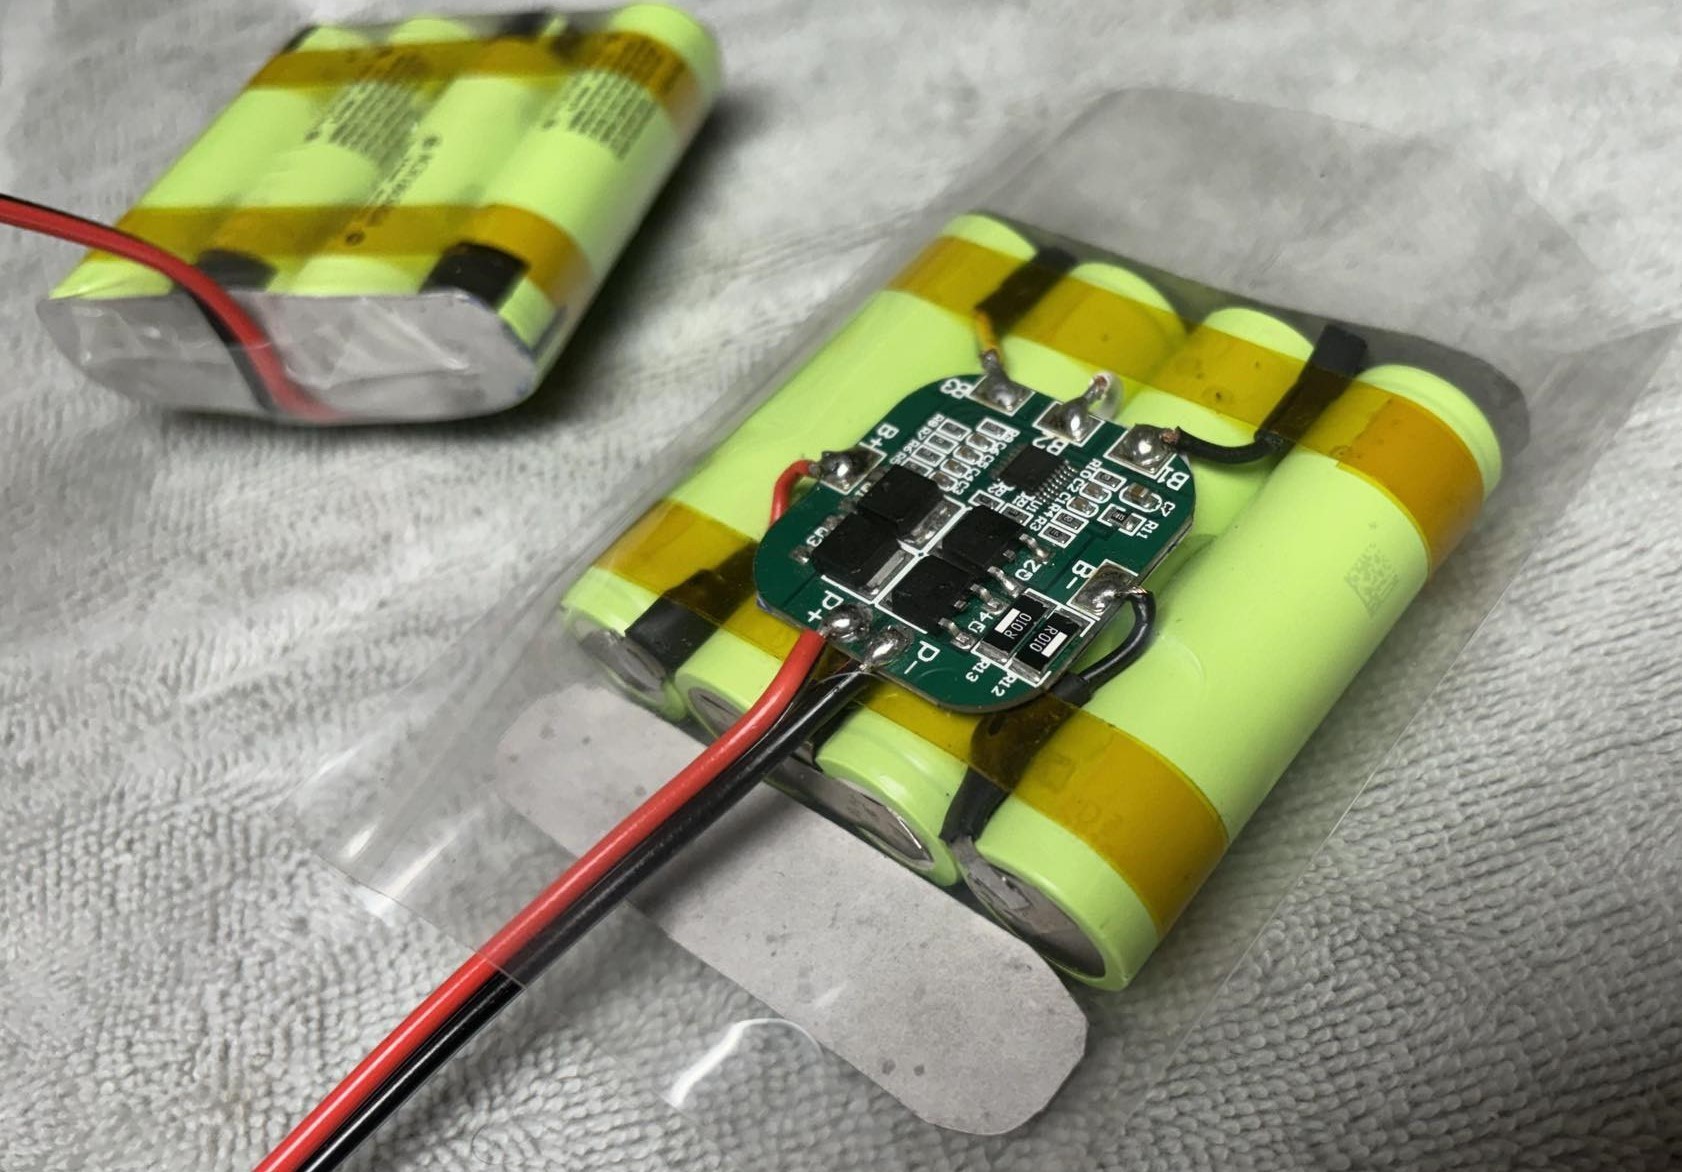
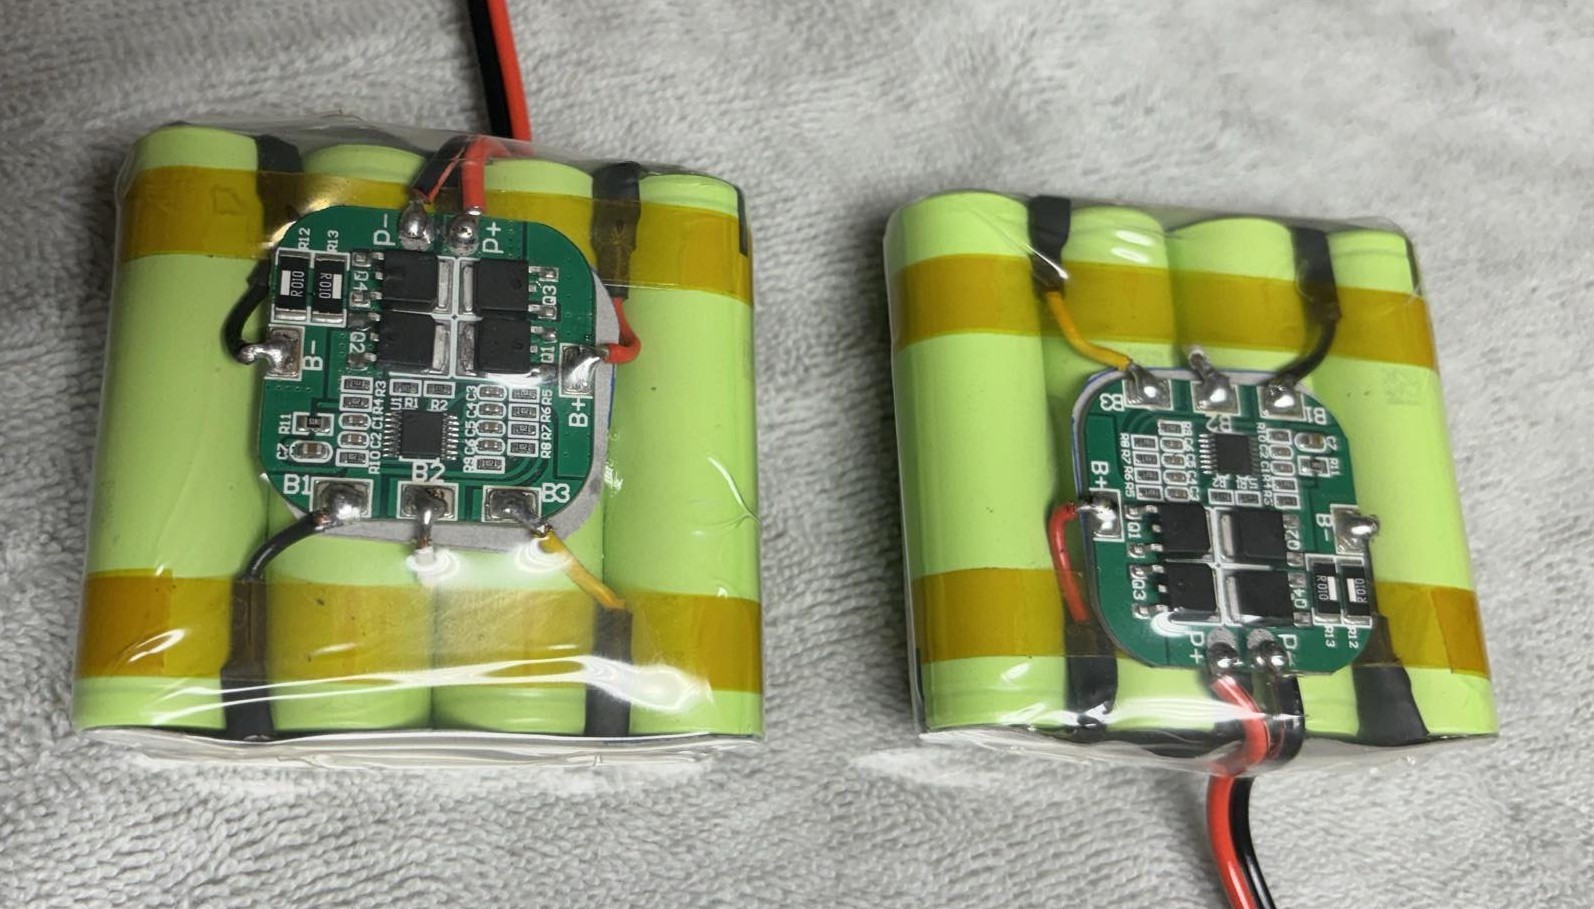
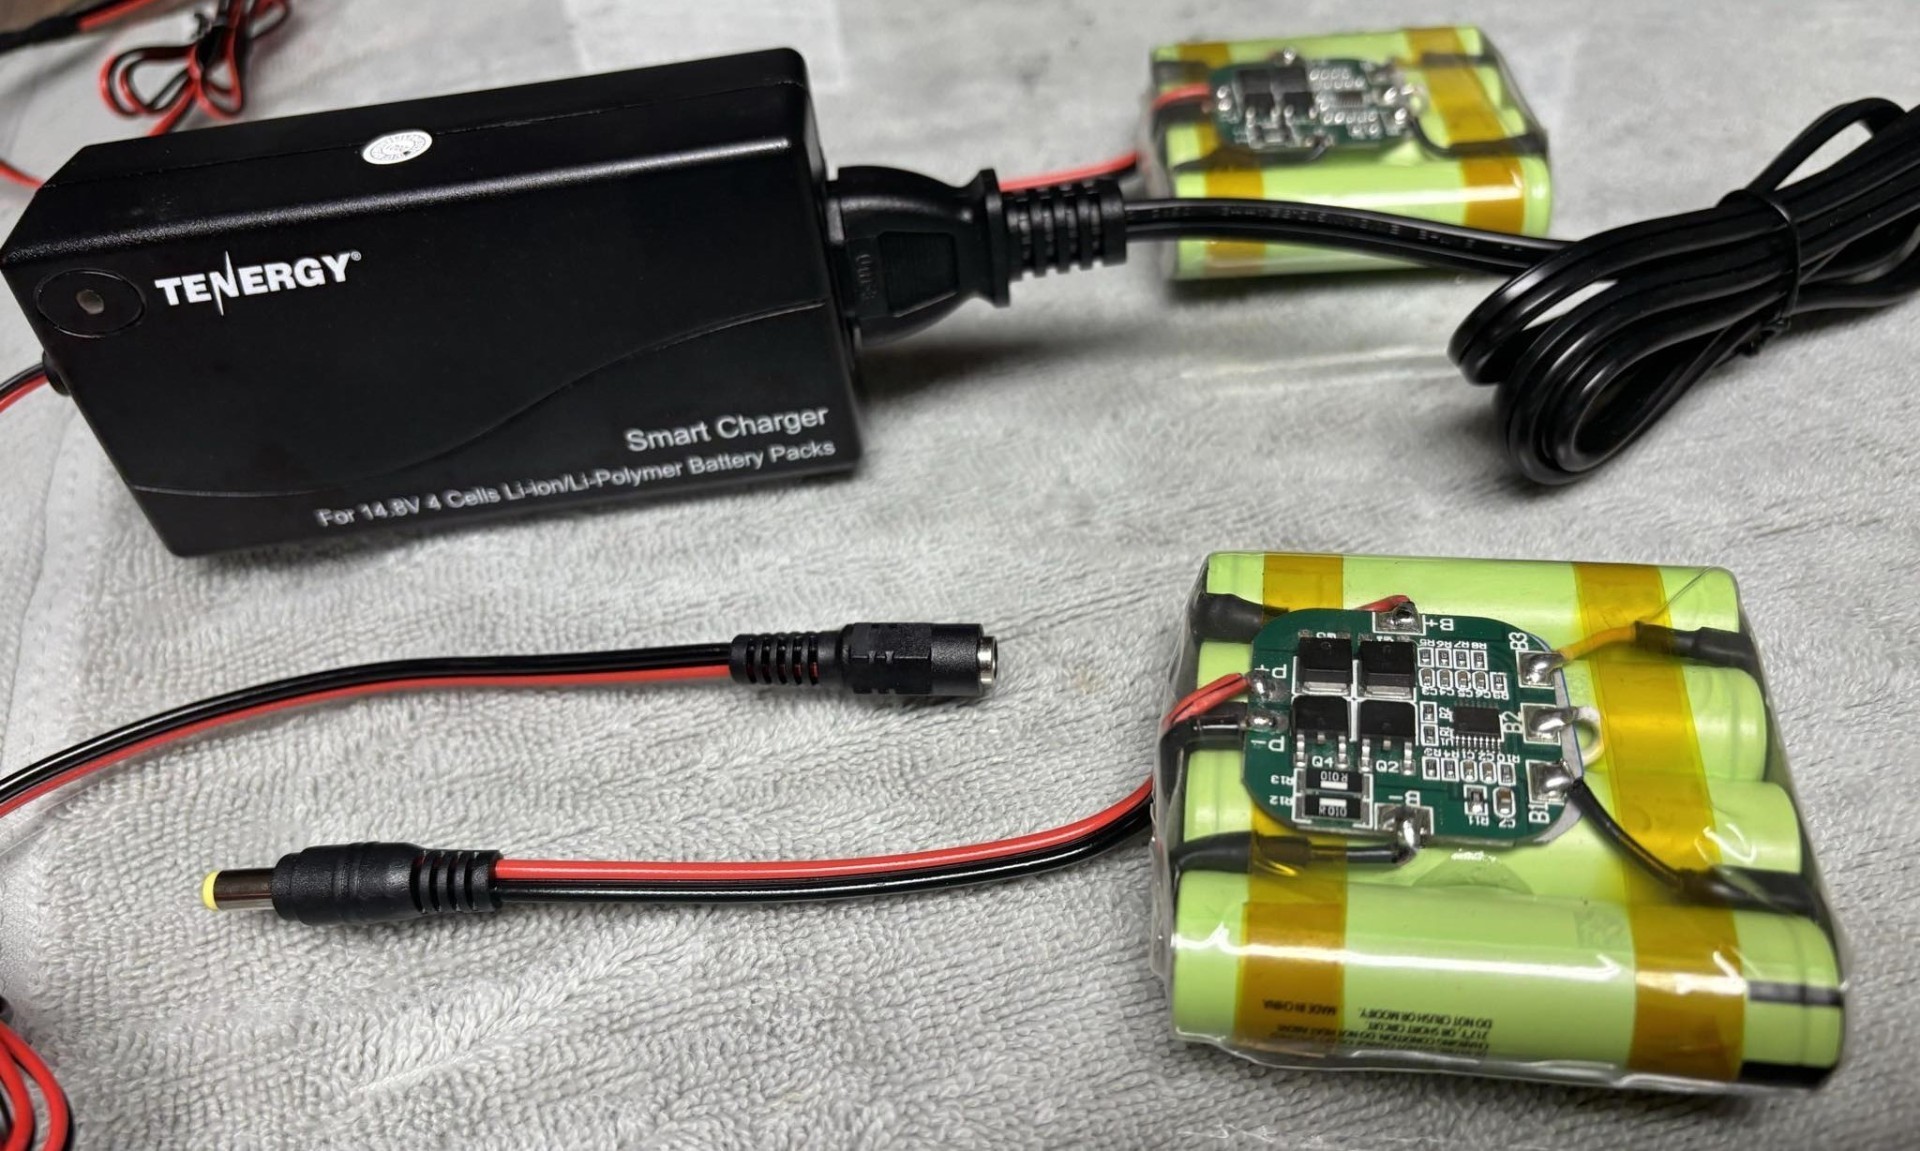
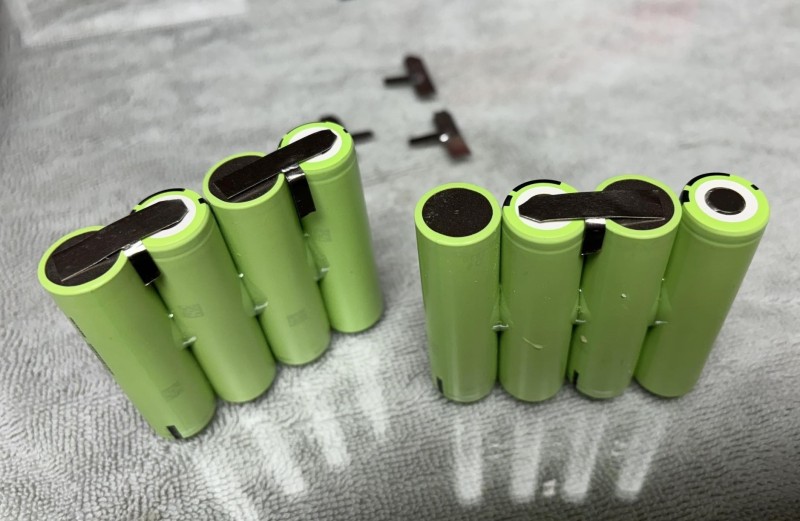
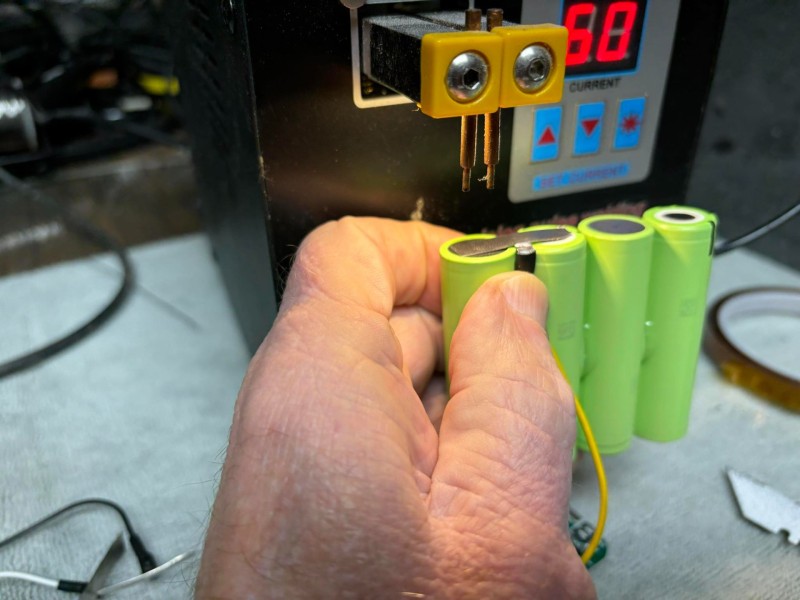
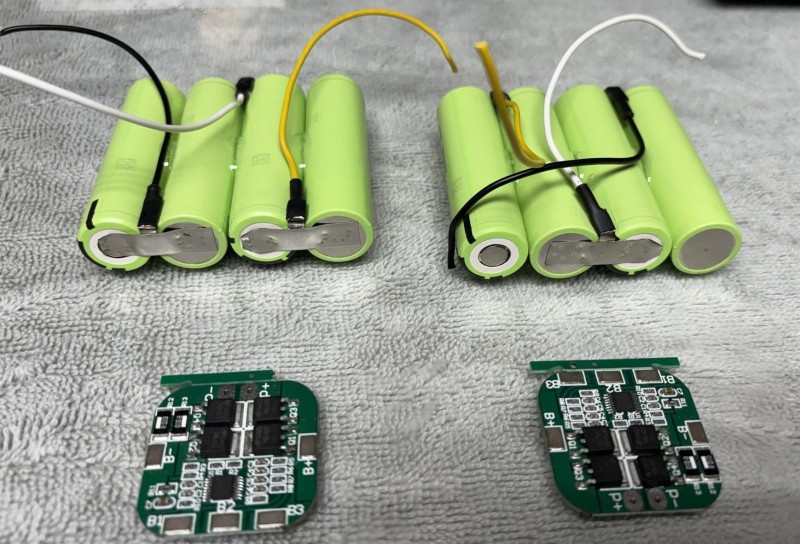
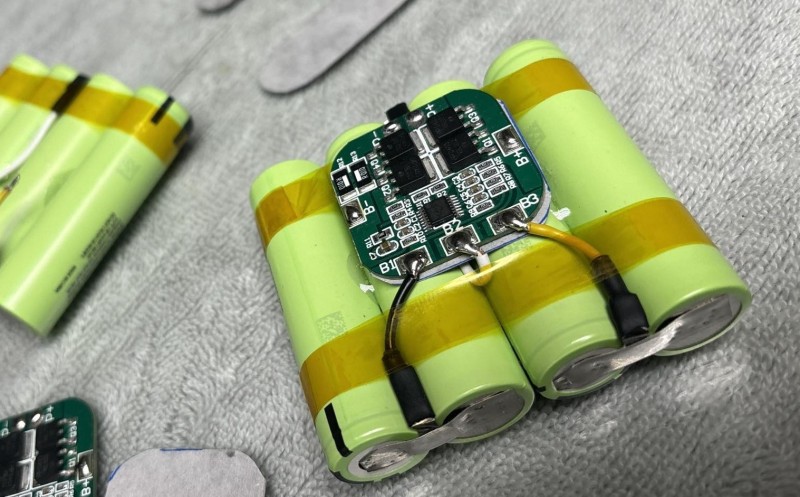
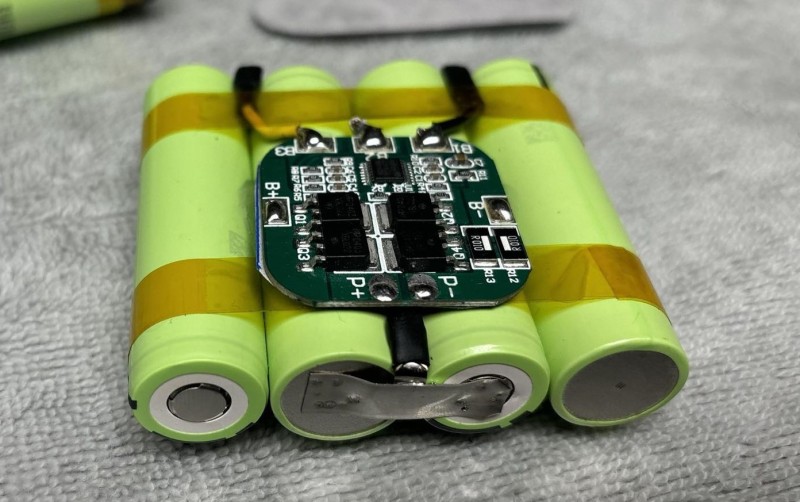
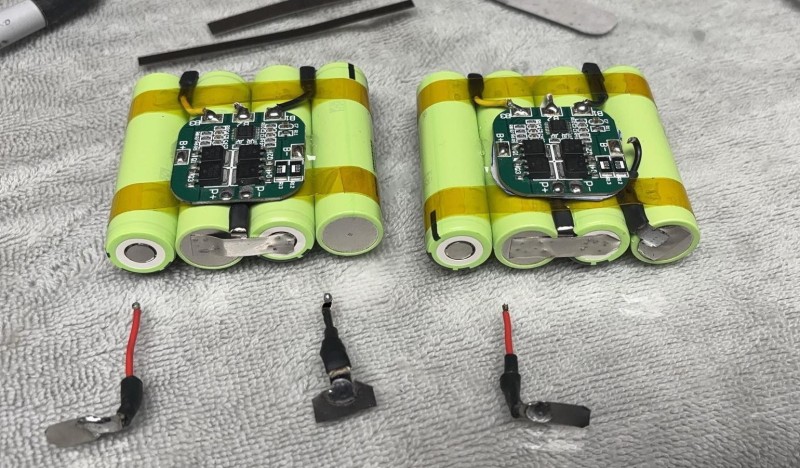
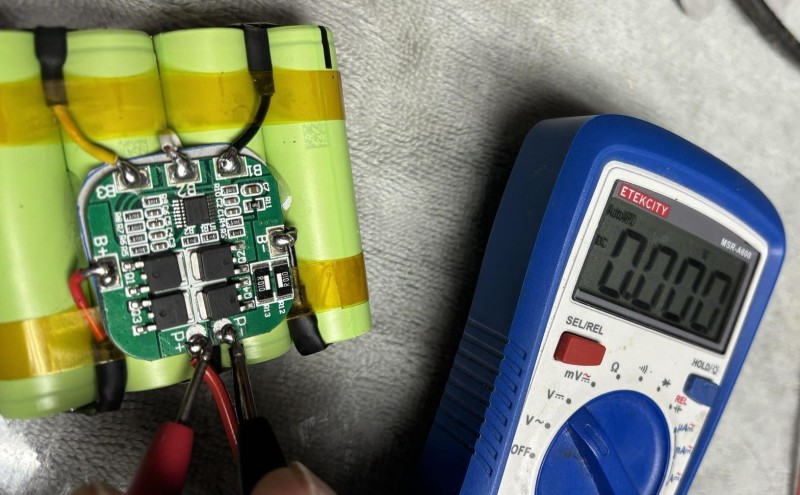
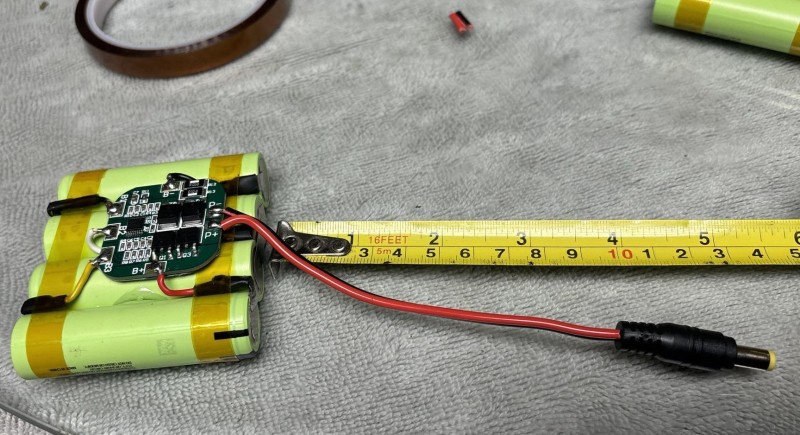
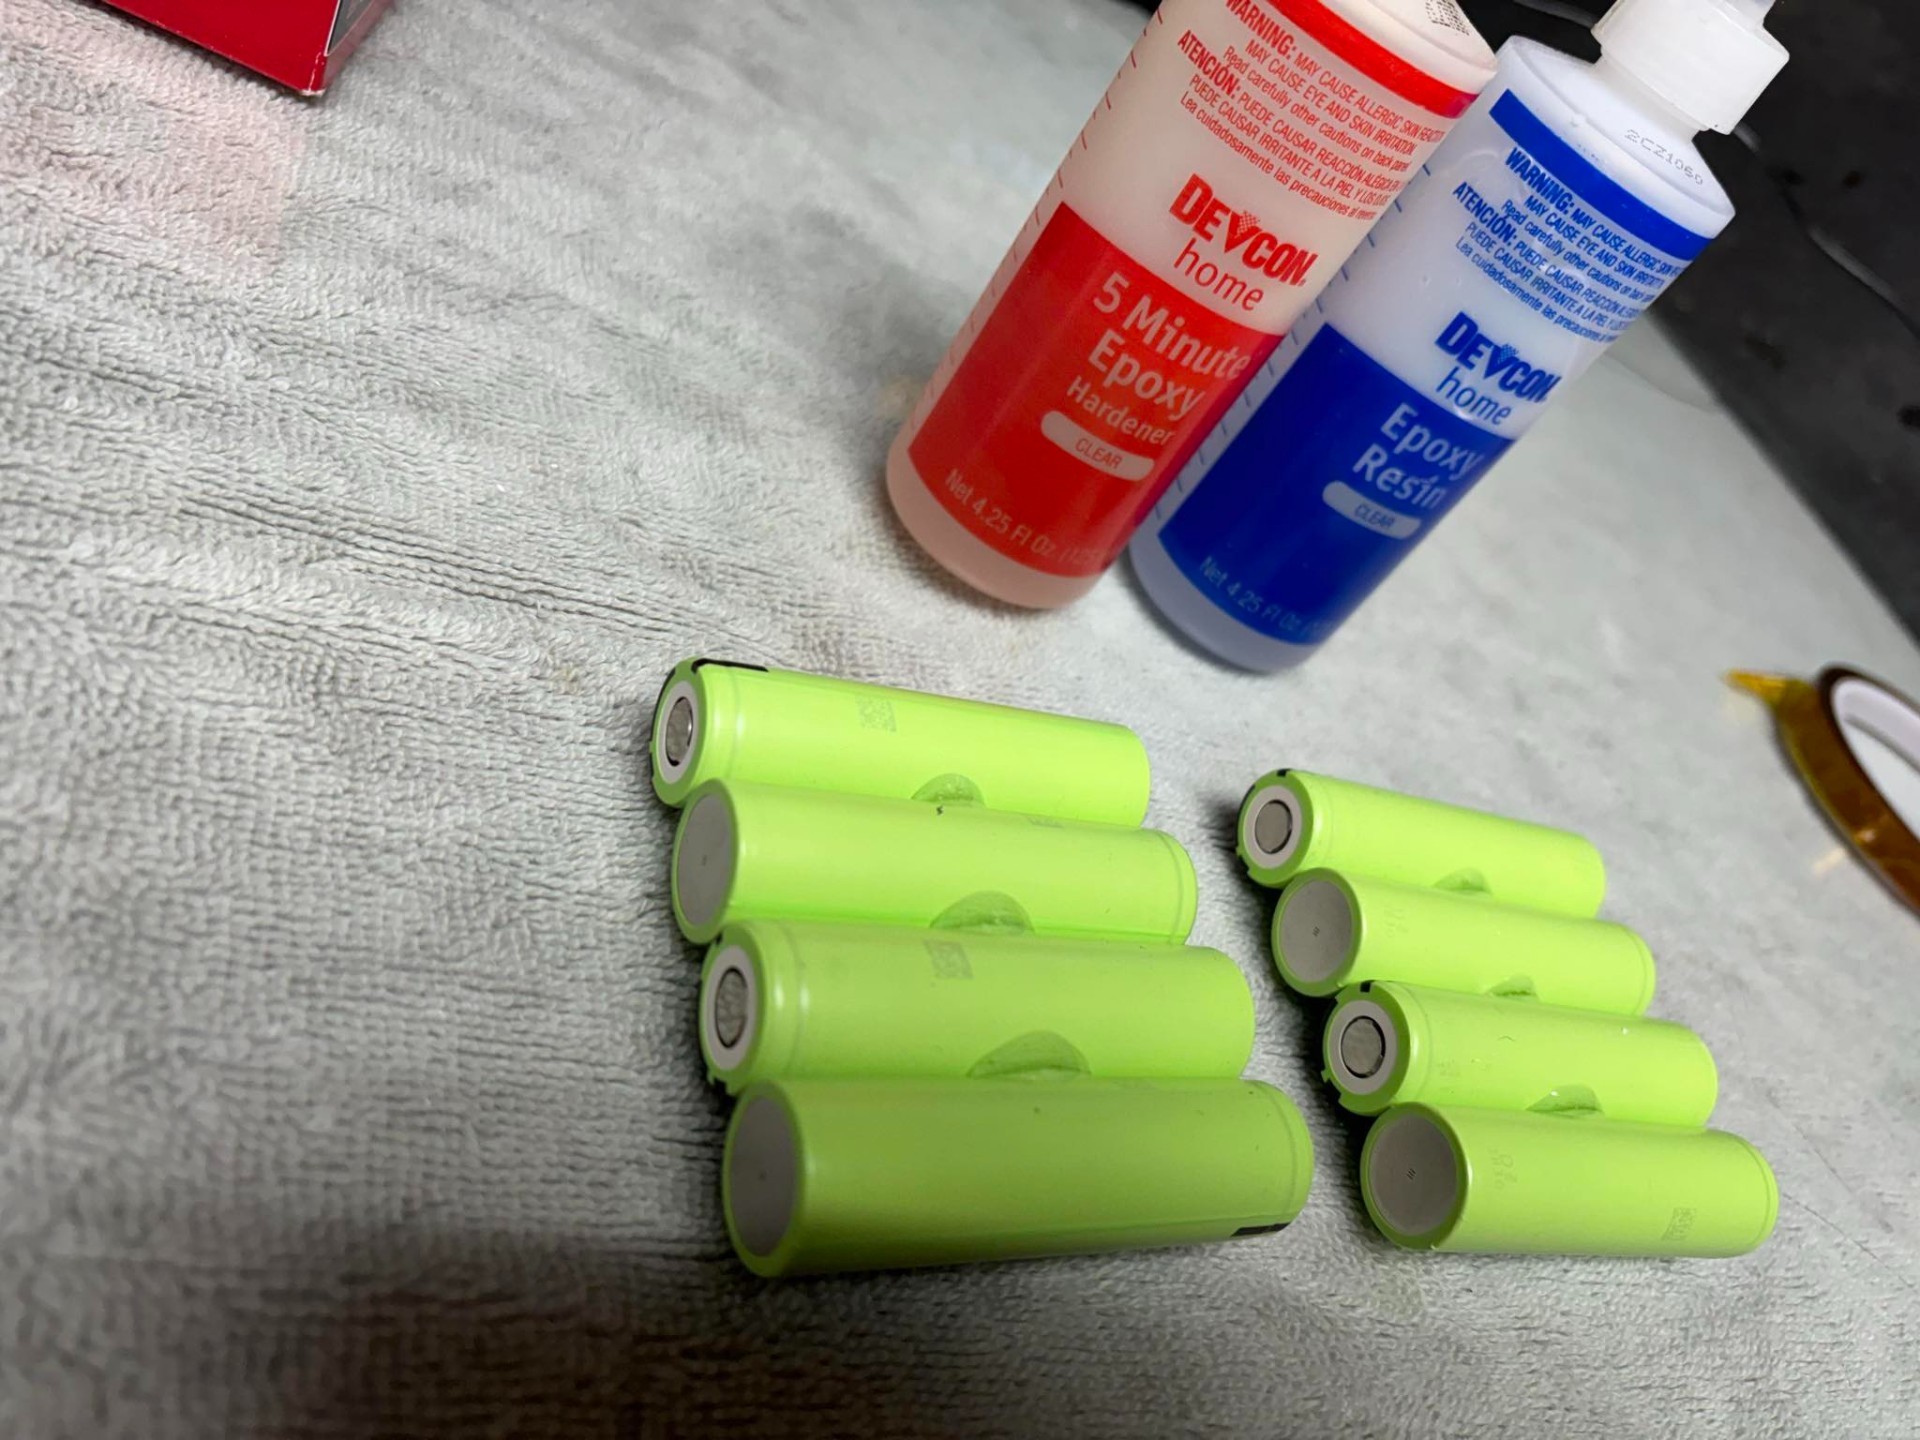
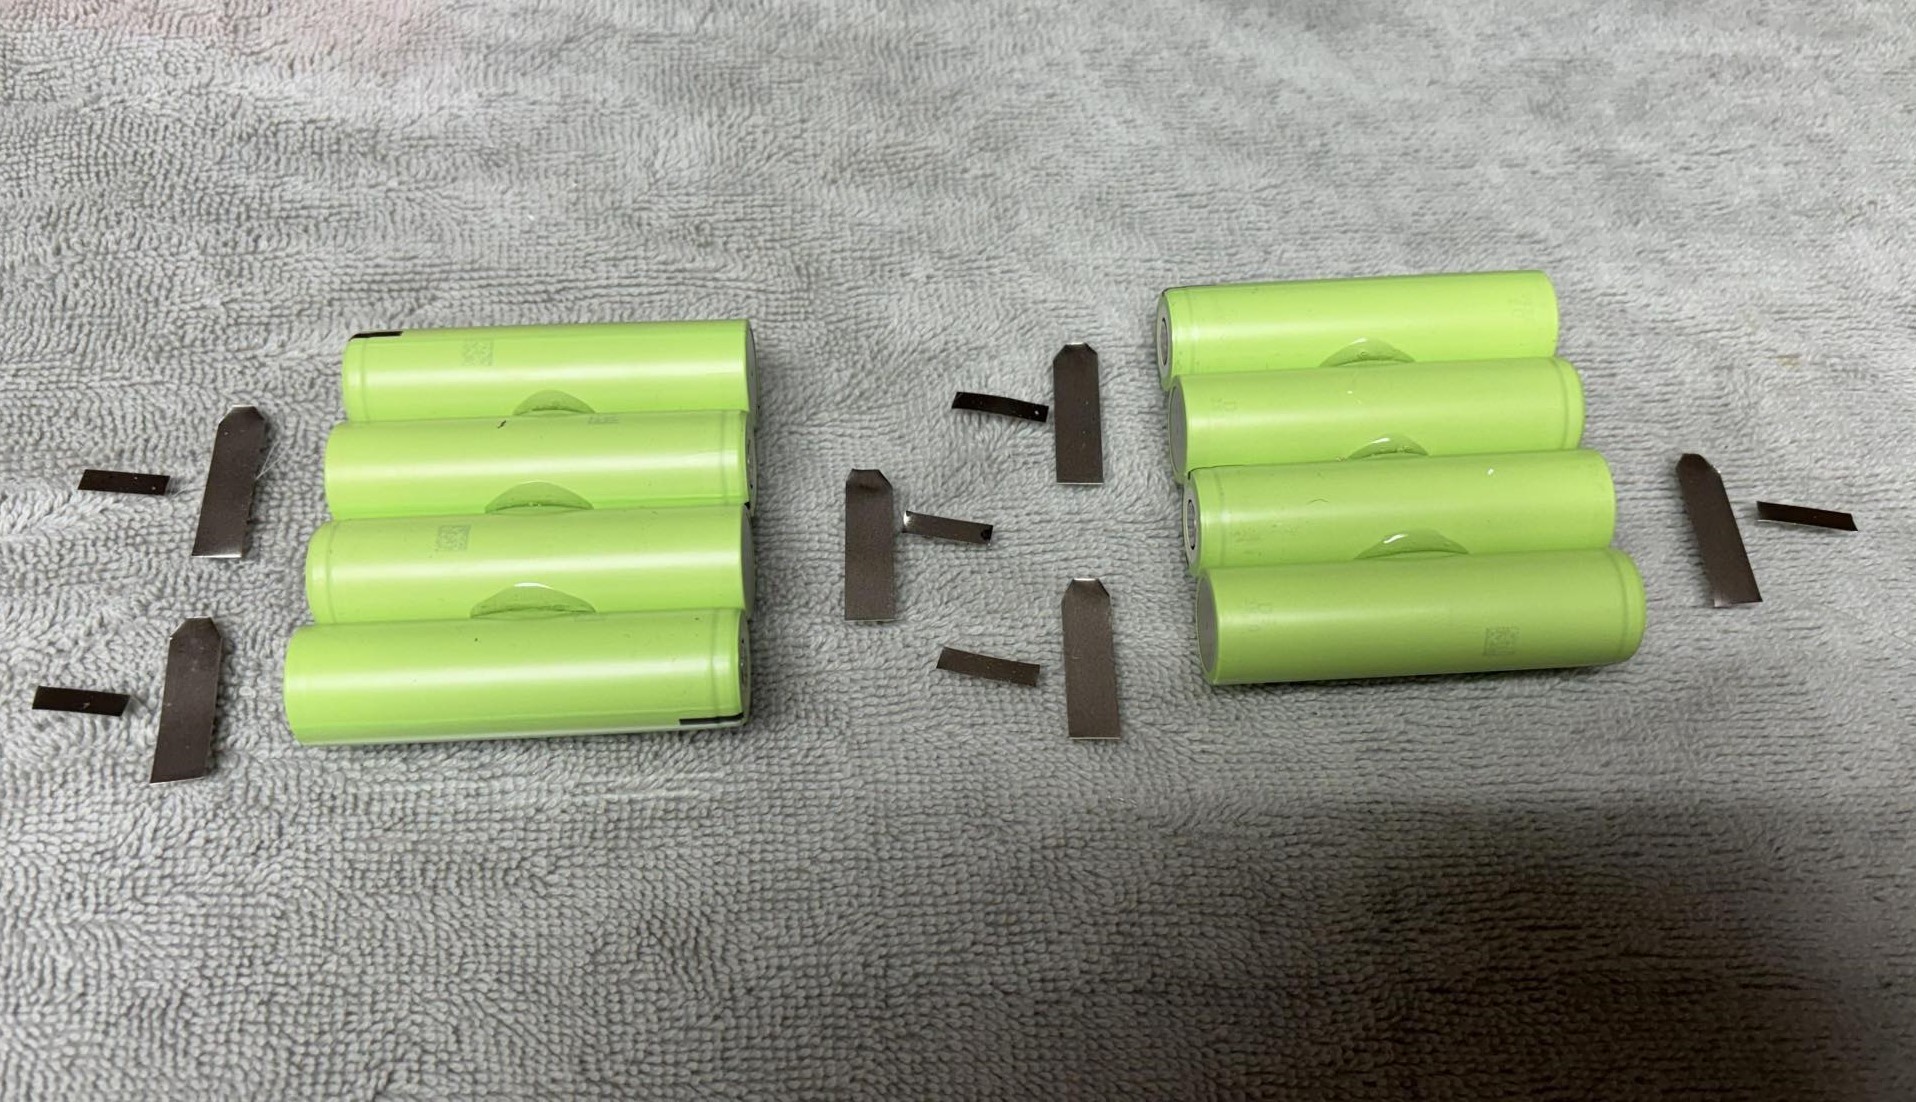
Asked by a friend to make a battery pack for his new TDI Pro. 4 cell 16.8 volt, most important thing is to buy brand name batteries from a well know source. I like Samsung, Panasonic, Molice, Epoch, Sony, Nitecore.. And most of the time I purchase from the 18650 battery store. One thing as your assembling the battery pack, keep a bucket of water and a fire extinguisher near by, Li-ion batteries can be very dangerous and can short out fast causing injuries and fire. I know TDI Pro's are becoming rare but for those that still have them I'm sure many need new batteries so I figured sharing this information may help. Whites TDI Pro Parts list Panasonic NCR18650GA 3450mAh Li-ion Pigtail Barrel Plug Connector cable 2.5mm x 5.5mm Male and Female connectors (Male for the Battery pack and Female for the charger) PVC Clear Heat shrink tube 95mm wide (I chose clear for Earl but comes in Blue, Black, and Red) Heat transfer tape 10mm Polyimide Brown 4s 10A 18650 BMS 16.8v Protection module Tenergy Universal TLP3000 1.5a charger for Li-ion 4 cells 14.8v Black assorted shrink tubing Nickel strips assorted 2 inch Battery Insulating rings Red Battery Insulating material Gray 18 gauge wire assorted colors Red-Black-White-Yellow 2 part . 15 minute dry epoxy Assemble batteries in the correct order with small amount Epoxy drops between each Make up nickel ends that will connect to B1 B2 B3 on the PCB and the battery Measure and fit Measure and trial fit PCB/BMS board Connect wires 18 gauge Weld or solder nickel ends Nickel ends welded and ready to connect to PCB's B1 B2 B3 Black to B1 White to B2 Yellow B3 White wire under PCB to B2 ...... notice insulation under PCB 2 Red and 2 Black wires ready ... soldered to Nickel fittings, ready to solder to ............. B+ B- wire to PCB/BMS Checking B+ B- 13.60 volts low charge P+... P- will be dead until the battery charger is hooked up...it wakes the battery pack up Fitting/soldering 5.5 x 2.5 females to the battery charger.. red to red and black to black ..outer shell is Neg, Pin is Positive Batt packs on charge, red lights indicate charging Pic out of place........... but showing male 5.5 x 2.5 barrel plug to P+ P- on the PCB Insulation is put under the PCB and on both sides of the battery to protect from shorts....Shrink wrap is slide in place and ready for the heat gun to shrink Two finished 16.8 volt battery Packs Finished Charger and Battery packs


.thumb.jpg.09bd4312516376e03266d47f269ffc6b.jpg)


-
 Hello - I have a Minelab Eq800 which uses a sealed lithium-ion battery. As far as I know, having checked TSA and FAA websites, a Li-ion battery cannot exceed 100 watts if you are travelling by plane. Q: can you please tell me how many watts this battery is? TSA is also vague about even flying with one that is less than 100 watts and says one should check the airline's website. Q: what do you do when there are restrictions like this? When flying to France, I was able to take my Vanquish 540, but that uses AA batteries and I would really prefer to use the EQ800. I would really appreciate any suggestions about flying with metal detectors and how you deal with the security issues. Thanks a lot, Jane
 -
 Wife has me changing all the batteries in our smoke alarms...they are hard wired but also have the 10 year 9 volt batteries installed...they are 6 years old and was going to throw them away but then decided to try one in the pinpointer...seems to work fine...anyone try these before ? I realize they are basically back up batteries in the smoke alarm but I’m wondering it they would last longer then the regular Duracell 9 volts that I’ve been buying... strick
 -
 Hello All, I am new to your forum and could use your help. I have a Teknetics Mark 1, which I purchased back in the 80's, and I just pulled it out of storage looking to get back into the swing of treasure hunting. My battery clips are in kinda rough shape and I have seen a post on your forum about doing a mod to change the 8 aa's to a 9v and 2 aa's , and then on the 6 aa's side, they had stated that they put 2 9v batteries on that side. Would 1 9v work on that side or does it require 2? Any help that you could give me would be greatly appreciated. Also, any other mods that you can think of, would you share those as well. Thank you guys, I hope to hear from you soon. Take Care. Arlin
 -
 Flat pack Lipo LP-904085, 3.7v, 3700mAh 85mm including wrapper x 38mm x 10mm Seen some on ebay but they are in the UK. Amazon doesn't have them and trying to avoid the slow boat from China via Aliexpress.
 -
 Curious as all hell about this question. Would it be possible for the Owner/Layman to do the procedure at home ? Or is this something the Factory recommends you send the unit in to them for ? Approximate Cost ? Inquiring minds want to know ! ??
 -
Just wondering If anyone has used a External Power Bank. 1. What kind did you buy and what size mAh? 2. If so how did you attach it to the detector and where? 3. How did it work if you just used it for charging both the head set and the detector?
-
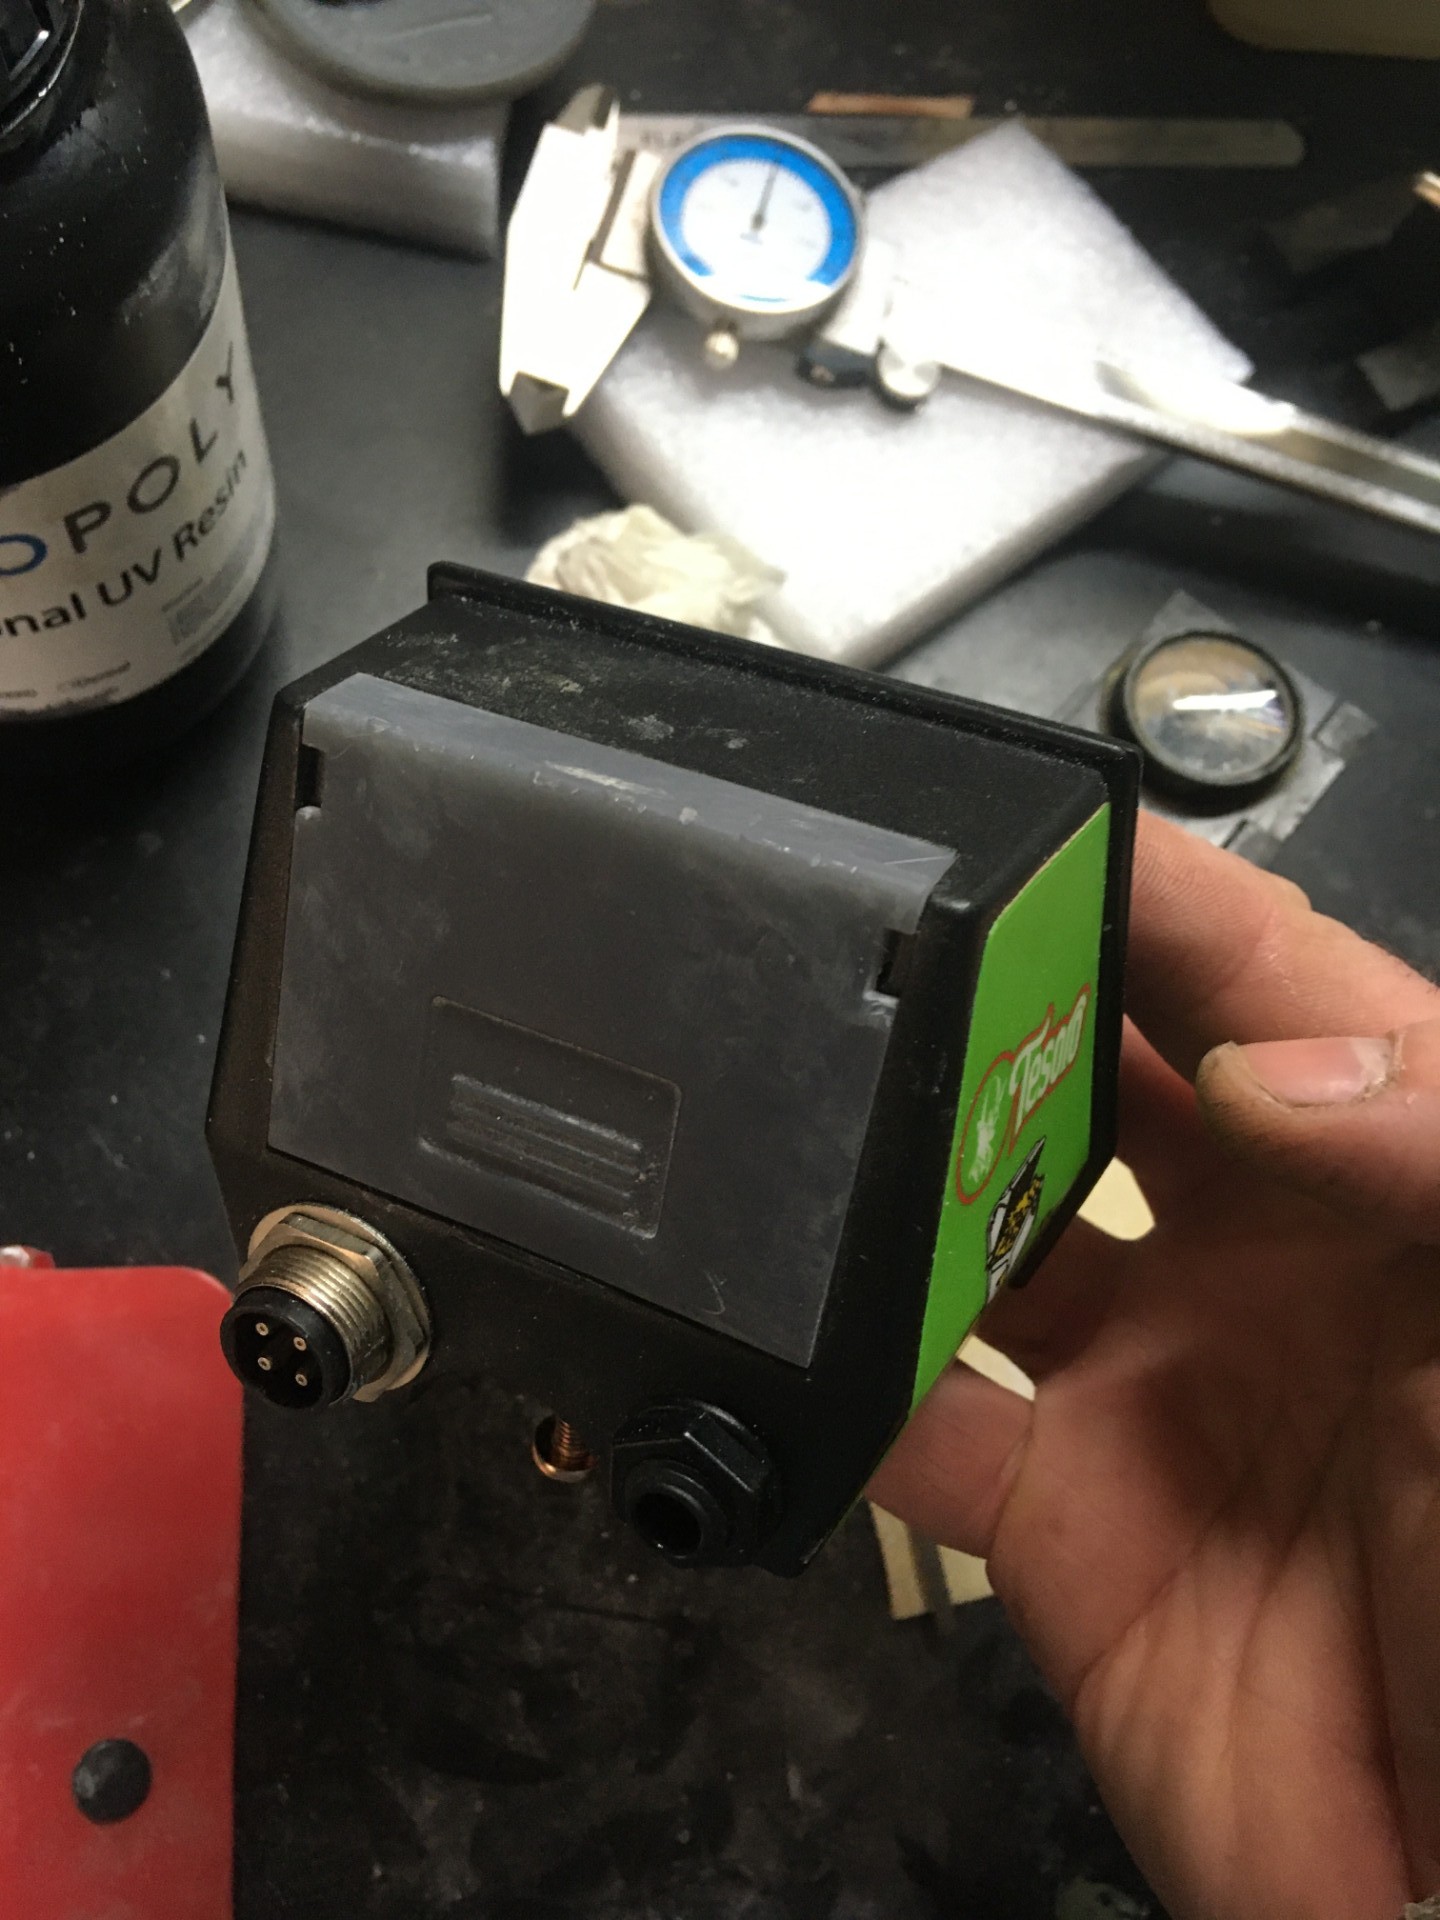
Does anyone happen to know which Iklite fitting was modified to make the charger to battery adapter? Or was it proprietary specifically for the excal? I am missing the adapter and it looks like they want about 75 bucks for the stupid little thing on The Bay. I have all the little bits to make one except the threaded adapter to install the pins and jack into. Right now I have it shoddily rigged up to charge but am hoping to make a round two that looks cleaner and is more secure. My backup plan is to try to design one and 3d print it but that always turns into a big project to get everything printing cleanly and consistantly. It generally devolves into a lot of cursing. Thanks Coggles
-
does the external aa battery pack charge the gold kruzer
-
 I would think the Detecting Doodads Coil Charging Clip would work… any reason why not?
 -
? I think this might be help those that can't afford lithium batteries for their detectors ? .............LINK...........
-
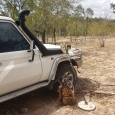
 Hi, I am currently using a car battery for my gold cube when in the field. It is my understanding that they lose power as they continue to run so the water flow is slowing down quite a bit before the battery is dead. I was wondering if anyone has any recommendations for a better battery that doesn't cost an arm and a leg? I know everyone says to use a deep cycle marine battery but they are so expensive. Any help would be greatly appreciated! Matt
 -
I had something strange happen, today. I had my GPX 6000 battery fully charged and fresh off the charger. It had completed its charge cycle and then trickle charged overnight. I popped it in the detector and started detecting. Within five minutes the battery meter dropped from three bars to two bars. If I turned off the detector and let it sit for a 5-10 minutes and then turned it back on, it would go back up to three bars for a short period of time before then going back to two bars. Has anyone else noticed this with theirs?
-
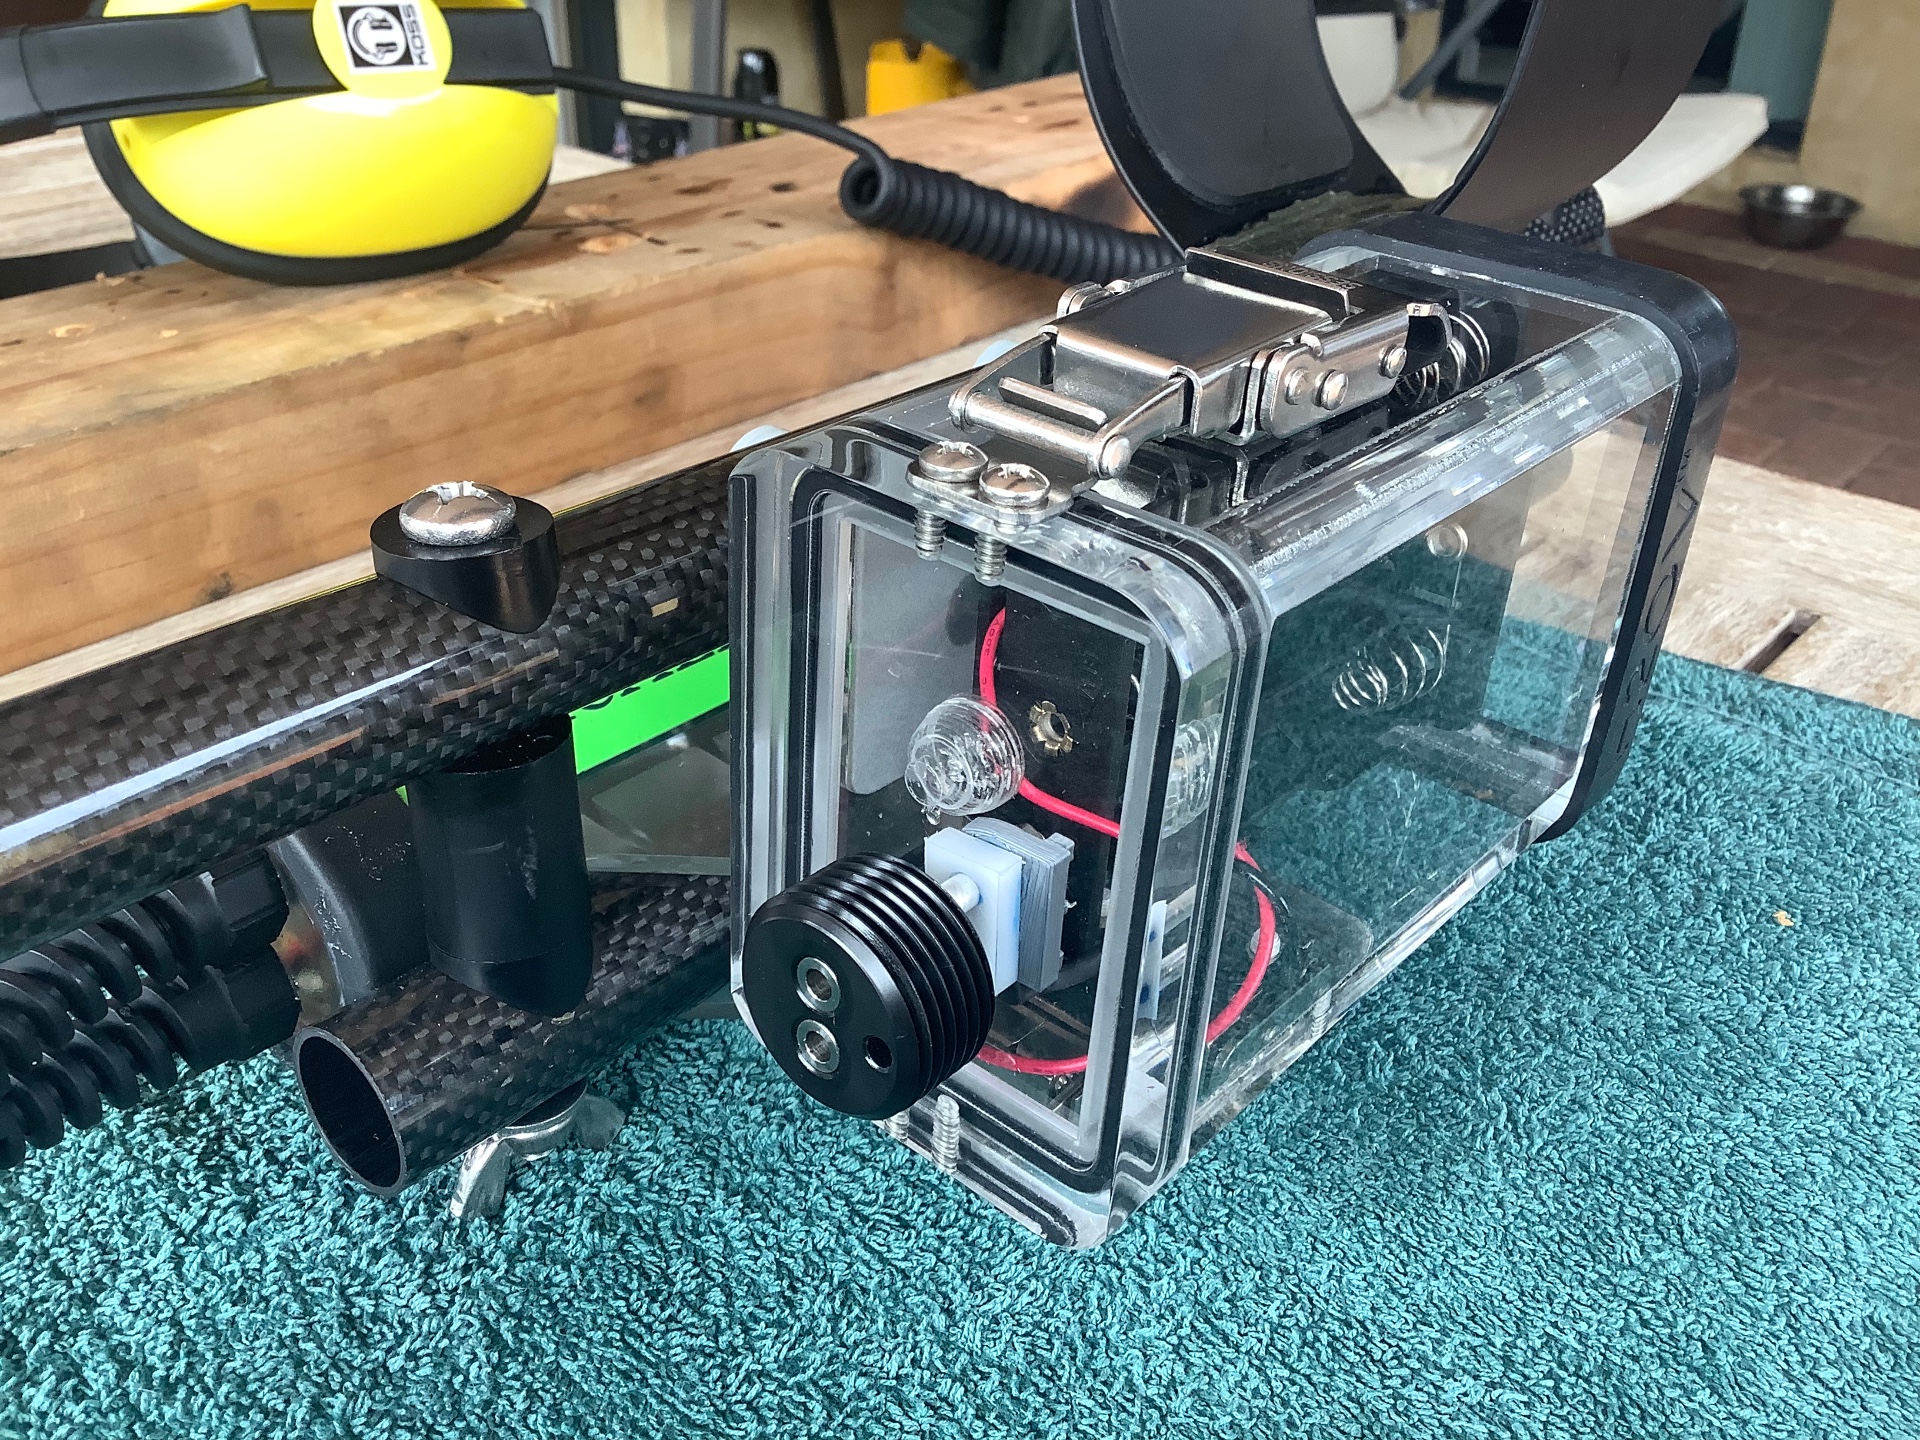
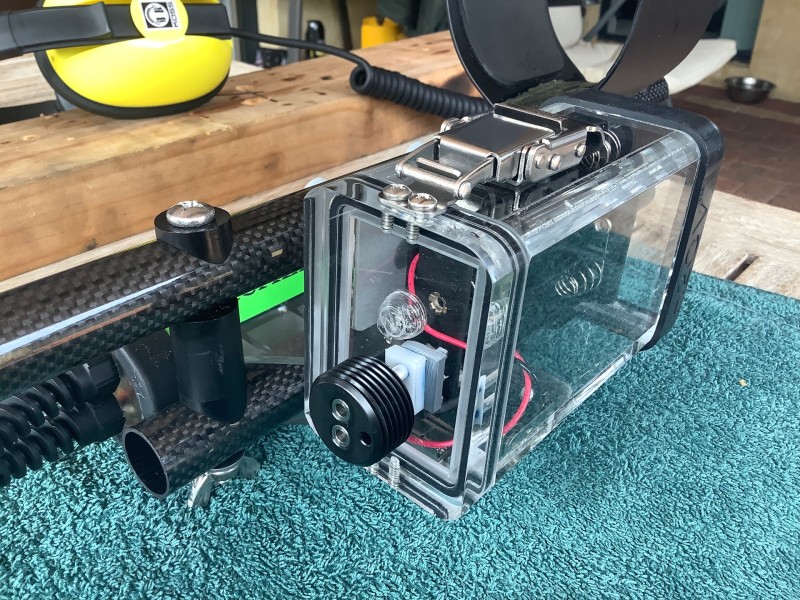
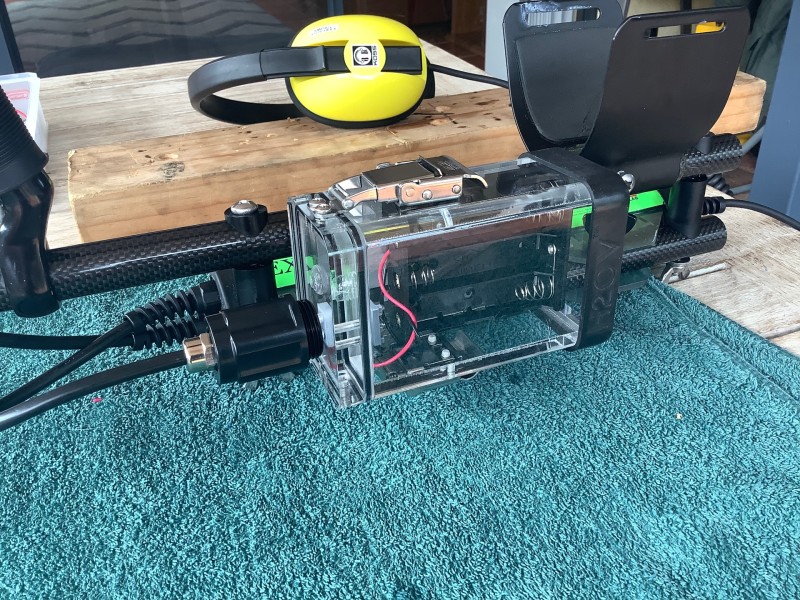
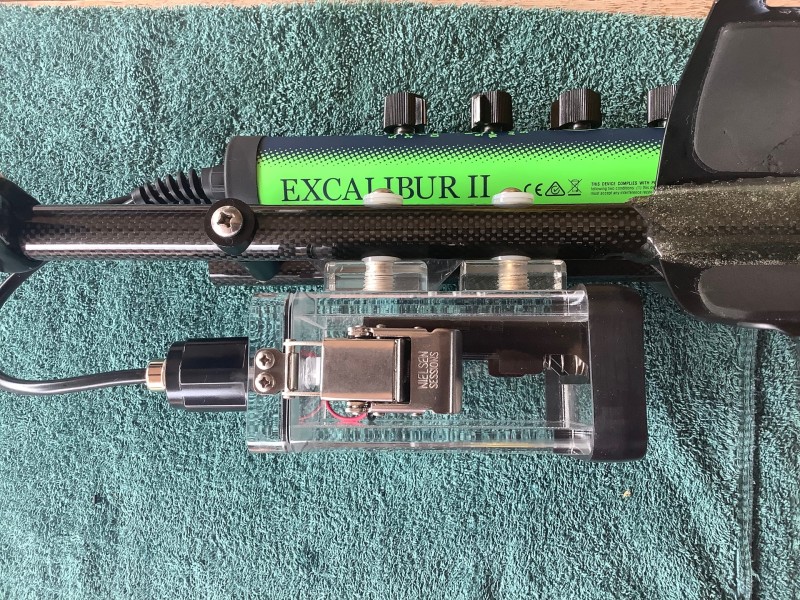
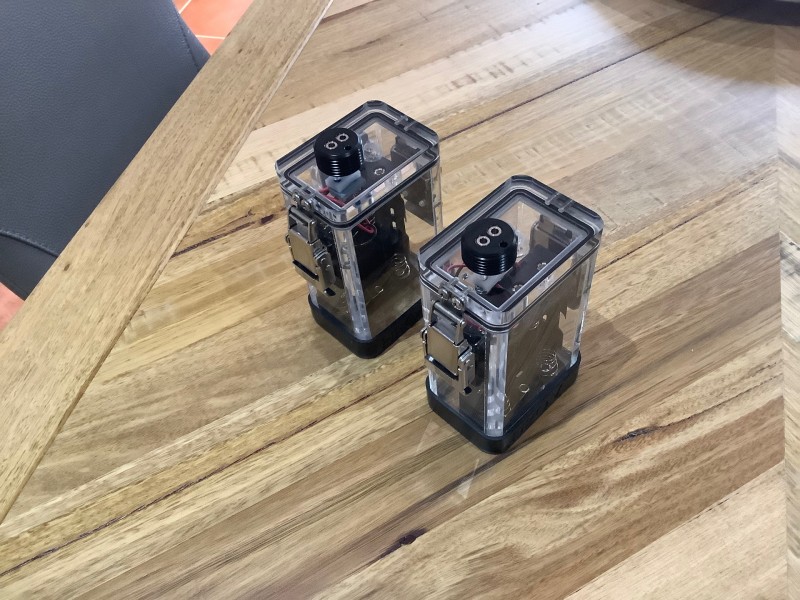
I love my Excalibur but the stock battery pod construction leaves a bit to be desired. My main gripe is the cheap and somewhat brittle plastic pod, especially the battery cap threads as these will crack if tightened too much. Water and fine silt also gets into the fine opening just before the O ring. Small surface cracks seem to appear for no apparent reason ? So I managed to pickup two new underwater camera enclosures that were priced to clear (rated to 200m). These are 15mm thick acrylic cases and very high quality. I was able to get equally high quality suitable connectors for the battery power cable from Aquascan in the UK as Ikelite no longer make this part. I also wanted to charge the Lithium 18650 cells externally (and not in a sealed case) as they can generate heat when charging. The 3 x 18650 cells should give quite a long run time…..much the same as the R&B battery. I’ve got two of these cases now plus the original NiMH pod and the R&B pack. There is no noticeable extra drag in the water that I can feel even though the case has a somewhat larger profile in the water. Two stainless bolts secure the cases (as shown). There is actually room inside for 6 x 18650 cells which would be about a 6000 mAh battery pack ?
-
I have a old EQ, out of warranty. Seems i have more EMI problems the last year or so. Been told a battery swap might fix this. I see them for sale for around $30 bucks but haven't looked at them seriously. Battery life seems fine but if i can reduce EMI problems it would be worth it. Anyone been thru this? thanks
-
This topic has come up before but I haven't been able to find the thread I remember, and battery technology seems to change rapidly anyway. I'm wanting a small device which can serve two purposes: 1) charge up my detecting rechargeable batteries multiple times, and 2) be capable of jump starting my vehicle in the event its battery runs down. I thought there was a solution for all three, but it seems devices I'm finding capable of jump starting a vehicle are both A) bulky and B) don't carry all that much charge. No expert here but I think a unit capable of jump starting a vehicle has to have high current capability. The small lithium devices with lots of charge tend not to put out a lot of current. Here are a couple interesting, affordable small devices I found searching Amazon, both carrying quite a bit of charge (neighborhood of 40 Ah = 40,000 mAh). But I don't think they put out enough current to jump start a vehicle. Wall charging type. Solar charging type. Can anyone point me to a high (charge) capacity, high current capable (for jumping a vehicle), compact charger?
-
whats the fit like and general quality ?? as seen on the bay
-
Hello. I am expecting my new Nokta Legend pro pack this Friday, and I am already "pre-learning" it (watching videos, studying the manual that I downloaded, etc.) My question is about the external battery: Am I supposed to connect it only after the internal battery is depleted, or is it ok to start detecting with both batteries full charged and the external connected before the internal one runs out? I can't find an answer to it in the manual, and I am afraid to do anything that may damage the detector. Thanks!
-
 Hello everyone, I just got my first detector with a Lipo battery. It's the Notka/Makro Simplex+. Since I have no knowledge on this technology, I looked into how to care for this battery. So, I looked here and didn't see a topic on break in procedure. I went online and one expert said he studies batteries and races RC. He claims to extend the life of his batteries and the internal resistance drops once broken in gently. He listed a process in where he gently (low amp) charges then uses a slow discharge then lets it rest for over night. Then slowly charge, then rest then discharge. Then rest. The explanation goes into quite a detail on how low of voltage before stopping the discharge. However, it boils down to discharging to about 10%. Then fully charge. Well, I wanted to post this info here rather than just a link in case his website goes away. So, who on this forum can add to this? I am going to go slow in charging my detector for the first time. I don't see it hurting. Also, news to me is storage should be around 40% for long term. I store long term during the winter months. Below I took only his conversation on the actual process and a couple of comments he made. There is some talk of other things as well and one guy just trying to prove his point. So, this is the meat of the talk. This has helped me I think. Here's the info: How I Break-In New LiPo Batteries (Lowers Internal Resistance Slightly and Prepares Cells for High Demand so they Last Longer): Link: https://www.rctech.net/forum/radio-electronics/1074298-how-i-break-lipo-lithium-polymer-batteries.html I prepare new LiPos by running the first 3 cycles slowly on the charger. This allows the electrolyte in the cells to stabilize and get used to both their fully charged and fully discharged states. Every time I do it, I do notice a small drop in Internal Resistance, and my LiPos seem to last for years and years. These days, many people say that breaking in your LiPo is a waste of time, but I can tell you for sure that it certainly makes a difference for me. So with that being said, here is how you do it properly: For all break in cycles, you will want to BOTH charge and discharge VERY SLOWLY. The MAXIMUM rate of charge or discharge for break-in is 0.5C, I usually run somewhere in-between 0.25C and 0.5C. For Example: Breaking in these new Ovonic 3S 5200mAH LiPos, ALL of the charges and discharges were run at 2.0A, or 0.38C. Yes, it is time consuming, but as I said, it ACTUALLY makes a difference. So, on to the actual process: STEP ONE: SLOWLY charge to 100% fully charged (4.20V Per Cell for standard LiPos, 4.35V Per Cell for LiHV packs). Unplug the battery when finished. Allow battery to rest and settle for 20-30 mins. Plug the battery back in and run CHARGE CYCLE AGAIN. This additional charge is performed because the battery will lose some voltage while settling, and it needs to be topped off. Once the Battery is topped off, unplug the battery and let it sit fully charged for 4-12 hours. This will allow the electrolyte and internal chemistry to become accustomed to its fully charged state. I usually leave the topped-off batteries overnight and then proceed to the next step first thing after I wake up in the morning. STEP TWO: SLOWLY Discharge the battery to a voltage of 3.7V Per cell. This very gentle discharge will only drain about 60% of the LiPo's capacity, or "mAH". This is something done deliberately because a fresh LiPo stays healthier if it is "eased" into a full discharge. As with the first step, unplug the battery when finished, settle for 20-30 mins, and then re-run discharge. You will notice that the oppasite has happened versus step one. Now the voltage will have bounced back up. These things happen because just like running the battery in an RC, charging and discharging puts a load on the battery. This means the voltage sags when discharging past what the actual voltage is, just as the voltage spikes when charging. This is why we re-run every single charge or discharge during break-in. We need the voltage to be as close as humanly possible to our actual target. So, after re-running the discharge to 3.7V per cell (11.1V total voltage on 3S pack for example), ensure that cells are balanced and unplug the battery. Again, as with the first step, now its time for the battery to fully settle in this state for 4-12 hours. Then you can proceed to step three. STEP THREE: SLOWLY charge to 100% again, same very slow rate as step one. Again, unplug and allow 30 mins to settle, re-run charge, then unplug and allow 4-12 hours. STEP FOUR: Same as step TWO but with ONE VERY IMPORTANT CHANGE: Now your discharge target will be 3.5V Per Cell (10.5V total Voltage on 3S Pack). Again, Unplug, settle for 30 mins, then re-run discharge. Finally, unplug, settle for 4-12 hours. STEP FIVE: FINAL SLOW FULL CHARGE. Unplug and settle for 30 mins, then re-run charge. Unplug and settle for 4-12 hours. STEP SIX: FINAL SLOW DISCHARGE. Target will be 3.3 Volts per cell (9.9V total voltage for 3S pack). You do NOT want to discharge your pack ANY LOWER than this, EVER. If you have an intelligent charger that can count mAH pumped in or taken out (like my ProTek Prodigy 625 Duo Touch can), you will notice that your full mAH rating will be drained going from fully charged to 3.3V per cell. The idea that discharging to 3.0V per cell on LiPos is okay for LiPos is actually a common misconception. 3.0V per cell will actually damage the life of the battery, just very slightly and very slowly, so it is considered acceptable. However, if you do your research, you will find that setting your LVC on your ESCs to 3.3V per cell or higher is the ONLY TRUE WAY to keep your LiPos FULLY HEALTHY for years to come. As with all other steps, unplug the battery when its done discharging and allow to settle for 20-30 mins, then re-run the discharge. Now, unplug and allow settling for 4-12 hours. FINAL STEP (SEVEN): After allowing your battery to FULLY settle at 3.3V per cell, you can return the battery to proper storage voltage (3.80-3.85V per cell) until it is time to stick it into a vehicle. When you are ready to run it in a vehicle, run the first usage charge at the same slow charge rate you used when breaking in, allow to settle for 30 mins, and top-off. Then, when running vehicle, take it a bit easy. You don't have to drive super slowly, but avoid full throttle and wheelies and things that put the battery under immense power draw for just the first run. Ensure your LVC (Low Voltage Cutoff) is set properly and do your best to drive the vehicle until you hit LVC. After this first run, you can now use your LiPo normally, using your choice of charge rate (I always recommend 1.5C or less for battery health longevity), and you can drive as you see fit as well. Monitor battery temps closely until you know how your battery responds to high demand. I hope this helps some of you guys get a bit more power and life out of your Lithium-Polymer batteries. These batteries aren't cheap, so I find it more than worth the time and effort to break them in, for the healthiest and longest-lasting batteries possible! One detail I forgot to mention: A good example is the fact that these Ovonic LiPos started with an Internal resistance of 4.4 MiliOhms on their first charge. However, after running my Break-In process, my charger now shows 3.2 MiliOhms average per cell at full charge and after settling for 60 minutes (this is how you properly measure IR, LiPo MUST be fully charged, topped off, and allowed to settle for 60 minutes in a environment with standard room temperature of 70-80°F). Firstly, leaving a LiPo fully charged for a few hours at a time does no harm to it. Usually, once you leave a LiPo fully charged or discharged for about 48-72 hours, THEN you will begin to see slight degredation in the life of the battery. If you leave it fully charged for weeks or a month (a mistake often made by people new to the hobby) then that might be enough to finally seriously damage or kill the battery. If leaving a LiPo fully charged for just a few hours hurt them, nobody would be buying them. You can find articles if you do your research that will explain how Lithium battery chemistry benefits from allowing the electrolyte to become accustomed to being fully charged. If you look at HRB USA website, you will find in LiPo battery product descriptions that they even recommend a break-in process for their batteries. The owner of SMC Racing and I have spoken about this over E-Mail before as well. One of my favorite sites for learning about battery technology is "Battery University". A very good read indeed. For instance, did you know that when LiPos were first invented, Break-Ins were MANDATORY for satisfactory performance? If you didn't do a proper break-in, your battery likely burst or put out very little power. There were several reports of bursting batteries to show that it truly wasn't an option. Now days, its not 100% necessary, but I have been doing RC for 16 years. Yes, Ive tested more than just 2 packs. This is just ONE example. Ive been breaking in LiPos now for about 8-9 years. In that time I have noticed changes on about all but one pack. Somewhere in the neighborhood of 50 packs tested. 5 Manufacturers, I run ProTek LiHV packs, Gens Ace Bash packs and Redline LiHV packs, SMC Racing Packs, Fantom Race Packs, and Ovonic Bash packs. Now as I said, the difference made on expensive race packs like Fantom was minimal. There WAS an observable difference, but was the process woth the time and effort? Eh, debatable. I suppose you could just charge slowly the first couple charges and drive gently the first couple drives if you want an easier way to break in that doesn't seem like a waste of time. I prefer the charger because I can observe and measure the difference from start to finish.
 -
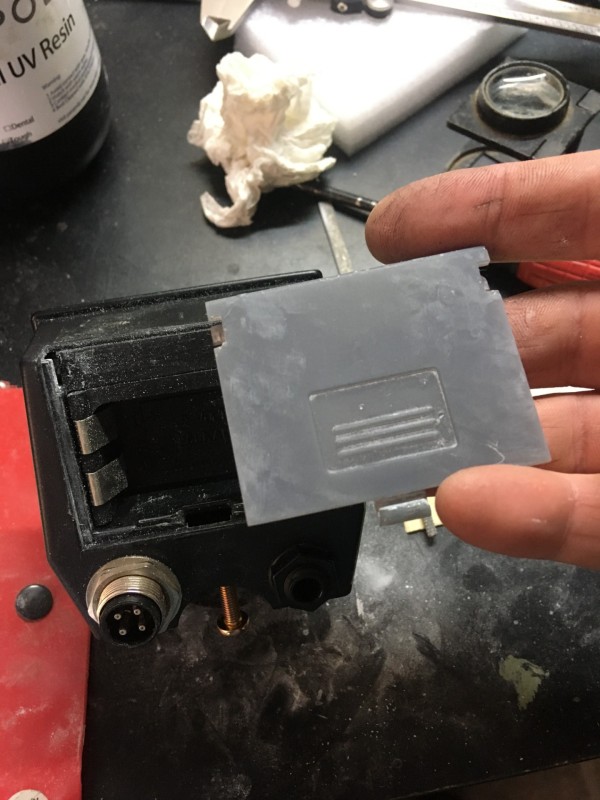
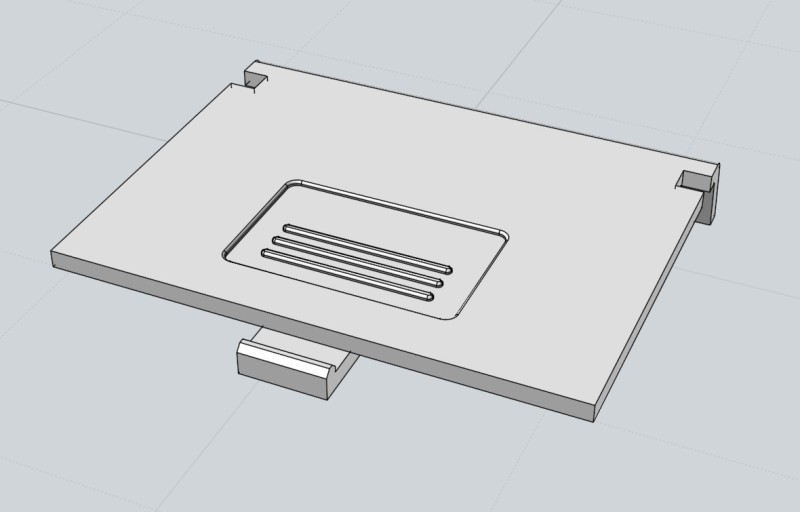
Seeing these parts are getting scarce and I needed a battery door for a Cibola I whipped up one and printed it out. Seems to be working well. I used an SLA printer but recommend an FDM or SLS print as they would be stronger. Better choise of material would be ABS or PLA. Can files can be found on my onedrive here: https://1drv.ms/u/s!AjccxQu5QhuelFqzB1wbY0LvAHz7 There are a slew of 3d print houses out there ie shapeways etc. Enjoy!

-
 Hello, Please Help. I Have A Gpz7000 Battery That Does Not Work With The Detector. After I Removed The Battery, It Became Clear That The Cells Were Working Fine And There Were No Problems. I Checked The Cells With A Voltmeter At The Outlet Of The Battery مرحبا ارجو المساعدة. لدي بطارية gpz7000 لا تعمل مع الكاشف. بعد أن قمت بإزالة البطارية ، أصبح من الواضح أن الخلايا تعمل بشكل جيد ولا توجد مشاكل. راجعت الخلايا باستخدام مقياس الفولتميتر عند مخرج البطارية. لا يوجد جهد 7.2 فولت تشغيل الكاشف مع العلم أن جميع الأجزاء المثبتة سليمة ، لا أعرف ما إذا كانت عبارة عن برنامج
-
Just got the D2 last nite and when I charged the remote with the included plug the plug doesn't go very far and is loose and falls out easily. I have it lined up correctly. I don't see how that will work when trying to upgrade the system. If it looses connection while doing an update it could cause a lot of problems. am I missing something on this? I don't want to push too hard for fear of bending or breaking any of those tiny thin pins. It's freezing and more snow coming so I am trying to figure out the menu system. I did scan some coins and stuff under the coil to see approximate TID's and to hear tonal nuance (CD) lol The EMI in this house is crazy and you should see what it looks like in the XY screen... lol


.thumb.jpg.d71314a45f3dc82bf75ac1b96e7e9201.jpg)

.jpg.537f700bce3058c4f156412e2d921674.jpg)