
Steve Herschbach
-
Posts
19,640 -
Joined
Content Type
Forums
Detector Prospector Home
Detector Database
Downloads
Everything posted by Steve Herschbach
-

I Guess I‘m In.. Kind Of Logbook
Steve Herschbach replied to Sinclair's topic in Minelab Equinox Forum
Yup, what Terry said. If two people listen to 100 targets, they will differ as to how much stuff they dig as being “good targets” and “bad targets”. In other words, what one person may decide is a trash target may be good enough sounding to dig to the other person. We vary in how aggressively we reject trash, which goes hand in hand with potentially missing good items. Then add the fact that the local trash mix varies tremendously and how much it interferes with your detecting depends on the targets you hunt and how much local trash reads the same. This leads to situations where one person says “this works for me” and another says “it does not work for me”. It’s not a matter of making things up or anything, and no reason for anyone to take offense or argue. So whether it worked for Sinclair or not I will just say thanks staffydog33 for sharing your advice. Even if it does not help Sinclair it may help someone else, and helping others is a large reason for this forums existence. -
GPZ 7000 Auto, Semi Auto, Manual ???
Steve Herschbach replied to DolanDave's topic in Minelab Metal Detectors
I totally agree Reg that when people spend money they want things right, and the more money, the more they want it to be right. I too know many Minelab horror stories I could tell, especially on the business side of things and especially here in the United States. Aussie business practices are notoriously unforgiving and the company does many things I think are totally counterproductive. I have my own laundry list at the moment, but rather than air it on forums I am writing up a letter to the CEO. Will it change anything? Doubtful, but if people really do care about such things then the more letters like that the better. Long story short if around a campfire you might be surprised at what would come out of my mouth. I probably agree far more than you know with your thoughts on the subject. Sadly I also know that the other manufacturers are not immune from all this nonsense. Most of these companies are far smaller than people think and run more like small family businesses than corporate enterprises. You simply have seen more of it from Minelab because that's where your exposure has been. First Texas units more often than not undergo numerous revisions. The Garrett AT series needed a complete makeover after being released. If you did not hear about White's MX Sport mess, well, it was a real mess. Having sold ATVs, generators, outboards, heaters, water pumps, motorcycles, boats, snowmobiles, etc. etc. from names like Bombardier, Evinrude, Honda, Mercury, Suzuki, Polaris, Yamaha, Johnson, Husqvarna, Polaris, etc. I can also promise you I have seen far worse with far, far more expensive products. I have been screamed at to my face in our service department by upset owners on new, failed product. I have been sued because of manufacturer mistakes. All new product made by anyone can fail, and companies as a rule choose denial as a first response before ever admitting errors. Minelab is far from alone in all this, and far from the worst. Anyway Reg, I am sorry your friends had problems. Thank you for a reasoned response - you kind of made my day. -
You big tease - very nice gold Tom!
-
Cinders, Cinders And More Cinders
Steve Herschbach replied to Mark Gillespie's topic in Minelab Equinox Forum
Both beach modes though Beach 2 is the far more aggressive at signal reduction than Beach 1. My personal estimation of how the various modes line up: Hottest (more sensitive to small targets, hot ground/rocks, and saltwater - high frequency weighting) 1. Gold Mode 2. Park Mode 2 and Field Mode 2 3. Park Mode 1 and Field Mode 1 4. Beach Mode 1 5. Beach Mode 2 Least Hot (less sensitive to small targets, hot ground/rocks, and saltwater - low frequencty weighting) -
How To Ignore Users On The Forum
Steve Herschbach replied to Steve Herschbach's topic in Meet & Greet
For a year or more but it is not obvious which is why I pointed it out. Other forums employing this software have the same feature so this may help people on more than just this forum. -
T2 Classic Videos
Steve Herschbach replied to a topic in First Texas - Bounty Hunter, Fisher & Teknetics
The T2 and F75 are both “classics”. I have to admit that with all the price decreases I get tempted to get another one, just because the price is so attractive. After years of detectors getting more expensive it’s nice to see this kind of power at such low prices. It used to be I would not be satisfied with detectors running under $799 but $499 is now the level at which one can get top of the line performance. Kind of amazing really. -
I have been mostly keeping my mouth shut about Multi-IQ and gold because I am operating more from a gut feeling than any direct comparative testing. Yet my use of the Equinox for nugget hunting and the tests I have done so far has me thinking that Multi-IQ is going to prove markedly superior to most VLF gold detectors currently on the market, and that it might possibly prove out to be the next best thing to a PI for larger gold at depth. It certainly has the hots for smaller gold. The old rule about single frequency packing more punch on gold than multifrequency may be something that Minelab really has made obsolete. Gold prospectors however have been inundated the last few years with quite a few machines all promising new edges in technology, etc. That being the case I decided to specifically lay low on that particular aspect of Equinox since it is clearly being marketed primarily to coin, relic, and jewelry hunters. It’s certainly not because I don’t think the capability is not there however - just the opposite. I think we will be seeing lots more posts like yours and Mitchels fairly soon Lunk. Thanks for posting!
-
It does appear that the 800 is finally arriving in volume. There are a few dealers advertising now they have them in stock, so hopefully everyone waiting for one is finally going to get one.
-
Another Question About The Ferrite Ring
Steve Herschbach replied to phoenix's topic in Detector Prospector Forum
If a reference ferrite setting is superior to that actually found in the field by the machine acquiring naturally occurring ferrite readings, then the machine could be locked to this reference ferrite at the factory. The fact this has not been done leads me to conclude that there must be situations where tracking to naturally occurring ferrite would be the better way to go. All the talk about using the ring generally revolves around the soils where naturally occurring ferrite is absent or minimal. That is apparently more common in Oz than in the U.S. All I know for sure is some people report improved performance using the ferrite, and some no difference at all. I use mine simply because it is a recommended procedure, but I can’t say that I have noticed any difference one way or the other when employing the ferrite and those times when I do not. As always, mixing up what works well for operators in Oz and operators in the U.S. can lead to confusing and possibly misleading conclusions. I will be curious if anyone can answer your question with authority phoenix. What you are surmising makes sense based on how things have been explained but I lean more to regular factory resets and retunes myself than letting things go untouched for long. -
Cinders, Cinders And More Cinders
Steve Herschbach replied to Mark Gillespie's topic in Minelab Equinox Forum
I know you say you tried all the presets Mark but just to confirm.... you tried the beach settings? The reason I ask is the beach modes are more like “difficult ground modes” and not just for beach use. -
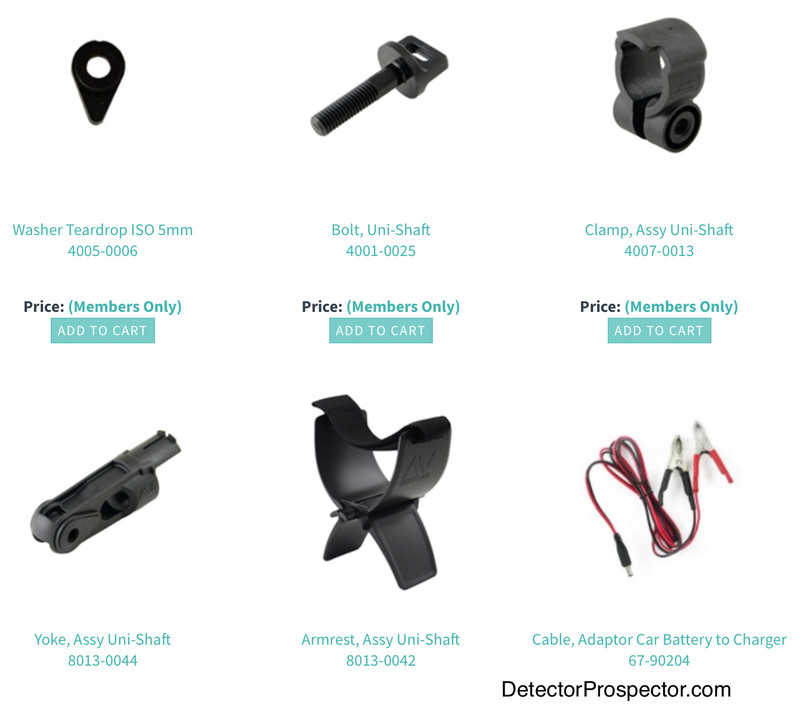
Universal Shaft Adapter For Gold Monster 1000
Steve Herschbach replied to Whitbey's topic in Minelab Metal Detectors
This is what you are looking for? Uni-shaft Yoke Assembly part number 8013-0044 The clamps, bolts, washers are all separate items.... http://parts.minelab.com/category-s/196.htm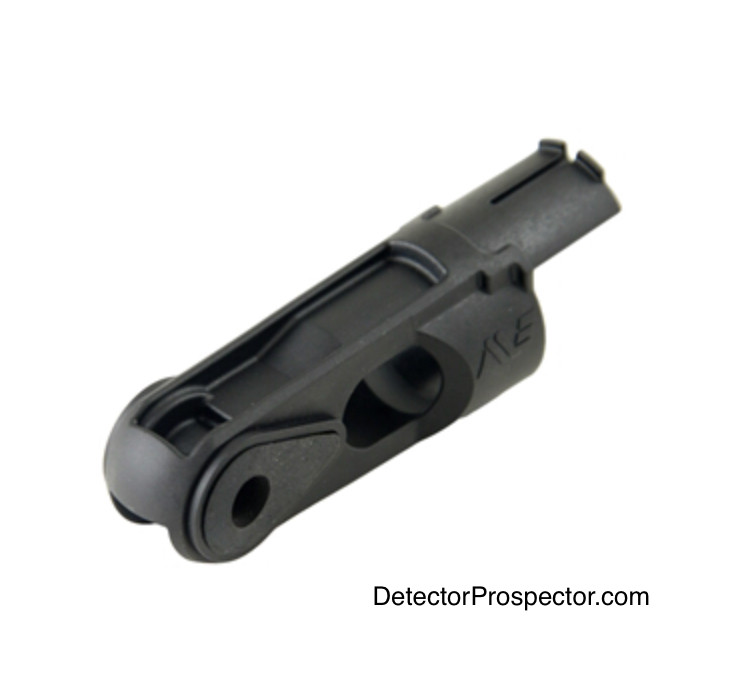
-
GPZ 7000 Auto, Semi Auto, Manual ???
Steve Herschbach replied to DolanDave's topic in Minelab Metal Detectors
What does the place of manufacture have to do with this thread? As far as your question about the ferrite ring and “why” it happened the way it did in the order it did, my response at least is “I don’t know”. We can talk about the ferrite and whether its use is of any benefit of not, but “why” Minelab does things is again not really the subject here. Reg, you obviously have a bone to pick with Minelab. If you want to start a new thread with all your “why” questions it might get it all off your chest, but I really don’t expect Minelab corporate officers or engineers to step in here and explain why they do what they do. -
Enjoying everything but one person’s posts rub you the wrong way? Go to your settings in upper right and look for “Ignored Users”. Ignoring a user allows you to block some or all of their content from showing. Users are not notified that you are ignoring them. Just add the user name you wish to ignore to the list accessed under “Ignored Users”. I prefer people not complain about or directly address other people about their behavior on the forum. Don't take moderation tasks on yourself... leave that to me. If you have an issue contact me directly about it, or use the ignore function.
-
New 61 Khz Makro Gold Kruzer
Steve Herschbach replied to Steve Herschbach's topic in Nokta / Makro Metal Detectors
Not yet. I am not sure any are in the U.S. All dealer sites but one I visited said pre-order. The other was more likely an error. Only a few days left in May so it may be June now before anyone can actually hold one. -
Answered my own question. The new D2 coil now has a matching scuff cover. Cover for 10″ DD Open Loop. Fits New (2017 and later) 10″ DD loop. SKU: 501-4145 $14.95 https://www.whiteselectronics.com/product/cover-10-dd-open-loop-new/?lang=us According to a measurement made on this older thread about the new coil the old D2 weighs 566 grams and the new one 526 grams so 40 grams lighter.
-
My V3i new last summer came with the newer slimmed down D2 coil. On my digital postal scales, coil and cable weigh 1 lb 2.6 oz or 526 grams. Now we need an accurate weight on the old coil, which can be hard to get unless somebody does what I did and weighs them. many weights quoted on the internet are inaccurate - just people repeating something they Googled. FYI the old scuff covers will work but are a poor fit, with large gaps at the edges allowing sand and debris to get in unless taped. I wonder if White's ever made a new scuff cover to fit the new coil?
-
The Best Of Garrett Searcher - Part 1
Steve Herschbach replied to Steve Herschbach's topic in Garrett Metal Detectors
You can now download the Best of 2017, Part 2 -
Very nice coin, good sharp detail!
-
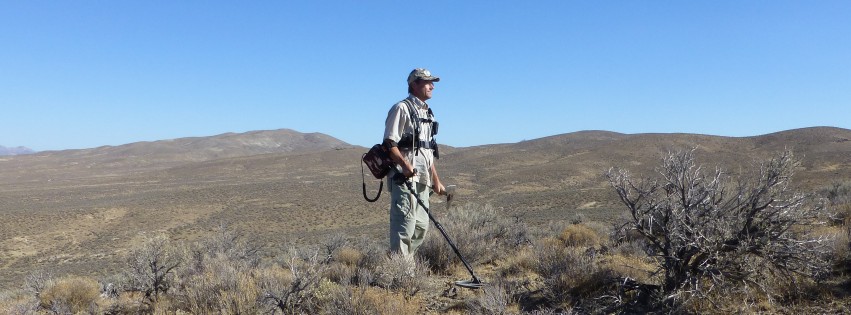
 Edit: I chronicled this trip to Alaska first, and then told the story of my earlier 2013 Alaska Trip after the fact. I did well enough in 2013 I did not want to tip anyone off to what I was up to until I had a chance to return in 2014. Therefore this story got told first, as if the other had not happened. And then the years story was told at the link above. My history with the Fortymile Mining District of Alaska began in the 1970's and has continued off and on ever since. Last summer I spent considerable time in the area and have decided to return again this summer. Here is the basic plan. I leave Monday to drive from Reno to Alaska. I am stopping a day to visit family in Olympia then will continue to Anchorage, where I will pick up my brother Tom who is flying up from the Lower 48. Then we will backtrack to Chicken, Alaska and pitch a tent site at the Buzby's Chicken Gold Camp http://www.chickengold.co Last year I mostly camped around but did spend a period of time at the Buzby's operation. When I was out and about I had to activate my satellite phone to stay in touch because there is no cell phone service in the Chicken area. The nearest cell phone access is a couple hours back along the road at Tok. There is WiFi access at several locations in Chicken however, one of them being at Chicken Gold Camp. The WiFi access is included in the price of staying there. I am getting a dry camp site for $14 a day (6 days get seventh day free) but it saves me $300 activating my satellite phone, and WiFi allows me to keep on the forum and stay in better touch with my wife than the sat phone. Bottom line not activating the sat phone ends up paying for nearly a month of staying at Chicken Gold Camp. Right now I am booked from June 15 until July 20 but may extend. Since I will have pretty much daily Internet access for the entire trip I am inviting you along via this thread to see how we are doing plus to perhaps answer questions for anyone planning to visit Alaska. The Internet access in Chicken is not the greatest even at its best, as the satellite dishes point straight at the horizon just trying to get a signal. That being the case plus I will be busy I will not be posting on other forums for the duration. If you know anyone who might be interested in following this point them this way. I will report in at least a couple times a week and probably more often as time allows or something interesting happens. My brother and I will be commuting to various locations from our base camp in Chicken, with a lot of attention paid to Jack Wade Creek about 20 minutes drive up the road. I have access to mining claims on this and other creeks in the area, but we will also spend considerable time on the public access area on the lower 2.5 miles of Jack Wade Creek. Visit this link for more information. This area is open to non-motorized mining and we will of course be metal detecting. Main building at Chicken Creek Gold Camp I have detected on Jack Wade a lot, and I can tell you it is an exercise in hard work and patience. It is all tailing piles full of nails and bullets. The nuggets are very few and far between, with even a single nugget in a day a good days work. However, the nuggets are solid and can be large so can add up if you put in a lot of time. Or not as luck does have a bit to do with it. You could easily spend a week detecting Wade Creek and find nothing. So do not be surprised when I make lots of reports indicating nothing found on a given day. We fully expect that to be the case but hope we hope a month of detecting here and at other locations will pay off. I plan on relying mostly on my GPX 5000 but will also be using a Gold Bug Pro for trashy locations or for when I am tired from running the big gun and want to take it easy. I usually run my 18" mono coil on the GPX unless in steep terrain or brushy locations and dig everything. And that means a lot of digging! The Gold Bug Pro eliminates digging a lot of trash and is easy to handle in thick brush. My brother will mostly use my old GP 3000 he bought from me years ago. I am also bringing along the Garrett ATX kind of for backup and also to experiment around with. It also will be easier to use in brushy locations than the GPX. Finally, I hope to possibly have a new Minelab SDC 2300 get shipped to me somewhere along the way to use on some bedrock locations I know of that have been pretty well pounded to death. Chris Ralph will be arriving in Fairbanks on July 8th so I will drive in and pick him up. He will be staying with Tom and I until I return him to Fairbanks on July 21. High on the list is to visit with Dick Hammond (chickenminer) and other friends in the area. The road to Alaska is just another highway these days, with the only real issue being the lack of gas in northern Canada in the middle of the night. The pumps there still do not take credit cards so when the gas station closes you are stuck there until it opens in the morning. Do not try to get gas at Dot Lake at 2AM! I will drive to Olympia to spend a night and day with my mom (12 hours) then on to Dawson Creek/Fort St. John (16 hours), then to Whitehorse (15 hours), and then to Anchorage (12 hours). Four days driving, about $500 in gas for my Toyota 4-Runner. Pick up Tom and some supplies and then back to Chicken (about 8 hours). Anyway, you are all invited along at least via the internet to share in the adventure. You have any questions about Alaska in the process then fire away. The full adventure continues here.
 -
Detecting In Hawaii With The Garrett ATX - 2/4/14
Steve Herschbach posted a article in Steve's Mining Journal
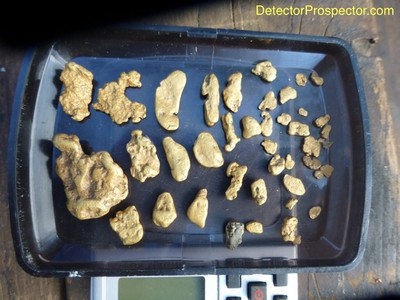
 Well, back home safe and sound after a couple weeks in Hawaii with my wife. We visited the island of Kauai for the umpteenth time. We like the laid back vibe, made even more so by being familiar with everything. We do what we both like - she relaxes in the sun and I go metal detecting. And lots of walks and dinners together. The back story is told at Steve's Mining Journal about prior trips made to the same location over the years. Hawaii has always been a pet project of mine as it is the most difficult environment I have even encountered for a metal detector. There is of course the salt water. There is also literally military grade electromagnetic interference (EMI) from military installations plus missile and satellite tracking stations. Finally, there is a mix of non-magnetic coral sands and volcanic basalt derived sands and cobbles. Throw in the heavy surf and out of control tourists on surf boards trying to kill you... things can get interesting! If you stick to the tan to nearly white sands you can get decent performance from many detectors. But when the basalt gets involved is where things get fun. Most prospectors are familiar with basalt rocks and the challenge they present in gold prospecting. Well, just take the same hot rocks and douse them in really salty water and heavy duty EMI and you have Hawaii. Multi frequency VLF detectors like the Fisher CZ or Minelab Excalibur do ok in in the stuff but lack any real punch. They do best in the whiter sands, but the basalt sands and cobbles really leave them feeling gutless. I went to PI detectors early on, and overall probably had my best results with the various White's Surf PI models. Again, however, they worked best in homogenous materials. Places where the white sands and basalt cobbles mixed gave the Surf PI fits as it hit on the basalt cobbles. In darker sand beaches it was near impossible to keep the machine steady over the bottom in the surf, leading to lots of false signaling. I tried several Garrett Infinium detectors in Hawaii and got tantalizingly close to the detector I wanted. The Infinium as a ground balancing PI could tune out the black sands and hot rocks and eliminate many of the false signals. But it introduced just as many if not more by an inability to play well with salt water and EMI. The interference in particular made the Infinium almost unusable at times. I really wanted a stable Infinium, and confirmed this idea by using the White's TDI in Hawaii. It seemed to solve the issues I was having with the Infinium and so I waited for White's to make a waterproof TDI. And waited. And waited. I waited so long that Garrett had time to take what they learned from the Infinium and another model, the Recon, and build a next generation PI, the Garrett ATX. I was cautiously hopeful that all the noise I had made over the years had been heard, but frankly, I was not getting my hopes up too much. On top of that, the good old days are gone. I used to spend a couple weeks in Hawaii years ago and never see anyone with a detector. This trip I saw people every day! Ok, often the same guy but also more different people detecting than probably all my previous trips combined. The competition has gotten fierce by comparison to the old days. Hawaii treasure of another sort - beautiful beaches lit up at sunset! The Garrett ATX is the best PI detector I have ever used for difficult water hunting. Hands down, no comparison. I have to qualify that by saying that what makes it shine is the severity of the conditions. A person buying it and using it on clean white sands in Florida would probably have a less enthusiastic reaction. There is a lot of confusion regarding ground balancing PI (GBPI) detectors like the Garrett Infinium or White's TDI. They do not air test well against good VLF detectors and indeed do not really perform all that well against them in mild ground. People never really understand what detectors like these are all about until they get into difficult ground. The kind of ground where the best VLF detectors lose half their depth, the GBPI detector just keeps plugging along, and all the sudden now have a big depth advantage. Not because they go so deep to start with, just that VLF detector fare so poorly in really bad ground. GBPI detectors only really shine in the worst conditions. Let that sink in because it is very important. Anyone reading this should not get the idea these detectors are the be all or end all for all circumstances. But when the going gets tough, when other detectors fall on their face, a GBPI detector like the Garrett ATX can be the answer. Tuning a detector like the Garrett ATX can really bother some people. There is this resistance to doing anything that reduces the theoretical max depth of the detector. As soon as you start getting into reducing settings the feeling is that "well, yeah, but now it does not go as deep". The reality is that any machine that can be run maxed out in bad conditions has left some performance on the table. You may be able to max settings in benign ground, but you should have to back off of max settings in really bad conditions. That is why the controls exist - to compensate for bad conditions. The goal is to be set as high as possible while getting stable performance. The ATX is a powerful detector, and so it should be expected the machine has to be dialed back in severe conditions. The ATX has three adjustments that affect the depth. The Gain control is the simplest. You decrease the sensitivity of the detector to help compensate for conditions that are introducing too much noise. Just like the Gain or Sensitivity control on a VLF detector. This control was lacking on the Infinium and is a major reason why the ATX is superior. There is the pulse delay, which Garrett labels as a discrimination control. It is, sort of. Without getting all technical on you it is also a sort of sensitivity control, in that increasing the delay or discrimination also eliminates signals from weak conductor targets like foil, hot rocks, or salt water. This is really the only control you have on the Infinium to deal with false signals and it serves a similar function on the ATX. Finally, you have the ground balance. The ground balance is basically another type of discrimination circuit or filter. The signal produced by the ground is determined and then eliminated. However, this comes at a cost. Items that read the same as the ground signal are also eliminated, and items near to the ground signal will exhibit reduced signals. The White's TDI makes it easy to demonstrate this. You can turn the ground balance completely off, and when you do so the machine air tests far better than it does when you turn the ground balance on. This is because of the subtractive nature of the ground balance circuit on the TDI. Also, because it has a manual ground balance, you can see the effect of tuning the ground balance control closer to and farther from a particular target response. Instead of tuning out the ground the control can be manipulated to tune out other items instead. It is just a basic discrimination circuit. Different ground balance methods can affect items to greater and lesser degrees so the example shown by the TDI should not be taken as being the same with all detectors. But the effect is real and does exist to some degree on all ground balancing detectors, both VLF and PI. So why use ground balance? That should be obvious - to tune out ground responses. If there is no detectable component in the ground you would be better off without the ground balance circuit. Such conditions rarely exist, but they do exist. Absolute pure white coral based sands are one of them. The ATX at its hottest will detect salt water however, and new to the ATX is the ability to ground balance out the salt signal instead of the ground signal, but you are trading some sensitivity for stability doing it. Long round about way to explain that when the Garrett ATX is turned on with factory default settings the ground balance setting is at a minimum. The ATX should be tried first with the factory default setting and on many beaches you will not want to ground balance it. Just leave the discrimination (pulse delay) at zero, set the gain as high as possible while still allowing the machine to be stable, do a frequency scan, and go. In Hawaii at my location however I could not do this. I could on clean sand but not in the cobbles I wanted to hunt. But first, a total surprise. My ATX was almost totally immune to the EMI that I had previously experienced on Kauai without even doing a frequency scan. The frequency scan was basically redundant. That one thing made the ATX a huge advantage for me before I did anything else. I would not have believed it had I not had a White's Surf PI along for backup and sure enough, when I fired it up, the EMI was there. It was discernible in the ATX non-motion mode but even then nothing to worry about. I. Do not know what Garrett did or if I have a magic ATX but this one thing alone really floored me. It absolutely eliminated my number one problem with the Infinium. Basalt cobbles in sand on Kauai A detector with all controls set to max is in theory getting the best depth. But if it is not stable you cannot work with it, so you have to adjust back to find the best balance. The ATX is a very powerful detector and so I found a combination of settings that worked for me to get quiet, stable performance. This is in no way being advertised as a setting to for you to use! It is what I did for this location and other locations will take different settings. In general, the more powerful all your settings can be the better while still being able to have a stable running detector. So the ATX with factory default (minimum) ground balance, zero discrimination (pulse delay), and max gain would be at its most powerful. The worse the conditions, the more you may need to dial the settings back. The problem is with all the settings maxed out the ATX is very sensitive to small gold, but that also means it picks up salt water and hot rocks. I played with the gain control and the pulse delay (disc) control looking for a balance that left the detector running quiet. A discrimination setting of three and a gain of seven made the ATX submerged in salt water run like a VLF. I periodically reduced the disc setting or bumped the gain higher and noise was introduced, so settled on the 3 and 7 setting for my Kauai beach. Then I found a fat basalt rock buried in the sandy bottom and ground balanced over it, eliminating the signal. I would be the first to admit these settings were probably aggressive and of course costing me some depth in theory, but I got what I have always wanted in Hawaii. A PI detector running quiet as a VLF and by that I mean just purring along with a threshold sound, and when it made a noise, it was because I had a target under the coil. Here is another way to look at it. A very hot detector will detect salt water. It will detect hot rocks. And it will detect things you want. EMI can also be an issue. The trick is to reduce the signals from the things you do not want to hear as much as possible while enhancing the good signals as much as possible. It may be letting unwanted signals through will also increase depth on desired targets a bit. It may also be true that too many signals from undesired targets will inhibit success. You have to decide for yourself where the balance lies. If maximum depth is the goal then digging more undesired targets may indeed pay off. In my case I had plenty of targets, so the goal was quiet, efficient operation. I would not hunt clean white sand set like this. I would have the settings maxed out. I had a strategy in mind here, and my goal was to detect in the basalt cobbles. I was not tuning the machine for maximum performance in the easy stuff, but for maximum performance in the worst stuff. I wanted to detect the places where targets were more likely to have been missed by other detectors. Finally, after one go with the stock coil, I switched to the 8" mono coil. A few reasons. First, it is easier to handle underwater and fits in depressions better. It can be pushed through sand ridges and is less likely to move on the shaft. And I could find items edge on with it easier than with the stock coil. By that I mean turn the coil on edge and drag it in the sand and it acts like a pinpointer on small surface targets. The edge of a mono coil is very sensitive. A smaller coil is easier to pinpoint with to start with anyway. And honestly, I used the 8" mono because I was worried about sand getting in the twist locks and giving me problems, possibly even seizing up the rod assembly. The 8" mono and shaft assembly was my sacrificial lamb. If it got totally screwed up my stock coil would still be fine. Garrett ATX with 8" mono coil (goodie bag attached to arm strap, waterproof watch on handle) I may as well relate now that I did have issues with sand in the twist locks but not as bad as anticipated. The lower two twist locks seemed just loose enough that at the end of every outing I just worked them back and forth and the rod in and out and they cleared. But the upper one gave me problems. It got sand inside that refused to come out, even after taking it off and working on it under running water for a half hour. For some reason that upper most twist lock was just a bit tighter to start with and the sand would not clear out. Yet it never quit 100%. I lost most of the ability to twist the lock but it still twisted just enough to hold the rod in place. I am asking Garrett for advice on where to drill a couple holes or maybe slots to see if we can get these things clearing sand a bit better. Overall I actually am ok with them but they need improvement. In other types of sand it could be a big problem. I am going to see if I can get my upper lock to loosen up similar to the lower two and will report back later. The rod assembly got scored up quite a bit from being extended and collapsed with sand in the assembly. I will post photos later. Nothing that bothered me but some might hate seeing their expensive detector getting ground up like this. I have to say at the end of the day the physical design and the rod assembly in the water were nothing short of brilliant. I have given the ATX low marks for prospecting as being a duck out of water. The waterproof design adds weight, complexity, and expense not required for most dry land prospectors. But in the water the ATX felt really, really good on my arm. It is slightly negative so will settle on bottom if released. But not much; it is essentially weightless on your arm underwater. The rod assembly was a dream. I was working in heavy surf with 40 lbs of lead weight on. I steadied myself many times by leaning on the ATX with absolutely no fear it would break, and the rod never slipped. I could get in the shallows on my knees and shorten the rod down as short as I liked. And just right, no fumbling for the right holes, just loosen a twist lock or two and put it right how I wanted it. Better yet, due to the three piece design, I could also extend the ATX to be longer than any detector I have used underwater. I was in 6 foot of water with just my snorkel in the air, and easily detecting around me. I do a lot of breath hold recovery in deeper water and the ATX was just so easy to adjust for whatever depth I was working at. So easy and so solid and tough that I 100% forgive any little work needed to sort out the twist lock situation. This is one really great handling detector underwater in rough surf conditions that would leave other detectors in serious danger of breaking. The 8" mono was perfect for me. It stayed where I put it and I pushed it around a lot. I learned quickly if I wanted to adjust the coil position to be flatter all I had to do is turn the detector over and push down on the nose of the coil. Maybe not as easy as pushing down on the heel of a coil with a rod mounted in the center instead of the rear but no big deal, mainly because the coil stayed put. After two weeks of heavy use I never had to adjust the coil tension and it showed no signs of having any issue with all the sand it ran through. I had no scuff cover, and the coil shows no sign of cracking, just your normal scuffing from use. The epoxy appears much improved from the old Infinium days. A weak point - that tiny spring loaded rod lock, the one you flip to disengage the rod and coil assembly. The tiny spring popped out on me once. I took it apart, made the spring end ninety degrees again, and it worked for most of trip, but slipped out again last day. Not a big deal but needs beefing up. Be sure when twisting the rod and cams while cleaning to not hold the detector body. You will be twisting against that little lever. Hold onto the rods themselves and twist the cams. We need to find out what the part number is for the coil and headphones connector covers. Everyone should have a couple extra. Better yet, a couple spare caps like are fixed to the back of the ATX to cover the male headphone connection when not in use. One of these to put over the male coil attachment point inside the housing would be very helpful when rinsing and cleaning the ATX. Take the coil off, put the cap on, and now no worries while cleaning. I will find out the part numbers and pricing for those and get some and suggest ATX owners do also. I saw no point on beach hunting with all the competition. One guy in particular walked the beach a couple times every day with a Surf PI. I saw a couple Surf PI detectors at work, a Minelab Excalibur, and a Tesoro Sand Shark or Piranha. They all walked the beach and only the Excalibur guy ventured into the trough when it was calmer once. I spent all my time in the surf or deeper water with a weight belt and mask and snorkel. I recover targets by fanning or digging. And I went looking for mixed coral/basalt harder bottoms instead of deep sand. I played on the beach a bit and hit deeper sand underwater but basically all my finds came off of more solid bases. I am not going to say the ATX was some kind of super depth monster. That would be misleading and really missing the entire point. I have no doubt it was getting as good as depth as could be wrung out of the conditions. I was easily getting nickels down to ten inches in the basalt, maybe a tad deeper but honestly it is hard to tell recovering targets underwater while holding my breath in the surf. The real thing I am trying to relay here is the ATX was rock solid, just like using a good VLF above water, but in the worst detecting conditions I have ever encountered. It allowed me to just get on with the business of detecting targets and recovering them. If I was lacking for targets maybe fighting for another inch would be the name of the game but I never ran out of targets. Steve's Finds in Hawaii with Garrett ATX (Click on photo for larger version) The rings just banged! Nickels hit hard. By virtue of the ground balance system large junk goes low tone and I ignored many low tone targets. That cost me some dimes, copper pennies, and quarters but that is ok. Nickels, zinc pennies, and rings go high tone. As do sinkers, bottle caps, hair pins, and aluminum. Still, being able to ignore low tone targets upped my odds some. Though I dug a lot of low tones also just to learn more and frankly, because I have a hard time passing targets. You just never know for sure until you dig them and I was there to dig targets. Still, this photo shows my target mix skewed to high tone targets. With the exception of a few large items discarded at the trash can this is every item I dug over the two week period and about 50 hours of detecting time in the water. Another benefit with the ATX is the adjustable target volume and threshold, a real boon in an underwater detector. I had brought Gray Ghost Amphibian phones with me that started out loud enough but then got too quiet to hear, so I had to FedEx a set of Garrett phones in quick. I like the sound of the Ghosts better but not if I can't hear them. I surmise the sound chamber was filling with water and so will return them to get checked out. First time DetectorPro phones ever let me down. The Garrett phones have a lower tone but worked just fine. The volume and threshold control on the ATX makes them much nicer to use since they can be set comfortably for both above and below water use even though they have no volume control themselves. You can even set the volume on the fly easily while underwater. This is a very nice thing that most underwater detectors lack. I have read a few posts by people very concerned about the placement of the headphone connector. Total non-issue for me. It is under my right elbow and was never a concern at any time. Icing on the cake? The ATX retains all settings when turned off. Once I found my magic settings I was so happy with how the ATX was running I was afraid to change anything and did not have to. Just turn it off, turn it on, and ready to go. Everything is just the way you left it. This is very important with the ground balance setting. It is the one setting you have no idea where it is set. I wish and am suggesting that when the detector is manually ground balanced the LED indications reflect the entire range and show you where you end up at for future reference. Right now the LEDs simply follow to audio and reduce to nothing when the unit is ground balanced. But where am I and can I get back there? You have no idea and neither did I. All I knew was my ATX was running great and recovering targets at what I thought was good depth so I left it be. I used rechargeables exclusively. I kept rough track of detecting time and charged up about every ten hours. Again, it was nice being able to pull batteries out, charge, reinstall, and when the detector was turned on again no tuning was required due to the retained settings. I carefully looked for water in the battery compartments each time but never saw a drop. I have total faith in the waterproof integrity of the ATX after what I put it through. I just got back and blasted this report out but will probably edit it a bit to smooth it up over the next couple days. I will also post a more story like version with more details and photos on my journal in the next couple days. I am cleaning up a few of the rings. There is one very old class ring I thought was junk but is encased in sand and lime I am dissolving away and I have a couple silver rings to clean up. Once again the big diamond eluded me but no complaints here, it was my best haul ever for a beach hunting trip. In no small part due to the Garrett ATX but I will take some credit also for really hitting the water hard. So here are the rings. The bottom line is I just had my most successful trip to Hawaii ever. I recovered over a couple dozen rings with the ATX and half of those were gold or platinum. Some silver rings, a nice 14K bracelet, and a pile of coins and the inevitable PI junk. This despite bad weather early on and all the extra detecting competition. Eight Gold and Two Platinum Rings Found by Steve Herschbach with Garrett ATX in Hawaii Another view later after the better silver rings were cleaned up, and that fabulous bracelet Again though, do not take this as some kind of crazy ATX testimonial. Pay attention to my caveats. Beach hunters in clean white sand with tons of hair pins have less to be excited about here. But if you have black sand beaches or worse, the ATX is a machine to at least be aware of. I just can't help it though, I really like a detector that puts gold and platinum in my pocket! Things I most wanted? An indication of what the ground balance setting is and an ATX version of the 14" Infinium mono coil. Thing I liked most? The way the ATX handled in the water and the way it adjusted up to handle the conditions. My last detecting nut cracked - thanks Garrett and especially Brent Weaver for obviously listening to my suggestions all these years! I would like to learn more about this detector as there is much it is capable of. How exactly does it compare with factory default minimum ground balance mode versus PI detectors that have no ground balance at all? I tried the no-motion mode a bit but saw no real value for what I was doing - there has to be more to it that is of value in other situations. Most importantly, what combination of pulse delay, gain, and ground balance is optimum for various locations and targets? I found some that worked for me but I am not swearing they were the best settings possible. I admit to focusing more on detecting than fiddling and so it is hard to get me to stop and do comparative tests when detecting time is at a premium. I look forward to seeing what works for others and will add what I can as I learn more about the ATX myself. This article was promoted from a thread on the DetectorProspector Forum and those interested in the article will find additional information in the posts on that thread. ~ Steve Herschbach Copyright © 2014 Herschbach Enterprises Steve's Mining Journal Index
 -
 I spent a couple months in Alaska prospecting for gold in the summer of 2014. That adventure was chronicled as it happened here on the forum at Steve's 2014 Alaska Gold Adventure. It was a great trip and a great adventure, but when I told it I relayed the fact that it was actually part two of the story. Part one happened in 2013 and for reasons you will now discover I kept quiet about it until now. Those interested in the logistics of making the trip to Alaska and details on where I stayed, etc. will find all that covered in the 2014 story so I will not repeat that stuff here. 2013 was a momentous year for me. My business partner and I had sold the business we started together in 1976 to our employees in 2010. My partner immediately retired but I stayed on a few years to oversee the transition. Things seemed to be going well enough that I announced my retirement to take place in the spring of 2013. My wife and I had purchased a new home in Reno, Nevada and so plans were made to sell our home in Alaska and move south. At the same time, some partners and I had acquired some mining claims on Jack Wade Creek in the Fortymile country near Chicken. Alaska. My plan was to move my wife south then spend the summer gold dredging with my brother. The disaster struck. I screwed up the paperwork and the claims were lost. That mess was described online at Making Lemonade Out of Lemons and I even wrote an article for the ICMJ about it. I was not to be deterred however and made plans instead to go metal detecting for the summer. Unfortunately, my brother also had a change of plans and so was unable to make the trip with me. Just as well as I ended up having my hands full. The house sale was in progress and time running out so I boxed and palleted everything we wanted to keep and shipped it south. Then I loaded my wife and dogs up in the car and drove them to Reno. Next I flew back to Alaska and had a last big garage sale. I sold everything I could by the afternoon and out a FREE sign on what was left. Worked great - the house was empty, I cleaned it up, and pretty much left it to the realtors at that point. Finally, on June 16th I jumped in my fully loaded truck and headed for the Fortymile! On the way up just past the town of Palmer on the way to the town of Glenallen you pass Sheep Mountain in the Talkeetna Mountains. It is a very colorful, mineralized peak and it was a beautiful sunny day so I stopped and took this photo. Sheep Mountain, Alaska From the USGS ARDF file at http://mrdata.usgs.gov/ardf/show-ardf.php?ardf_num=AN080 Early Jurassic greenstone and minor interbedded sandstone and shale is intruded by numerous mafic dikes and at least one body of unmineralized Jurassic granite. Greenstone has been hydrothermally altered and contains at least 6 separate gypsiferous deposits in altered zones along joints and shear zones. Deposits composed of pods and stringers of gypsum, quartz, alunite, kaolin minerals, pyrite and serpentine minerals (Eckhart, 1953). The gypsum-bearing material averages 25 to 30 percent gypsum, with a maximum of 50 percent. In addition also reported from same general area are: (1) small irregular quartz-calcite-epidote veins in greenstone containing chalcopyrite, malachite, azurite and possibly bornite and chalcocite (Berg and Cobb, 1967); (2) disseminated chalcopyrite in greenstone over 5 ft thick zone subparallel to bedding (Martin and Mertie, 1914); (3) trace gold in samples of pyritic greenstone (Berg and Cobb, 1967); and (4) minor anomalous concentrations of copper and gold associated with some of the alteration zones and nearby veins (MacKevett and Holloway, 1977). Large area of south flank of Sheep Mountain is stained dark red from oxidation of pyrite in greenstone (Berg and Cobb, 1967). Oxidation of Cu minerals. The gypsiferous material averages 25 to 30 percent gypsum, with a maximum of 50 percent. The six deposits indicated and inferred reserves contain about 659,000 short tons of gypsum material, of which about 50 tons of this material had been mined (Eckhart, 1953). In addition, about 55 tons of clay was mined for the manufacture of fire brick and boiler lining. Samples of pyritic greenstone assayed trace gold (Berg and Cobb, 1967), and nearby veins in alteration zones show concentrations of copper and gold (MacKevett and Holloway, 1977). We did a talk radio show for many, many years at our company. The latest of several "radio personalities" to work with us on the show was Kurt Haider. He had expressed an interest in metal detecting so I invited him up to look for gold. I met him along the way just before we got to Glenallen and headed on to Tok for a bite to eat at Fast Eddie's. Then on to Chicken and finally Walker Fork Campground by evening. This is a very nice, well maintained BLM campground at the mouth of Jack Wade Creek where it dumps into the Walker Fork of the Fortymile River. The campground hosts this summer were a very nice couple named Pat and Sandy. Walker Fork Campground Steve's Camp at Walker Fork Campground The next morning Kurt and I ran up the creek to find Bernie and Chris Pendergast. They were spending the summer camped along Jack Wade Creek prospecting and I was anxious to see how they had been doing. Not bad, they already had over an ounce of gold found before we arrived, and that got Kurt and I all fired up to go look for gold. I had told Kurt, a total newbie, that I had a sure thing. We were going to hit a bedrock area I had detected the previous summer and where I had found a lot of nice fat little nuggets. There was rubble and little piles of dirt, and I thought all it would take is moving the rubble and dirt aside and we were sure to find gold I had missed. We got started after lunch on a steep slope where it was easy to just rake material off and then check with a detector. Kurt Looking For Gold With White's MXT Pro The location turned out to not be very good, but Kurt did manage to find one little nugget, his first ever. He was real happy about that! We did not work at it all that long though with the late start, and Chris and Bernie had invited us over for moose stew. Chris is a fantastic cook so we enjoyed both the stew and a DVD packed full of Ganes Creek photos from the couples adventures there. Finally we called it a night and headed back to our camp. Now time to get serious! Kurt and I grabbed the picks and rakes and spent the whole day tearing into some berms left behind by the miners bulldozers on the bedrock bench area. I just knew we were going to find gold for sure. We would both do hard labor for awhile, then I would put Kurt on the ground with my Gold Bug 2. Working Bedrock With the Gold Bug 2 We worked a couple hours. Nothing. No big deal, just need to move a little more. Nothing. More digging and scraping. Nothing! I would have bet $100 we were not only going to find gold there but do pretty well. The spot had produced quite a few nuggets before and I had refused to believe we couple possibly had cleaned it out. But by the end of the day it was a total bust. We finally just wandered around a bit detecting and I lucked into a little 3 grain nugget. What a letdown. No big deal for me but I was really wanting Kurt to do well and this was not working out anything like I had thought it would. The next and last day for Kurt we decided to hook up with Bernie and just give it a go like we normally do. And that means hitting the bushes and tailing piles wandering around looking for gold. Kurt had his MXT Pro and Bernie and I our GPX 5000 detectors, so we had a horsepower advantage for sure. Still, I was hopeful as we put Kurt on the best spot that Bernie knew of from his extra time before us. Bernie Pendergast and His Trusty Minelab GPX 5000 Very first beep, Bernie digs up a 3 pennyweight nugget! Yeehaw, we are going to find gold!! We all hunt away, with Bernie and I checking in with Kurt periodically. Kurt, it seems, just was not destined to have any beginners luck at all; Bernie and I each found a couple 1-2 gram nuggets by the end of the day but Kurt came up dry. I was feeling kind of bummed out but Kurt insisted he was having a huge adventure, and come to find out he rarely ever got out of town at all, so this really was a big adventure for him. I just wish he could have found more gold, but he was up early and headed back to town the next morning. I was on my own now, so I rigged my GPX 5000 up with my Nugget Finder 16" mono coil and hit the tailing piles. All day. For no gold. However, just by myself that is really no big deal at all. It happens all the time and I do not think anything of it. If anything, the pressure was off trying to help a friend find gold, so it was a relaxing day wandering around. Saturday, June 22 started out sunny with a few clouds. There were some tailing piles across the creek I had been wanting to detect. I had hit them a bit the year before and just dug trash, but had not put in more than a couple hours at it. Still, they looked real good and I had been thinking about them all winter and decided it was time to give them a go. I started out with my GPX 5000 but immediately got into some old rusted metal, like decomposed and shredded can fragments. I just was not in the mood for it that morning, so went back to the truck and got out my Fisher F75. The F75 had done well for me in the past hunting trashy tailing piles and was along on the trip for that reason. I got near the top of the pile with the F75 and on getting a signal looked down and saw a dig hole full of leaves. I try to recover all my trash and get frustrated when I find holes with junk in them. The signal though was flaky, not a distinct trash signal, so I figured I may as well see what the other person left in the hole. I gave a quick scoop with my pick, and gold pops out of the hole! I am not sure if the person was using a VLF and the specimen gave a trash signal, so they left it after half digging it, or maybe they were using a Minelab, and the signal just sounded "too big" so they left it for trash. Too big indeed, they walked away from a 2.37 ounce gold specimen! To say I was stunned would be a vast understatement. The trip had only just begun. The best part of all was that my expectations for the trip were very low. I had been hoping that a month of camping and detecting would get me a couple ounces of gold. That would be more than enough to cover my expenses and make a few bucks. Yet here I was on the sixth day of my trip, and I had already exceeded that amount. This was just great on several different levels, not least in pretty much taking every bit of pressure off going forward. Here is that specimen from a more detailed account of the find I told previously at Fisher F75 Strikes Gold in Alaska! 2.37 Ounce Gold Specimen Found With Fisher F75 Metal Detector on Jack Wade Creek, Alaska I had to take a break and go show Chris and Bernie my good fortune. Then I switched back to the GPX 5000 and got with digging everything, including all those bits of rusted cans. Funny how a nice chunk of gold changes your perspective. That, and seeing what somebody else had left behind as trash. I finished out the day finding three more nuggets, a 2.5 gram "cornflake" nugget, a 3.4 gram piece and and fat round 6.1 gram marble. First week, 2-3/4 ounce of gold, This was shaping up to be a really great adventure! To be continued...... Steve's Gold From Jack Wade Creek, First Week 2013 This adventure continues as a thread on the DetectorProspector forum with many more photos and details. View it all here. ~ Steve Herschbach Copyright © 2014 Herschbach Enterprises
 -
 I slowly worked my way up the wash, swinging my new Garrett ATX pulse induction metal detector from side to side. I was on bedrock so hunting the best I could, taking extreme care to cover every inch of ground, and keeping the hot spot of the coil as close to the bedrock as possible. I took my time, and moved a rock or two when they kept me from getting the coil as close to the ground as I wanted to. I concentrated on the bottom of the wash but scanned areas along the side that looked inviting. Hours of careful work had produced a handful of targets. Bullets, shell casings, nails, and bits of flat steel. I was new to the area, relying on friends to point me in the right direction. One of those friends had found a couple nuggets earlier when we were both farther down the gully, but he had wandered off somewhere up ahead of me. I worked along a bend in the wash, where the sand covering the bedrock was deeper. There was exposed hardpan material along the inner corner so I worked along that, digging another nail. Then I saw a bit of bedrock peeking out of the sand, and scanned it with the coil. Another loud signal, probably another piece of steel. I gouged out some soil and fractured bedrock, and out popped a gold nugget! My first Arizona gold, and my first gold nugget with the new Garrett ATX. I was elated and got out my camera to record the event. The nugget was quite flat, more like a large flake of gold, and later weighed in at 0.7 grams. My expectations for this little trip had been about zero since I was absolutely new to the area and the detector, so I was very happy. I picked up the detector and gave it a couple more swings, and got another signal! This time I was pretty sure it was gold since it was less than two feet away from the first signal. I went ahead and exposed the bedrock crevice and carefully scraped and blew the material away until a small nugget was exposed to human eyes for the very first time. My first Arizona gold nugget and first found with the new Garrett ATX This nugget was even smaller than the first, weighing in at 0.39 grams. Again, a clean solid signal, no problem finding this little nugget. Now I had two nuggets in my bottle, and I gave the spot a good go looking for a third, but that was it for that stretch of creek. I continued my way up the wash, very happy with the day and the new Garrett ATX. Small 0.4 gram gold nugget in crevice - second found with new Garrett ATX I had recently acquired the detector but I was initially too busy to get out and go prospecting with it. I did a bunch of short day trips coin and jewelry detecting with the machine and posted my results in an earlier article. I finally got the time to go prospecting with the ATX and my first outing was a short day trip to an old hydraulic mine in the northern Sierras. With the drive there and back I only had a short amount of time detecting, and unfortunately did not find any gold. I did learn a few things however. First and foremost was that I forgot to bring along the sling that comes with the ATX. I went ahead and used the detector without, and by the end of the day decided a sling or harness is mandatory for using the ATX for more than a couple hours. Prospecting combines long hours with rough terrain and so is more physically demanding than most types of metal detecting. My forearm and hand was sore at the end of the day from using the ATX. More detecting to come but lets pause and talk about setting up the ATX for gold detecting. The ATX is ridiculously easy to tune up for nugget detecting. A good way to start if unsure of the detectors settings is to hold the RETUNE/PINPOINT button down while turning the detector on. This resets everything to factory default. The ATX factory default settings are: Mode: Motion Discrimination: Zero discrimination (1st LED) Sensitivity: 10 Threshold: 7 Volume: 10 Ground Balance: Neutral Ground Track: OFF With this starting point in the locations I have hunted so far I have been able to adjust the Sensitivity all the way up to the maximum setting of 13. In most locations it is not needed but as a matter of habit I then push the FREQ SCAN and let the ATX cycle for a minute to find the quietest operating frequency. If I intend to use my Garrett Pro Pointer I have it turned on and a couple feet away while the frequency scan is performed to help eliminate interference from the pinpointer when I am using it. If I have a buddy hunting nearby they also should be turned on an operating maybe 50 feet away while the scan is performed, to help eliminate any possible interference from their detector. I want to point out that I was in very close proximity to some high tension power lines on this trip. The ATX was able to tune out the electrical interference from these lines with no problem unless directly under them. I would be able to work there but only by backing the sensitivity down quite a bit. I normally do a manual ground balance. Just push and release the SHIFT button, insuring that the red LED indicator comes on. This activates all the control secondary functions. Then press and hold the GND BAL button while pumping the coil up and down about 6 inches over the ground. The ground will initially signal (unless it is neutral ground) with louder signals indicating more mineralized ground. Then within 3-7 seconds the detector should go quiet, indicating that the ground balance is complete. Release the button. Finally, I adjust the threshold to be a barely discernible tone. Running without headphones and using the built in speaker I find this to be a notch above the factory default of 7 and so set my ATX at threshold 8. Now I am ready to go nugget detecting. Garrett ATX standard 12" x 10" DD search coil I have an 8" round mono coil for the Garrett ATX that I think may be a good choice for nugget detecting but so far I have used the 12" x 10" modified DD coil that comes with the detector. I did this on purpose to be able to report to people on how the coil that comes with the detector performs. I learned a couple very important things. First is that small nuggets give varying tone responses depending just where they are under the coil. A small nugget dead center under the coil will usually give the normal high/low audio indicating a low conductive target. That same nugget moved forward of center under the section of coil connecting the nose to the center coil circle will reverse in signal to low/high. In order to get consistent tones small targets must be centered under the coil. Most importantly, the signal on small nuggets weighing under a gram is greatly enhanced under the inner 5" x 4.5" coil area. Although this is a DD coil it is a new modified design with the inner windings split apart to form the small inner coil area. In some respects it acts like two coils; a large 12" x 10" outer coil and small 5" x 4.5" inner coil. My advice when hunting for small gold nuggets using the stock coil is to focus on and treat the small 5" inner coil as the only coil on the ATX. Larger nuggets will take care of themselves and signal anywhere under the 12" x 10" coil though as a DD coil the field is centered more down the middle of the coil. The ability to find small nuggets is enhanced in the center coil area with best depth and tone response dead center in the middle of the coil. If hunting for larger than gram nuggets you can focus more on using the overall coil but again, if chasing small gold, focus your attention and act as if you have a 5" coil on the detector. My air tests with the 8" mono reveal that it has the even coil response I would expect of a mono coil and overall better depth on half gram nuggets than what is in effect the 5" inner coil that comes stock with the ATX. There may be a situation where the 5" inner coil meets the 8" mono in performance on the smallest nuggets weighing only a grain or two but I have not had time yet to explore this possibility. The bottom line is that the ATX comes stock with what acts like two coils, a 12" coil for most targets and a 5" inner coil for tiny targets. The obvious caveat is that you are swinging the weight of a 12" coil when you use it as a 5" coil. And as I found, it is impossible to get the small 5" inner coil into pockets in bedrock or even laterally up against a large rock or the base of a bush. The outer 12" x 10" ring acts as a barrier. So I do very much recommend that for hunting small gold a prospector seriously consider adding the round 8" mono coil as an option. I plan on using it for future hunts now that I have experience with the standard coil. The good news for many people, especially those that might hunt for nuggets rarely, is that the ATX 12" x 10" DD coil is very versatile and can serve well finding small gold nuggets without investing more money in a specialty coil. Garrett ATX with 8" mono coil I have lots of questions regarding the stock coil versus the 8" mono as far as how the two differ in handling mineralized ground, hot rocks, electrical interference, and depth on both large and small gold nuggets. I have a lot left to learn still about the Garrett ATX but I will pass on what I learn as I learn it. The stock coil is marginally sensitive to false signals when contacting rocks. This is a bit odd since it is an epoxy filled coil so in theory the coil windings cannot move to produce false signals when bumped. The signals do not occur consistently or often but in my case at least happened most often when the coil would catch a rock on the surface and roll the rock under the coil. It is possible that the coil cable, even though protected by being enclosed in the lower shaft assembly, is jiggling enough to produce the signals. Another area for more investigation. The open design of the stock coil provides lots of edges to catch on rocks and stubble. A solid bottom scuff cover would be a nice option although they have a tendency to collect debris. This would allow the coil to slide better on the ground, possibly reducing the false signals, and more importantly keeping the coil from hanging up. If I had a wish it would be for a solid elliptical mono for nugget detecting, perhaps a 10" x 6" more or less. The 8" mono with solid coil cover will be nice. This all leads right back around again to arm strain. The ATX is a heavy metal detector at 6.9 lbs. Add to this the need to use carefully control the 12" coil while prospecting. I found the combination of the need to keep the coil close to the ground while avoiding having it false by rolling rocks under the coil or catch an edge on an obstruction to be very wearing. I have to constantly tweak, twist, and twiddle the position of the coil in relation to the ground. This is normal in nugget detecting. In my opinion superb coil control is one of the secrets that separates the pros from the amateurs. The ATX is simply too heavy for 8 - 12 hours of this activity daily, especially for days in a row. At least for this guy! There are no doubt some people for whom it will not be an issue. I have decided that for my nugget detecting with the ATX additional support is necessary. The included sling is much better than I thought it would be. It hooks over one arm, drapes across the back of the neck, and drops over the opposite shoulder to support the ATX. I found the easiest option is to just slip the elastic loop at the end of the sling over the control pod and onto the handle of the ATX. With the rod length kept short it balances perfectly there, and is very easy to just slip back off when putting the detector down to dig. The only improvement I can see would be for extra padding under the area directly back of the neck where the sling splits to go around the arm. There is no padding there and it tends to dig a bit if used long hours with just a thin shirt. I decided to go one step further however. I recently acquired a Minelab Pro-Swing 45 harness and bungee system. This new harness incorporates a plastic strut that transfers weight from the shoulder to the waist belt. This not only relieves shoulder strain but helps keep the harness belt from creeping up your back as the front of the harness is pulled down. I have other heavy detectors I thought might benefit from using this harness and so it was a happy coincidence I already had one on hand to use with the Garrett ATX. The Pro-Swing comes with a clip and Velcro wrap you can position wherever you like on the detector. I keep as much weight as possible to the rear by keeping the shaft short, basically just using the lighter two lower sections and about 3 inches of the uppermost rod section. This makes a nice little spot between the upper rod locking rings to attach the clip. The bungee can be disconnected at both the detector end of the bungee by slipping it off the clip or off at the shoulder also, which I found I preferred. I now buy cheap LCD watches for all my detectors and leave on them since I normally do not wear a watch myself. I can keep track of time or set alarms for myself to tell me it is quitting time. I put my ATX watch on at the same location. Total aside here but every detector with a LCD readout should have a built in clock and alarm. Time flies when I am detecting! Garrett ATX and Minelab Pro-Swing 45 harness It took a bit of fiddling to get the detector set right, which is very easy. Just take a guess at the correct bungee length and go detecting. It takes just a second to adjust the length by pulling down on the bungee end to release and pulling up again to lock. You feel very quickly if the setting is too long or too short and just adjust up a bit to get it right. For even terrain the system works like a dream. I just glided along with no weight on my arm, directing the detector back and forth. In rough terrain I adjust a tad short so I have to push the detector down a little, and can take pressure off the bungee to allow the detector to come up a bit when needed. Negative pressure, if you will. Only when hitting a high spot did I actually need to lift the detector. Bottom line for me when using the ATX for full days of nugget detecting this is the only way to go. I have experienced tendonitis from excessive detecting hours (is there such a thing?) and it is no laughing matter. It can put you temporarily out of business for a long time as these sorts of injuries take a lot of time to heal. Do not ignore arm pain when detecting! Now back to the fun stuff. The Garrett ATX handles bad ground and most hot rocks with ease. I have detected several different locales now and basic ground balancing is all that I have needed to do. I doubt I will ever need the optional ground tracking but it is there if I do need it. In very uneven mineralization automatic ground tracking can smooth detector responses but it also can rob depth so should only be used when absolutely needed. Manually balancing to the ground should be sufficient. I did encounter hot rocks. If few in number I basically ignore them as they are usually on the surface and a little kick takes care of them. If they are more numerous, or more intense, like the basalt cobbles I encountered at one location, it is possible to manually ground balance against the hot rock to eliminate it or reduce its effect. Just find one and then balance over both the rock and the surrounding ground. I try to find an average setting that works to eliminate the ground and hot rock signal and usually the ATX will do just that. The ground and the offending rock are both tuned out. More intense rocks may require tuning mostly to the ground and a bit for the rocks to alleviate issues from all but the worst rocks while keeping the ATX properly balanced to the ground. If required, back off the sensitivity as full sensitivity enhances ground and hot rock effects. I would not even have encountered the issue at the default ATX sensitivity setting of 10 but maxed out at 13 some hot rocks "lit up". Remember the goal is to get the smoothest possible audio out of the detector that allows very small or very deep nuggets to jump out. Fighting too much sensitivity is a common mistake. If the ATX is banging on hot rocks that cannot balance out, back the sensitivity down to compensate. In very rare cases advancing the pulse delay (Discrimination) setting on the ATX will allow for dealing with extreme situations. Finally, the DD coil may also be of help versus the mono coils if mono coils are being used, although I have not confirmed this as of yet. The new Iron Check feature on the Garrett ATX is very effective. It is biased to not give false signals on gold targets so only works on shallower and larger targets. Still, I found it very helpful in confirming that loud shallow signals were indeed the ferrous targets I thought they were. It would only take a quick dig to confirm the ferrous identity but in areas with lots of surface trash this eliminates a lot of needless digging. Just push the button, wave the coil, and the ATX gives a "goose honk" on ferrous targets. Non-ferrous items like bullets or shell casing will read good but as always they could also be nuggets and so they need to be investigated. Many iron hot rocks will also read as ferrous so an option in some areas instead of other tricks may be to use the Iron Check to confirm suspected hot rocks. I continued my hunt up the wash, concentrating on exposed bedrock. I got a very faint signal in a little pocket and dug in, this time exposing an even smaller nugget. This one only weighed 2.5 grains (480 grains per Troy ounce) or 0.16 grams. Now we are talking! I was impressed with the large coil on the ATX being able to find such a small piece of gold in mineralized bedrock. Again, a very clean, discernable signal, although weaker than the nuggets found before. Note here that I opted to use the speaker on the ATX this day and forgo the headphones. It was a very quiet place so I could hear the detector well enough, and there were snakes in the area (saw a hawk carry one off!) so it was nice being able to hear what was going on around me. Still, I am certain using headphones would have made this small signal jump out even more. It is always a good idea to use headphones when chasing small gold that produces the tiniest signals. Small 0.16 Gram gold nugget found with Garrett ATX - can you see it? Frankly, in the United States more often than not it is all about the small gold. Large nuggets are easy to find in many locations, like the area we were hunting. The bedrock is shallow and most of the large nuggets have been found except in rare places a coil has not been over yet. Going deeper will find no more gold since bedrock is so shallow. Small nuggets are hard to detect however and they are also far more plentiful than large nuggets. Many mining districts do not have any large gold at all so you either find the small nuggets or nothing at all. Garrett seems to have realized this and made significant progress in improving the small gold ability of the ATX compared to the now over ten year old Garrett Infinium. Now truthfully, in many locations a good, relatively inexpensive VLF detector is the best choice in the United States when chasing small gold. The problem is areas where there is either ground mineralization or hot rocks or both that seriously impede the ability of VLF detectors to operate efficiently. These are the locations where the ATX will shine. Luck was with me this day. Again, I worked slowly and carefully up the wash, concentrating on places where I thought bedrock was shallow enough to detect. I got another faint signal from a crevice in exposed bedrock. This one was down in some pretty solid rock so it took a bit of hacking and prying to get it out. Out popped nugget number four, the smallest yet at 1.8 grains or 0.12 grams. One little nugget was maybe a fluke, but now two tiny gold nuggets with the Garrett ATX with stock 12" x 10" DD coil. Definitely impressive. 0.12 gram gold nugget found with Garrett ATX metal detector After two days of nugget detecting I can say without doubt that the new Garrett ATX is a very capable nugget detector. It easily handles ground conditions that most prospectors will encounter in the United States. Most impressive for a pulse induction detector is the small gold sensitivity of the ATX out of the box with the stock coil and no tuning tricks. Basically all I did was bump the gain (sensitivity) up, ground balance, and go. The ATX retains all settings when powered down, so firing up again after a break is no more difficult than turning the detector back on. The waterproof design does add weight, but with the obvious benefits of being able to work in pouring down rain without fear that the detector will be damaged. Even the speaker is fully waterproof. I think the ATX has great potential for working in and around streams and rivers looking for gold lodged in underwater crevices and pockets. I have my suit ready and have the optional underwater headphones required to use the ATX with mask and snorkel. The included headphones allow the detector to be submerged but the actual working ear muff portion of the headset must be kept high and dry. All in all Garrett has produced a very powerful and very versatile detector at an extremely attractive price. That is a lot of superlatives in one sentence but it is a fact. I have no doubt my ATX will pay for itself in the coming year. My only warning is that this is a professional grade pulse induction metal detector and not for people expecting VLF type discrimination capability. Yet with practice the ATX offers far more than just base level PI discrimination, which is all but non-existent. For basic dig-it-all nugget detecting however, the Garrett ATX is about as simple as it gets. A novice can be up and running in minutes with this detector. The team at Garrett deserves praise for bringing a unique detector to market, expanding the options available for all detectorists. 1.36 grams of gold nuggets found with Garrett ATX - smallest 0.12 & 0.16 Grams Here it is, four gold nuggets found with the new Garrett ATX pulse induction metal detector. Total weight 1.36 grams, smallest nugget 0.12 grams. The dirty quarter found metal detecting is for scale. All found in mineralized ground with the stock 12" x 10" DD coil and no headphones (used built-in speaker). Again, I was impressed by the ability of the ATX straight out of the box to hit gold this small. I can't wait to see what I can do with headphones and the 8" mono coil. ~ Steve Herschbach Copyright © 2013 Herschbach Enterprises
 -
 I have all my various metal detecting requirements pretty well covered. I like to do a lot of different things with detectors so that takes a collection of models all with specific purposes. Most of these purposes have to do with gold in one form or another. One thing I have been lacking for some time however is a waterproof pulse induction detector. I have used several, most recently the White's Surf PI Pro and Garrett Infinium. The Infinium in particular served me well - see my previous story on the Garrett Infinium in Hawaii. I really liked the Infinium but had two main issues with it. When I recently became aware of a new detector in the works I sent word to Brent Weaver, the engineer at Garrett working on the unit (I am sure with the help of others) to please, please, please work on the EMI (Electro Magnetic Interference) and salt water stability issues. These two problems dogged my use of the Infinium, particularly in Hawaii. The Infinium is perhaps the best detector I ever used in Hawaii on one level - on another it drove me nuts. It was near impossible to get the detector to quiet down and run smoothly, so although it worked it was a tiring exercise. The Infinium is a classic first generation detector. Very good but very rough around the edges. Well, I am not going to take credit for harping on the subject for over ten years but for whatever reason Brent and company really appear to have got it right in the new Garrett ATX model. This detector screams next generation product. It is hands down one of the best pulse induction metal detectors I have ever used. I am amazed at how refined it is. The ATX in many ways acts and sounds more like a VLF than what I have come to expect from a PI detector. I suspect the Recon was the second generation and the ATX is now the third generation product as it is just so much better than the Infinium. Bravo and congratulations Brent and whoever works with you, job well done!! The first thing that got me was the EMI rejection. This is not the frankly rather horrible process used on the Infinium. The Infinium has 32 discrete unmarked settings in a single turn knob. You are supposed to guess at 1/32 of a turn, wait and listen, turn another 1/32, wait and listen, and after doing this 32 times remember what unmarked setting was better than the rest and go back to it, except basically they all sort of were only a little better or worse. The ATX, push the tune button, wait a couple minutes while the detector cycles, and then the detector is quiet. Really quiet. VLF quiet. Better than some high gain VLF quiet. In my house, in the middle of the city - quiet. I have no idea what they did but oh my gosh this machine tunes out EMI and does it so well it is amazing. Want to use your Garrett pinpointer with the ATX? Turn the Pro Pointer on and toss it a couple feet away. Let the ATX cycle to find the best operating frequency. Now not only no EMI but you can use the Pro Pointer with the ATX on and get not a peep. No interference. Now there has got to be a catch and urban locations where there is interference but so far I have been using the ATX around Reno like it is a VLF going coin detecting in parks and getting no interference. Now add in a rock solid stable threshold. Good VLF stable. Minelab GPX 5000 stable. Clean and clear at stock settings, a little noise at higher than stock gain levels, again, in the middle of a city! Garrett ATX Waterproof Pulse Induction metal detector I am sure this is not at all what anyone expected from me. I was supposed to go out and go nugget detecting, right? Well, for personal reasons that was not an option when I got the ATX. I have been experimenting with coin detecting with ground balancing PI (GBPI) detectors in the past and have written several articles on the subject. I have found piles of coins with the Minelabs, Infinium, and TDI. Coins from depths VLFs cannot hit except in all metal mode, but with better discrimination than a VLF in all metal mode. But I had lots of issues with EMI in particular, and the relative crudeness of the detectors I was using - crudeness now only apparent because I am running the ATX. Item three - a very well modulated audio target response. Shallow targets sound shallow, deep target sound deep, and lots of nuance to go around. There is a ton of information in the audio of the ATX, much like in a very good VLF for those that hunt by ear. All the sudden Garrett has dropped the best urban pulse induction detector in my hands that I have ever had. I went coin detecting! One thing I found on moving to Reno was the ground is mineralized and pretty well detected. I was doing some coin detecting looking for my first Reno silver, but finding depth not what I expected at all. Coins deeper than about 6" were giving weak and erratic signals on the best VLF units made. I was finding coins, but more recent stuff, and nothing beyond about 6". The ground here is not very easy on VLF detectors and what is detectable has been hit pretty well over the years. But I knew it had to be there. I took the ATX and used the old Infinium trick of concentrating on just low/high targets. The signals break depending on the ground balance setting, so it varies, but in general the tone break is right around zinc penny. Zinc penny and higher coins (silver, clad coins, nails) give a low/high tone. Zinc penny and lower (nickels, most trash, gold) give a high/low tone. The high/lows are very common since all aluminum and small ferrous trash gives a high/low tone, plus nickels, and gold jewelry. Low/high tones are much rarer, basically silver and clad coins and larger ferrous items like nails. The ratio of coins to trash basically depends on the amount of nails in the ground. Old cabin sites would be impossible to hunt. But many parks have few nails, and in the past my ration has run about 50/50 coins versus ferrous trash digging just good sounding low/high tone targets (or just low tone on the TDI). It helps immensely to dig isolated low/high tones as opposed to double blip type tones, which usually indicate a nail. Zinc and screw caps can go either way depending on the ground balance but usually are a much louder signal since they tend to be shallow. The combination of EMI being non-existent, clean steady threshold, and well modulated audio made using the ATX more like using a VLF than using a PI in the Reno park setting. The big, big difference is the sounds are totally PI and must be learned from scratch but any decent VLF hunt by ear types should get the knack pretty quickly with the ATX. I know I did. Next thing you know I am digging wheat back pennies and my first silver dime in Reno. Only as 1954 silver but silver nonetheless. My brief foray into coin hunting with the ATX had this result: Nails and coins found park detecting with Garrett ATX - including silver dime! Three clad quarters, three clad dimes, four copper pennies, two zinc pennies, 1954 dime, 1920 penny, 1942 penny, 1949 penny, 1956 penny, 14 nails, and a screw cap. There were a few large iron items I did not get out of the hole, so about a 50/50 trash to coin ration, plenty good for me. The old coins were all nice mellow low/high tones, the quarters and more recent stuff much louder shallower targets. I could have left them and just gone for the older deeper targets but they were too easy to retrieve and hard to resist so I got them. A few of the nails are square nails which makes me feel good about the age, as does that 1920 penny. I think I am going to nab some good silver soon! One thing I learned was take a pair of pliers. The nails tend to come up one end or the other in the hole and if you can grab it with pliers you can pull it out and get rid of it so it is not there to be detected in the future. Otherwise they stick pretty hard in the hole. My holes are always filled and invisible when I get done so this can be a bit more work than nugget detecting, where I just blast a pit into the ground. We have to protect the hobby so use care in parks to never leave a mark. Which leads to item number four. Superb pinpointing. The 12" coil pinpoints dead center, backed up by an honest to gosh no motion on demand pinpointing mode. The coins were in the middle of my plugs. Or one end of the nail. Excellent pinpointing capability, better than a VLF DD coil. This DD acts more like a mono than a DD, with the inner coil area doing the heavy lifting. For small targets treat the inner coil as the only coil for overlapping purposes as that is the hot zone for small gold nuggets, etc. Garrett ATX outfitted with 8" round mono accessory coil I am not trying to sell anyone on coin detecting with a PI. I repeat, I am not doing anything here but telling you what I am doing and my results. Urban PI detecting is not for the faint of heart or those who detest digging junk. Most of you reading, just don't go there. Those of you who see what I am up to, well, this is for you. More later as I get more time under my belt but for now I will say this. The Garrett ATX is the best urban PI I have ever used. For me it (urban PI detecting) just went from a curiosity sideshow thing to something I am going to pursue more in the future. My main issue with the ATX is hand in hand with it being waterproof - it is a heavy detector. It weighs 6.9 lbs with the stock 12" coil and rechargeable batteries loaded ready to run. Big boys will have no issue but I am of slighter build and so can feel the weight. The good news is the sling included is simple and surprisingly effective. If like me weight is an issue do yourself a favor and use the included sling right off the bat. I went without awhile and once I tried the sling was pleasantly surprised. It just slips over your arm and over the handle, very easy to just slide off the handle when digging. Do keep the rod assembly short for best balance. OK, the Infinium was the best waterproof GBPI I ever used but it had issues and I have been waiting for over ten years for something better, Frankly, I thought it would be somebody else, not Garrett, that would do the deed. So the ATX first and foremost in my mind is the potential successor to the Infinium that I have been waiting for. I had to get this baby in the water, and fast. So I made a run up to Lake Tahoe, where water meets black sand hot rock infested beaches. I had my water hunting gear from Alaska, chest waders and long handle scoop, so hit it day before yesterday, both on the beach and in the water. I got the usual beach suspects, various trash items, a handful of coins, two earrings (looked good but fake diamonds) and a 14K gold ring with five little 1/10th carat diamonds. Gold and diamond ring found with Garrett ATX at Lake Tahoe I could see the black sand lines in the sand. There were hot rocks aplenty, all of which I just ground balanced out with the simple push button method and then just locked. I do not generally use automatic ground tracking and have not needed to on the ATX yet in my limited experience. Again, no EMI. I ran gain up high for awhile and the machine was well behaved but it did introduce a bit of noise. I decided to opt for a quiet stable threshold which was a notch above the stock setting of 10 at the 11 setting. I think you are better off setting the ATX to run quiet so that even a peep is a target. Too much gain leads to false peeps so resist the urge to max it out. I am looking forward to getting out and doing some prospecting with the ATX but first and foremost for me it is a water detector. I have plenty of prospecting detectors, and the ATX is a bit heavier than I like for dry land use. I can't wait to get the ATX into the water in Hawaii and see how it does in locations I previously hunted with the Infinium. I think the Garrett ATX is really going to perform for me there. ~ Steve Herschbach Copyright © 2013 Herschbach Enterprises
 -
Fisher F75 Strikes Gold in Alaska - June 2013
Steve Herschbach posted a article in Steve's Mining Journal
 I am a big fan of the Fisher F75 from a different perspective than most. I am a prospector and have done very well finding gold nuggets with the F75. The very powerful all metal mode combined with the simultaneous on screen target id numbers have allowed me to quickly and efficiently hunt trashy tailing piles in search of large gold nuggets. The light weight and superb balance make the F75 a pleasure to use for long hours in rough terrain. It also was my detector of choice for my one and only trip to the UK that I have done so far, and it served me well there. I spent a month in 2013 metal detecting on Jack Wade Creek near Chicken, Alaska. I kept my great results there quiet pending a return trip there in 2014. That trip has now been made but that is another story already told in detail on my forum at Steve's 2014 Alaska Gold Adventure. Now I can finally reveal the details of the 2013 expedition. As I explained in the previous entry Making Lemonade Out of Lemons I had decided to take four metal detectors to Alaska with me, with the Minelab GPX 5000 as my main unit, supplemented by the Fisher Gold Bug 2 for tiny stuff and Gold Bug Pro for trashy areas. As I also explain there, the Fisher F75 was redundant, but in the end I could not bear to leave it behind. I started out early one morning with my big gun pulse induction metal detector, but got onto a tailing pile that had ferrous trash scattered down one side, and I was just not in the mood for it that morning. I went back to my truck and got out my trusty F75. I run the F75 in all metal because it has instant target response; there are no worries about recovery times in all metal. The coil picks up every variation not only in targets but in the ground allowing me to monitor what is going on at all times. Knowing what the ground is doing is important in keeping the ground balance properly adjusted for maximum results. The key thing I like about the F75 in all metal however is that the meter always runs in discrimination mode and places a nice, large target number on screen while in all metal. The audio alerts me to a potential target, which I then analyze more carefully while watching the target numbers. All metal goes deeper than discrimination modes, so no on screen number means a very deep target beyond discrimination range. This alone makes running in all metal desired when prospecting because running in discrimination mode would miss all those extra deep signals. Steve's Fisher F75 metal detector In all metal I dig them until a target number shows up. Deep targets or small targets in mineralized ground will often read ferrous, so I watch the numbers and if they even once jump to non-ferrous, I dig. Only targets that give a 100% strong ferrous reading over multiple sweeps can be safely passed. Though I will throw in my caveat that no discrimination system is 100% accurate and there is always a risk of passing a good target. When in doubt, dig it out! I do often employ pulse induction detectors and do very often just dig everything. I advocate that when time and conditions allow. The reality is this is not always practical for many reasons. Maybe it is just limited time and overwhelming amounts of junk. Better to increase the odds by using discrimination than bogging down digging 100 nails in a small area. In my case it often boils down to fatigue or flat out not being in the mood to dig junk. So it was on this particular morning, and therefore my F75 came out and I got to work sorting through the trash working my way up the side of the tailing pile. I crested the top and got a strong reading and looked down. There was a shallow dig hole with leaves in it, obviously from some hunter there in prior years. I figured the guy had recovered a trash item and kicked it back in the hole so I cussed him quietly under my breath. I hate it when people do that Then the target numbers caught my eye. They were all over the place. A crumpled piece of flat steel might give numbers like that though. Still, I was curious and figured I would retrieve the trash this person left in the field. I gave the old dig hole a big scoop, and out pops a big gold nugget!! I seem to have a talent for finding ugly gold nuggets, and this one was perhaps the ugliest I have ever found. It looked more like a rock burnt in a fire than a gold nugget when I dug it up, though the glint of gold is unmistakable. This gold however was very pale and in fact later analysis revealed it to be roughly half gold and half silver and other metals. 2.37 ounce gold specimen from Jack Wade Creek, Alaska found by Steve with Fisher F75 Top and bottom views of the Jack Wade specimen It is a little known fact that gold alloys tend to have very poor conductivity ratings. Gold is very conductive, and silver is a superb conductor. You would think adding silver to gold would improve the conductivity, but in fact just the opposite happens, and the conductivity lowers dramatically. Gold/silver alloys are closer to lead in conductivity than that of the pure component metals, explaining why bullets read identically to most gold nuggets. This nugget has a very pale gold, much paler than most gold on Wade Creek. I found another pale gold nugget like it later and was told locally that it is suspected that the source of this gold is somewhere up Gilliland Creek, an upper tributary of Jack Wade Creek. I did later sell the specimen, and the buyer performed an X-Ray Fluorescence (XRF) assay of the specimen revealing that it is 53% gold and 44% silver, a little iron, and a smattering of platinum group metals. The platinum group metals are extremely interesting, as it would indicate the possibility that the gold is related to an ultramafic bedrock source? Some of the rock enclosed in the specimen is decidedly darker than normal, another clue that the source might be unusual. Technically something with this much silver in it would be called electrum rather than gold. Electrum is a high silver content gold alloy. X-Ray Fluorescence (XRF) Assay of 2.37 oz "Ugly Nugget" This ugly nugget is a detectorists worst nightmare, because the 50-50 alloy mix and the rock content give it a much lower conductivity reading than would be the norm. I surmise what happened is this earlier operator got a poor signal and gave a quick scoop to get the coil closer to the target. The signal did not improve, as would be expected with most gold nuggets, so the operator decided it was trash and moved on. The rest of the hill being covered with junk no doubt contributed to this decision. It was my insistence on investigating everything except 100% ferrous readings that made the difference. The readings on this target were not solid as one would expect from a pretty strong signal but all over the place. Most people would say that indicates a trash target but I have seen many gold nuggets do the same thing in mineralized ground. The result is I dug a shallow 2.37 ounce gold nugget that somebody else walked away from. Sadly for them one more scoop would have revealed the nugget for what it was. Hopefully this is a reminder to the reader that far too often detectorists look for excuses not to dig. How many good finds get left behind because we do not want to take that extra minute or two to dig a target? This nugget is far from a premium find, but I have already sold it for over twice the cost of a new Fisher F75. That detector was a real money maker for me as that was far from the only gold I ever found with it. Good thing I decided not to leave home without it! ~ Steve Herschbach Copyright © 2014 Herschbach Enterprises
 -
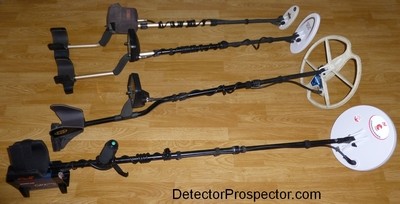 Wow, what a dramatic turn of events. After many years of juggling permits and more types of paperwork than one can imagine I screwed up not once but twice and caused our mining claims to be lost! I'm not much for making excuses and bear the responsibility for the mess. Thankfully, I have good friends and partners and so a hanging did not occur. The error was part of a convoluted situation, but suffice it to say you had better get all the facts straight when messing with mining claims on areas closed to mineral entry. The feds are absolutely unforgiving of errors. The story was such that I wrote it up and had it published in the ICMJ Prospecting & Mining Journal. I had big plans for the summer as detailed at Alaska Gold Dredging Adventure 2013 and with the claim now gone there was quite a bit of planning to roll back. I was able to cancel all the equipment on order and return the rest. I had to tell my partners there summer plans were also messed up but suggested various options we could undertake. Not to make light of a bad situation but things are working out. Time to make lemonade out of lemons! I experienced a bit of depression over the whole mess and decided I was fed up with permits and paperwork for the time being. I went so far as to sell out of some other federal claims I was involved in to just get free of it all and spend a year regrouping. I still want to possibly do a dredging operation, but have put it off to 2014 at least while I look at various options. One thing I did decide was that perhaps I was thinking too small with a 6" dredge and so now am mulling over options for placing an 8" dredge someplace. In the meantime I am just going to hang loose and go prospecting, with my main goal to stay mobile and to stick with methods that require no permitting, which generally means staying non-motorized. I am putting together a mobile tent camp and basic prospecting gear including sluice box, recirculating rocker box, and metal detectors. I am going to start in the Fortymile area near Chicken, then head for the Iditarod country, and finish up in the Nome area. I plan small side trips to the Petersville area and Kenai Peninsula if time and circumstances permit. I do intend to use metal detectors for the bulk of my prospecting efforts and am relying on the four units above to put gold in my poke this summer. Gold Bug 2 with 6.5" coil. This will be for scraping/detecting bedrock cleaning up the tiny bits. Gold Bug Pro with 10" x 5" DD coil and 11" x 8" DD coils. General purpose tailings detecting. F75 Special Edition with 13" DD coil and 11" DD coil. General purpose tailings detecting. Minelab GPX 5000 with 8", 11", 16" and 18" mono coils. The "big gun"! For use anywhere there is not too much junk. Fisher Gold Bug 2, Gold Bug Pro, F75 SE, & Minelab GPX 5000 The Gold Bug Pro and F75 are redundant. For most people the Gold Bug Pro is the way to go. But I get a tiny edge with the F75 on larger gold in tailing piles and I like the large target id that pops up on the screen while in all metal mode compared to the tiny indicator on the Gold Bug Pro. The Pro is a tad hotter on small gold than the F75. The bottom line is I could narrow it down to three machines by leaving the F75 behind but can't quite bring myself to do that. The machine has been too good to me so it goes along and I will be using it for much of my detecting. I intend to split my time between hunting old ground to get some gold and doing some true blue sky prospecting looking for undiscovered gold patches. Patch prospecting is common in desert areas but I am unaware of anyone giving it s serious go in Alaska, so figure I may as well give it a shot. The terrain and ground cover do not favor this type of metal detector prospecting in Alaska and so most people stick with hunting old mine workings. The odds on patch hunting here are slim but the potential rewards are great. I have my trusty sluice box, but have also finally acquired a rocker box. I have always wanted one, but did not want a wood homemade unit and have never seen a commercially made rocker i really wanted. Alan Trees recently started making a plastic rocker box which looks really good. I got one for $599 plus $100 shipping to Alaska. I want it for working areas away from water in non-motorized locations and so have paired it up with a 50 gallon tub to use as a water recirculation system. I will fill out more details here later but that is the rough plan for now. I will be hitting the road for Chicken in mid-June and checking in every few weeks with updates ~ Steve Herschbach Copyright © 2013 Herschbach Enterprises