
Steve Herschbach
-
Posts
19,780 -
Joined
Content Type
Forums
Detector Prospector Home
Detector Database
Downloads
Everything posted by Steve Herschbach
-
 I think they had two separate product lines that overlapped a lot. With the two companies integrating more closely the lineup will be oddball as many models get dropped and what is left merging. Anfibio and Multi Kruzer were probably conceived back when the plan was to keep the two companies more separate. What you have is two different ways of doing nearly the same thing. Buyers will vote with their pocketbooks, and one design path will survive, the other die off.
 -
Concentric Coil For Equinox 800?
Steve Herschbach replied to Desert Dawg's topic in Minelab Equinox Forum
I am aware of the Infinium and ATX so-called mono coils. They are not. By definition a mono coil has a single winding that alternates between transmit and receive. VLF or more properly induction balance or continuous wave has one coil continuously transmitting and one coil continuously receiving. They cannot use a mono coil and function. Garrett and now Minelab marketing pays no particular attention to prior use. So they use terms improperly or out of place simply because it sounds better. That then adds to my growing list of detector definitions that have exceptions. Garrett for instance, by their position in the industry define mono any way they want. Nokta and Makro is messing with the same deal calling the Impact and Kruzer multifrequency. Well, not by prior normal conventional use of the term they are not. But the bottom line is there is no true standard and therefore no law saying they can’t. -
White's Rant ( Or Feedback )
Steve Herschbach replied to Hard Prospector's topic in White's Metal Detectors
Well, there is no doubt White's, like a couple other outfits, have got caught behind the curve. The good news is White's has an enthusiastic and very hard working young man in the form of Tom Boykin trying hard to get new products out the door. I feel your frustration but at the same time wish Tom and White's success going forward. -
Nevada Nugget With Goldmaster 24k
Steve Herschbach replied to tboykin's topic in Detector Prospector Forum
It was fun hanging out with you Tom, and I am glad you did not get skunked. That's easy to do when you have limited time to work with but when you have a hot machine like the Goldmaster 24K and are chasing the small stuff it definitely improves the odds of at least finding something, even if it is small. I remember a guy once who told me he did not want to waste time digging that tiny stuff. We were on a hunt with me following along after him. He was getting nothing, and yet every once in awhile I would dig a tiny nugget he had passed over with his less sensitive detector. Any gold beats no gold, and next thing you know he was getting a new detector. And speaking of new detectors of course - you and your crew did a great job on the 24K -
Future Of Nokta & Makro
Steve Herschbach replied to Nokta Detectors's topic in Nokta / Makro Metal Detectors
The 14 kHz Kruzer and the Multi Kruzer can use these new coils. Only the coils made specifically for the Gold Kruzer will operate on it. -
Rye Patch Nugget Shoot 2018 - Come See The Elephant
Steve Herschbach replied to tboykin's topic in Detector Prospector Forum
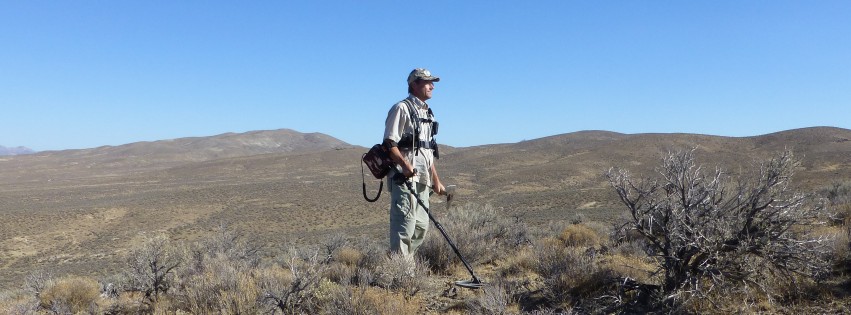
It was great seeing faces old and new out at the hunt - pretty amazing event with about 400 people in attendance. The hunt area is HUGE! The clubs get kudos for putting on such a great event and it was nice to see all the kids that were attracted to their first detecting experience. Again, nice seeing you all! Tom and I snuck off at first opportunity and yesterday we running the Goldmaster 24K around on some old beat patches. The big stuff is about gone but little nuggets remain for hot detectors like the 24K. I managed to snag these four little bits, 7 grains total, largest piece 3.8 grains using the 6" concentric. Nice, easy running machine. The XGB multiple point ground tracking does seem to offer smoother operation with at least some combinations of hot rocks and ground. The place we were at is medium alkali ground with two particular hot rocks that trouble machines and the 24K ran great in this type of scenario.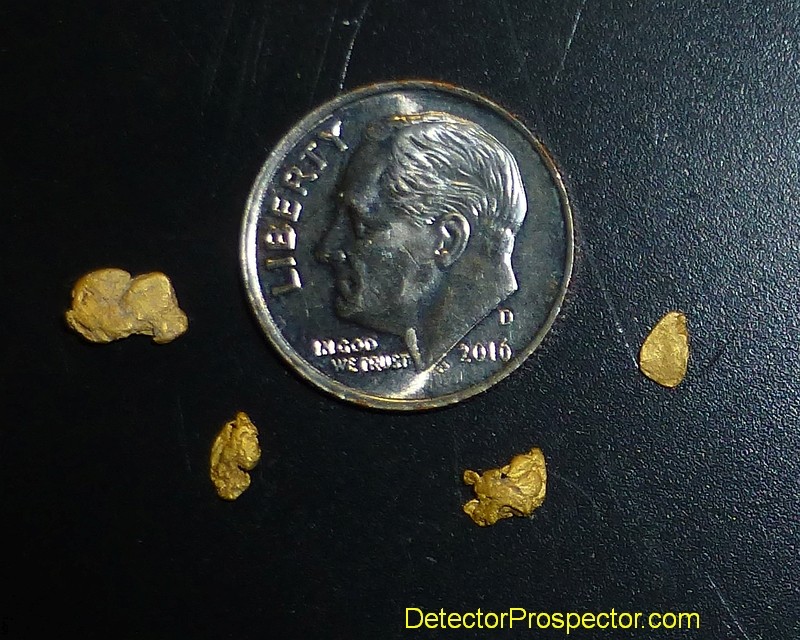
-
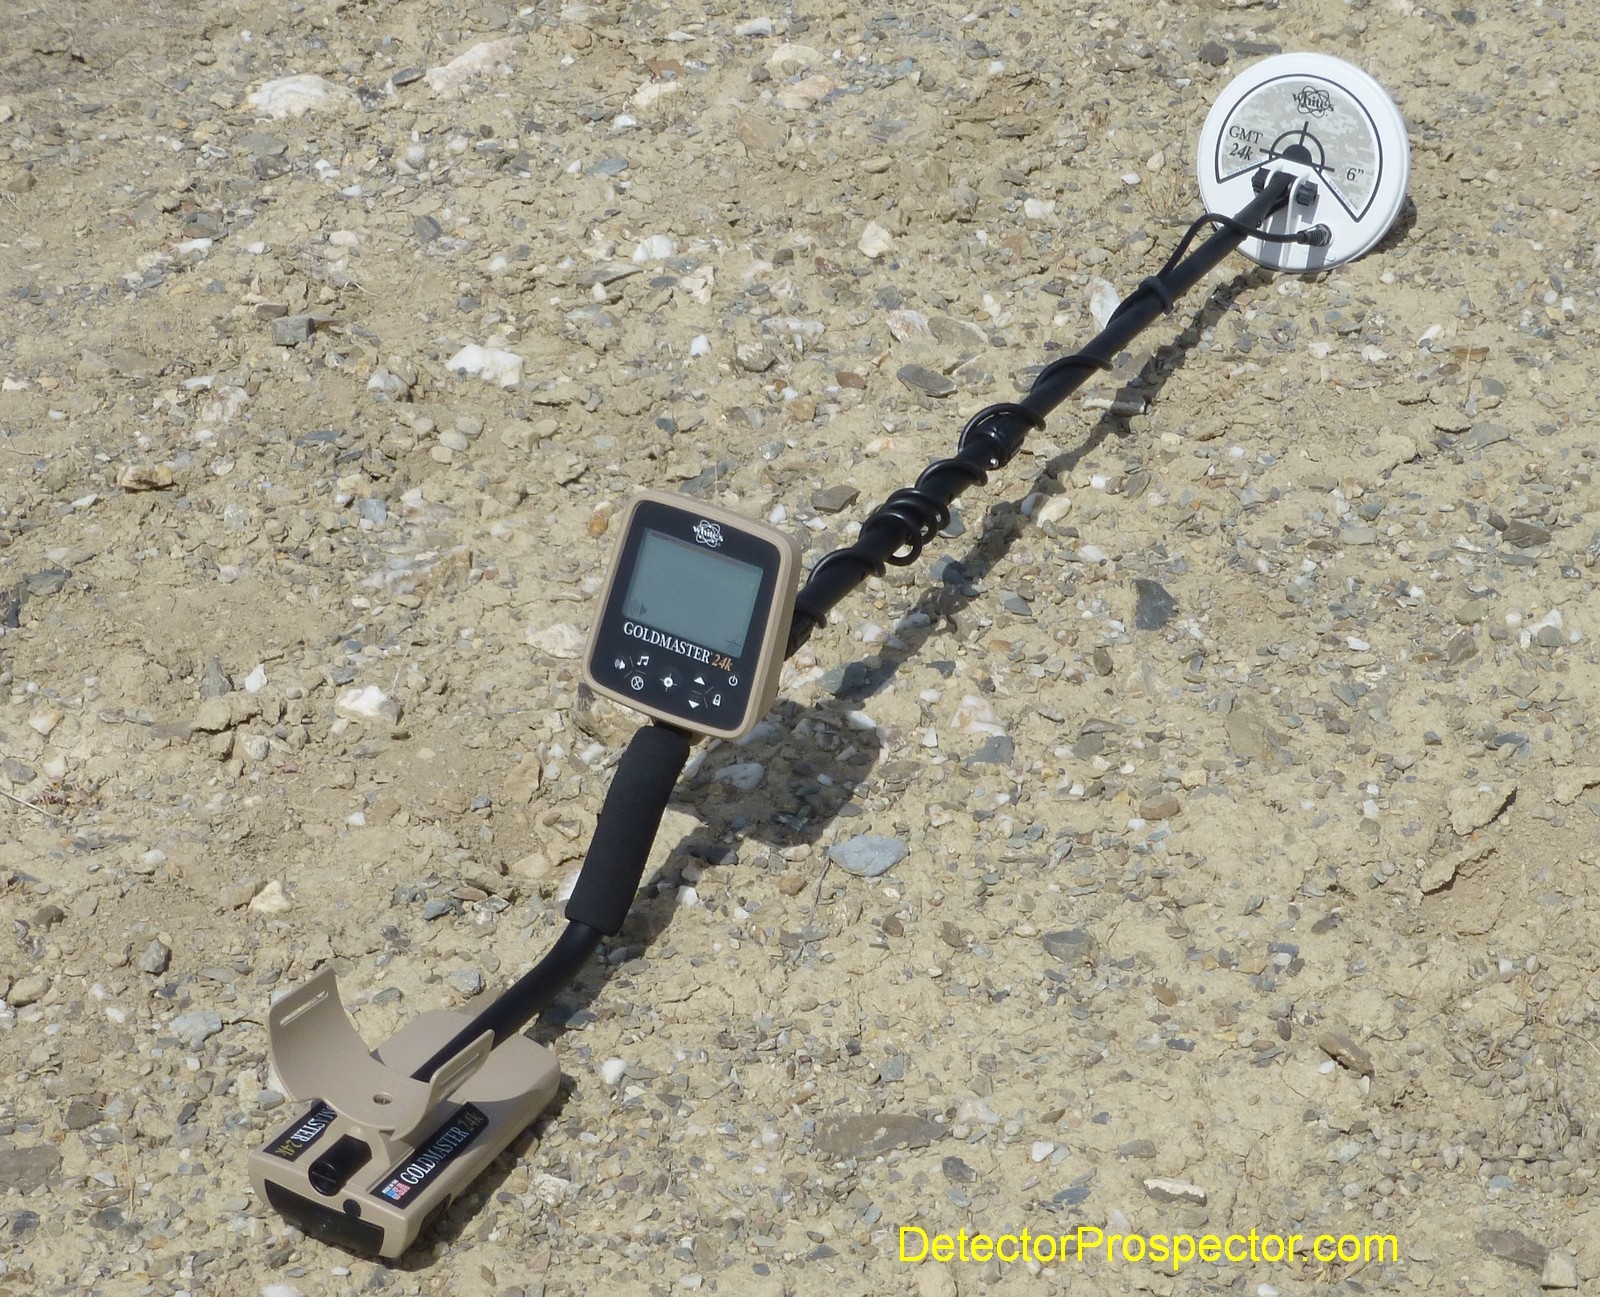
Detailed Review Of White's Goldmaster 24K
Steve Herschbach replied to Steve Herschbach's topic in White's Metal Detectors
Was out with Tom Boykin of White's Electronics yesterday running the Goldmaster 24K around on some old beat patches. The big stuff is about gone but little nuggets remain for hot detectors like the 24K. I managed to snag these four little bits, 7 grains total, largest piece 3.8 grains using the 6" concentric. Nice, easy running machine. The XGB multiple point ground tracking does seem to offer smoother operation with at least some combinations of hot rocks and ground. The place we were at is medium alkali ground with two particular hot rocks that trouble machines and the 24K ran great in this type of scenario. It's been fun checking out the 24K as it kind of brings things around full circle in a nice way. I got my first detector, a White's Coinmaster 4, in 1972. And now 46 years later I am playing around with a new White's detector! A fitting end to my series of detector reviews over the years. White's Goldmaster 24K gold nugget detector with 6" concentric coil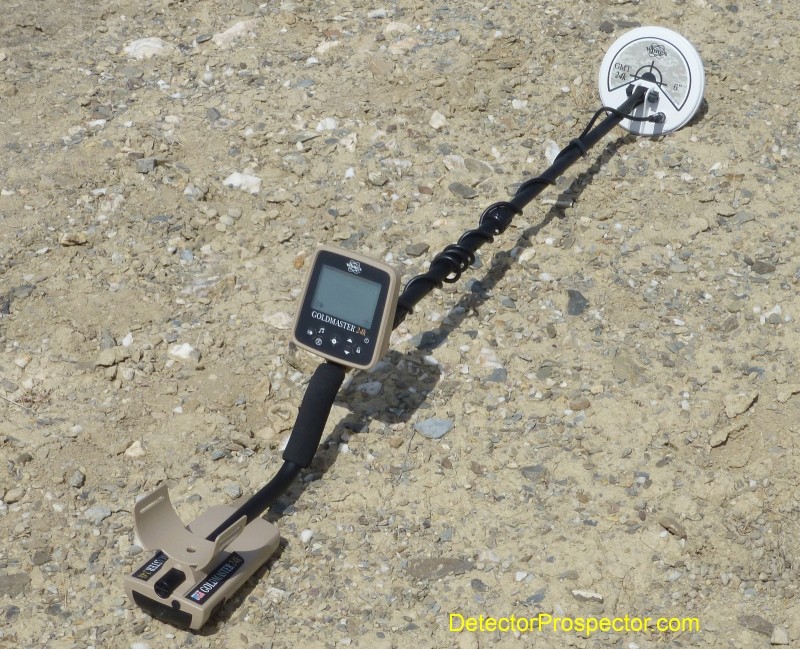
-
So far most people seem happy with the update though a few people are less sure.
-
Looking good....
-
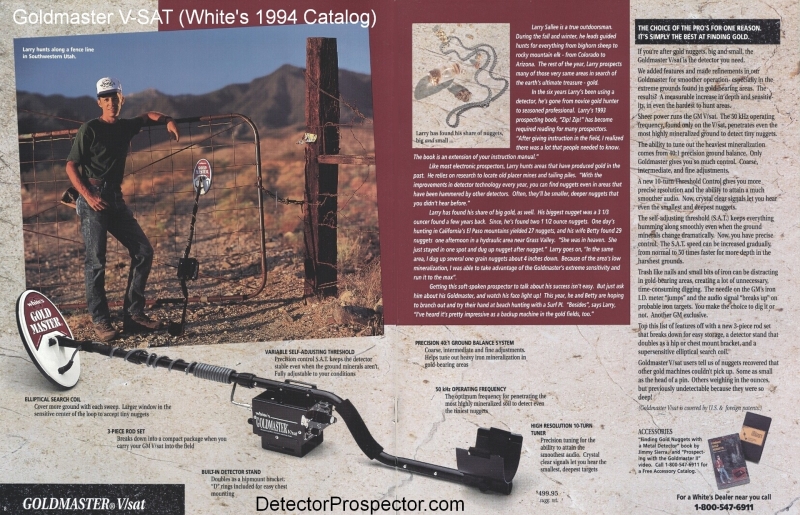
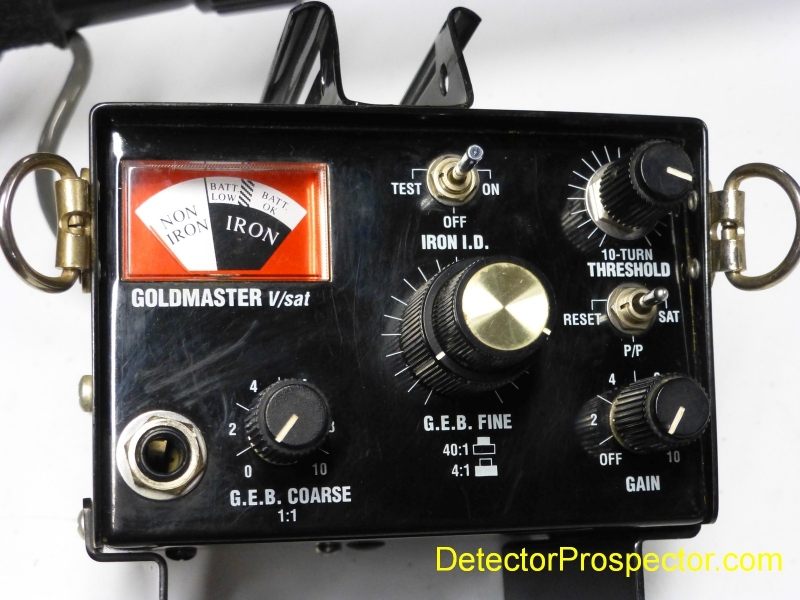
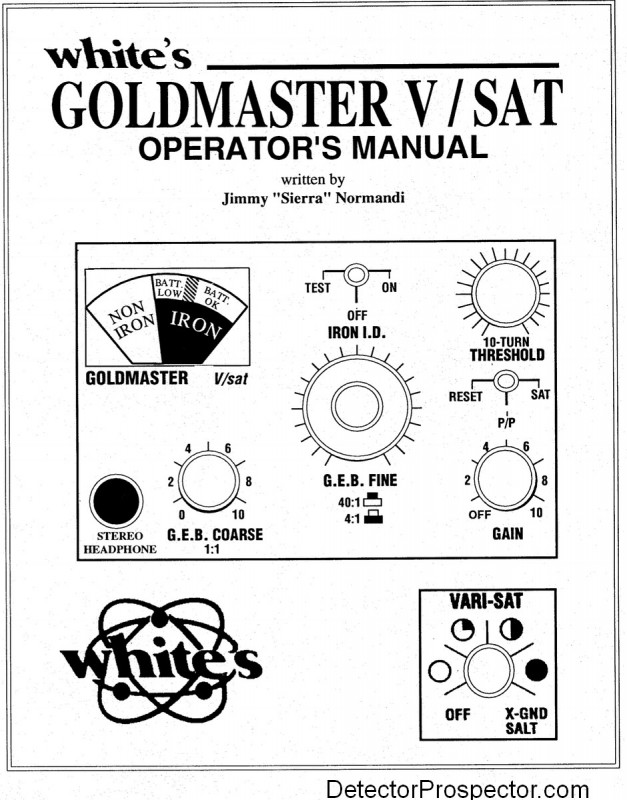
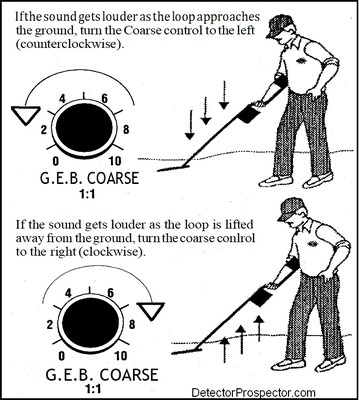
From page 9 of the White's V/SAT Instruction Manual: SETTING UP THE CONTROLS Set the G.E.B. COARSE knob midway "5" on the scale. Set the G.E.B. FINE with the large knob pointing to the midway position - straight up at 12 o'clock. Set the IRON I.D. toggle to the center Iron I.D. Off position. Set the MODE TOGGLE to the right SAT position. Set the VARI-SAT to OFF. Set the THRESHOLD fully counterclockwise, it may need to be turned a number of revolutions as this is a ten turn control. Now turn the GAIN control clockwise till it clicks "ON". Look at the meter to make sure the battery condition shows in the "BATT OK" area of the meter. It takes several seconds to check the battery condition. While holding the detector with the loop in the air, rotate the GAIN control clockwise to full sensitivity "10" on the scale. Now turn the THRESHOLD clockwise 4 - 5 revolutions until you hear a soft threshold hum. This hum may be slightly uneven, this is normal. The level of hum will be determined by whether or not you are using headphones. We strongly recommend headphones for all of the reasons stated in the earlier section on controls. This level should not be t‹xi loud nor too faint. Practicing will be the best way to establish the most effective level of sound. SETTING GAIN LEVEL Lower the loop of the detector toward the ground. We will now determine what level of GAIN will be allowed by the ground mineralization. If you can actually place the loop on the ground without hearing the high pitch squeal of the detector, which indicates loop overload, you can operate with a GAIN of "10". If you hear the high squeal, back the GAIN knob off to the left or counterclockwise till the squeal disappears. Since you will rarely use the loop flat on the ground, you can carry out this process an inch above the ground. Just make sure you do not lower the loop close enough to the ground to create the high pitch squeal while you are searching. In other words, you are trying to establish at which level of GAIN you should set the detector to prevent loop overload. You should set the GAIN at the level above the ground where you will be sweeping the 1‹xip of the detector, giving yourself some leeway for a comfortable swing. GROUND BALANCING PROCEDURE Once the GAIN is set, you are ready to go through the ground- balancing procedure. By the way, if you should ever change die GAIN level, you must ground balance again. The SAT MODE TOGGLE position is required during the ground balance procedure. The GOLDMASTER V/SAT is ground balanced in the motion or pumping fashion. It is important to note that the Iron I.D. toggle should be kept in the OFF or center position during the initial ground balancing procedure. Once this is accomplished, you may switch the Iron I.D. toggle to the ON position if desired. Small corrections in ground adjustment can be made with the Fine Tune control during the process of prospecting' even if the Iron I.D. toggle is in the ON position. Ground balance is done by pumping the loop up and down near the ground as if you were making butter in an old fashioned butter churn, except the loop need only move a few inches up and down. As you push the loop toward the ground a few inches and then pull it away from the ground a few inches, fry to determine whether or not the threshold hum gets louder as you pump it on the downstroke or whether it gets louder as you pull away from the ground (this would indicate that the sound was actually getting softer as the loop approached the ground). Once you have decided whether the sound increases going toward the ground or coming up from the ground, you can make the first correction of ground mineralization by using the G.E.B. Coarse control. GROUND BALANCE PROCEDURE - Continued If the sound was getting louder as you approached the ground, begin turning the Coarse control to the left or counterclockwise. If the sound was getting louder as you came up from the ground, begin turning the Coarse control to die right or clockwise. As you pump the loop and turn the control in the appropriate direction, you will ultimately find that the sound will not appear to change much in either direction. At this point, the ground balance has been achieved in a rough sort of way. Actually, you will note that if you continue to turn the Coarse control, you will overshoot the point of balance (no sound change), and start to create an increase in the opposite direction. The trick is to stop just short of balance and go on to the Fine control. This Coarse control is really just intended to get the ground balance in the ballpark. It will probably only need to be adjusted once for a particular area. That is, unless the ground mineralization changes dramatically from one spot to another. You will now go to the G.E.B. Fine control and roll the small dial with the side of your forefinger, either right or left (clockwise or counterclockwise) to correct the sound just as you did with the Coarse control. Remember, if the sound increased as you approached the ground, roll the Fine control knob to the left or counterclockwise. If the sound seems to increase as you pull the loop up from the ground, just roll the knob to the right or clockwise. You will soon get used to this pumping action and become quite adept at quickly determining whether or not the sound is increasing on the up or the down pump. Ultimately, you will find that the sound will not appear to change in either direction. At this point the detector is tuned. However, I recommend that a very slight increase should be maintained when the loop approaches the ground. This slight over-tuning for the ground will actually enhance the signal from tiny or deep nuggets. On the other hand, often small BB size hot rocks, which tend to mimic the way small nuggets sound, can often be eliminated by underground balancing. Note that the G.E.B Fine control is a double stacked knob. The larger knob is intermediate, neither coarse nor fine. This Intermediate knob follows automatically any adjustment of the smaller Fine knob. You will probably use this Fine control very often during the process of prospecting. The frequency of its use will be determined by how much the ground changes from place to place while you search. You will soon get used to the level of hum that is achieved when you get to a proper ground balance, and when it begins to vary you will automatically make small corrections with the Fine control. The SAT mode will actually correct the minor variances in the threshold hum caused by the changes in the ground mineralization. These changes may be more dramatic in some areas making the VARI-SAT desirable. Very large changes in the ground must be corrected by adjusting the G.E.B. Coarse or G.E.B. Fine controls. In extreme ground the G.E.B. Coarse control will often be used, instead of the G.E.B. Fine, to update the ground balance during searching. However, in most areas the G.E.B. Fine control is used to periodically update the ground balance setting. GROUND BALANCE (Low Mineral Conditions) The Goldmaster V/SAT is designed to work in an environment of heavy iron mineralization. In some instances however, there may be so little iron mineralization that the loop will never go null or blank when it is lowered to the ground. In other words, there always seems to be a faint hum when the loop is lowered to the ground. Turning the Coarse Ground Balance control fully counterclockwise doesn't change the picture. In this instance, merely set the ground balance knobs to the midpoint or at 12 o’clock and hunt. Any slight changes should be able to be corrected with the Fine Tune control. VARI-SAT / GAIN If the threshold becomes too erratic or noisy, it might be necessary to use the VARI-SAT feature and or reduce the GAIN control. This noisy behavior will make it difficult to recognize a true target (possible nugget) from pieces of mineral, commonly referred to as "hot rocks". It is not wise to keep a high level of GAIN if the detector will not operate smoothly. This is a false sense of security. Recognizing a real target is the most important part of detecting. This is an example of when less GAIN will produce more nuggets. You must be the best judge of just how much noise you can tolerate and still identify nuggets, as well as the combination of VARI-SAT and GAIN which produces the desired results in your area. Some real Pro’s can work at levels intolerable to the rest of us, because they have trained their ears over the years. Tiny hot rocks are not the only culprits. Alkali salt flats, in the desen, can also cause erratic behavior and require faster VARI-SAT settings or reduced levels of GAIN, or both, to handle such very extreme conditions. Remember, whenever you change the level of GAIN, correct the ground balance. Wet alkali washes can be extremely difficult to work due to the sensitivity of high frequency gold detectors to dissolved salt. In some instances, pinpointing is easily performed by merely "X"ing or crisscrossing. The loudest part of the target will be under the center of the loop, just as with any detector. After the approximate location of the target is determined, take a handful of soil and check the hole again. Continue this process until the target is no longer in the hole, but in the hand. I prefer putting the handful of soil in a plastic container (pan, tray, cup, or scoop). Passing the container over the lmp will determine if the target is really in it. If so, a series of separations will quickly expose the target. Some prefer to pass the handful of dirt across the loop directly. Caution must be exercised if this is done. The GOLDMASTER V/SAT is sensitive enough to pick up the salt in your hand and respond with a signal. Try this with nothing in your hand and you will see how close you can come to the loop using this method. One way around this salt sensitivity is to pinch the soil in small amounts and wave only the fingers over the loop. You will find the way best suited to your needs. The condition of the soil - dry, wet, rine, coarse, etc. will have a lot to do with the best method for you. Until you get good at eye-balling the target in the SAT mode, you can switch the mode toggle to PP and locate the loudest sound, thus indicating the center of the target. Remember to switch the toggle back to SAT mode when you continue to search. White's Goldmaster V/SAT Instruction Manual White's V/SAT Instruction Manual Cover White's V/SAT control panel Below - White's V/SAT catalog pages from 1994 - click for larger version
-
From https://www.detectorprospector.com/forums/topic/5683-fisher-f-pulse-versus-garrett-carrot/?do=findComment&comment=69859 by First Texas engineer Carl Moreland: “There are 2 software versions, R1 & R2. R1 had a lock-up problem if you turn the unit on while overloaded. R2 fixed that problem, and in the process I added a few new features. Therefore, you need to figure out which version you have as I moved the factory reset from 3 clicks to 2 clicks, should you need that feature. The easy way to tell what version you have is to turn the thing on while a coin is right against the tip; if it locks up, that's R1; if you hear a beep-boop-beep-boop-beep-boop overload jingle, that's R2. In R2 I slightly extended the default time-out from 2s to 3s. I also added a Turbo-On mode which bypasses the auto-cal procedure and shortens the power-on time to maybe 1/4 seconds. There is a separate Turbo-Off mode which reverses the "off" and "retune" functionality; a quick-press powers down, while a press-hold retunes. If you use both Turbo-On and Turbo-Off, then the F-Tek powers up & down incredibly fast.” F-Pulse Detailed Instructions Revision 1 F-Pulse Detailed Instructions Revision 2 Only version 2 of the F-Pulse features Turbo Mode. From the Revision 2 instuctions above: Advanced Features All advanced features are accessed in the following way: 1. From OFF state, press/hold the button; there is an immediate single audio chirp. 2. After 1⁄2 second, the state of the LED toggles (off-to-on or on-to-off). 3. As soon as the LED flashes immediately release the button, then quick-press the button N times in a row. Each press will be indicated by a short beep. The number of presses “N” determines the feature selected, described below. Further steps are also listed. N=2: Restore Factory Defaults This procedure restores all settings to factory defaults: Response = Beep+Vibe Sensitivity = 2 Frequency offset = 1 LED = On, 70% TurboOn/TurboOff disabled 4. After 1⁄2 second the LED will begin weirdly flashing, indicating success. 5. Quick-press the button to operate, or press/hold to power down. N=3: Turbo-On Mode This procedure toggles the Turbo-On mode. Normally on turn-on the PP executes a calibration routine that optimizes the sensitivity. This can take anywhere from 1⁄2 to 1 second. Turbo-On bypasses the calibration and immediately goes to operation. While much faster, the downside is a slight reduction in sensitivity, and over time hardware “aging” may require occasional calibration (see below). Note: TurboOn also shortens the turn-on response. 4. A short beep indicates completion. 5. Quick-press the button to operate, or press/hold to power down. N=4: Turbo-Off Mode This procedure toggles the Turbo-Off mode. Normally to turn off the PP you press/hold the button for about 1⁄2 second, then release. In Turbo-Off mode, only a quick-press of the button is required to turn off. Note: Retune is now based on a press/hold of 1⁄2 second, indicated by a brief chirp. Note: TurboOff also shortens the turn-off response. 4. A short beep indicates completion. 5. Quick-press the button to operate, or press/hold to power down. N=5: Calibration This procedure recalibrates the internal DAC which primarily affects turn-on speed in Normal mode, but in TurboOn mode can also optimize sensitivity. CRITICAL: Keep the PP away from any metal during the cal procedure (including watch/rings on hand). 4. Calibration can take up to 10 seconds; when done, unit will beep 2-3 times. 5. The LED will begin weirdly flashing, indicating success. 6. Press/hold to power down. N=6: Calibration & Master Reset This procedure recalibrates the internal DAC which primarily affects turn-on speed. It also executes a factory reset on all settings. CRITICAL: Keep the PP away from any metal during the cal procedure (including watch/rings on hand). 4. Calibration can take up to 10 seconds; when done, unit will beep 2-3 times. 5. The LED will begin weirdly flashing, indicating success. 6. Press/hold to power down.
-
TDI Beach Hunter...... Some Basic Beach Tests
Steve Herschbach replied to Tony's topic in White's Metal Detectors
Every TDI I have ever seen or heard of, with the exception of the TDI SL that auminesweeper owns, will get better depth and smoother operation with the ground balance off. Ground balance only adds depth when there is enough mineralization present to severely cut performance while the ground balance is off. Then engaging the ground balance regains back some, but not all, of that lost depth. You do lose the discrimination capability tied to the tones when ground balance is turned off. Link deleted since Findmall Forum update broke all old links Effects of Ground Balance on Target Depth?
-
EnglandsHistory Published on Sep 15, 2018 “This is just an initial look at the capabilities of the NEW Anfibio multi.. The results are from just one test, in one location in clean soil conditions. looks great out the box, will do more vids to see if performance is good in all scenarios.” Nokta/Makro Anfibio Multi Data & User Reviews Minelab Equinox 800 Data & User Reviews
-
Concentric Coil For Equinox 800?
Steve Herschbach replied to Desert Dawg's topic in Minelab Equinox Forum
A mono coil and a concentric are not the same thing. A mono has a single coil winding, and can only work on a PI, as this one coil alternates between transmitting and receiving. A concentric coil and a DD coil both have separate transmit and receive windings. The Go-Find coil has to have two windings, and so is a pseudo mono just based on appearance. Coil Basics by Carl Moreland -
Anfibio New Nokta / Makro Machine
Steve Herschbach replied to Shelton's topic in Nokta / Makro Metal Detectors
-
Concentric Coil For Equinox 800?
Steve Herschbach replied to Desert Dawg's topic in Minelab Equinox Forum
Well, first we need to get the 12" x 15" DD out the door. And then I want my 6" x 10" DD coil. Then maybe we can start talking concentrics! -
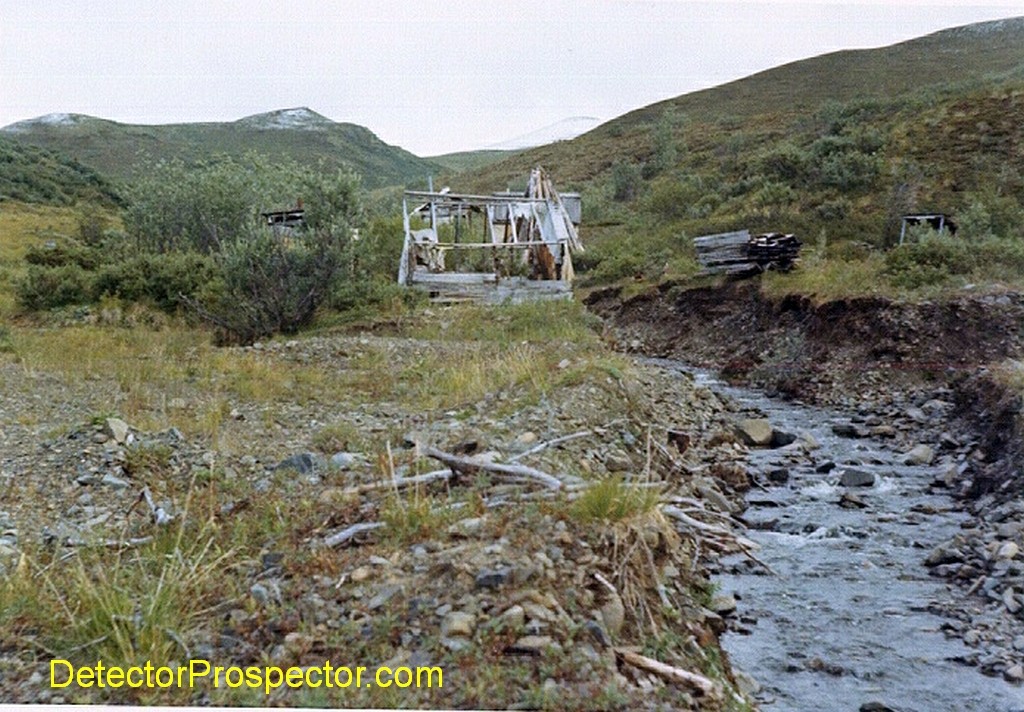
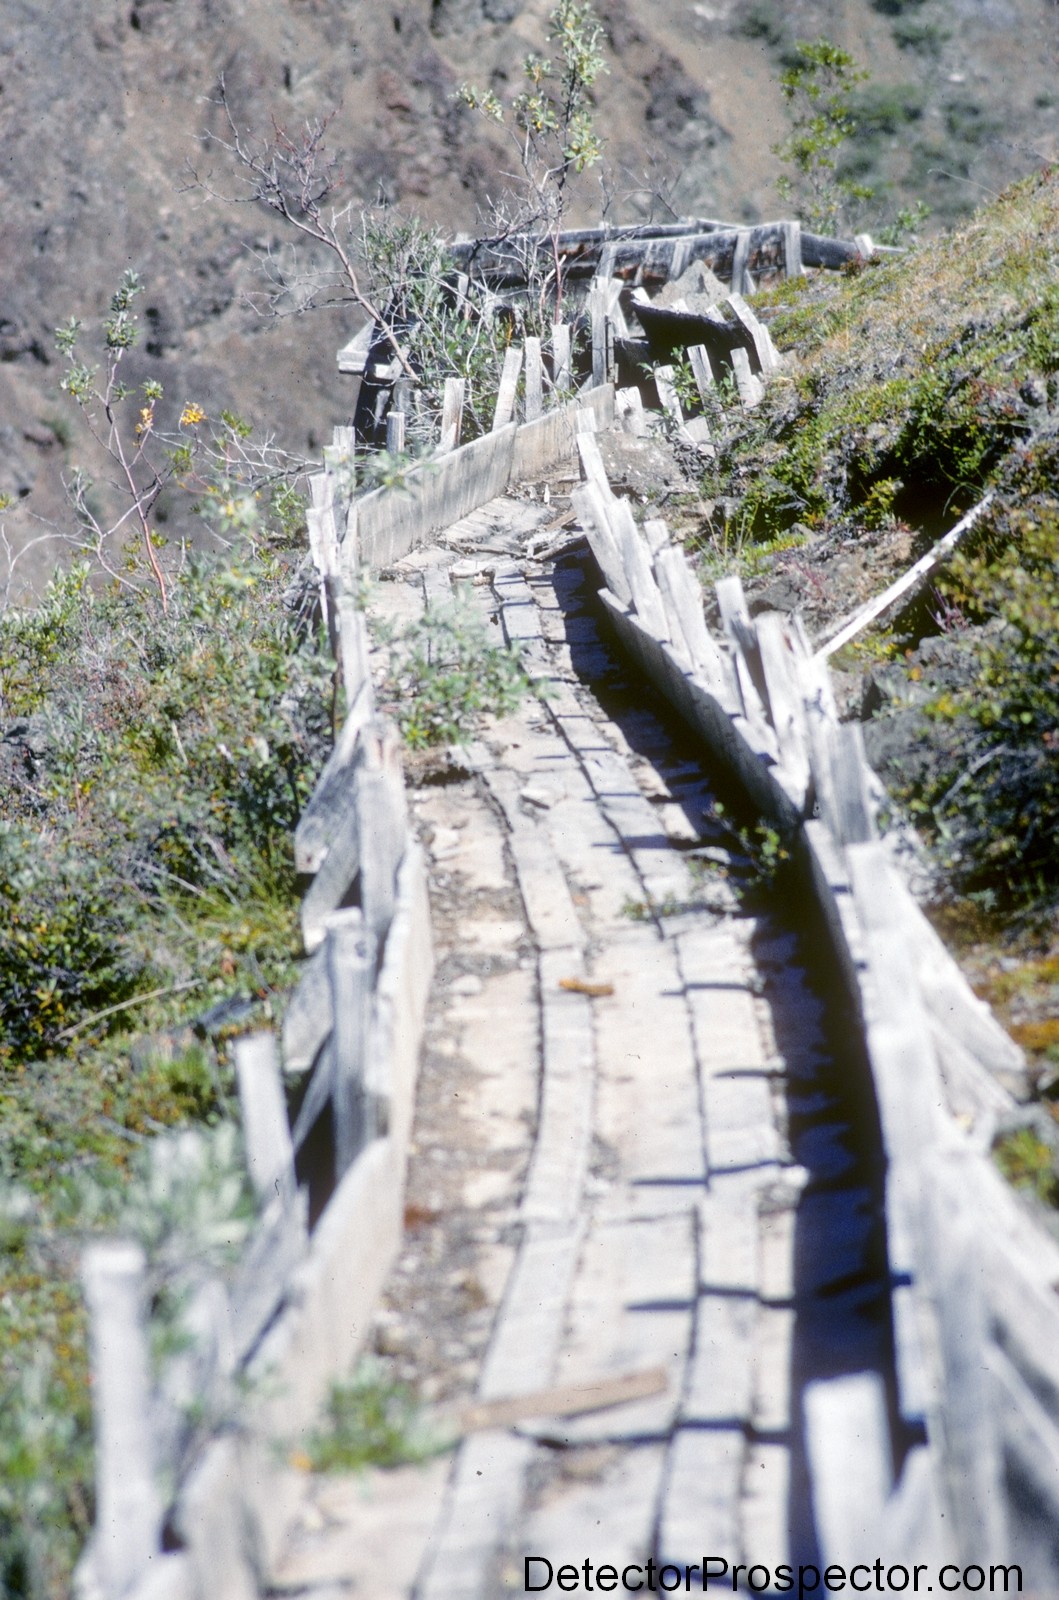
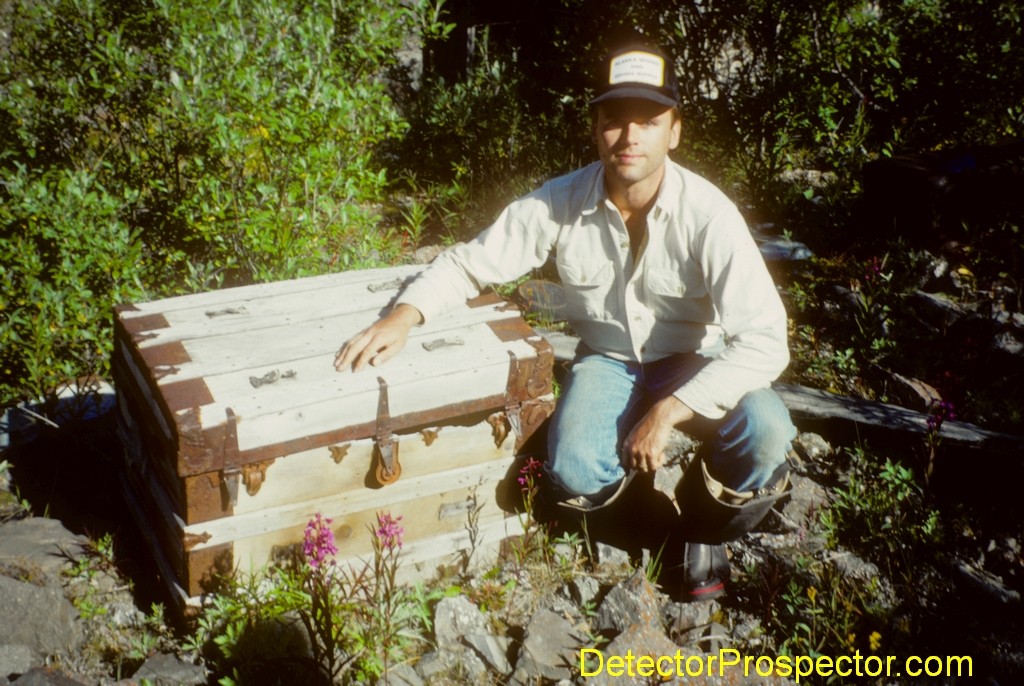
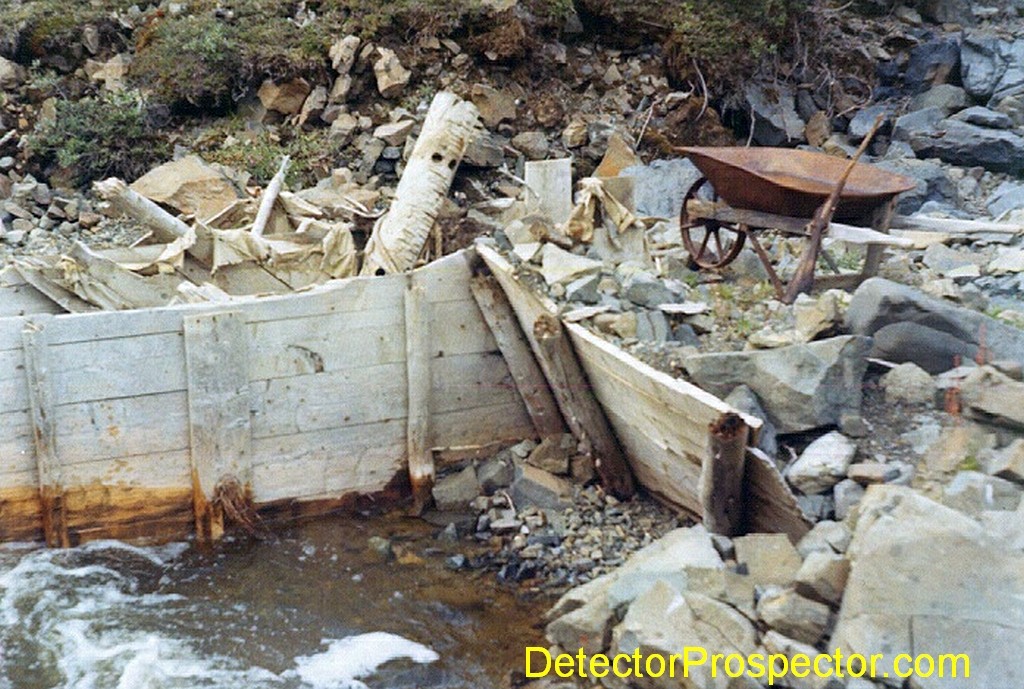
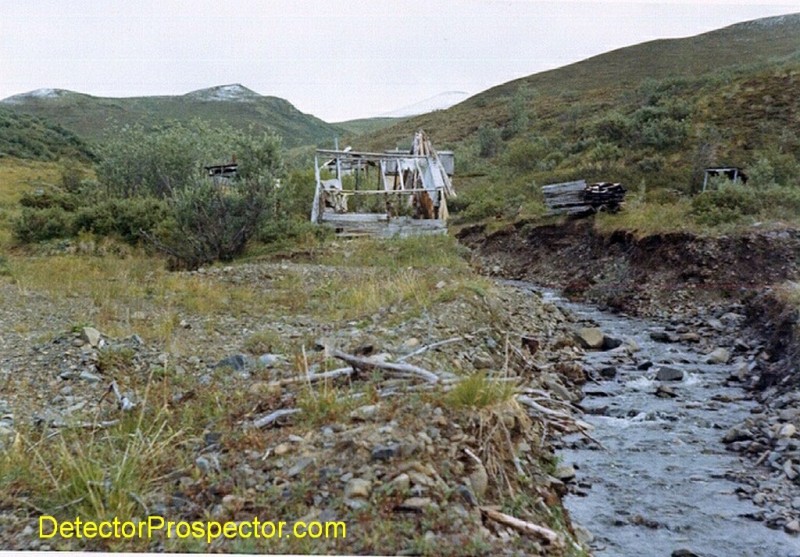
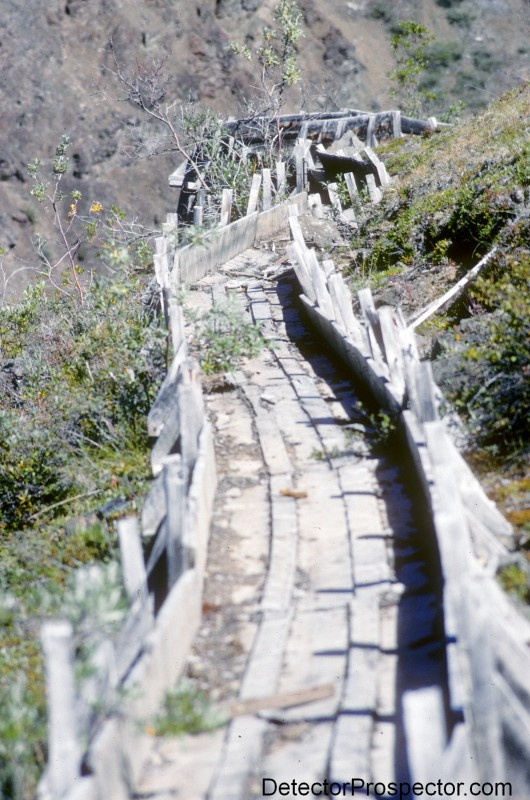
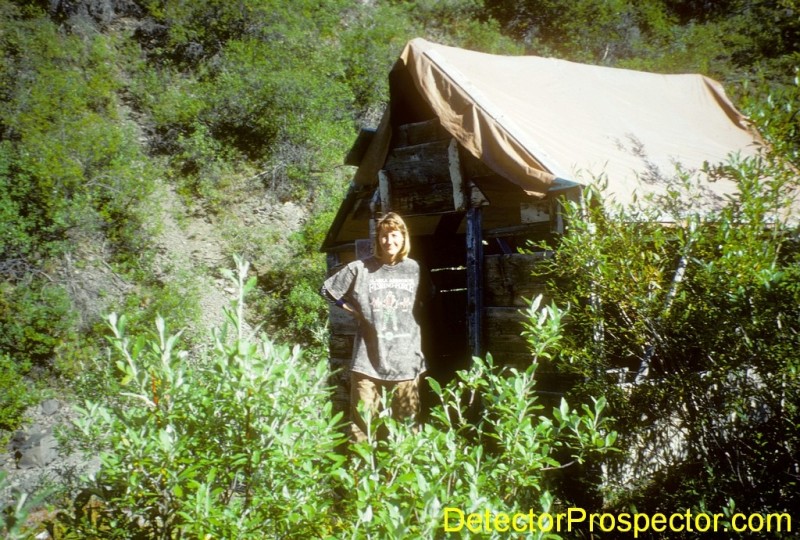
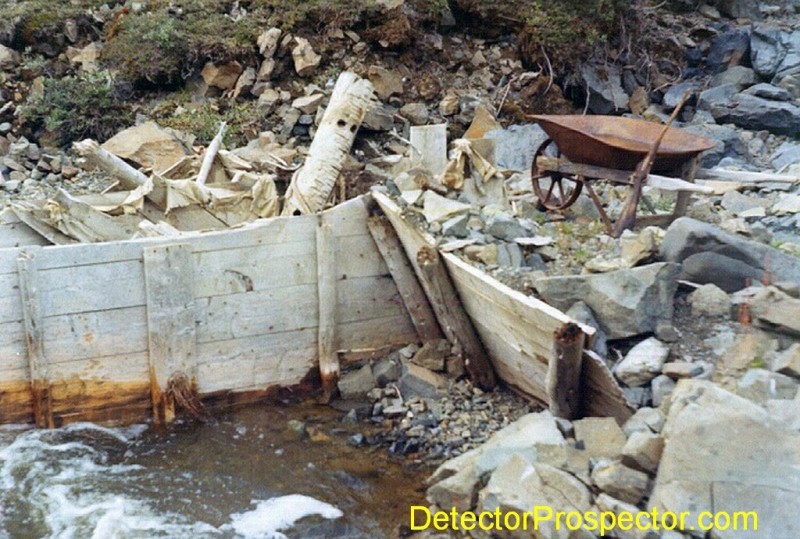
Hi Brian, good to have you here! That post is a perfect setup for a little Chisana history. I am helping out with the Rye Patch hunt today so this will perk things up until my next entry. First off, the entire area was added to the Preserve portion of Wrangell St.Elias Park & Preserve during the 1970's. The bad news is this required decades of adjustment for Alaskans and Park Service people figuring out how to work with situations like mining claims in a Preserve. Long story short permitting can only be had for previously mined ground - virgin ground is off limits and operations are under a microscope. That is frustrating to say the least. On the plus side, the Park Service did up a tremendous history of the area, quite detailed and full of photos. I am not sure of the copyright status of the old photos and so will refer you to the entire pdf history. Well worth a look. A History of the Chisana Mining District, Alaska 1890- 1990 My favorite quote, from the start of Chapter 2: "Billy James and N. P. Nelson began sluicing Little Eldorado No. 1 on July 4, 1913. Assisted by Andy Taylor and former Dawson City bartender Tommy Doyle, the pair recovered nearly two hundred ounces in just two days. By August 2 they had already garnered $9,000, or an average of about $300 per day." (emphasis added) And a few old photos... Wreck of old cabin on Gold Run Creek Treasure chest! - but nothing in it... Old wheelbarrow with old rusted gun leaning on it Canvas roof miners shack Old wooden flume for diverting water to bench workings

-
Dam For Sluice Maybe?
Steve Herschbach replied to Sourdough Moe's topic in Gold Panning, Sluicing, Dredging, Drywashing, Etc
I have both taken and studied many aerial photos of Alaskan stream valleys -
Rye Patch Nugget Shoot 2018 - Come See The Elephant
Steve Herschbach replied to tboykin's topic in Detector Prospector Forum
Goldmaster 24K with 6" concentric broke in and waiting to show it's stuff at the Rye Patch demo.... White's Goldmaster 24K with 6" concentric coil 8.3 grains gold found with Goldmaster 24K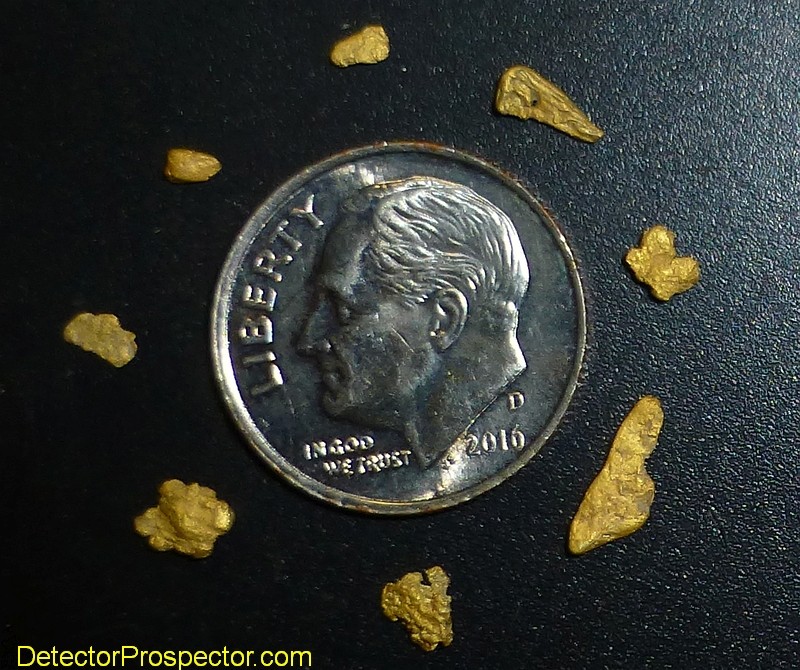
-
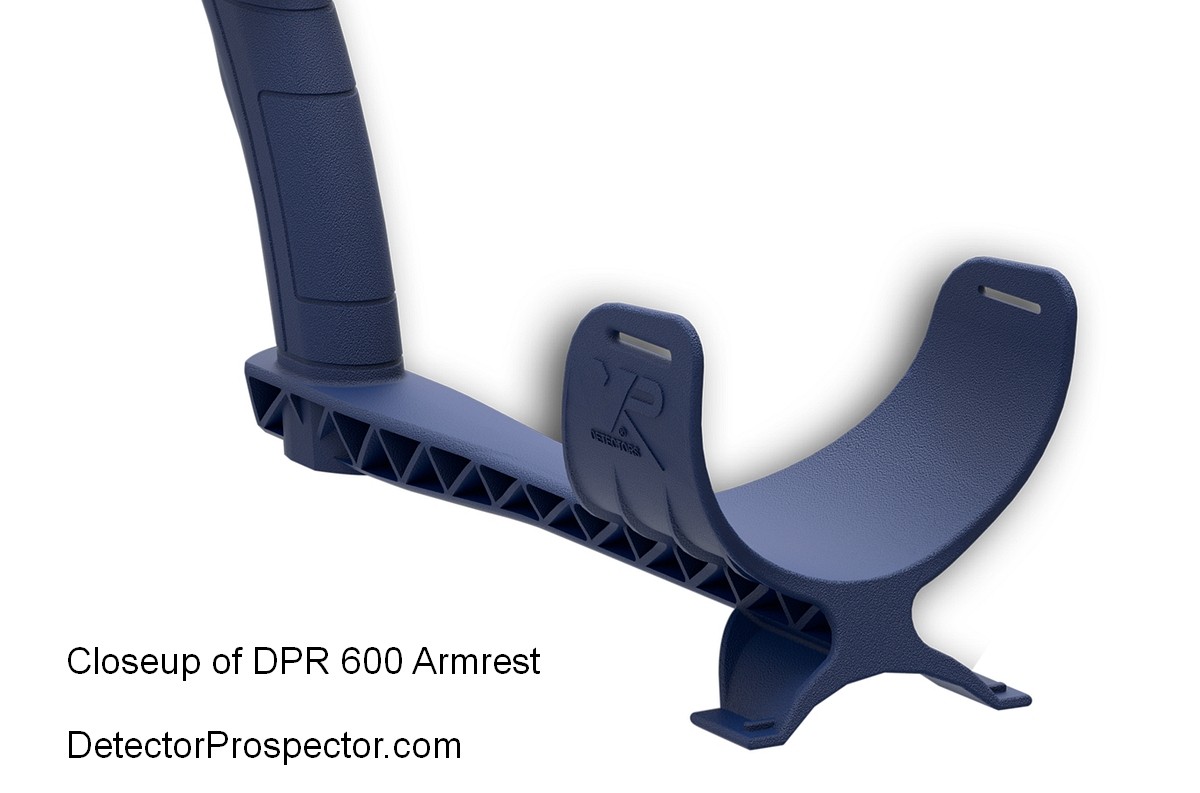
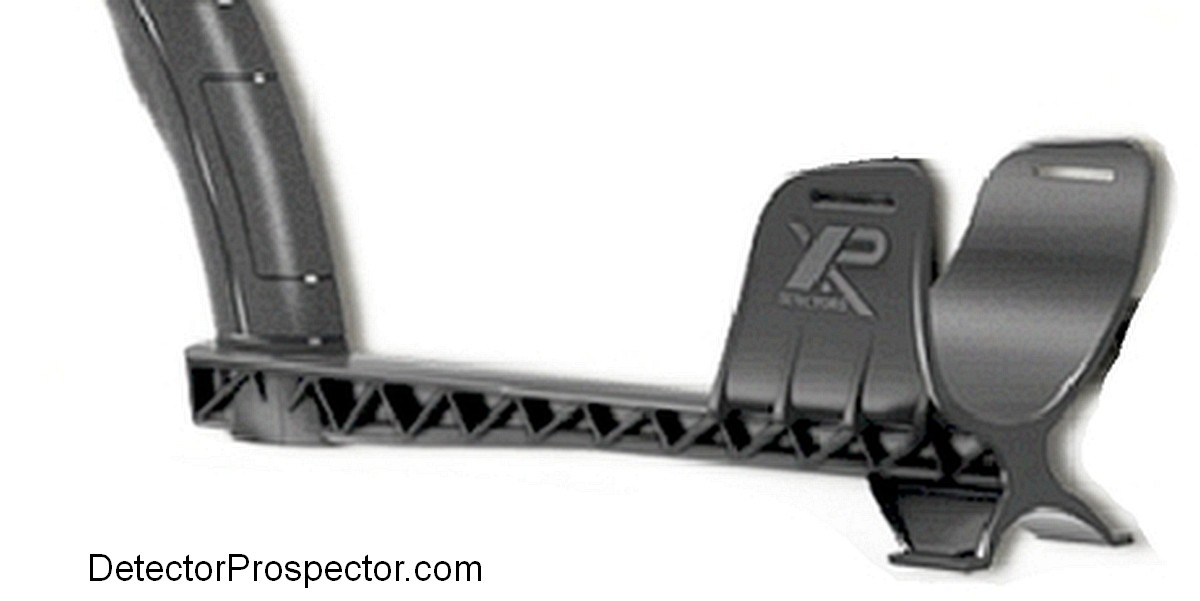
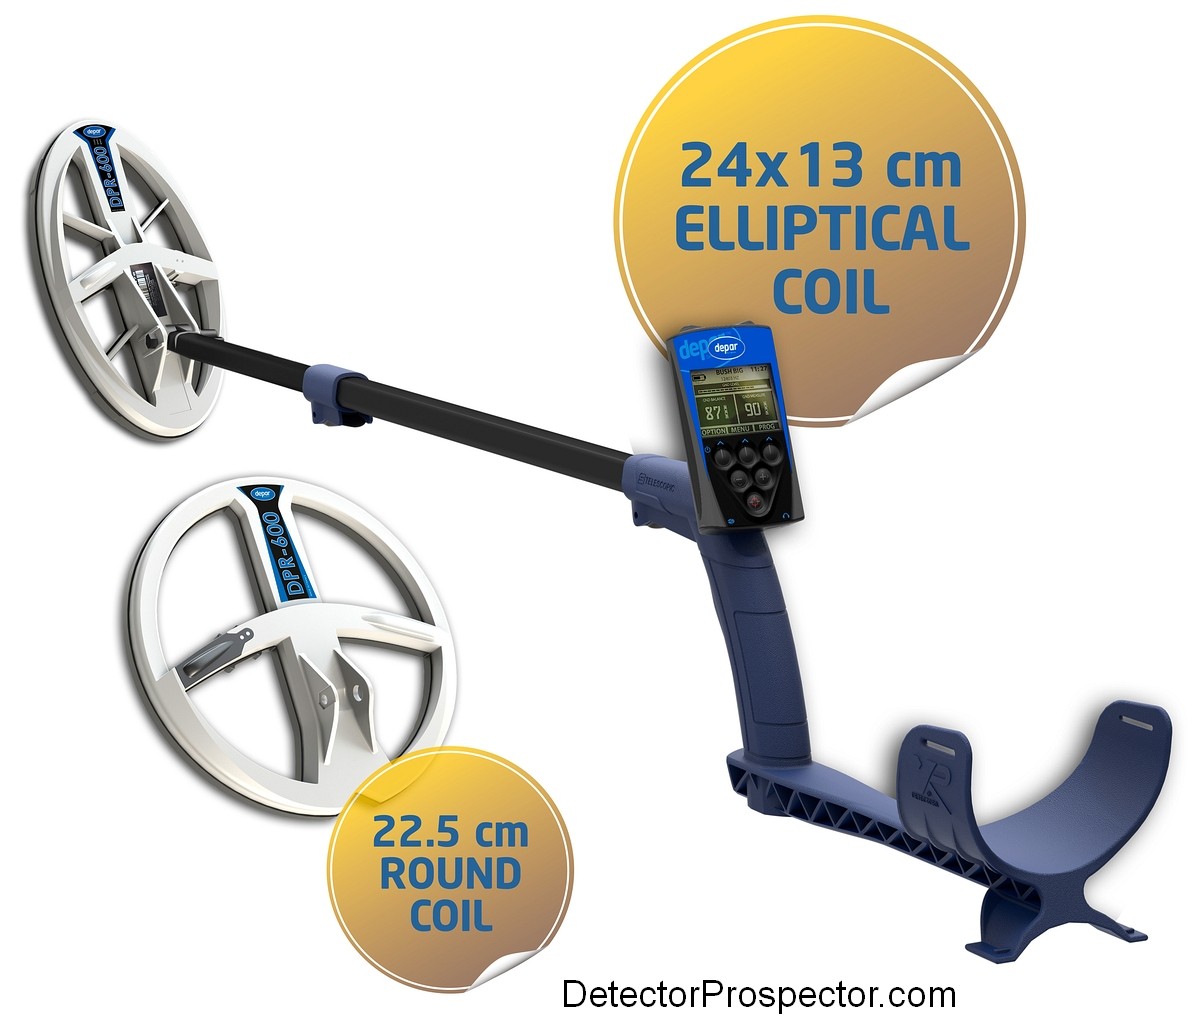
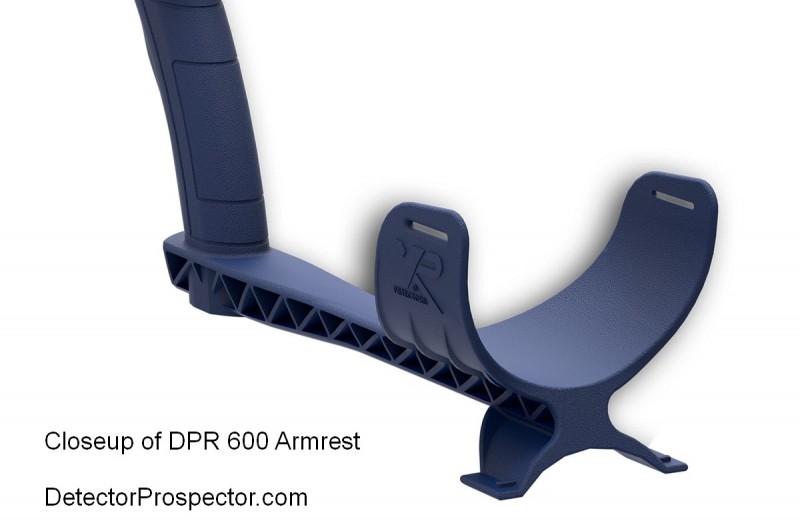
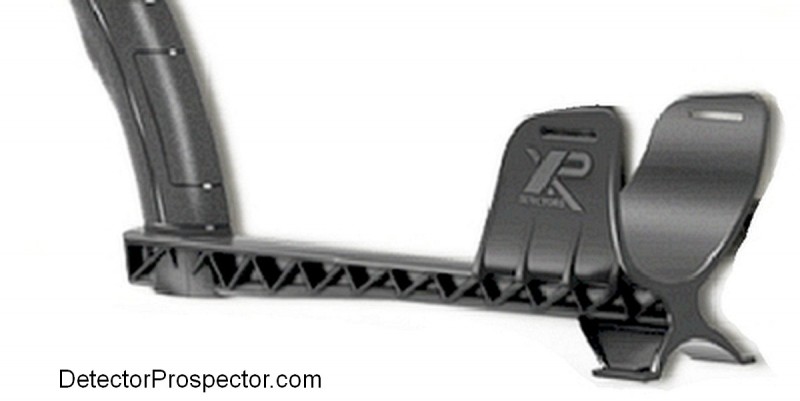
More evidence that the XP ORX is the Depar DPR 600 is in the rod assembly. The DPR 600 uses a different rod assembly that the XP DEUS. Look at the Depar 600 and XP Orx photos below and you can see they share the same rod assembly. Here is the Depar DPR 600 manual for more clues Depar DPR 600 metal detector XP ORX metal detectors Depar DPR 600 armrest closeup (notice it says XP) XP ORX armrest closeup


-
Easy Learning The Gold Monster 1000
Steve Herschbach replied to Frozen_daze's topic in Minelab Metal Detectors
Nobody can say those coils are not getting used! It’s very good to hear when patience and persistence pays off - thanks for sharing!! -
XP has just announced a new model called the XP ORX which looks to me to be a version of the XP made Depar DPR 600. The main clues are HF versions only (13 - 81 kHz), just like the DPR 600, and a four preset program with two custom programs setup (two gold programs, two coin programs). Information on new XP ORX Information on the Depar DPR 600 Available in two versions, HF 9” round and elliptical HF for €700 with wired headphones, €800 with wireless headphones. I am not sure on the U.S. pricing but if it is a straight exchange of the Euro then we are looking at $816 and $932 respectively. Probably more like $799 and $899. If so they would be targeting machines like the Equinox and those below. The advertising does suggest the machines are targeting the gold prospecting segment, just like the DPR 600. The XP product line may be splitting, with the Deus X35 coils taking over as the normal coin and relic offering, and the XP ORX aimed more at the gold prospecting crowd. Makro Gold Racer 56 kHz - $599 one coil White's Goldmaster 24K 48 kHz - $649 one coil White's GMT 48 khz - $729 one coil White's Goldmaster 24K 48 kHz - $749 two coils Makro Gold Kruzer 61 kHz - $749 two coils Fisher Gold Bug 2 71 kHz - $764 one coil Minelab Gold Monster 1000 45 kHz - $799 two coils Nokta AU Gold Finder 56 kHz - $799 two coils And new XP ORX here at $799 - $899 XP ORX metal detectors
-
Any Canadian Detector Prospectors?
Steve Herschbach replied to Alluminati's topic in Detector Prospector Forum
Looks like lots of Australians, even a few New Zealanders, but Canadians are a rare sight here. They do have a great forum - the Canadian Gold Prospectors Forum I have driven through British Columbia and the Yukon Territory plenty of times, right through gold country, but have not a flake of Canadian gold to my name. -
TDI Beach Hunter Has Landed..... Question Time !
Steve Herschbach replied to Tony's topic in White's Metal Detectors
Over at Findmall... Simple DIY 16V Li-Ion pack for TDI SL Do note that I do not vouch for or recommend aftermarket modifications. People are on their own with this stuff. -
I am decent with a detector but terrible at door knocking - good for you!